Replacing the rear wheel bearing of VAZ 2113, 2114, 2115
Radial and shock-axial loads on the suspension of modern Lada cars lead to failure of the rear wheel bearing on the VAZ 2114, the replacement of which is regulated by the manufacturer at least one hundred thousandth mileage, and given the condition of the road surface on domestic roads, the period for this repair occurs much earlier.
Troubleshooting such a problem begins with choosing a new part, which must be of high quality for a long, trouble-free service life and a tool suitable for repair.
List of required spare parts and tools
The domestic spare parts market offers a wide range of parts for replacing the rear wheel bearing on a VAZ 2115 and similar models, but when choosing, you should pay attention to those that have the approval of the automaker, thereby confirming their quality, namely:
- rear wheel bearing (original art. 2108 – 3104020 – 00);
- retaining rings 2 pcs (art. RG2108 – 3104800);
- hub nut with safety washer (art. art. RG2108 – 3104800);
Carry out the work of replacing the rear wheel bearing on a VAZ 2115 quickly, reliably and without damaging other suspension components, possibly using the following tools:
- open-end wrenches (available in sets from 8 to 21 mm);
- socket heads (set from 8 to 24 mm);
- car jack;
- 30 mm socket head and extended knob;
- torque wrench;
- thin round nose pliers for removing retaining rings;
- specialized bearing presser;
- specialized hub puller;
- hammer;
- Screwdriver Set;
- bottle WD 40;
- brush;
- gloves for hand safety.
The cost of fixing this problem at the sites of official dealers ranges from 3,500 to 4,000 rubles (at the end of 2021), small private garage-type workshops estimate it from 2,000 to 3,000 rubles. The presence of the above-mentioned parts and tools, as well as simple car mechanic skills, will allow the owner to carry out repairs with his own hands without much difficulty.
Stages of self-repair
The entire process of self-repair can be divided into several stages, after carefully reading them, any owner will understand how to repair a car without having the skills of a professional car mechanic; it is enough to follow the following steps:
- It is necessary to drive the car into a room with a flat floor, turn it off, engage first gear in the gearbox, place a stop under the front wheels for safety, remove the rear wheel from the desired side, having first jacked up the car. It is important to take into account here that the vehicle cannot be put on the hand parking brake, otherwise it will be impossible to remove the brake drum and disassemble the rear hub assembly.
- Having removed the wheel, we proceed to unscrew the rear hub mounting nut, which tends to be very tight due to rotational axial loads, so you may need to apply the maximum possible force to break it off.
- At this stage, they begin to remove the brake drum. Using a Phillips screwdriver, unscrew the screws that secure the drum. Then carefully (using a small block), knock on the drum with a hammer from the back side over its entire surface (before dismantling, it is advisable to treat its seat with WD 40 liquid and treat it with a brush, which will significantly simplify the removal of the part).
- The next step is to remove the hub from its axis; to do this, you need to use a special puller that will carefully remove the part. Here it is worth considering that the inner race of the wheel bearing can remain on the axle, and it can be pressed out in two ways: using a wheel puller, or using a chisel and carefully knocking it down with a hammer.
- Next, we proceed to pressing the oldest bearing out of its seat in the hub, for which we remove two retaining rings, and remove it from there using a press or using a specialized puller. If you don't have a press or puller, you can use a hammer to simply knock the old bearing out of the rear suspension assembly.
- Having completely dismantled the old part, it is necessary to thoroughly clean all the seats and the axle on the axle (dirt-repellent shield of the rear brake pads) from dirt, after which everything is carefully inspected for various damages, and if any are found, the damaged unit must be replaced with a new one.
- The bearing seat is lubricated both in the hub and on its axle, then it is carefully pressed in or driven in with a hammer through a buffer (usually the old bearing race is used), the retaining rings are installed in their places, and the assembled unit is mounted on the axle, after which the locking hub nut is tightened .
- The remaining parts are assembled in the reverse order of disassembly.
Also watch the step-by-step execution of the work with the explanation of the master in the video:
When to replace
The rear wheel bearing should be changed no later than every 100 thousand kilometers. But the realities of our roads and the quality of products are such that in fact the service life of the element is noticeably less than the specified period.
Practice shows that it is necessary to change the spare parts every 50-60 thousand kilometers, and in some cases even more often. It is best to focus not on mileage, but on signs of wear.
Symptoms of a problem
The car itself will tell you that it’s time to change the air conditioner by displaying the following signs:
- There is a noise, a strong hum or knocking sound in the rear of the car when driving;
- Play is detected in the bearing.
Checking status
If one of the symptoms appears on your VAZ 2109, you must lift the rear wheels one by one and make sure whether the problem is really in the bearings. For this:
- Lift the wheels and spin each one by hand;
- Listen to whether any extraneous sounds appear when the wheel spins;
- If you hear a characteristic hum, this indicates wear on the wheel bearing;
- Check the assembly for play. The wheels must be hung;
- Firmly grasp the top of the wheel and pull away from you and towards you;
- If the bearing is in good condition, the wheel will not move, that is, play;
- If there is a build-up, then you will have to replace the spare parts.
When choosing a rear wheel bearing, you should focus on the required characteristics and manufacturers who today produce ZPS suitable for the VAZ 2109.
Let's start with the characteristics. The choice should be made in favor of bearings with the following parameters.
For the rear hub, a ball, angular contact, double-row closed type bearing is used.
Now let's talk about manufacturers. There are several of them, each of which has its own characteristics.
Since the test results showed that the old rear wheel bearing has already served its purpose, it will need to be replaced.
Many people ignore the noise and hum of the ZPS until a certain time. But if timely repairs are not done, this can lead to serious problems that can result in the following consequences:
- Initially, hum and noise will cause discomfort due to their unpleasant sounds. Many motorists are accustomed to comfort, so they will do everything to get rid of the noise;
- If you continue to ignore the problem bearing, you will soon have to replace not only it, but the entire rear strut. And these are serious financial losses;
- Bearing wear leads to disruption of the running system. From here, the car can behave in the most unpredictable ways, increasing the likelihood of an accident.
Don’t joke with a problematic air conditioning system, but it is better to start repairing it immediately when you notice signs of its malfunction.
- After checking, lower the car to the ground, loosen the hub nut and bolts holding the wheels.
- Remove the decorative cap from the hub nut, then unlock the nut, loosen the tightening and use a socket with a lever to increase the force, remove the fasteners. Please note that these nuts are tightened with a large torque, so you will have to work hard.
- Loosen the tension on the wheel bolts.
- Use a jack to lift the side on which you will begin the repair. In this case, the car must be in the first gear position at the gearbox.
- Remove the wheel.
- Remove the brake pads and drums, which will allow you to completely unscrew the hub nut and put it aside along with the thrust washer.
- Now you have got rid of everything unnecessary, so you can arm yourself with a special puller to press the hub off the axle.
- You will need a vise to hold the removed hub. Without them, removing the bearing will be quite problematic. Don't forget to remove the retaining ring before doing this.
- Using a mandrel and puller, press out the old bearing.
- It is extremely important to treat the hub, wash it, removing all dirt.
- Only after the hub has been cleaned can a new bearing be pressed in that meets the parameters required by the VAZ 2109.
- Replace the retaining ring. It is also better to replace it rather than use the old ring.
- Press the hub into its rightful place using a mandrel of suitable diameter. The force must be applied to the inner ring of the new bearing, and not to the outer one.
- All you have to do is assemble the knot in reverse order. There shouldn't be any serious difficulties with this.
- The last step is the mandatory replacement of the old hub mounting nut. It is not advisable to use an old nut. After installing the fastener, lock the nut.
- Carry out a similar operation with the second hub. Experts recommend replacing the rear hub bearings in pairs so that their wear is equal and uniform. In addition, if one bearing fails, the second will soon follow. Why put off already obligatory events?
A competent approach to replacement, the correct choice of rear wheel bearing in accordance with the stated parameters are a guarantee of successful repair of your VAZ 2109. Do not delay in solving this problem, otherwise it will result in serious financial costs for you or, God forbid, an accident.
Rear wheel bearing VAZ 2114 2115 2113 replacement. Video and photo instructions
We will show you visual instructions on how to replace the rear wheel bearing in VAZ 2114, VAZ 2115, VAZ 2113 cars with your own hands without using an inspection hole, using a press with only a puller.
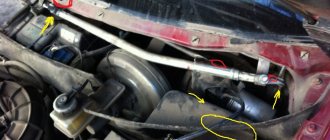
When driving the car, an unpleasant sound began to be heard in the area of the rear wheel, after stopping, jacking up the problem side and turning the wheel, we were convinced that the wheel bearing was faulty. Before starting work, make sure that the car is on a level surface, engage first gear, and place bricks or wheel chocks under the other wheels.
We proceed to the replacement, dismantle the wheel. We knock out the cotter pin using a core and a hammer:
We loosen the nut that tightens the bearing, we do this using a 30mm socket and a pipe that will create a lever for us:
Unscrew the nuts securing the drum cover:
There are specially cut threads in the adjacent holes; we screw the bolts in there to squeeze out (remove) the drum:
Unscrew the hub nut completely:
Next, we use the bolts from the engine head and tighten the drum cover backwards:
It turns out to be a homemade reverse hammer, we pull strongly towards ourselves several times, gradually the hub with the bearing will come out. Now the time has come for the special tool “Hub Bearing Remover”, I advise all car enthusiasts who repair their cars to purchase it with their own hands, it is suitable for both front and rear bearings for most of the family of front-wheel drive VAZs, the price is around 1000 rubles.
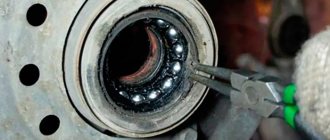
Use pliers or another suitable tool to remove the retaining ring:
Use a puller to press out the bearing:
If you don’t have such a tool, then you can simply knock it out, although this is a rather inhumane method. Lubricate the seat and the bearing itself with lithol or oil.
We press in a new bearing, for this we use a puller, a wheel and the bolts from the engine head that we already know:
Don't forget to install new retaining rings:
Lubricate the hub and install it in place:
This is done using the strength of your hands; there is no need to knock with a hammer. Next we assemble in reverse order.
Video of replacing the rear wheel bearing in a VAZ 2114, VAZ 2115:
Backup video on how to replace the rear wheel bearing in a VAZ 2114, VAZ 2115:
Recommendations and features for replacing the rear bearing
1. Purchase spare parts for VAZ only in trusted stores, if possible, order from the manufacturer. 2. Replace both sides at once; they wear out evenly.3. For an option for installing a part without the use of an impact tool and without a puller, read the link. 4. To remove the inner race from the axle shaft without a puller, use a sharp chisel, or make a notch on the ring with a grinder and split it. 5. Watch a video of replacing a bearing on a VAZ 2114, this will speed up the repair process.
- When to replace
- Symptoms of a problem
- Checking status
- Selection of ZPS
- Replacement
Many experts agree that on the VAZ 2109, like other domestic cars, the rear wheel bearing (RH) is a weak point. This is not due to the low quality of the products. It's all because of the condition of the roads.
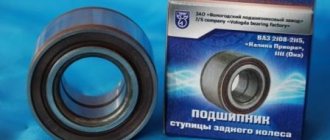
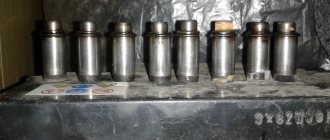
New bearings
Considering the condition of the road surface, as well as the need to have a car always ready for travel, replacing a faulty bearing should be done in a timely manner. Otherwise, the consequences of operating a car with a worn bearing could result in expensive repairs and an accident.
Replacing the rear wheel bearing and brake drum of a VAZ 2114
Today we’ll talk about replacing the wheel bearings, as well as the brake drum on a VAZ 2114. Once upon a time, similar work was done with the front hub, this time we will change the rear hub bearing with our own hands, the principle is approximately the same, so there should be no problems.
Before replacing the VAZ 2114 wheel bearing, you need to prepare a tool, for this you will need:
- Wheel hub and wheel bearing remover;
- End to “30”;
- Jack;
- Keys for “12”, “13”, “15”;
- WD-40 liquid (if the nuts are rusty);
- Pliers for removing the retaining ring (if these are not available, use a knife or nail.).
Replacing the rear wheel bearing, as well as replacing the brake drum on a VAZ 2114
- As always, the first step is to loosen the hub nut using a 30mm socket.
- Then “tear off” the wheel bolts.
- Place the jack and raise the rear of the car. To be safe, engage first gear and install wheel chocks under the front wheels.
- Unscrew the wheel completely and remove it.
- Using a 12 key, unscrew the two studs on the drum.
- If the handbrake is tight, you need to loosen it.
- Remove the brake drum using a key set to “13”.
8. Next, completely unscrew the hub nut. It is advisable to replace it with a new one.
9. Attach the hub remover and begin removing it.
10. Now you need to remove the retaining rings installed in the hub; for this you can use special pliers, or you can try to remove them with a nail or a thin knitting needle.
11. The bearing itself can be removed using the old “old-fashioned” method. To do this, place the head at “30” on the bearing itself, then with all the “stupidity” you need to hammer on the head until the bearing flies off. But I would still recommend using a puller. Before doing this, it is advisable to remove the boot from the hub so as not to damage it.
12. After the bearing is removed, install a new wheel bearing in its place and, in the same way, using a puller, install it in place, only in this case pressing it into place. You need to pull until the bearing “sits” in its place.
13. When the hub bearing is pressed in, install the retaining ring in place.
14. Using light, gentle blows, install the hub into place, then tighten it with the hub nut.
15. Reinstall the new drum if necessary, you may need to move the pads together a little.
All subsequent actions are performed in the reverse order, there is nothing complicated about it, so there is no need to describe it. Don't forget to tighten all the nuts after the car is on four wheels.
That's all. We replaced the wheel bearing of a VAZ 2114, saved money and gained experience. Thank you for your attention, I hope everything is clear.
Changing the front wheel bearing of a VAZ 2114 with your own hands
Do-it-yourself replacement of the VAZ 2115 wheel bearing
Problems with the brake system or wheel bearing can be diagnosed by characteristic squeaks or knocking noises in the front (wheel area). If the brake system is in order, you will need to diagnose the wheel bearing and replace it if necessary.
To check the wheel bearing, you need to compare the temperature of the wheel rim at the end of a long trip on the side where the squeaks and knocks are coming from. If the disc is too hot, it means the pads are sticking or the wheel bearing is faulty. The latter can lead to wheel misalignment, which usually leads to friction.
To check everything more thoroughly, you need to use a lift or jack.
Raise the tire that is causing some doubt with a jack and rock its lower part, holding it with both hands. If you feel play and a dull knock appears, the wheel bearing needs to be replaced.
Replacing the rear wheel bearing on a VAZ 2114
If there is a constant extraneous sound (hum) from the rear wheels when driving, you should pay attention to the condition of the wheel bearing. On the VAZ 2114, this part is quite durable and it happens that the bearing travels more than 200,000 km, but if it starts to howl, its replacement is required.
In order to replace it yourself, we need the following tool:
- Vise for more convenience
- Special puller with rotating jaws
- Circlip pliers
- Wood block
- Hammer
- Ratchet and crank
- 7 and 30 mm heads
At one time I did a video review on this topic, but due to the fact that at that time I did not have all the necessary tools and a vice on hand, which are very useful when performing this repair, everything did not turn out quite as I wanted. But the essence of working in a garage environment can still be understood.
Video on replacing the rear wheel bearing of a VAZ 2114
In order to watch all the video reviews on repairing the VAZ front-wheel drive, you can go to my channel and get acquainted with many materials.
Now below you can look at the entire repair process with all the necessary tools.
Photo report on replacing the rear wheel bearing on VAZ 2114 and 2115 cars
So, the first thing you need to do is remove the cap of the nut and rip it off using a good wrench. Then lift the rear of the car with a jack, having first loosened the wheel bolts. And after that you can completely remove the wheel.
Next you will need to remove the brake drum. It is not necessary to remove the pads, although they have already been removed in this report.
Unscrew the hub nut completely, as shown in the photo below.
When the nut is completely unscrewed, you should also immediately remove the washer using a screwdriver or magnetic handle. And now, use a puller to remove the entire hub assembly from the axle shaft:
By turning the puller rod, the hub itself slides off the axle shaft and can be completely removed without any problems:
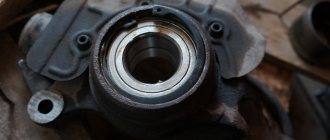
If the inner race of the bearing remains on the axle shaft, which sometimes happens, you can remove it using the same puller. Then we take the hub assembly and clamp it in a vice so that the inner side is directed upward. And using pliers, remove the retaining ring:
And then you can turn the hub over:
We take a drift of a suitable size and use it to knock out the old bearing. I did this using a large socket and wrench:
And after some work we get the following result.
We can say that the dismantling of the bearing was successful. Now we take the lubricant and apply it in a fairly generous amount to the inside of the hub.
And we align the new wheel bearing exactly in the center:
And in order to press the new one evenly without distortions, it is better to use the old bearing for this purpose. When it goes deep enough, you can finally press it in.
This must be done until a groove appears for installing the retaining ring.
After this, lubricate the axle shaft with lithol and put the hub assembly in its place. The price of a new bearing is about 300 rubles, but if assembled with a hub - at least 700 rubles.
Signs of a bad wheel bearing
✔ Noise from the wheel, turning into vibration;
✔ A grinding sound indicates that the separator or cages have already been destroyed; ✔ Increased chassis play—the locknut is not tightened or the bearing has failed. Steps to diagnose a bearing
:
1
.
Rotate the chassis in a suspended state; if you hear noise or other extraneous sound, the bearing will have to be replaced. The wheel can also slow down when turning. 2
.
Check the wheel play by moving it axially by hand. If there is no significant play, this does not mean that the part is working properly. Since the axial clearance is checked using a special technique. Focus on point No. 1. 3
. To accurately determine the “diagnosis”, unscrew the bolts and check how the brake disc rotates. When the product is in good working order, rotation is easy - without jamming or noise. The video shows the noise that occurs when the chassis rotates if there is a malfunction in the hub assembly. The second video shows details of the replacement.
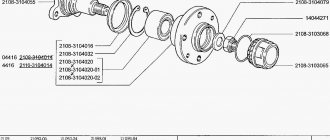
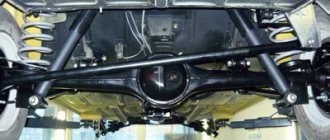
Rear wheel hub design of VAZ 2114
MrPodshipnik
Bearing replacement, repair
Enter the marking or size (for example: 8*22*7) of the product and the country of sale
- Car brands
- Auto components
- Moto
- Velo
- Equipment
- Tool
- Technique
New instructions
- How to make your own repairs and replace the bearing on the steering column in a ZOOM bicycle 10/09/2019
- How to independently, at home, replace a bearing in an electric motor of a Philips food processor 10/05/2019
- We repair a DAB heating circulation pump and change the bearing ourselves 10/04/2019
- How to repair a Shimano fishing reel yourself and replace a faulty bearing 10/03/2019
- We replace the bearing and repair the SBR_ 132_A concrete mixer ourselves 10/02/2019
Guide for replacing the rear wheel bearing of a VAZ 2114 on your own
This article will tell you, point by point and in all details, how to diagnose a breakdown and how to replace the bearing of your VAZ 2114 car.
I will advise and give recommendations on how to do the repairs yourself. Listen to my opinion on how to choose a new quality part.
- How to make a diagnosis yourself
- How to find out that the breakdown is in this particular unit
- Your actions before replacing the bearing on the fourteenth VAZ model
- How to remove the rear wheel bearing when repairing a VAZ 2114
- How to install a rear wheel bearing on a VAZ 2114
- Choosing a new bearing for VAZ 2114
- Some practical advice from the master
- Video: the simplest and easiest way to replace the rear wheel bearing on a VAZ 2114
- Photos on the topic
How to make a diagnosis yourself
If your VAZ car belongs to models such as 2110,2111,2114 and others, then after a mileage of 90,000 km the rear wheel bearing needs to be replaced. The cause of damage, as a rule, is its long-term use, environmental exposure, humidity, radial and axial load, and, alas, the quality of our roads. Evidence of a breakdown is a hum that you hear even when driving on a high-quality road.
Replacing such a VAZ part is quite easy. Following my advice, you will do it yourself without effort and problems. Since, in my opinion, the bearing design of the so-called fourteen is quite simple. In this regard, removing the old worn bearing and installing a new one is not difficult. I will help you with consultation and advice.
The issue of replacing the bearing is not too serious, but I would strongly advise you not to delay the repair. This is quite simple to do; you can do it without complex and expensive tools.
How to find out that the breakdown is in this particular unit
To begin replacing either the rear or front bearing, you must finally make sure that the failure is here.
- You have traveled a long way and hear a noise in the wheel. And then comes a strong vibration. Touch it. If it is very hot, then bearing replacement is necessary;
- When a strong grinding noise is heard, this means that the cage and separator can no longer be helped;
- you have discovered an increase in chassis play - the locknut has not been tightened or the bearing is broken;
- When lifting the car, try to unscrew the wheel bolt. If you pump the wheel too much and the noise is weak, your assistant presses the brake, and you do it all again. Is there any noise now? We will change the bearing together.
To finally make sure that the bearing is broken, I will tell you one more check. If the locknut is tightly tightened, and now the play and all sorts of noise disappear, this spare part will serve you for some time.
Your actions before replacing the bearing on the fourteenth VAZ model
You should know how the rear hub of the VAZ 2114 works. Look at our photo and familiarize yourself.
Let's get ready for repairs. You need to place the car on a flat surface. This will make it more convenient to replace the part. Good light at the repair site is very important.
I will tell you your steps in preparing to repair the damaged part.
- put the car in first gear;
- you need to put a stop against the car rolling away;
- Be sure to turn off the hand and pedal brakes, since when you disassemble the unit being repaired, you need to eliminate interference from the pads.
You will need the most common tools for repairs, the same ones that any car enthusiast has in his garage. You will need to use a jack, a vice, and a puller that has flat jaws. The use of round nose pliers will come in handy and various locksmith wrenches will also not interfere with the work.
How to remove the rear wheel bearing when repairing a VAZ 2114
1.Wheel bolts need to be loosened. We do the same with the hub locknut.
2.Next, use a jack and raise your car. After the nut is loosened, unscrew it completely and now you need to remove the wheel. And immediately the drum mount must also be removed.
3.Now remove the drum. It would be good to try to shake it up quite strongly before doing this.
4.Failed to do it? I advise you to use a lubricant to treat the joints.
Another practical recommendation for you. Naturally, the drum was not removed for a very long time, so dismantling does not seem easy. To make this task easier, do this. The studs must be tightened and screwed into the hole gradually, one after the other. A hammer will help you with this.
5.Now the hub and locknut are available to us. We can take further actions. This is the extension of the stopper; you also need to unscrew it. To make this procedure easier, applying an extension to the pipe is very useful.
6. Now we need to press out the hub. Using a puller will greatly help in this process. Grab a place behind the hub, the blow is made from the end. When you tighten the removable device, this part is easily dismantled. If you don’t have such a tool in your garage, I’ll tell you how to do without it. You will need a metal pipe with a diameter that is slightly smaller than the diameter in the bearing.
7.Some parts remain in the middle of this connection. This is a separator, rollers, with an internal race. There are times when it is also necessary to replace the pads. Then you must unscrew the axle mount. Do you need to replace the pads? Great, let's move on to number 10.
8. We dismantle the product by unscrewing the bolts. Let me remind you that we are removing the brake flap and pads, as well as the axle. We use a hammer and hit the hub nut. A very important point! I advise you to do this extremely carefully so as not to damage the axle shaft.
9.The brake flap is removed simultaneously with the axle. The part at the back often burns. You have to tap it to remove it.
10.The axle has a seating surface; the holder is removed from it. Use a puller.
11. Let's deal with the hub itself now. You need to place it on two surfaces, as in the photo.
Using a head that fits the inner diameter of the holder, the car part is knocked out with a hammer. Congratulations! Together we finished removing the wheel bearing.
How to install a rear wheel bearing on a VAZ 2114
- The very first thing, of course, is to clean all parts from dirt. The hub and axle shaft are cleaned with gasoline. We apply lubricants and coat all repair parts;
- The ball bearing is now installed on the hub. Do this with extreme precision;
- press the part with your hand and insert it into the hole. It will be useful to use an old bearing; it is installed on top of this structure.
- without allowing any distortion, use a hammer (it is more convenient to use the side part) to hammer the new part inside;
- at this stage it is already possible to install a retaining ring using pliers;
- We put the assembled parts on the axle, then the washer, and at the end the hub locknut is screwed in. Using it, the hub is pressed onto the axle and we make sure to lock it.
- final stage. The drum is installed, the chassis is strengthened and screwed on.
Together we did a great job with the renovation!
Choosing a new bearing for VAZ 2114
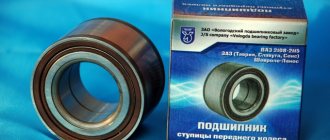
Since the VAZ 2114 uses an angular contact double-row ball bearing, I would recommend this choice from the manufacturers of these spare parts. Manufacturers from Russia have proven themselves excellent in this area.
I mean the Russian brand SPZ and VBF. Among foreign brands, I recommend purchasing bearings from Germany (FAG brand) and Sweden (SKF). Take my advice - do not buy parts from unknown companies. Although they are cheaper, the quality leaves much to be desired.
Some practical advice from the master
1. Buy spare parts only from reliable stores. If you go directly to the manufacturer, this will be an ideal option.
2. I recommend changing these parts on both sides at once, because wear occurs simultaneously.
3.Repairing and replacing the wheel bearing will still take some time. Set aside one day for this. And reach out with any questions. I'll help you, I'll give you some advice.
Video: the simplest and easiest way to replace the rear wheel bearing on a VAZ 2114
Your actions before replacing the bearing on the fourteenth VAZ model
You should know how the rear hub of the VAZ 2114 works. Look at our photo and familiarize yourself.
Let's get ready for repairs. You need to place the car on a flat surface. This will make it more convenient to replace the part. Good light at the repair site is very important.
I will tell you your steps in preparing to repair the damaged part.
- put the car in first gear;
- you need to put a stop against the car rolling away;
- Be sure to turn off the hand and pedal brakes, since when you disassemble the unit being repaired, you need to eliminate interference from the pads.
You will need the most common tools for repairs, the same ones that any car enthusiast has in his garage. You will need to use a jack, a vice, and a puller that has flat jaws. The use of round nose pliers will come in handy and various locksmith wrenches will also not interfere with the work.
Replacement
First, let's set priorities. If you just want to save money, so you do the work yourself without any experience, then this is a wrong decision that can lead to dire consequences. If you have experience and certain knowledge, you can safely do the repairs yourself.
In any case, we recommend watching the training video instructions, where you will be told in detail about all the nuances of such work. This way you will gain additional experience and useful knowledge.
After this, we proceed directly to the work of replacing the wheel bearings. There are several ways. We will tell you about each of them in more detail, and you will decide for yourself which option suits your skills and capabilities.
- The first method involves carrying out work without removing the steering knuckle from the car. But here you will definitely need a special puller to dismantle the bearings. The advantage of the method is that there is no need for subsequent wheel alignment adjustment. But this is the most inconvenient way. To press out and reinstall the wheel bearing, we recommend driving the car into an inspection hole.
Puller
- The second method will require removing the steering knuckle. A workbench will also be useful for removing the bearing. In this case, you will definitely break the collapse. If you don’t want to go to a service station after repairing yourself, use a couple of tricky tricks: Before removing the lower bolt of the strut and steering knuckle, apply marks;
- One mark will allow you to determine the position of the bolt;
- The second mark will be responsible for the position in the steering knuckle strut;
- During the reassembly process, try to ensure that the marks match each other as accurately as possible. This method allows you to simultaneously make adjustments to the chassis and check the condition of the components.
The third method will require removing the bearing along with the stand and dismantling it using a vice. This method is complex compared to others.
It remains to press out the element
Before work, do not forget to turn on the handbrake and place wheel chocks under the wheels to avoid accidental movement of the vehicle.
- Remove the strut, knock out the tie rod ends and unscrew the fasteners of the upper support to the body of your car.
- Position the jack so that it does not become an obstacle during operation. It all depends on your personal understanding of comfort.
- The wheel bolts are unscrewed, after which the nut of the desired bearing is removed using a 13 mm wrench.
- Using a 17 mm wrench, you dismantle the caliper, which is secured with wire to prevent sagging on the brake hose.
Dismantling works
- After this, the brake disc and ball joint are removed.
- The hub will now be knocked out of the steering knuckle, giving you access to the damaged bearing.
- All that remains now is to press out our problematic element using a puller.
- If you do not have a device such as a puller, use a metal tube whose diameter is slightly smaller than the diameter of the bearing.
- Clean the landing site, treat it with lubricant, after which you can install a new spare part.
- Reassemble in reverse order. Do not forget to simultaneously check the condition of various components, lubricate, change gaskets as necessary.
As you can see, there is a lot of work to do. Do not rush to conclusions regarding the ease or difficulty of such a task. If you want to do everything quickly, efficiently, without having any experience, contact the service station. Otherwise, be prepared to spend a whole day, or even more, on repairs.
Sources
- https://miravto24.ru/zamena_zadnego_stupichnogo_podshipnika_vaz_2114/
- https://luxvaz.ru/vaz-2114/194-zamena-perednego-i-zadnego-stupichnogo-podshipnika.html