Wheel bearing failure is a common occurrence during the operation of domestic cars. Using an example, consider the Lada Granta car (Lada Granta, 2190, 2191, Sport, Liftback, Sedan) produced by VAZ, designed on the basis of the Lada Kalina, in terms of dimensions the car is classified as “C” class.
The front suspension is borrowed from Kalina, but is modernized. In terms of reliability, these models differ little.
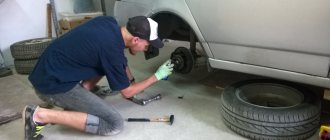
The Granta wheel bearing is replaced without specialized tools, experience and knowledge.
Replacing the front bearing and CV joint of a VAZ
Diagnosis of wheel bearing failure Grants
The front wheel bearing on the Grant is not the most vulnerable part in the suspension, but its failure is possible after a mileage of 80,000 km or due to external and internal factors.
A front hub malfunction is determined by the following symptoms:
- Noise from the wheel while driving (damaged ball bearing parts: rolling elements, raceways or cage);
- Vibration, wheel beating, grinding noise (typical of a broken ball bearing);
- Front wheel play (the ball bearing has failed or the wheel nut is not tightened with sufficient torque).
The same signs of malfunction are characteristic of the rear wheel bearing on the Grant.
Watch the video with the characteristic noise when a hub unit breaks:
Bad bearing humming
Diagnostics of the front hub bearings proceeds as follows:
- The front of the car is raised with a jack;
- Spin the wheel by hand and check for noise;
- Check the axial play (clearance) according to the instructions.
- If you hear a noise or notice other signs, then replacing the front wheel bearing on Granta is inevitable.
- Be sure to watch the diagnostic video.
Diagnostics of the VAZ front wheel bearing
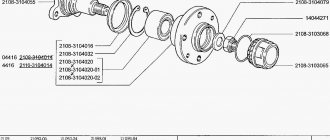
The device of the hub on the Lada Grant
Front
- rounded fist;
- external and internal dirt-reflective metal rings;
- front roller bearings;
- hub;
- washer;
- hub nut;
- retaining ring, plug.
Rear hub device
- hub mechanism axis;
- metal ball bearing;
- mud ring;
- retaining ring;
- washer;
- screw;
- sealing ring;
- rubber boot;
- hub cover.
Resource for replacing hub mechanism elements
The average service life of wheel joints is 80 – 85 thousand km. The indicator is average, as it depends on the following factors:
- quality of workmanship of the part;
- frequency of operation of the technical device;
- driving style;
- quality of road surface;
- aggressive environment;
- high operating temperatures;
- compliance with technical inspection intervals.
Signs that a hub needs to be replaced
- the appearance of uncharacteristic noise during wheel rotation;
- wheel runout in the steering column;
- vibrations at different speeds. Sometimes there is vibration at a certain speed;
- metallic grinding noise as the wheel rotates;
- front wheel hub play.
Diagnostics of the hub mechanism
- We place the car on a level platform, squeeze the parking brake if we are checking the front row. For the rear, we install wheel chocks.
- Let's jack up the front (rear) part.
- We turn the car wheel and carry out troubleshooting.
- We shake the wheel up and down with our hands. In good condition there should be no play. Otherwise, we dismantle and replace worn elements.
What are the causes of the malfunction?
Below are two common reasons why a rear wheel bearing may fail.
- The element loses its tightness. The product body contains a certain amount of lubricant, which reduces the friction of mutually contacting parts. The lubricant is retained by means of plastic housings with rubber seals present. These materials tend to degrade over time, causing loss of lubricant.
- Large output due to the impressive mileage of the Lada Grant. In any case, even the most highly durable product in a car becomes unusable over time. Each detail has its own resource. For a bearing, this figure is at around 60 thousand km. Sometimes this chassis component shows signs of malfunction much earlier. This occurs during operating modes that involve driving over potholes and other off-road conditions.
How to replace a bearing in a Lada Grant?
Spoiler for Granta sedan
Replacing the Grant clutch
Replacing the rear wheel bearing will require the following tools:
- a special puller designed for hubs;
- chisels paired with a hammer;
- puller for removing retaining rings;
- “30” size heads;
- vice;
- a device that allows you to press out and reinstall the bearing;
- flat-profile screwdriver.
Let's get to work.
- Remove the decorative protective cap from the rear wheel of the Lada Granta.
- Set the transmission lever to the position corresponding to 1st gear.
- We put stops on the front wheels to prevent spontaneous rolling.
- Loosen the nut that secures the hub itself. We use an extended wrench. We also “loose” the wheel bolts.
- Using a jack, we hang up the side of the rear of the car from which the rear wheel bearing is supposed to be replaced.
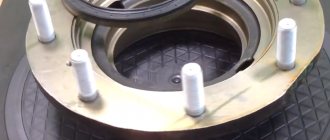
- We remove the wheel and dismantle the drum belonging to the brake unit of the LADA Granta car.
- We “defeat” the hub nut and remove the thrust ring.
- Armed with a puller, with special care we press the hub from its seat on the axle.
- We clamp the removed hub using a vice. Don't forget to remove the retaining ring (with a puller).
- Now we press the bearing. We clean the inner hub cavity with a brush.
- We press in the new bearing and correctly fix the retaining ring. We control the correct fit of the element in the internal cavity of the hub in order to avoid distortion.
- We install the hub. It is also a good idea to clean the brake assembly components from accumulated dirt and rust. Here we use a metal brush with soft bristles.
- We return the drum to its place and put on the wheel.
- We tighten the wheel fasteners and lower the hanging side of the car until the wheel touches the ground.
- Tighten the central nut. We put on a decorative cap.
- We tighten the wheel fasteners and start the LADA Granta engine. While moving, we check the quality of work. There should be no sound effects characteristic of a faulty bearing. If there are none, then the rear wheel bearing is replaced correctly.
Replacing the front hub of Lada Granta
- We place the car within the perimeter of the repair area and provide priority safety measures.
- Let's jack up the right (left) side.
- Unscrew the bolts and remove the wheel.
- Let's unlock the hub.
- On the back side, unscrew the two bolts that guide the brake caliper.
Location of two bolts
- We remove the caliper, hang it on a wire (we fix it on the steering tip).
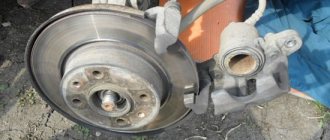
- Unscrew the hub nut and remove the brake disc.
Removing the hub nut
- We unscrew the two bolts - the rack clamps. If necessary, we use a liquid to remove deposits like WD-40.
- Disconnect the strut with the steering knuckle and unscrew the ball joint fasteners.
- We remove the CV joint.
Next, install the new hub assembly and assemble the structure in the reverse order.
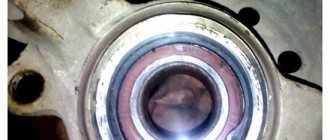
Replacing the front wheel bearing of Lada Granta
- The front hub joint is located in the steering knuckle housing, remove it. Pre-clamp the structure in a stationary vice.
- We install the metal spacer - the head at “22” on the surface of the hub. We apply targeted blows with a hammer to press it out.
- We disconnect the inner race of the hinge and remove the separator with metal balls.
- To remove the outer part of the hinge, use pliers and remove the retaining rings.
- To dismantle the inner part of the cage we use a chisel. Gently tap with a hammer. Press-out puller
- Use a puller to press out the axle shafts.
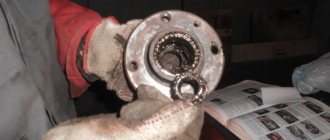
Pressing in a new wheel bearing and assembling the unit
- We clean the surface from dirt, deposits, and rust. We remove the old grease from the hub and wipe it with a rag. We measure the diameter of the hub, it should be 35 mm.
- Apply a thin layer of graphite grease to the surface. Press in the new bearing.
- We press the hinge until the retaining ring comes into contact with the edge of the part.
- We insert the hub into the hole using a vice.
Replacing the front wheel hub bearing of Lada Granta
Tools:
- Jack or ditch lift
- Stand - 2 pcs.
- Wheel key
- Medium flat screwdriver
- Hammer medium
- Kerner
- Driver for socket attachment
- 10mm wrench attachment
- 19mm wrench attachment
- 30mm wrench attachment
- Torx wrench attachment E12
- Torx wrench attachment E14
- 7 mm straight box spanner
- 17 mm straight box spanner
- Punch
- Bolt M12×1.25 mm - 2 pcs.
- Bench vice
- Chisel
- Double jaw puller
- Cup puller
- Circlip Pliers
- Metal brush
- Needle file
Parts and consumables:
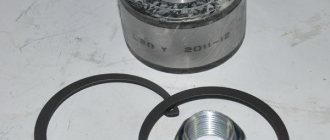
- Grease "CV joint-4"
- Rags
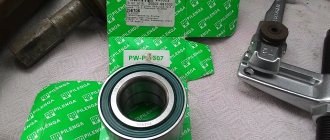
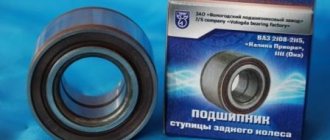
- Wheel bearing - 2 pcs.
Notes:
Replace the bearing when it fails. There are two ways to replace a bearing. The first is by removing the steering knuckle assembly, the second is without removing it from the car. The operations for replacing the wheel bearings of the left and right wheels are similar. Carry out the work on an inspection ditch or overpass.
1. Apply the parking brake, raise the front of the vehicle using jacks or a trench lift, and place it on jack stands.
2. Remove the wheel using a wheel wrench.
3. Using a screwdriver, remove the hub protective cap.
4. Using a hammer and center punch, straighten the collar of the hub bearing nut that has been dented in two places.
5. Have an assistant press the brake pedal; At the same time, use a 30 mm wrench to loosen the hub bearing nut.
Note:
The nut is tightened with a large torque, so the attachment and wrench must be strong enough to transmit the necessary force.
6. Unscrew the hub bearing nut completely and remove the washer.
7. Remove the front brake disc as described in this article.
8. Disconnect the wheel drive from the hub. How to do this, see here (for the right wheel) or here (for the left wheel).
Note:
In order not to disturb the wheel alignment angles, you can replace the bearing without removing the steering knuckle.
9. Connect the ball joint to the knuckle and compress the hub. There are two ways to remove the hub: 1) by striking through a soft metal drift;
2) Using the front wheel brake disc. Pass M12×1.25 mm bolts about 130 mm long through two diametrically opposite holes in the disk and screw them into the holes of the hub to a depth equal to its thickness. By sharply hitting the bolt heads with the disk, compress the hub.
10. If the hub cannot be removed this way, remove the steering knuckle. To do this, unscrew the nuts of the bolts securing the shock absorber strut to the steering knuckle and remove the bolts as described here. Disconnect the ball joint and remove the steering knuckle.
11. Place the steering knuckle on the vise jaws and press the hub out of the knuckle through a mandrel or head of suitable diameter, applying force to the end of the hub.
12. Remove the hub from the fist. In this case, the outer part of the inner ring of the bearing remains on the hub.
13. Remove the mud ring from the hub.
14. Insert a blunt chisel between the ends of the inner race of the bearing and the hub and, using a hammer on the chisel, move the inner ring.
15. Use a puller to compress the inner race of the bearing.
16. Using snap ring pliers, remove the bearing snap ring.
17. Using a cup puller, press the bearing out of the steering knuckle and remove it with the puller.
18. Remove the bearing from the puller.
19. Clean and lubricate the inner surface of the steering knuckle with grease.
20. Using a file, clean out the nicks on the hub from the chisel. Press the new bearing into the steering knuckle, applying force to the outer race of the bearing.
21. Install a retaining ring into the groove of the steering knuckle socket. When pressing the hub, rest the puller washer on the inner race of the bearing.
22. Carry out further assembly in the reverse order, tighten the bearing nut to the prescribed torque, and be sure to lock it by jamming the collar.
Note:
Before installing the brake disc, thoroughly clean the mating surfaces of the hub and brake disc from rust and scale, since even the smallest particle sandwiched between the mating surfaces will cause the brake disc to run out and vibrate during braking.
If the bearing was replaced with the steering knuckle removed, then it is necessary to check and adjust the wheel alignment angles at a service station.
The article is missing:
- Photo of the instrument
- High-quality photos of repairs
Replacing the rear wheel bearing of a Lada Granta with your own hands
Note to the driver. Before starting installation work, clean the surface from debris and dirt. Apply a thin layer of oil and be sure to lubricate the outer race of the hinge.
- We install the new hinge and lightly press it into the cavity.
- Evenly tighten the hinge until it touches the outer edge.
- We fix the retaining ring and install the hub in its original place.
Installation in a regular place. Assembly of the structure
- Apply a thin layer of graphite grease, put the assembly on the shaft, and secure it with a nut.
- We complete the tightening with a torque wrench (tightening torque 30 Nm).
- Use a chisel to counter the nut and put on the cap.
This completes the disassembly, assembly, and replacement of the rear wheel bearing.
Note to the driver. The Lada Granta Sport modification has a rear hub with a pre-installed ABS sensor.
It often happens that during the process of dismantling the hub mechanism, a bolt or pin breaks. The reasons for this are different, ranging from the old age of the metal to manufacturing defects.
So, how to remove a broken bolt. We carry out the work in several stages:
- mark the center of the stud;
- drill with a drill to 2.5, after 5.5, 9.5 mm;
- scroll with a bolt with a diameter of 9.5 - 10.0 mm;
- remove remaining metal and shavings.