Causes of wheel bearing failure
Attention : if repair work is not carried out in a timely manner, the likelihood of an emergency on the road increases. As a rule, the use of a low-quality bearing leads to the fact that the wheel may jam during steering, or as a result of the disc being separated from the shaft.
It is also important to note that if the hub fails, it becomes very hot. As a result, the brake system fails, and therefore operation is disrupted. However, the work is never disrupted at the same time, unless there is a strong collision with another object. The car may hit a hole, a bump, or drive onto a curb. As a result, the VAZ 2114 may receive serious mechanical damage.
Destruction occurs gradually and the driver can often understand this by the presence of a specific sound when a specific body vibration appears. There may be small shocks, sometimes the car shakes.
There are several reasons why a malfunction may occur:
- Constant driving on off-road or poor quality roads with a lot of uneven surfaces.
- Transportation of large loads.
- The car may constantly fall into mud or slush.
- Some drivers begin to drive aggressively: they brake or accelerate sharply, or drift.
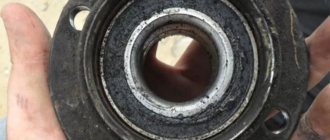
Depending on what cause is present, deformation of the main housing may occur over time, and sometimes the outer housing and bearing rim may crack. Often the lubricant dries out. Dirt, sand, and dust may get inside the rotating parts.
Sometimes there is a malfunction of the rollers and bearing balls. Often this happens not as a result of inaccurate driving, but from the quality of workmanship itself. Spare parts from domestic or European manufacturers last an order of magnitude longer than from Chinese ones. But they can also become unusable over time as a result of constant use of the car.
When a breakdown just begins to appear, it is almost impossible to recognize it in a timely manner. As a rule, for this purpose you need special diagnostic equipment, which is available in auto repair shops or official dealers. If a whistle, strong hum or crunching occurs, you have to provide it yourself or with professional help.
If the breakdown occurs on the front hub, then identifying the fault is much easier. It is enough to pick up a speed of 40-60 km/h and perform simple maneuvers. Most often, a specific hum appears. If the sound increases when turning to the right, this means that the left bearing has failed. The opposite situation occurs with the left side.
If a breakdown occurs in the rear hub, it is much more difficult. So, for example, the sound may come from one part, but in reality the breakdown may be localized in a completely different place.
However, experts advise that in order not to engage in self-repair in vain, it is recommended to carry out diagnostic measures from professionals. If the car enthusiast does not have the relevant experience, then you can ask the person to show how to carry out such events.
Causes and symptoms of failure
The causes of failure can be very diverse, but basically they are all related to loads, for example:
- Operating a vehicle on bad roads or off-road;
- Transportation of heavy loads;
- Aggressive car handling with sharp acceleration and braking.
But there are often cases when breakdowns occur due to low-quality spare parts. For example, the previous owner of the car decided to save money before selling it and installed not the original, but a Chinese analog wheel bearing, and they contain the following defects:
- Insufficient amount of lubricant inside the bearing. Because of this, in the future it simply dries out and begins to wear off.
- Faulty rollers or bearing balls. Parts may not be made according to the stated characteristics, but from softer metals, which is why deformation occurs under normal load.
Useful : Prices for front wheel bearings VAZ 2114 (9 manufacturers)
Replacement parts and necessary tools
On a VAZ 2114, the wheel bearing is replaced using prepared tools and high-quality spare parts.
First you need to purchase the following components:
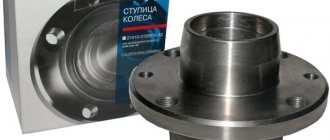
- Front wheel bearing.
- Front hub retaining rings.
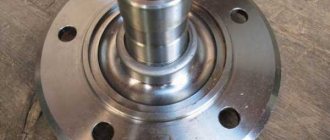
- Front hub (it is not recommended to purchase a used model). It is necessary in a situation where excessive wear or rotation is allowed in the driver's seat.
Before changing the front wheel bearing on a VAZ 2114, it is recommended to prepare the following set of tools in advance:
| Balonnik |
| Open-end wrenches 12-24 mm. |
| Socket heads in the range of 12-19 mm, wrench |
| Special puller for wheel bearing |
| Puller special for tie rod ends |
| To dismantle the retaining rings: |
| Screwdrivers |
| Car brush |
| Pliers |
Most car owners try to independently study the instructions on how to change the front wheel bearing on a VAZ 2114, since when contacting official representatives, the cost can vary in the range of 4000-6000 rubles. When contacting private craftsmen, the price is reduced to 3,000 rubles. By deciding to find out how to change the front wheel bearing on a VAZ 2114, each owner can save money on paying for technicians. By following the instructions consistently, any car enthusiast will not have any difficulties. In addition, the procedure does not take much time.
Chassis design
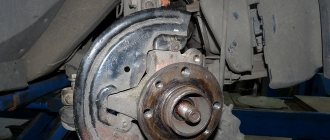
Front wheel bearing
Before you begin the replacement process itself, you need to see all the structural elements that need to be dismantled. Therefore, first you need to understand the structure of the front part of the suspension, or rather, look at the elements in section and determine the location of the bearing.
Front chassis design
Front suspension assembly: 1 – upper support of the telescopic strut; 2 – upper support cup; 3 – compression stroke buffer with protective casing; 4 – compression buffer support; 5 – suspension spring; 6 – lower spring support cup; 7 – steering rod ball joint; 8 – steering knuckle; 9 – telescopic stand; 10 – eccentric washer; 11 – adjusting bolt; 12 – rack bracket; 13 – steering knuckle; 14 – front brake protective cover; 15 – brake disc; 16 – retaining ring; 17 – wheel hub nut; 18 – splined shank of the wheel drive hinge housing; 19 – guide pin; 20 – wheel hub bearing; 21 – ball joint; 22 – suspension arm; 23 – adjusting washers; 24 – stabilizer strut; 25 – stabilizer bar; 26 – stabilizer bar cushion; 27 – stabilizer bar mounting bracket; 28 – body bracket for mounting the suspension arm; 29 – suspension arm extension; 30 – bracket for fastening the extension; 31 – protective cover of the ball pin; 32 – ball pin bearing; 33 – ball pin; 34 – ball pin body; 35 – suspension strut rod; 36 – outer body of the upper support; 37 – inner body of the upper support; 38 – upper support bearing; 39 – rubber element of the upper support; 40 – travel limiter of the upper support; 41 – protective cap of the upper support; B - zone for monitoring the suspension joint
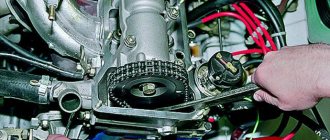
How to check a wheel bearing
And although replacing the front wheel bearing on a VAZ 2114 involves a simple operation, it is worth first checking the part for operability and whether it is advisable to carry out repair work or replacement. A basic check will not only help determine the malfunction, but also help to find and determine the cause.
- At the end of the ride, you need to touch the area of the wheel where the specific sound comes from. If the wheel temperature fluctuates (hot on one side and cold on the other), then the bearing needs to be replaced.
- Raise the car with a jack, unscrew the bolts from the wheel and lift the required side for inspection. Make an effort and rock the wheel. If a clunking sound occurs, it is recommended to ask someone to press the brake and try again. A replacement will be required if there is no noise.
There are other alternative options for solving the problem:
- Tap your foot on the tire. If, as a result of manipulation, any of them wobbles, this means that play has appeared, and the hub gradually fails. It is important to note that sometimes play can appear before the hub begins to wobble and before a characteristic sound appears. As a rule, at low speeds they are practically invisible or do not appear.
- If wear has reached a critical point, the extreme degree of wear can be determined by ear. However, in such a situation, using the vehicle becomes dangerous, as it can break down and create an emergency situation.
Wheel bearing selection
Since the modern market is constantly expanding, bearing models from domestic and foreign manufacturers can be found on sale. Everything depends on a person’s material capabilities.
However, it is recommended to pay attention to several important recommendations from experts:
- You should not use analogues made in China. First of all, their quality is not high. As a rule, most buyers are seduced by affordable pricing policies. But such spare parts are designed for a short service life.
- European models are considered to be among the highest quality and offer the longest service life. The price category in comparison with Chinese manufacturers is an order of magnitude higher. However, it is important to pay attention so that the client is not sold a Chinese counterfeit. Unfortunately, every year the market situation worsens, and it is difficult for non-professionals to identify a fake.
- Domestic production. Manufacturers from Vologda and Samara deserve special attention. The cost of such spare parts is much lower, while the quality is higher than those made in China.
It doesn’t matter which bearing is purchased (front or rear), its dimensions are identical: 64*34*47mm.
Detailed instructions for replacing the wheel bearing
Before replacing the front wheel bearing on a VAZ 2114, it is recommended to study each stage of the work:
- Place a jack on the side of the car where the faulty part is located. To gain access to the outer CV joint lock nut, you will need to remove the wheel. Take a 30mm socket. It is important to take into account that sometimes the nut is tightened too tightly for the part to withstand high loads. Then you need to put the car back on the wheel and put the jack aside. At the checkpoint, engage second or first gear and make every effort to break it. A prepared gate may come in handy.
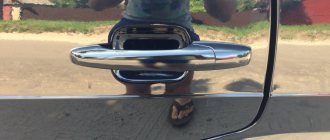
- As soon as the first task is completed in the instructions on how to replace the wheel bearing on a front VAZ 2114, you can begin to remove the brake cylinder. First you need to unscrew the bolts with fasteners (usually there are 2 of them). They are located in the hub on the inside. To speed up the process, it is recommended to use a 17mm wrench. To move the assembly to the side, you will need a flathead screwdriver to help. In this case, the pad must be pressed away from the disc.
- Go to the steering knuckle and unscrew the nut, which is located on the steering mount with a tip. To achieve this task, it is allowed to use a special puller. In the area of the seat you need to squeeze it out. The same operation is assumed when working with the ball joint, which is located at the bottom of the hub.
- The next step in the instructions on how to replace the front wheel bearing on a VAZ 2114 involves removing two bolts, which are the fastening elements of the upper part of the knuckle and the shock-absorbing strut. The lower part is the collapse of the vehicle. Before dismantling, be sure to mark its original position, and then dismantle the entire hub assembly. Next, get rid of the brake disc. Its fastening also consists of two screws.
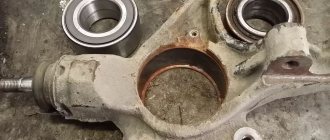
- The front hub is pressed out of the holder by using a special puller. All that remains is to remove the retaining rings located on the sides. As an alternative, you can use the same stopper to squeeze the unusable part out of its place.
- Before replacing the front wheel bearing on a VAZ 2114, you will need to thoroughly clean the vacated areas and remove dust and dirt. It is also necessary to check for mechanical damage and breaks so that the new part does not fall out as a result of active use of the car. If the fist is not in good condition, it is recommended to first purchase a new one and make a replacement.
- Next, lubricate the steering knuckle and the bearing seat. This will help you quickly press-fit, then install one retaining ring, and then replace the front wheel bearing of the VAZ 2114. To do this, you will need to use a special puller. Wait until a characteristic click occurs, and then install the second ring.
- Clean again and check for mechanical damage. If everything is in order, lubricate the seat where the front hub is located. Take a puller and press it into the inside of the new bearing. The new unit is also installed at the landing site.
All that remains is to insert the splined flange, and then install the brake disc, caliper, ball joint, and steering tip. Next, we re-fasten the CV joint nuts and fasteners, roll the edges into the grooves and return the wheel to its place.
The procedure does not take much time. Even a car enthusiast with minimal knowledge about the structure of a car can do it.
Step by step replacement
1. Place the desired wheel on the jack and remove it.
2. Flare the hub nut.
3. Place the wheel and engage the gear. We take the head at thirty and tear off the hub nut.
4. Remove the wheel and completely unscrew the hub nut.
5. Unscrew the 2 bolts securing the brake caliper using a 17mm wrench.
The bolts are located at the rear of the caliper.
6. Separate the pads and remove the caliper. So as not to interfere, we tie it to the stand.
7. Unscrew the 2 bolts securing the brake disc and remove. Nuts for twelve.
8. Remove the 2 ball fastening bolts. Seventeen bolts.
After unscrewing the bolts, remove the ball pin from the hub.
9. Pull the hub towards you and remove the axle shaft from the hub.
10. Using pliers, remove the cotter pin and unscrew the nut securing the steering tip pin.
11. Using a puller, squeeze out the finger.
12. Turn the strut out and knock the hub out of the bearing. I took a nineteen head and used it as a guide. You can come up with something else.
13. Remove the retaining rings holding the bearing on both sides.
14. Install the puller and squeeze out the bearing. Instructions for using the puller are on the box.
The puller costs 1000 rubles.
15. We pick up and remove the boot from the hub.
16. Press out the bearing race that remains on the hub.
To make it easier to rotate, I placed the hub with the back side into the wheel. I aligned the holes and inserted a screwdriver to prevent it from turning.
17. Install the internal retaining ring.
18. Lubricate the bearing seat. This will make pressing easier.
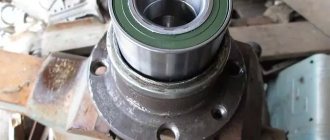
19. We mount our bearing into the puller and press it in.
20. Install the external retaining ring.
21. Mount the hub boot.
22. We also press the hub into the bearing using a puller.
23. Putting everything back together. If you forgot what comes with what, watch the video.