Reasons for replacing and diagnosing wheel bearing failure
In addition to driving style and road quality, the reasons for wear are the following:
- product quality;
- quality of service;
- weather conditions (at high temperatures, overheating and expansion occur, and the bearing is also susceptible to drying out of the lubricant).
- other minor factors: serviceability of the suspension, tire profile, play in the units, alignment.
Let's look at the signs of a breakdown, there are several of them:
- Rear noise when driving;
- Vibration in the cabin;
- Over time, the noise will turn into periodic grinding;
- The wheel is loose when raised.
Similar symptoms are observed when the front hub bearings are faulty.
Assembly
Clean and lubricate the inner surface of the steering knuckle. Insert the new bearing into the steering knuckle using a puller. A large puller washer is located on the inside of the steering knuckle to prevent damage to its o-rings, and the new bearing can be pressed onto the old one during an interference fit that will only be transmitted through the outer ring. Install the retaining ring. Using a puller, press the hub into the bearing. The puller washers now rest against the inner race of the bearing and the hub. Reassembly is carried out in reverse order, tighten the bearing nut to the specified torque and ensure that the flange is secure.
In conclusion, it should be noted that replacing a wheel bearing on a new car is not difficult, but if suspension parts are removed for many years, then removing the hub and other components will be very problematic. Replacing the wheel bearing is shown in the video:
By the way, do you know how to check the suspension yourself?
The wheel bearing must be replaced yourself.
Wheel bearing and how to replace it
It's not often that you notice unpleasant driving noise in cars, which increases with speed. Usually the noise disappears when turning sharply, but this is a temporary phenomenon. As a rule, this situation may indicate the need to replace the front wheel bearing of the VAZ 2110. Experts recommend replacing both bearings at the same time. But in this article we will look at how to replace the front wheel bearing on a VAZ 2110.
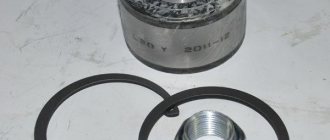
Rear wheel bearing VAZ 2110: price, dimensions, choice for replacement
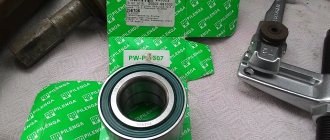
After diagnostics, making sure that repairs cannot be avoided, the question of choosing a new spare part will arise. The hub is equipped with a double-row angular contact bearing, number 6-256706E1S17 (marked according to GOST).
The price of the bearing varies from 600 to 900 rubles.
Recommended bearing manufacturers
| No. | Manufacturer, country | Catalog number | Dimensions, mm | Price, rubles |
| 1 | VAZ original | 2108-3104020 | 60*30*37 | 400 |
| 2 | Pilenga, Italy | PW-P-1307 | 435 | |
| 3 | Elastomag | EM52205 | 660 | |
| 4 | AT | AT30600337 | 455 | |
| 5 | Finwagle | HB321 | 480 |
To avoid mistakes when purchasing, check the markings and sizes:
- External landing diameter – 60 mm;
- Internal landing diameter – 30 mm;
- Height – 37 mm.
You can find more detailed information on this topic in the special article “How to choose a wheel bearing.”
It is important to know:
It is advisable not to purchase Chinese products; buy products from Russia, which are described above, in practice they are better. Beware of fakes, the photo shows an original wheel bearing from VPZ.
Advice:
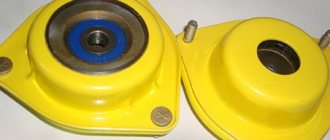
If the roads in your city are bad, and besides, you like to drive recklessly, install a roller bearing with increased load capacity, number 537906. The only downside is that the permissible rotation speed will decrease.
Replacement procedure
Lubricate
So, we have determined that there is no way around this, and the car really needs to replace the bearing. Therefore, we adhere to a clear procedure and begin work.
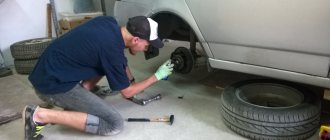
- Remove the brake drum. There should be no problems with this, since it is fixed quite simply on the rear wheel.
- Pry up the hub cap using a flathead screwdriver and remove it.
- Now, using a narrow chisel, straighten the collar of the nut, which was jammed in two places at once. Don’t be afraid, it wasn’t you who did something, such a jam is provided at production so that the element does not fly out of its rightful place.
- Use a 30mm socket to unscrew the fastening nut.
- Remove the unscrewed nut and also dismantle the thrust washer.
- Arm yourself with a three-legged or two-legged puller, which will allow you to remove the hub from its place.
- If you don't have a three-jaw tool, press out the hub using two bolts or screws. As the practice of craftsmen has shown, bolts for fastening the head of a power unit are excellent for these purposes.
- Screw the screws into the opposite holes for fastening the wheel and rest their ends against the heads of the bolts securing the hub axle to the rear suspension beam of your car.
- Try to tighten the screws evenly to allow the hub to press out. There is no need to remove the pads.
- As a rule, the inner race of the bearing should remain on the hub axis.
- Secure the ring using a puller, then remove it.
- If you don’t have a puller, you will have to additionally dismantle the brake pads and use a chisel to mix the ring to the axle.
- Next, the ring moves. Two mounting blades will help you with this.
- Do not be afraid that after processing with a chisel, some kind of defects or nicks will form on the hub axis. This is not terrible, but it is highly recommended to process them with a needle file.
- Arm yourself with pliers, thanks to which you can carefully remove the retaining ring.
- Using a piece of suitable pipe, also carefully knock out the bearing, leaning on the inner ring.
- Another option is to press it out using a wheel bearing puller.
- Clean and effectively lubricate the hub into which the new rear wheel bearing is pressed with a puller or vice. The pressing force must be applied to the outer ring. It will be most convenient for you to do this using the outer ring from an old bearing.
- Install the new retaining ring in its proper place.
- Using light blows on the inner ring, press the bearing onto the axle. Drive until deep enough to fit the nut.
- Full pressing is carried out with the nut already on.
- Be sure to use only the specified torque to tighten the fastener.
- Press the collar of the nut into the two grooves of your hub axle to restore the element to its original appearance.
This procedure cannot be called incredibly complicated, but you will have to “tinker” in your garage. But this is better and more cost-effective than going to a service station and entrusting your car to unknown specialists.
The good thing about the VAZ 2110 is that you can easily repair it yourself. A number of works are carried out on the basis of the operation and repair manual. But if you do not have experience, or the breakdown is too serious, contact the professionals. It may cost more than doing the repairs yourself, but the quality of the work is above all. This is a guarantee of the safety of your car and your own safety on the road.
How to change the rear wheel bearing on a VAZ. First, let's prepare for repairs
We will prepare the car, as well as the tools according to the list:
- Jack;
- A driver or pipe to increase the torsional moment;
- Wrench 30, better with a head;
- A set of other keys;
- Wheel hub puller with claws (to remove the hub);
- Vise;
- Hammer and chisel;
- Round nose pliers;
- Torque wrench.
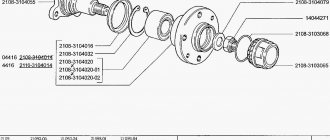
Now check out the hub design:
1 – rear axle; 2- hub body; 3- protective casing; 4 – lock pin. ; 5 – bearing; 6 – washer; 7 – nut; 8,9 – protective cap with gasket.
Place the car on a level surface, provide light, and install wheel chocks. Next, we put the first gear, and if desired, the parking brake, now we proceed to operations.
Replacing the rear wheel hub bearing of a VAZ-2110
1. Use a screwdriver to pry it off and remove the hub cap.
2. Use a narrow chisel to straighten the jammed collar of the nut in two places.
3. Use a 30 mm socket to unscrew the nut.
4. Remove the nut and thrust washer.
5. Remove the hub using a universal two- or three-legged puller. If the latter is missing, press out the hub using two bolts or screws (engine head bolts work well).
We screw the screws into two opposite holes securing the wheel and rest their ends against the heads of the bolts securing the hub axle to the rear suspension beam.
6. Evenly tightening the screws, press out the hub (the pads have been removed for clarity).
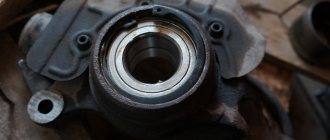
In most cases, the inner bearing race remains on the hub axis.
7. Engage the ring with a puller
8. ...and remove it
9. If a puller is not available, it is necessary to dismantle the brake pads and use a chisel to remove the ring from the axle.
10. Next we move the ring with two mounting blades.
11. After working with a chisel, nicks appear on the hub axis, which we remove with a needle file.
12. Use pliers to remove the retaining ring.
13. Using a piece of suitable pipe, knock out the bearing, leaning on the inner ring
14. ...or press it out with a wheel bearing puller.
15. We press the new bearing into the cleaned and lubricated hub using a puller or in a vice, and apply the pressing force to the outer ring (this is convenient to do through the outer ring of the old bearing).
Install the retaining ring.
16. Carefully, with light blows on the inner ring, press the bearing onto the hub axle to a depth that allows you to tighten the nut
The final pressing is carried out using a nut with a tightening torque of 186.3–225.6 Nm (19–23 kgf∙m)
We press the collar of the nut into two grooves of the hub axle.
Replacement methods
First way
So:
- In the first case, it is necessary to use a puller to remove the bearing;
- Simply carefully remove the bearing and replace it with a new one;
- After installation, all the steps above should be carried out in reverse order.
The main advantage of this method is the fact that the technician will not need to touch the camber adjustment bolt, which is very difficult to put in place later.
Bearing puller from the hub
If we talk about the disadvantages, we can note the following: the master will have to take a very uncomfortable position to perform actions. That is why it is necessary to prepare a lift and climb into the inspection hole.
But it is still very inconvenient for a car enthusiast to knock out the hubs in this position and press in the bearing assembly.
Second way
Consists of the following steps:
- To remove the bearing using the second method, you must carefully dismantle the steering knuckle and completely remove the hub;
- After this, the master will need to go to the workbench;
- The VAZ 2110 wheel bearing is replaced directly on the workbench;
- After this, everything is installed back, just as it was removed before.
This method is undoubtedly much easier than the first, but since it affects the camber, problems with adjustment cannot be avoided. Before you begin to unscrew the knuckle mounting bolts from the strut, you need to mark their position with chalk or a marker.
The first mark in this case will indicate the location of the adjusting bolt on the rack. The second mark will indicate the previous position of the fists.
After the master begins assembly, he will focus precisely on these marks. Of course, it will be difficult to achieve great accuracy and it will not be possible to return the parts to their place. But with careful work, installation errors can be minimized.
There are some steps to follow:
- The master puts marks;
- Knocks out the knuckle bolts;
- Unscrews the mounting bolts from the lower ball joint;
- The bearing must be knocked out of the hub;
- The retaining rings are dismantled;
- Using a vice, the bearings are pressed out.
Before reassembly, the space in the fists must be thoroughly and thoroughly lubricated.
This method is often used when repairing not only one bearing component, but the entire chassis. As a result of this method, it will also be possible to safely replace ball joints, silent blocks of levers and steering tips.
Third way
It is carried out in the following order:
- In this case, you will need to remove the entire rack completely;
- After all the components have been removed, the technician will need a special vice;
- The wheel bearing will be replaced at the vise and all parts will be reinstalled.
This method is the most complex and difficult because it requires the technician to dismantle the entire rack. In addition, it will be necessary to unpress the steering tip, and you also need to unscrew the fastening nuts, they secure the upper support to the body base.
Direct removal of this VAZ 2110 unit is carried out only after the entire rack has been removed from the car. And this process takes a lot of time.
Detailed instructions for replacing the rear wheel bearing
So:
- The car stops at the front.
- Wheel bolts break off.
- The nut in the center of the hub breaks off, and you must first remove the cap.
- The required side is jacked up and the trestles are positioned.
- The wheel is removed.
- The installation site is filled with WD-40 or other special liquids.
Note! In this situation, you can use diesel fuel or any brake fluid.
- The guide bolts are unscrewed, which it is recommended to first tap with a hammer.
- Carefully remove the brake drum. If removal is difficult, you need to screw special bolts into the threads on this drum, tighten it and lightly tap it with a hammer. Usually such measures produce positive results.
Note! You can buy specialized drum pullers, but this is the last option when you can’t do anything on your own.
- The central nut is completely unscrewed. Of course, you can unscrew it immediately and remove the hub, wheel and drum together, but in this case there will be a high risk of damage.
- The hub tightens. If one of the bearing races remains on the axis, you need to move it out of place using a puller or sharpened chisels.
- The axle is inspected for the presence of marks from bearing rotation; if such marks are present, the assembled hub will need to be replaced.
- The brake cylinder is assessed for leakage, and the pads are assessed for wear.
- The retaining ring is removed from the hub using pliers or screwdrivers.
- The edge must be cleaned of rust, after which it must be moistened with WD-40 or a similar liquid that is at hand.
- There are three ways to press out a bearing: using a special press, a puller or a heavy hammer (sledgehammer). The third method may seem aggressive, but it is preferred by most service station technicians, so let’s look at it in more detail.
- The hub is securely installed on a hard surface, and the bearing is dislodged from its place through the mandrel with several blows of a hammer or sledgehammer. After this, the hub is installed on a vice.
Note! There must be a stop for the part and a place for the bearing to bounce off.
- A couple more blows are made, after which the bearing comes out.
- The bearing seating surface must be carefully inspected, any existing rust should be sanded off and lubricated with plain motor oil.
- The purchased bearing must be screwed using a selected bolt through a washer, which must be selected in accordance with the internal races. Since the bearings are double row, they will have to be disassembled during installation.
- The hub is installed on a hard surface.
- A twisted bearing is installed on top, but first you need to lubricate its installed plane with oil.
- Use a one-kilogram hammer to slightly level the element in a plane.
- Take a suitable mandrel, for example, a pry bar, which is used to hit the part to press the bearing.
Note! The main thing is not to apply strong blows, since the pressing will be uneven.
- When the bearing is about halfway through, you can hit harder.
- When reaching the cut part of the hub, you need to use the old clip as a mandrel.
Note! Do not apply strong blows, as this is a high-carbon metal that can burst.
- You need to push it all the way, after which the stopper is installed; if it is not possible to install the last element normally, then most likely the bearing was not finished completely.
Note! The stopper should spring back into the groove without difficulty.
Bearing assembly procedure
So:
- Now it's time for assembly, the hub is put on the axle, and you need to remove the bolt used to tighten the cage.
- The central nut is tightened and tightened as much as possible. In this case, it means installing a new nut. We also install a thrust washer.
- The previously removed brake drum and wheel are put on and screwed on.
- The rotation is evaluated, if there is no noise, then all actions were performed correctly. The car is removed from the jack.
- The wheel with the central nut is tightened.
- The hub nuts are closed and the wheels are tightened securely.
It's no secret that any car, whether foreign-made or domestic, has a tendency to break down over time. Only the component parts of the unit fail, making the vehicle impossible to operate. A breakdown such as a malfunction of the rear wheel bearing on a VAZ-2107 car hides dangerous consequences. After all, if this part malfunctions, the car can theoretically be driven, but at any moment you can lose a wheel along the way. In the material we will pay attention to the features and principle of replacing the rear wheel hub bearing on a VAZ-2107 car.
Every part on a car tends to become unusable. Rear wheel bearings are no exception, but any part has characteristic operational features. If the operating conditions are met, the part can serve for years, which is confirmed by the driving experience of current older drivers.
The main reasons for bearing failure are:
- careless driving;
- incorrect installation of the product;
- water and dust getting inside the hub;
- leakage of lubricant;
- long service life.
If a VAZ-2107 car is often operated in aggressive conditions close to off-road, then the need to replace the rear wheel bearing will not take long to occur. It is especially important to take into account the fact that the famous “seven” is a rear-wheel drive car. But how can you determine that a wheel bearing has failed and needs to be replaced? Let's find out in more detail.
Methods for determining whether a wheel bearing is faulty
Timely identification of a malfunction allows you to prevent unpleasant consequences that can provoke an emergency situation on the road. The part in question on the VAZ-2107 car plays an important role, since thanks to this product the wheel rotates easily. The car has 2 rear wheel bearings, one for each rear wheel.
The main way to determine the malfunction of an important part of the hub on a VAZ-2107 is to carry out the following manipulations:
- raise the rear of the car on a jack;
- swing the outer part of the wheel in different directions;
- if a knocking noise occurs and the wheel dangles, then the rear wheel bearing of the VAZ-2107 needs to be replaced.
If the car drives while turning corners and a squeaking noise appears, this also indicates the need for repair work. To replace the wheel bearing, you will need the following tools:
- domktat,
- wrenches and screwdrivers,
- chisel and hammer,
- puller,
- Litol brand lubricant.
After making sure that you have a complete list of tools and materials for the work, you can begin replacement.
Replacing a faulty product
You must begin replacing the product by loosening the wheel bolts. This must be done before the rear of the car is jacked up. At the same time, do not forget to install stops under the front wheels.
Further actions are performed in the reverse order of removal. It is important not to forget that when replacing a bearing, the sealing seals must also be replaced.
No component of the car is subjected to such a load as the chassis. Hence the large number of malfunctions. A striking example of this is the rear wheel hub bearing. According to the design and calculations of the designers, it should serve regularly for at least 100,000 km. mileage But domestic roads and improper operation make their own adjustments. Very often, a bearing fails without serving even half its service life.
In this case, you cannot delay the replacement. It's not even that a faulty bearing will cause an even more serious problem. In this case we are talking about safety. You don’t need to think that such complex repairs can only be done at a car service center. It is quite possible to replace the rear wheel hub bearing yourself.
Causes of failure
The main cause of bearing failure can be simple wear.
If you drive your car often enough, it can quickly break down. On average, the bearing life is 60 thousand kilometers. But this is under ideal conditions. If you have bad roads in your city, the resource will be significantly reduced. It will also decrease with an aggressive driving style. But there are other, uncontrollable factors. For example, temperature, suspension, tire profile and many other factors. In any case, if a problem occurs, you need to replace the bearing in the VAZ 2110.
Removing and replacing the hub
First, let's arm ourselves with the necessary tools:
- Heads for 36, 15 and 13;
- Internal bat;
- A metal washer with a diameter of 8 cm;
- A large hammer or even a sledgehammer (you can also use an oil-powered or mechanical press);
- Five bolts.
If you need to replace the hub or remove it for any reason, you should first unscrew the nuts that secure the wheel. Let's continue:
- After unscrewing the bolts with a T-50 bit and a socket/36, the wheel is removed and the car is placed on supports.
Note. The car must be braked with the handbrake and wheel chocks, called boots, must be installed. We put the car on supports like this: we jack up the rear part of the car and install the support under the car.
- lower the lever all the way down, since the car is already released;
- Next you need to remove the brake disc.
Note. Don't forget to disconnect the handbrake cable from the brake caliper. We free the caliper itself from the guides.
- We fix the caliper (for example, it can be tied to the spring of the rear suspension or completely turned out using a 15 socket).
Note. We remember that during work you cannot twist or stretch the brake hose.
If the VAZ 2110 is a new modification, then there may be various sensors on the rear wheel. They should also be dismantled. Let's continue:
- take out ;
- pull the hub off the shaft (to do this, grab it with both hands and pull);
- instead of the five removed hub bolts, five M10 bolts having a length of 9 or 10 cm should be screwed in (they should be screwed in correctly, so that the bolt captures all the threads on the brake disc);
- We place the hub with the heads of the screwed bolts on some hard surface;
- a metal washer is placed on top;
- take a large hammer or sledgehammer;
- we hit the puck with a tool or press it with a press (as a rule, the hub moves after the tenth blow with a sledgehammer);
- disconnect the brake disc and hub;
- we assemble everything in the reverse order (when assembling the new hub, there is no need to use a sledgehammer, since everything is tightened using threads).
Note. The new rear wheel hub in the VAZ 2110 must be lubricated with oil.
At this stage of work, the replacement of the rear hub can be considered complete. In many cases, when replacing the rear hub on a VAZ 2110, the bearing is also changed at the same time. You can find out how to do this from other articles; we will not dwell on this in detail here. I would just like to note the following:
- Bearings with double-sided seals in the VAZ 2110 hub have a split ring in their design. These bearings do not require any adjustment or even lubrication for a long time (as long as they are working), because before installing the bearing in the rear hub, grease is added there.
- The hub itself, both front and rear, is made of chrome steel and has three holes. It is these same holes that help remove the bearings, if necessary.
- The rear hub bearings have an axial clearance of 0.06-0.085 mm, which is felt when the wheel rocks perpendicular to the rotation of the wheel. Such play should not be considered an increased clearance, since the reason may lie not in the bearing, but in other elements and connections;
- It is not recommended to tighten the hub nuts with a torque greater than that specified by the manufacturer. On the VAZ 2110 the torque is 15/0.15 kgf.
When replacing the rear wheel hub, it is advisable to use video and photo materials. When you work with your own hands, detailed instructions with pictures and diagrams are what you need. Replacing the hub and repairing other parts of the car yourself will allow the motorist to save a lot of money, because the price of the service in car repair shops today is very high.
The service life of wheel bearings should have a fairly long mileage (at least 100,000 km). But the condition of our roads can lead to a fairly early replacement of the wheel bearing on the VAZ 2109, 2110.
Bearing removal
When you have purchased a new bearing and are preparing to replace it, you will first need to remove the product. It won’t be difficult to get it, but you will have to spend a little time.
- First you need to loosen the bolts that secure the wheel.
- After they are loosened, you will need to jack up the car. Without this, replacing the bearing will not be possible.
- When the car has been raised, you need to completely unscrew the bolts and nuts that secure the wheel. It needs to be removed. It is worth noting that this can only be done after lifting the car with a jack.
- On the wheel you can find a special decorative cap. It will also need to be removed.
- Once you have removed the wheel and trim cap, you can see the drum. It is held in place with pins. These pins will need to be unscrewed. To do this, use a hexagon. There is no need to remove the drum, only the pins are unscrewed.
- Find the hub nut and unscrew it. Using a wrench extension, you need to remove the washer. Please note that this procedure will be much easier to do before lifting the car. If you do not have experience in replacing a VAZ 2110 bearing, then it is better to do just that.
- Next, using a removable device, you need to remove the hub. There shouldn't be any difficulties with this.
- Using the stop of the same puller, you will need to install the device on the axle.
- Find the hub piece and grab onto it. To do this, you need to use the paws of the removable device.
- After installation, be sure to check the quality of installation of the paws. If they hold steady, then you can tighten the threaded connection. This can be done with a key.
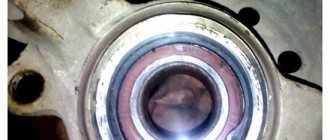
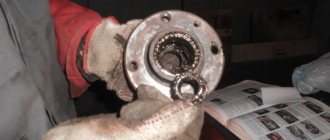
- After all these manipulations, you can finally remove the hub. It's not difficult to do. Behind the hub you will find the bearing outer race. It will contain balls and a separator.
- On the axle you will find a bearing ring.
- Attach the removable device. It will need to be attached to the back end. It is worth noting that here it will be much more difficult for the puller, so paws with sharper ends may be required. You can replace the presser feet, or use another removable device to make the job easier.
- Now you need to remove the inner ring. It is removed from the axle shaft using a removable device. Remove the ring only using a puller, this is much easier and safer.
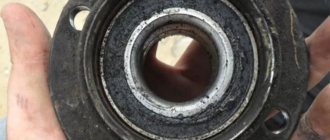
- Only the hub remains. It is necessary to press out the old parts from it. For this you will need pliers. Use them to remove the locking element, after which you can remove the protective casing.
- To remove the casing you will need a vice. Using a vice, press the hub to knock the cover off. You need to knock the lid off very carefully so as not to damage anything.
- Dismantling is almost complete. All that remains is to press out the outer race. To do this, you will first have to select a head of the desired diameter. You also need special attachments. With their help, the bearing will come out on the other side.
- Just clamp the resulting structure and twist it. It will be quite difficult, but eventually the bearing will be removed. After this, you need to move on to the bearing replacement part.