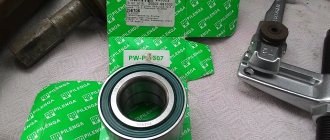
One day, the owner of a Lada Grant will experience an unpleasant failure of the bearing on the front hub. It is necessary to take timely measures, and at the same time the front wheel bearing is replaced, and if this is not done, then you can get away with significantly lower costs. And when the owner neglects the timeliness factor and postpones repairs, he automatically falls into the cohort of “provocateurs” of an accident, because the failure of this unit while driving can have dire consequences.
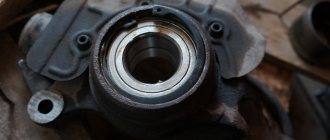
The main purpose of the bearing is to ensure the retention of the hub and rotation of the Lada Granta wheel. The design of the element we are considering provides for the presence of the following components:
- outer and inner races (metal);
- separator with balls or rollers;
- insulating rings to ensure protection of the working area of the product;
- lubricant.
What are the signs of a problem?
Oil filter Lada Granta 8 valve
The primary factors that make it possible to diagnose a malfunction of the hinge mechanism include the following:
- the occurrence of extraneous noise coming from a specific wheel in motion;
- wheel runout or manifestation of vibrational nature of rotation;
- sounds resembling grinding, as well as wheel play.
If such faults are present in your car, the front wheel bearing needs to be replaced.
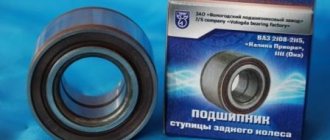
How to choose a rear wheel bearing for Granta 2190 - price, number and manufacturers
The Lada Granta rear wheel bearing, the price of which is indicated in the table below, has an AVTOVAZ catalog number:
21080-3104020.
If you are guided by GOST markings, then look for:
256706AKE12
Before buying a wheel bearing, you should familiarize yourself with the list of recommended and trusted manufacturers. Such a list is compiled in the table below. It contains prices, exact articles, equipment, and manufacturers.
Study the table and decide for yourself which is better; the companies presented are approximately equivalent to each other in terms of workmanship and service life.
Table of recommended manufacturers
| No. | Manufacturer | Catalog number | Price 2021, rub. | Equipment | |||
| Retaining ring | Dirt cap | Lock-nut | Instructions | ||||
| 1 | VBF Russia | 2108-3104020 | 500 | — | — | — | — |
| 2 | SPZ Russia | 2108-3104020 | 520 | — | — | — | — |
| 3 | SKF Sweden | VKBA1307 | 1900 | 2 | — | + | + |
| 4 | FAG Germany | 545312A | 600 | — | — | — | — |
Bearing size table 256706AKE12
| Parameter | Unit | Value according to GOST (TU) |
| Hole diameter | mm | 30 |
| Outside diameter | mm | 60 |
| Width | mm | 37 |
| Dynamic load capacity | kH | 30,1 |
| Static load capacity | kH | 25,9 |
| Speed | rpm | 6500 |
| Axial clearance | mm | 0,06-0,09 |
| Steel type | — | SHH-15 |
| Hardness of rings and balls | H.R.C. | 61-65 |
| Type of lubricant | — | Litol-24 (S17) |
| Torque | H*M | 220 |
| Ring roughness | Ra | 0.32 |
| Weight | G. | 435 |
Causes of malfunctions
The resource of this part is very impressive and can reach 100 thousand km, subject to gentle operation. Modern realities show that the front hub bearing can become unusable much earlier than the specified regulatory period.
Next, we will identify three significant factors that can cause premature wear of a part such as the front wheel bearing in a Lada Granta car.
- The state of domestic roads, the quality of which is far from ideal. When driving over bumps, the front wheel bearing experiences enormous stress. Also, critical temperatures and dynamic impacts (shocks) can have a negative impact on their condition. All this leads to the structure of the material from which the front hub bearing is made losing its strength properties, which provokes destructive processes.
- Exposure to aggressive environments. Due to the structural location of the bearing, it is doomed to constant contact with moisture, dirt and other negative atmospheric factors. The influence of heat and cold is also detrimental to his condition.
- Increased operating temperature. During the rotation process, natural heat generation occurs. Temperature changes, especially in winter, also have a detrimental effect on the strength parameters of the product.
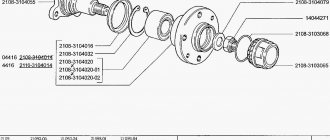
The device of the hub on the Lada Grant
Front
- rounded fist;
- external and internal dirt-reflective metal rings;
- front roller bearings;
- hub;
- washer;
- hub nut;
- retaining ring, plug.
Rear hub device
- hub mechanism axis;
- metal ball bearing;
- mud ring;
- retaining ring;
- washer;
- screw;
- sealing ring;
- rubber boot;
- hub cover.
Resource for replacing hub mechanism elements
The average service life of wheel joints is 80 – 85 thousand km. The indicator is average, as it depends on the following factors:
- quality of workmanship of the part;
- frequency of operation of the technical device;
- driving style;
- quality of road surface;
- aggressive environment;
- high operating temperatures;
- compliance with technical inspection intervals.
Signs that a hub needs to be replaced
- the appearance of uncharacteristic noise during wheel rotation;
- wheel runout in the steering column;
- vibrations at different speeds. Sometimes there is vibration at a certain speed;
- metallic grinding noise as the wheel rotates;
- front wheel hub play.
Diagnostics of the hub mechanism
- We place the car on a level platform, squeeze the parking brake if we are checking the front row. For the rear, we install wheel chocks.
- Let's jack up the front (rear) part.
- We turn the car wheel and carry out troubleshooting.
- We shake the wheel up and down with our hands. In good condition there should be no play. Otherwise, we dismantle and replace worn elements.
How to replace the front wheel bearing in a Grant?
Fuel consumption Lada Granta
When to change the timing belt on a Lada Granta 8 valve
Lada Granta timing belt replacement
Performing the work requires the presence of special tools, including:
- special bearing puller;
- “legendary pair”: hammer and chisel;
- a wrench with an extended wrench to make it possible to unscrew the hub nut;
- set of keys with heads;
- center punch;
- knob with a 30-size key;
- flat-profile screwdriver;
- pliers with a round gripper profile that can act as a puller for retaining rings;
- wheel chocks and a jack (or better yet, a lift).
Replacing the rear wheel bearing of a Lada Granta with your own hands
Note to the driver. Before starting installation work, clean the surface from debris and dirt. Apply a thin layer of oil and be sure to lubricate the outer race of the hinge.
- We install the new hinge and lightly press it into the cavity.
- Evenly tighten the hinge until it touches the outer edge.
- We fix the retaining ring and install the hub in its original place.
Installation in a regular place. Assembly of the structure
- Apply a thin layer of graphite grease, put the assembly on the shaft, and secure it with a nut.
- We complete the tightening with a torque wrench (tightening torque 30 Nm).
- Use a chisel to counter the nut and put on the cap.
This completes the disassembly, assembly, and replacement of the rear wheel bearing.
Note to the driver. The Lada Granta Sport modification has a rear hub with a pre-installed ABS sensor.
It often happens that during the process of dismantling the hub mechanism, a bolt or pin breaks. The reasons for this are different, ranging from the old age of the metal to manufacturing defects.
So, how to remove a broken bolt. We carry out the work in several stages:
- mark the center of the stud;
- drill with a drill to 2.5, after 5.5, 9.5 mm;
- scroll with a bolt with a diameter of 9.5 - 10.0 mm;
- remove remaining metal and shavings.
Replacement procedure
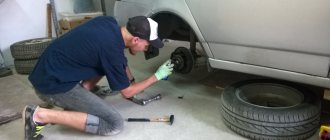
- We place the car on a level area with sufficient lighting, placing stops under the stern wheels.
- On the side planned for replacement, we loosen the tightening torques of the Lada Granta wheel bolts.
- Armed with an extended lever, we loosen the central hub nut.
- We hang the car or lift it with a jack from the side of the bearing being replaced.
- We remove the plastic cap protecting the central nut.
- Use a hammer and a core to align the collar of the hub nut.
- We unscrew the nut itself and remove it together with the washer.
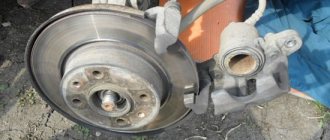
- We dismantle the brake disc and caliper.
- We remove the CV joint shaft from the splined engagement with the hub on the LADA Granta.
- We unscrew a couple of bolts that hold the shock absorber strut on the steering knuckle.
- Disconnect the lever from the steering axle. The fist itself can now be removed.
- Having placed the steering knuckle and hub assembly in a vice, take a mandrel of a suitable size and compress the hub itself.
- We dismantle the protective ring on the LADA Granta.
- We use a chisel and a hammer, striking the ring until it moves to the side. Then we remove this element with a special puller.
- Having removed the retaining ring using the pliers indicated earlier, we remove the bearing from the seat in the fist.
- We clean the internal cavity of the journal with a wire brush and then coat the bearing seat with a special lubricant.
Now you can begin installing a new Lada Granta bearing. The procedure for this action is the reverse of dismantling manipulations.
Replacing the front wheel bearing
This was created using the YouTube editor
We screw the bolts into the holes of the hub to a depth equal to its thickness.
By sharply hitting the bolt heads with the brake disc, we press out the hub.
We unscrew the fastening of the ball joint to the steering knuckle (see the article “Removing the ball joint from Lada Kalina”) and remove the CV joint from the bearing hole.
With another method of dismantling the hub, we first disconnect the ball joint and remove the CV joint from the hub.
Rotating the hub, we knock it out of the steering knuckle using a soft metal drift.
Remove the retaining ring.
Using a puller, we press the bearing into the cup located outside the steering knuckle, while the bolt presses on the inner race of the bearing
through the washer from inside the fist.
In fact, when the hub is pressed out, the bearing ring
, which is difficult to remove due to its tight fit on the hub.
You can use a puller if its claws fit into two small grooves on the hub. If the puller does not provide the required force, then.
. pry it up with a screwdriver and remove the dirt ring.
. and use a chisel to move the bearing ring.
We remove the ring and, if necessary, use a file to clean out the nicks on the hub.
We install the mud ring and seal it on the hub. Clean and lubricate the inner surface of the steering knuckle.
Use a puller to press the new bearing into the steering knuckle. This was done by replacing the front wheel bearing and checking the front wheel bearing. In this case, the large puller washer rests on the steering knuckle from the inside so as not to destroy its mud rings, and when pressing in, the new bearing can be pressed through the old bearing, which will transmit force only through the outer ring. Volkswagen golf 1.4 tsi 6 manual transmission › › replacing the front wheel bearing vw golf 6. Installing the retaining ring
Use a puller to press the hub into the bearing. Now the puller washers rest against the inner ring of the bearing and the hub. Lada Kalina replacing the front wheel bearing. We perform the subsequent assembly in reverse order, tighten the bearing nut to the prescribed torque and be sure to lock it by jamming the collar.
Tools:
- Tubular socket wrench seventeen mm
- Seven mm straight box spanner
- Seventeen mm straight box spanner
- Driver for socket attachment
- Thirty mm knob attachment
- Large flat screwdriver
- Beard
- Large hammer
- Boots
- Jack
- Support posts
- Soft metal punch
- Vise
- Dull chisel
- Double jaw puller
- Cup puller
- Circlip pliers
- Needle file
- Wheel key
Parts and consumables:
- Bolts M12x1.25 mm, about one hundred thirty mm long, two pcs.
- Front wheel hub bearing
- Brake disc
Note:
The work can be carried out on a level area, but it is more convenient on an inspection ditch or overpass.
1. You can change the bearing using 2 methods - on the car, without removing the steering knuckle and without thereby disturbing the wheel camber angle, or by previously dismantling the steering knuckle. The work is shown on the right wheel bearing. The left wheel hub bearing is replaced in the same way.
2. Loosen the wheel bolts.
3. Use a screwdriver to pry off the protective cap of the wheel hub.
4. Remove the protective cap of the wheel hub, which is fitted with a rubber O-ring.
5. Use a beard to straighten the dented collar of the hub bearing nut in two places.
6. Apply the parking brake, engage first gear and place boots under the wheels.
7. Use a 30mm socket to loosen the hub bearing nut. The nut is tightened with a huge torque, so the head and knob must be quite strong in order to transmit the required force.
8. We hang up the front part of the car (specifically both front wheels, because otherwise the anti-roll bar interferes with dismantling, pushing the suspension elements upward).
9. Unscrew the hub bearing nut completely and remove the washer.
10. Remove the front wheel brake disc as described here. We remove the shank of the outer drive joint housing from the hub, as described here. We connect the ball joint to the fist and compress the hub, striking it through a drift made of soft metal.
11. You can also compress the hub using the front wheel brake disc. We pass M12x1.25 mm bolts about one hundred and thirty mm long through two diametrically opposite holes in the disk (cylinder head mounting screws are suitable) and screw them into the holes of the hub to a depth equal to its thickness. By sharply hitting the bolt heads with a disk, we compress the hub.
12. If it was not possible to remove the hub this way, remove the steering knuckle. To do this, unscrew the nuts of the bolts securing the shock absorber strut to the steering knuckle, and remove the bolts as described here. Remove the steering knuckle.
13. We install the steering knuckle on the lips of the vice and press the hub out of the knuckle through a mandrel or head of suitable diameter, applying force to the end of the hub.
14. Remove the hub from the fist. In this case, the outer part of the inner bearing ring remains on the hub.
15. Remove the mud ring from the hub.
16. We insert a dull chisel between the ends of the inner ring of the bearing and the hub. By striking the chisel with a hammer, we move the inner ring.
17. Use a puller to compress the inner ring of the bearing.
18. Using circlip pliers, remove the circlip.
19. Use a cup puller to press the bearing out of the steering knuckle.
20. Remove the bearing together with the puller.
21. Remove the bearing from the puller.
22. Clean and lubricate the inner surface of the steering knuckle. Using a needle file, we clean out the nicks from the chisel on the hub. We press the new bearing into the steering knuckle, applying force to the outer ring of the bearing. When pressing the hub, we use the puller washer to rest on the inner ring of the bearing. If the bearing was replaced on a removed steering knuckle, then it is necessary to check and adjust the wheel alignment angles to 100.
READ Replacement Rear Door Side Glass Renault Logan
The article is missing:
- High-quality photos of repairs
We have already written in detail about replacing the rear wheel bearing. At some point in the life of the owner of a Lada Kalina, there comes a time when the front wheel bearing needs to be changed. This part may fail after twenty thousand km or earlier, everything depends on the properties of the product. According to the service manuals, it should be replaced every 25-30 thousand km.
on replacing the front wheel bearing on a Lada Kalina:
Hub malfunction
The front bearing of the Lada Kalina manifests itself in a constant, additional sound while driving (noise, howling, buzzing). Its frequency and volume may vary depending on the speed. Usually the noise increases when turning or driving over bumps. In addition, you can diagnose the serviceability of the bearings at 100 stations; usually the technicians check the free movement of the wheel. Replacing the front wheel bearing. Rotating ninety degrees after 3-4 strokes. Every Lada Kalina owner will have to replace the front wheel bearing at some point. Replacing the front wheel bearing of a Volkswagen Golf 4. An experienced technician is able to find the increased clearance in the bearing by rocking the wheel manually, in a suspended state.
At first, I wanted to finalize the design of the steering knuckle, the bearing in it, and the rings installed on the Lada Kalina car. The design with a description of the parts in it is clearly shown in the figure below.
