July 19, 2020 Lada.Online 10 576 3
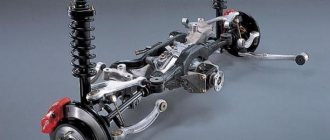
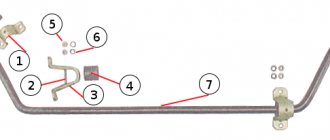
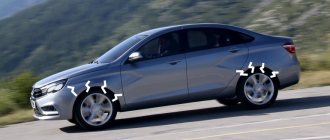
Rear suspension with coil springs, double-acting telescopic hydraulic shock absorbers and trailing arms elastically connected by a transverse beam and a stabilizer bar. The following are instructions on how to change the rear shock absorbers and springs on a Lada Granta, Kalina 2 and Priora yourself.
The replacement process is shown on a Lada Granta car. For other models everything is done similarly.
When should you resort to repairing your car's depreciation system?
If the car is just from the showroom, then it still has the technical potential given to it; when the factory settings are functioning, the control system works flawlessly. It is very pleasant and comfortable to be in the car. But the situation changes dramatically when the car crosses the “Rubicon” of active operation for six months or a year. It seems that everything is starting to “crumble”, something is already tapping. And often an acute problem arises when you urgently need to decide where and how to change the rear struts on a Lada Kalina, purchasing the necessary components on the car market.
Shock absorption system
Signs that it’s time to change the struts
There are characteristic signs indicating wear on the shock absorbers.
- Extraneous sound when moving over an obstacle. When the car goes through a pothole, the pillar knocks and a dull thud is heard.
- Wheel loosening on uneven surfaces. The car holds the road worse, the tire bounces on potholes. Additionally, the process may be accompanied by a specific, intermittent whistle when turning.
- Leaking shock absorber seals. Drips of working fluid may appear on the racks. This causes airing of the damper and provokes a critical decrease in its efficiency.
- The need for scheduled replacement of components. Each manufacturer indicates the service life of shock absorbers.
- Loss of control stability. The car begins to float along the road, and the process is accompanied by a rhythmic tossing.
What will make a car enthusiast think?
- The situation is if you often have to drive off-road, on poor asphalt surfaces, when the vehicle’s suspension is subject to the aggressive influence of potholes, holes, and sharp soil. Initially, the car still resists the “traps” of poor-quality road surfaces, and then many parts become unusable: they either rust, or become covered with cracks, or succumb to rupture.
- Buying a used car. The seller is not always conscientious, and it is not necessary that he previously monitored the technical condition of the vehicle, thought about how to change the rear struts on Kalina, or eliminate emerging problems. Used cars are a lottery, and you can lose if you don’t have a minimum of knowledge about repairs and maintenance of the domestic automobile industry.
- Frequent changes of drivers. This is the situation when several people alternately drive one family car, especially when there are also novice drivers who have recently received a license and do not know how to change the rear struts on a Kalina; the profile video for them is just beginning to open up new horizons in understanding the structure of the car.
- A machine that sits idle for a long time has a negative impact on its rubber parts. And before you start an active driving period again, it is worth checking all its control systems to see if they are acceptable for use and if their condition is safe.
- Unfavorable temperature conditions. Sudden changes in temperature and increased humidity levels will also force the driver to soon figure out how to change the rear struts on a Lada Kalina, having first checked them.
Replacement methods
We will tell you about two main ways to replace silent blocks on the rear beam of the “tens”, which can easily be used in a garage.
Which method to choose is up to you to decide. But before that, familiarize yourself with them in more detail.
First way
The method is not particularly difficult if you strictly follow the instructions. To begin with, we note that the silent block is located at the bottom of the car. Therefore, you will need a jack or inspection hole.
Defects
- Raise the car with a jack or drive it into a viewing hole. The second option is more convenient, since this way the view of the bottom will be better. And it’s much more convenient to work standing up than lying under a car.
- It is not necessary to completely remove the rear beam. When dismantling it, you will need to remove additional brake hoses, which takes a lot of time.
- It is better to disconnect the sorcerer so as not to damage it during the repair process. But shoot carefully.
- Now remove the nut with a 19mm wrench. You will have to make a serious effort, which is why some car owners call their comrades for help. If there are no assistants, pre-treat the thread with the almighty WD40 or plain water. This will allow the fastener to oxidize. Then clean it with a wire brush, which will make it easier to remove the element.
- Using a crowbar, lower the beam down a little, but do not remove it completely.
- There is an elastic band on the beam that should be cut off, otherwise it will interfere with the work process. Just keep in mind that if the rubber band is old, feel free to remove it. It is better to dismantle a good product by drilling a small hole.
- Now the silent block is removed.
- The new part is generously lubricated and pressed into its rightful place. Just do not use grease for lubrication, as this substance corrodes the part. The best lubrication option is regular soap or any available detergent.
- Return the sorcerer to its place and tighten the beam.
Second way
The second option for replacing the silent block is even simpler. But he also has his tricks.
Easy way
- Raise the car on a jack or drive it into a viewing hole.
- Using the same 19 mm wrench, remove the fastening nuts on the rear beam. This will allow you to detach the beam from the bracket.
- Remove the unscrewed bolt and move the rear beam eye down slightly.
- To make work easier, insert a wooden beam between the beam and the body, approximately the same size as a regular building brick.
- Remove the silent block by hitting it with a hammer.
- Lubricate the new block with something slippery, which will allow the element to do its job better.
- Press the silent block into its place.
- Remove the inserted beam and return the beam to its original position, securing it with fasteners.
At this point, the procedure for replacing the silent block of the rear beam of your domestic “ten” produced by AvtoVAZ can be considered complete.
Both methods allow you to independently, without unnecessary problems, resolve the issue of a failed silent block. Just in case, don’t forget to call a friend in the garage who will help you at the most difficult stages.
Signs indicating wear on the rear shock absorber struts
- Constant creaking, clearly visible even inside the car.
- Deterioration in vehicle maneuverability.
- A decrease in the level of comfort in the car interior, when bumps in the road are felt, the vehicle itself rides harshly.
- In the arched opening of the rear wheel, it is easy to distinguish water and oil stains, which means that the rear pillar can no longer cope with the loads.
Rear shock absorber strut
Symptoms of a problem
Damage to shock absorbers, unlike many other components of the car, is relatively easy to determine. It is worth thinking about the malfunction of the rear struts of the Kalina in the following cases:
- oil smudges on the shock absorber housing;
- rocking of the car when overcoming bumps;
- knocking in the rear suspension;
- strong lean when turning.
In any case, when doubts arise about the maneuverability of the car, its handling, or any discomfort is felt while driving, you should first of all pay attention to the rear pillars of the Kalina.
Methods for diagnosing the depreciation system
- Vibration stand with computer diagnostics
- Technical inspection of the vehicle in the service
- Self-test the shock absorption system by pressing on the rear of the body, holding it, releasing it and monitoring the behavior of the vehicle. Positive result - the machine should return to its original position without unnecessary swings.
Diagnostics of the depreciation system
How to replace longitudinal tension
In order to adjust the longitudinal tilt angle of the axle, you must contact a service center. At the same time, they will definitely remove the stretch. Therefore, you should not change it yourself; it is better to do this immediately before adjustment. But, if you remove the old stretcher and install it in place, in order to minimize the error in adjusting the caster angles of the axle, you need to count and record the number of washers that were located on the rear and front edges of the stretcher before removal.
The replacement procedure is as follows:
- Remove the bracket that secures the suspension extension.
- Use a 24mm wrench to keep the extension from turning. And with the second key you need to unscrew the nut that secures the front end to the wishbone.
- Remove the washer from the brace and remove the rear edge from the hinge.
- Remove the adjustment washers completely.
Installation of the longitudinal extension is performed in exactly the reverse order. It is necessary that the chamfers on the adjusting washers face the extension. After replacement, it is necessary to adjust the wheel alignment angles. This is a mandatory condition if the Kalina suspension is being repaired.
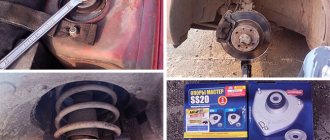
What tools are needed to repair and replace the rear strut?
- Socket head for 19, 17 and 24
- Vorotok
- A set of wrenches for working with shock-absorbing system fasteners
- Open-end wrench 17
- Wrench for unscrewing the strut rod nut
- Grover and bushings, washers, “donuts”
- Wire brush and rags
- Jacks
- Two spring ties for one strut
- Use WD-40 lubricant to turn rusted bolts
Tools for repairing and replacing the rear strut
Installation
Figure 10-4 — Orientation of the rear suspension shock absorber: 1 — lower spring support cup; 2 — rear suspension shock absorber; 3 — rear suspension arms; 4 - wheel; A - top point of the support cup
Install the shock absorbers into the eyelets of the levers, insert the bolts and tighten the nuts without tightening (spanner 19, interchangeable head 19, wrench).
Attention!
Orient the shock absorber so that the highest point “A”, Figure 10-4, on the lower spring support cup faces the wheel.
Install the compression stroke buffer, the protective casing assembled with the casing cover, the shock absorber hinge bushing, the lower cushion, the spring and the upper gasket onto the shock absorber.
Insert the shock absorbers into the holes in the rear wheel arches and lower the car until the shock absorber rods appear in the mounting holes to the car body.
Install the shock absorber upper hinge cushion, cushion washer, spring washer onto the shock absorber rod and tighten the nut, securing the shock absorber rod. The tightening torque of the nut is 31…37 N.m (3.1…3.7 kgf.m) (wrench A.57070, wrench type KL-4071-3117 f. “KLANN”, ratchet wrench, torque wrench).
Install the plugs for the shock absorber rod mounting points.
Raise the rear seat backs.
Install the rear wheels.
Place the vehicle on a four-post lift, apply the parking brake, and turn off the ignition.
Push the rear suspension two to three times with your hands.
Finally tighten the nuts of the bolts securing the shock absorber to the rear suspension arms. The tightening torque of the nuts is 70…80 N.m (7.0…8.0 kgf.m) (ring wrench 19, replaceable head 19, torque wrench).
The process of replacing rear shock absorbers and springs is also shown in the video:
Have you ever had to change the rear shock absorbers on a Grant or Kalina yourself?
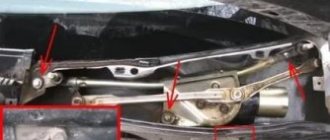
Knock in the front suspension of Lada Kalina
Many motorists dread the day when strange knocking noises appear in the suspension, especially the front suspension, which increases with increasing speed. Of course, there is reason to worry, but at the same time, a car’s suspension is a strong and reliable unit that will clearly withstand a few more kilometers to a service station or garage, where it can be diagnosed.
There are four main reasons for the occurrence of knocks and squeaks in the front suspension of the Lada Kalina. Of the three possible causes of knocking, two of them can be eliminated independently.
So, the first reason why a knocking sound may occur in the suspension is the quality of the road surface. Yes, suspensions, even the most ideal and new ones, can squeak and knock on a bad road, even if this has not been observed before. To test this theory, you should drive onto a well-paved road and drive a few hundred meters; if there is no knocking, everything is fine with the suspension; if not, look at the second reason.
The second reason for the knocking sound, if it is accompanied by vibration in the steering wheel, is a malfunction of the steering, or rather the steering rack, or thinning of the brake discs. If the discs can be replaced independently, then in the case of steering, if you are not a level 80 mechanic, it is better not to flirt with it right away bring the car to the service station.
The third reason is the springs that have lost their tone, as a result of which the car body practically hits the suspension. You should not deal with this problem on your own - it is better to immediately take the car to a service station or service center, since self-repair may seriously damage the front suspension strut.
The fourth reason is a worn-out silent block, which is designed to dampen vibrations and knocks when driving. You can replace the silent block yourself; see the step-by-step replacement of the silent block in the Lada Kalina mono in the next paragraph.
Replacing front suspension silent blocks
Replacing the silent blocks of the Lada Kalina front suspension is necessary after 15-17,000 km, otherwise noises and knocks may be observed when driving. In most cases, the loss of its functions is observed after 15-17,000 km; knocking noises that appeared during this period of kilometers are a problem of faulty silent blocks.
Silent block
The silent block replacement diagram looks like this:
- The machine is placed above a hole or ditch in order to be able to comfortably see the entire suspension. The movers are fixed by the wheels, we put the car itself on the handbrake, then it’s worth checking again that the car is stationary.
- Use a jack to lift the car and remove the front wheel.
- After this, you should fix the bolts of the ball joint with your hands, after which its fastenings are removed.;
- The SPU nut is unscrewed, before this the ball-type support is knocked out into the lower part, after these manipulations the bolts are removed.
- After removing the bolts, the sleeve blocking the lever is pulled out. After pulling out the bushing, the lever is pulled out.
- There are marks on the lever that indicate the direction of installation of new silent blocks; this should be taken into account when installing new blocks.
- The silent blocks must be lubricated at the point of contact with the lever. Using a vice or pliers, apply pressure to the blocks until they fall off.
The diagram is approximate and is for informational purposes to understand how many manipulations need to be made to replace silent blocks.
Let's look at certain problems that Lada Kalina car owners have to face. And you will have to face them, since the long-awaited car will sooner or later require repairs. Very quickly the car owner becomes a buyer of spare parts.
After driving a certain distance, any driver begins to lose patience due to the knocking sound of the original SSAZ suspensions. When choosing between KAYABA or cc20, most people choose the latter option. Having decided on the suspension, you need to select parts that are suitable for replacement in order to achieve reliable, comfortable and, most importantly, quiet operation of the suspension. The cc20 functions much better compared to the SAAZ. They are not affected by severe frost and can withstand our broken roads. The racks have some similarities with foreign ones, but the SS20 allows you to overcome potholes much more smoothly.
Difficulties in replacing struts on Kalina
Despite the fact that car dealerships provide the owner of the Lada Kalina with 3 years of warranty service, a very modest number of drivers are lucky enough to use this service absolutely free of charge. Under the terms of this service, the consumer will encounter so many reservations and “buts” that it will be much easier and cheaper to do the repairs himself or contact a private car service.
In the process of repair and further operation of newly installed shock absorbers and shock absorber struts, the car owner is faced with a new problem. Unworn parts begin to act up even faster than the original spare parts. Some, hoping to no longer encounter such a disadvantage, seek to purchase imported spare parts. Foreign companies produce a wide range of spare parts for shock absorbers and their components. Naturally, they are of better quality than the original Ladovsky ones, and this creates great competition for our AvtoVAZ. It would seem that the problem is solved - you just need to replace domestic worn-out spare parts with imported ones that are more durable and long-lasting.
Lada Kalina is produced from the VAZ plant with shock absorbers that are not suitable for repair. This is due to the fact that they are non-separable. That is, you will have to replace the shock absorber strut complete with a platform for the spring and a bracket. The production of such assembled parts is expensive and unprofitable even for foreign companies.
There is no need to give up and sell the Lada Kalina. There is only one way out of this situation: make the non-separable shock absorbers collapsible. This task can be performed independently, but it is better to turn to a professional, since such work is quite complex and requires certain skills and experience from the master.
You will need to remove both the front and rear shock absorbers from the car. Now they will become collapsible, which already solves half the problem. The second, no less important task is to make these shock absorbers repairable.
For this you will need:
- lathe;
- spot welding.
The upper part of the rack body needs to be sawed off on a lathe. Next, you need to weld a glass with a nut in this place
There is one important rule: when working on a machine and welding, you must not damage the integrity of the parts and maintain all axes. In an asymmetrical body, shock absorbers wear out even faster