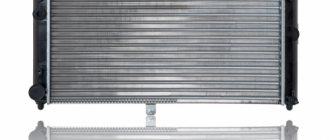
The standard rear beam on a VAZ 2110 car, as a suspension element, is designed to give the vehicle lateral stability and is the means on which all other suspension elements are attached.
How is the rear beam structure constructed?
The metal rear beam, a photo of which is presented on our resource, is structurally represented by 2 longitudinal levers and connection elements, which are connected by welding through reinforcement components. At the rear of the product there are special holders with holes for mounting shock-absorbing elements. There are also flanges with holes for fastening the axles of the rear wheel pair together with the casings of the stern brake systems.
In the front part of the rear axle beam of the VAZ 2110 there are levers with welded bushings, in which rubber metal type hinges are installed by pressing. The rear beam mounts pass through them, which connect the lever part of the stern suspension to stamped-welded type holders. Those, in turn, are mounted with welded bolts to the body side members.
The spring elements of the suspension rest with one plane on the support of the shock absorber strut, and with the other, through a rubber insulating gasket, into the welded support of the hidden arch of the body tail. The shock absorber strut of the rear suspension beam of the VAZ 2110 is a hydraulic telescopic system of a two-way operating principle.
Through fasteners in the form of a bolted connection, it is articulated with the holder of the longitudinal-type stern suspension arm. The upper fastener of the rack is made in the form of a pin connection, while the fastening of the rod to the upper support is made through rubber pads and a support washer.
The factory “tens” rear beam, the dimensions of which differ from the parameters of similar products, has the item number 2110-2914008, while the “eight” beam has the catalog number 2108-2914008-10.
Replacing the rear beam of a VAZ 2110 Photo instructions on how to change the rear beam of a VAZ 2110
Garage or service station
All car owners can be divided into two categories:
- Those who carry out most of the repairs themselves in their garage, and only in emergency cases turn to a car service;
- Those who prefer not to touch anything with their own hands, but completely entrust repairs and maintenance to the masters of service stations.
Each of them is right in their own way. Therefore, we have no right to reproach those who do not want to carry out repairs themselves. After all, garage and professional repair of silent blocks, like other components, has its advantages.
STO has the following advantages:
- A high-quality, responsible car service provides a guarantee for repairs performed;
- In the event of a repeated breakdown covered by the warranty, repairs will be carried out free of charge;
- Professionals are professionals; they have extensive experience and knowledge, which allows them to competently perform their work.
But first you need to find such a car service, which, alas, is not an easy matter. Many provide a guarantee, but when you re-apply, they do everything possible to prove that the breakdown does not comply with the terms of the guarantee. A banal trick.
Repairing your garage will provide the following advantages:
- Significant financial savings, since you only have to spend money on consumables;
- The quality of the work performed by a master is always in doubt if you do not know this person personally. So self-repair may be much better than at a service station;
- You purchase the silent block, and the master only installs it. Why pay money for work that you can do yourself?!;
- Guarantee that a new one will be installed instead of the old silent block. Questionable service stations can easily install an old, more or less usable silent block instead of the one you gave them. You know what the result is.
Here are the benefits you can get:
- Firstly, such a procedure will cost much less than at a car dealership.
- Secondly, it is not known how well the master will complete everything. After all, it’s no secret that very often they do everything badly, so that they will soon be turned to for help again. Of course, there are also conscientious car mechanics, but this is rare.
- In any case, you will need to purchase a silent block yourself and give it to the master. At the car dealership he will only install it. That is, payment will only be made for work that you can do yourself.
- And finally, no one knows whether the master will install a new silent block or will make do with some old one that still functions.
How to replace silent blocks without removing the beam
It is not always necessary to replace silent blocks. Let's consider several cases in which their replacement is simply necessary:
- The tires “squeak” while driving. It’s just that if the silent blocks do not perform their function well, then the rubber cannot move as quickly as before, which is why extraneous sounds appear.
- Some tapping can be heard from the rear of the car.
- The car is difficult to control as it has lost stability at the rear.
- The rear wheels wear unevenly, faster than the front ones. It is often observed that the rear tire "deflates" on its own, even though it has not been punctured.
If you do not replace the rear silent block in a timely manner, the problem may grow, which will lead to emergency situations.
How to choose silent blocks
You need to know the following:
- For VAZ 2110 and higher, silent blocks with catalog number are required - 2110-2914054. They have a specific outer diameter that is suitable specifically for these vehicles. If you buy a silent block for the “Nine” and try to install it on the “ten”, then nothing will work.
- You also need to pay attention to its quality. Having bought a low-quality product, it is not a fact that it will last long. It must be made of durable material that can withstand even the highest temperatures.
What tools will you need?
Here you can’t get by with just a hammer, a jack, and a 19mm wrench. In addition, the following tools may also be useful:
- wooden block;
- a special tool that allows you to “press in” the silent block (that is, install it so that it is not movable).
The silent block is located at the bottom of the car. Even for the first time, you can easily replace the silent blocks if you follow these instructions:
- Raise the car with a jack.
- The beam does not need to be completely removed. After all, if you remove it, you will also need to remove the brake hoses. And this will take a lot of time. But it is better to unhook the brake sorcerer, since it may accidentally be broken during operation. And besides, it can interfere, since its dimensions are quite large. To remove it, you need to pull it, but this must be done as carefully as possible. Otherwise, you may “rip” it out, making it difficult to put back in.
- You can unscrew the nut using a 19mm wrench. This is very difficult to do, so it’s better to call someone else to help. But if there is no assistant, then you will have to do everything yourself. To do this you need to press as hard as possible.
- Using a crowbar, you can lower the beam down, but do not remove it.
- You need to cut off the elastic band that is located on the beam, as it will also interfere. This should only be done if the rubber band is already old and not suitable for further use. Otherwise, you can not change it, but simply remove it. To make it easier to remove, you can drill a hole in it.
- You need to lubricate the silent block and press it back.
- Now insert the brake sorcerer back and screw the beam onto the bolt.
If during the operation of the vehicle the rear suspension beam of the VAZ 2110 bursts, then in the future it will need to be replaced. Of course, as a temporary aid, it can be restored by welding. But this is done solely in order to get to the maintenance site where it needs to be replaced.
Operating a vehicle with a welded beam rear suspension of the VAZ 2110 not only creates an emergency situation on the road, but also leads to disruption of vehicle stability and accelerated wear of the vehicle tires. The market value of the rear beam is quite high, but its replacement in this case is simply necessary.
1. We install the vehicle on an electric lift or a special repair pit.2. We remove the brake pads from the rear wheels and release the hand brake cables from the rear beam and holders.3. Remove the brake pipes from the rear cylinders, and the hoses from the rear beam.4.
We dismantle the fasteners of the drive-type pressure regulator from the stern beam.5. Remove the 4 bolts securing the hub axle to the aft beam using a wrench set to “17”.6. We dismantle the hub axle together with the brake mechanism casing.7. Having removed the fastening bracket, we dismantle the brake system pipe.8.
If the need arises, disconnect the hub axle and the brake mechanism housing, while releasing 2 screws with a curly screwdriver.9. We detach the lower fasteners of the shock absorbers from the rear beam.10. Remove the fasteners of the rear suspension beam to the holders.11. Place the rear beam on the ground.12.
Having removed the fasteners, we dismantle the product.13. Remove the fasteners of the holder to the bodywork and dismantle the bracket.14. Installation of the rear suspension component is carried out in reverse order.15. We complete the fastening of the rear beam and the lower part of the shock absorber struts with the vehicle installed on the platform.16. We finish the job by bleeding the brake system.
On the “ten”, specialized car stores always sell a rear beam stabilizer, which is used by specialists as a tuning component for this model. This element is presented in the form of a steel rod with fasteners to the aft beam and is similar in appearance to the cross-section stabilizer bar installed on the front suspension.
The fundamental difference is that when installing the system on the front wheels and overcoming obstacles with the rear wheelset, the stabilizer creates a torsional moment, and the rear beam stabilizer gives the aft suspension more rigidity, while it will create less torsional moment.
• reduces the roll angle of the vehicle body when turning; • increases the speed of overcoming turning figures; • improves the interaction of the rear suspension with the steering mechanism.
A product such as the silent block of the rear beam must be replaced provided that certain knocking or creaking of rubber products that are equipped with components of the running mechanism are heard in the area of the stern suspension. When making forward motion or performing turning maneuvers, the vehicle is not stable enough in the stern area. In this case, uneven wear of the tread on the rear wheels is observed.
Replacement methods
We will tell you about two main ways to replace silent blocks on the rear beam of the “tens” , which can easily be used in a garage.
Which method to choose is up to you to decide. But before that, familiarize yourself with them in more detail.
First way
The method is not particularly difficult if you strictly follow the instructions. To begin with, we note that the silent block is located at the bottom of the car. Therefore, you will need a jack or inspection hole.
Defects
- Raise the car with a jack or drive it into a viewing hole. The second option is more convenient, since this way the view of the bottom will be better. And it’s much more convenient to work standing up than lying under a car.
- It is not necessary to completely remove the rear beam. When dismantling it, you will need to remove additional brake hoses, which takes a lot of time.
- It is better to disconnect the sorcerer so as not to damage it during the repair process. But shoot carefully.
- Now remove the nut with a 19mm wrench. You will have to make a serious effort, which is why some car owners call their comrades for help. If there are no assistants, pre-treat the thread with the almighty WD40 or plain water. This will allow the fastener to oxidize. Then clean it with a wire brush, which will make it easier to remove the element.
- Using a crowbar, lower the beam down a little, but do not remove it completely.
- There is an elastic band on the beam that should be cut off, otherwise it will interfere with the work process. Just keep in mind that if the rubber band is old, feel free to remove it. It is better to dismantle a good product by drilling a small hole.
- Now the silent block is removed.
- The new part is generously lubricated and pressed into its rightful place. Just do not use grease for lubrication, as this substance corrodes the part. The best lubrication option is regular soap or any available detergent.
- Return the sorcerer to its place and tighten the beam.
Replacing the rear beam of a VAZ 2110 with a beam from Priora
What is the difference between the rear beam of the Priora and the beam of the VAZ 2110 ? A torsion bar is welded into the beam from Priora for reinforcement. Installation of torsion bar.
Stories from our readers
“Fucking basin. "
Hi all! My name is Mikhail, now I’ll tell you a story about how I managed to exchange my two-wheeler for a 2010 Camry. It all started with the fact that I began to be wildly irritated by the breakdowns of the two-wheeler, it seemed like nothing serious was broken, but damn it, there were so many little things that really started to irritate me. This is where the idea arose that it was time to change the car to a foreign car. The choice fell on the melting Camry of the tenth years.
Yes, I had matured morally, but financially I just couldn’t handle it. I’ll say right away that I am against loans and taking a car, especially not a new one, on credit is unreasonable. My salary is 24k a month, so collecting 600-700 thousand is almost impossible for me. I started looking for different ways to make money on the Internet. You can’t imagine how many scams there are, what I haven’t tried: sports betting, network marketing, and even the volcano casino, where I successfully lost about 10 thousand ((The only direction in which it seemed to me that I could make money was currency trading on the stock exchange, they call it Forex. But when I started delving into it, I realized that it was very difficult for me. I continued to dig further and came across binary options. The essence is the same as in Forex, but it’s much easier to understand. I started reading forums, studying trading strategies. I tried it on a demo account, then opened a real account. To be honest, I didn’t manage to start earning money right away, until I understood all the mechanics of options, I lost about 3,000 rubles, but as it turned out, it was a precious experience. Now I earn 5-7 thousand rubles a day. I managed to get the car buy after half a year, but in my opinion this is a good result, and it’s not about the car, my life has changed, I naturally quit my job, I have more free time for myself and my family. You’ll laugh, but I work directly on the phone)) If If you want to change your life like me, then here’s what I advise you to do right now: 1. Register on the site 2. Practice on a Demo account (it’s free). 3. As soon as you get something on the Demo account, top up your REAL ACCOUNT and go to REAL MONEY! I also advise you to download the application to your phone, it’s much more convenient to work from your phone. Download here.
To replace a beam with your own hands you will need:
- Set of wrenches with all heads and sockets
- Special wrench for unscrewing brake pipes
- VD-40
- A piece of pipe for keys
To conveniently unscrew the nuts securing the beam to the body, you need to cut the spanner to “19”. Before starting work, first remove all the nuts and brake pipes in the pit. It is also advisable to remove the “Sorcerer” rod; it is mounted on a rod, at the end there is a clamp in the form of a cut washer.
Now we jack up the car, remove the wheels, drums, and brakes so that only one hub remains.
We unscrew the 4 step bolts with an open-end wrench set to “17”.
We unscrew the brake pipes from the hoses at any connection. This should be done somewhere easier, because... With the beam removed, it’s easier to unscrew the remaining tubes, or it’s even possible to replace these short ends. Otherwise, you can change the entire circuit.
We unscrew the beam from the racks and from the body.
We knock down the hubs and unscrew the hoses, tubes, and handbrake mounting brackets.
If you bought a Priora beam without silent blocks, then we press in the polyurethane using a press-in puller (long bolt, stops, VD-40).
Don't forget to stretch the hubs.
We put everything back together in reverse order. We check the connections of the tubes and hoses, tighten the nuts, bleed the brakes and rejoice.
Conclusion
Installing a beam from Priora on a VAZ 2110 made it possible to improve the car’s handling, and the slips and unnecessary squeaks disappeared.
Now I began to take turns more confidently. To bring the top ten completely closer to the Priora, you need to replace the front suspension, VUT, adsorber, mirrors or interior.
Replacement of silent blocks of rear beam 2108-15,2110-12, Priora, Kalina
Now disconnect the thin brake hoses leading to the brake cylinders located at the rear of the car. Disconnect the brake pipes attached to the support. Today, it will be useful to disconnect the flexible lever from the beam, which is located on the drive responsible for regulating the pressure.
Using a size 17 wrench, remove the 4 mounting bolts holding the hub axle together with the rear suspension support. Remove the axle itself together with the brake mechanism shield and, if necessary, separate them by unscrewing the two fastening screws using a Phillips screwdriver. Bend the bracket and remove the brake pipe.
From the beam you need to disconnect the lower ends of the shock absorbers and the nuts attaching the beams to the brackets. Then you need to remove the bolts from the beam and carefully remove it. Using a size 17 socket, remove the 3 nuts securing the bracket to the body.
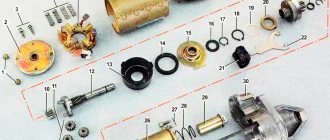
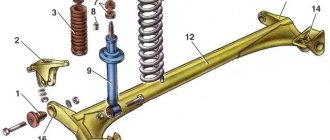
Rear suspension structure: 1 — rubber-metal hinge; 2 — suspension arm mounting bracket; 3 — shock absorber casing; 4 — compression stroke buffer; 5 — casing cover; 6 — support washer; 7 — shock absorber cushion; 8 — spacer sleeve; 9 — shock absorber; 10 - insulating gasket; 11 — rear suspension spring; 12 — lever connector; 13 — rear suspension beam arm; 14 — shock absorber mounting bracket; 15 - flange; 16 — lever bushing
If squeaks and extraneous noises appear in the car, you need to replace worn parts. This will help avoid more significant breakdowns that will lead to complex and expensive repairs. The first place you need to pay attention when checking the performance of beams is silent blocks. Their replacement is done using a special puller made using several sections of pipes where washers are welded.
Remove the raised wheel and check how loose the silent blocks are in the beam arm. If they are loose, they need to be repaired. Unscrew the upper support nut and, applying short blows to the bipod, unscrew the wheel. The blows must be applied until the support pops out. Then unscrew the long bolt, which is located at the top of the lever, and begin a specific inspection of the silent blocks of the front beam.
Read also: Replacement of automatic transmission of Suzuki Grand Vitara 2.0
“Fucking basin. "
Hi all! My name is Mikhail, now I’ll tell you a story about how I managed to exchange my two-wheeler for a 2010 Camry. It all started with the fact that I began to be wildly irritated by the breakdowns of the two-wheeler, it seemed like nothing serious was broken, but damn it, there were so many little things that really started to irritate me. This is where the idea arose that it was time to change the car to a foreign car. The choice fell on the melting Camry of the tenth years.
Rear beam and VAZ 2110
The beams, both rear and front, are important links in the car. The rear beam of the VAZ 2110 is made of two longitudinally located levers connected to each other. Fastening is made using amplifiers that were welded to each other.
Beam structure
On the inside, brackets with special holes necessary for installing shock absorbers are attached to the suspension arms. There are also flanges located there, bolted to the axle of the rear wheels and shields located on the brake mechanism. Bushings are attached to the suspension arms on the front side. They are inserted into hinges made of a special rubber-metal material.
Bolts pass through them, connecting the suspension arms together with the stamped-welded brackets. They, in turn, are attached with bolts welded into the side member of the car. The springs of the rear beam of the VAZ 2110 are located in such a way that the first end rests against the recess of the shock absorber, and the second passes through a special gasket directly into the support area attached to the underside of the arch on the car body.
The gasket acts as an insulator and is made of rubber. The shock absorber mounted on the rear suspension is double-acting. It is attached with short bolts directly to a bracket located on the trailing arm in the rear suspension area. In the upper part, fastening is done using the rod method. The rod is fixed in the upper support directly on the suspension spring. The shock absorber is fixed through a protective rubber pad and a support washer.
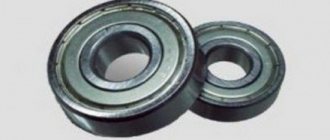
A double row thrust bearing is located in the middle of the hub. Its structure is very similar to the bearing located in the hub of the front wheels, but it is much smaller in size.
Removing the rear block
Replacement of the rear beam is carried out after transporting the car to an inspection ditch or lift. To begin, remove the brake pads located at the rear of the VAZ 2110. Disconnect the steel ropes that secure the parking brake to the underside of the beam attached to the rear of the bracket.
Replacing silent blocks
If squeaks and extraneous noises occur in the car, it is necessary to replace worn parts. This will help avoid more significant breakdowns that will lead to complex and expensive repairs. The first thing you need to pay attention to when checking the performance of beams is the silent blocks. They are replaced using a special puller made using several sections of pipes to which washers are welded.
If you do not want to spend extra time on manufacturing, purchase the device at any specialized store. The rear wheels must be secured using shoes specially adapted for this procedure or ordinary bricks. This must be done because the car, raised with a jack, can jump off it and crush you.
Remove the raised wheel and check how loose the silent blocks are in the beam arm. If they are loose, repairs will need to be made. Unscrew the upper support nut and, applying short blows to the bipod, turn out the wheel. The blows must be applied until the support pops out. Then unscrew the long bolt, which is located at the top of the lever, and proceed to directly inspect the silent blocks of the front beam.
They must be knocked out with strong blows of the hammer on the chisel. They pop out of the grooves with ease after the first successful hit. In order to obtain greater sliding ability, first clean the old socket. After this, all parts are moistened with a soap solution, and the new silent block is pressed into place of the old one using the pressing method. Please note: after you press in, there should be no play at all, otherwise the repair of the front beam will be in vain.
How to remove the rear beam of a VAZ-2110
We carry out the work on an inspection ditch or a lift.
Remove the rear brake pads and disconnect the parking brake cables from the rear suspension beam and brackets.
Disconnect the brake pipes from the rear brake cylinders, and the rear brake hoses from the beam.
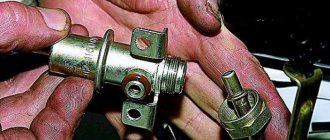
We disconnect the elastic lever of the pressure regulator drive from the beam.
Using a 17mm wrench, unscrew the four bolts securing the hub axle to the rear suspension beam.
Remove the hub axle along with the brake shield.
Having unbent the fastening bracket, remove the brake pipe.
If necessary, separate the hub axle and the brake shield by unscrewing two screws with a Phillips screwdriver
Brake shield and hub with axle
We disconnect the lower ends of the shock absorbers from the beam (see Removing the shock absorber and spring).
We unscrew the nuts of the bolts securing the beam to the brackets (see Replacing silent blocks of the rear suspension)
After removing the bolts, remove it.
Using a 17mm socket, unscrew the three nuts securing the bracket to the body and remove it
Install the beam in reverse order.
We tighten the bolts securing the beam and the lower ends of the shock absorbers when the car is on its wheels.
After this, we bleed the hydraulic brakes.
How to change the rear suspension beam on a VAZ 2110, 2111, 2112.
An article about how to independently replace the rear suspension beam on LADA cars of the tenth family.
Attention: Replacing worn rubber-to-metal hinges on the rear suspension beam arms requires special skills and tools. Therefore, it is recommended to change them at a car repair shop.
Withdrawal procedure
2. Disconnect the parking brake cables from the equalizer. Remove the shells of both cables from the bracket on the body, bend two brackets securing each cable to the body and remove both cables from the rear suspension beam mounting brackets for easy access to the beam mounting bolt
3. Disconnect the elastic arm of the pressure regulator drive from the bracket on the rear suspension beam.
4. Disconnect the brake hoses on both sides and plug the holes from them.
5. On both sides, unscrew the nut of the bolts securing the beam to the brackets. We knock out the bolts and remove the beam, rolling it out on wheels from under the car.
Recommendation: The manufacturer recommends removing the beam together with the brackets by unscrewing three nuts securing them. However, after prolonged use, rusted studs may break. Therefore, it is better to remove the beam by disconnecting it from the brackets that remain on the body.
6. The beam is installed in the reverse order. The final tightening of the nuts of the beam mounting bolts is carried out when the machine is standing on the ground. After installing the beam in place, you need to bleed the brake system and adjust the parking brake.
Video on the topic:
Grant rear shock absorber bushing
All modern cars have a large number of silent blocks in their suspension design. Their main purpose is to dampen the rigidity of connecting various parts to each other, protecting them from direct contact and destruction. All VAZ-2110 rubber silent blocks operate on the principles of torsion. They reduce vibration that is transmitted through the hinge during suspension operation.
Why do the rear beam silent blocks fail?
During operation, the rubber part peels off from the metal bushing.
The rubber of the parts itself, which is cast with metal bushings, must withstand enormous loads, but time destroys the rubber.
In addition, if the parts are installed skewed, or the quality of the ohms turns out to be low, which often happens, then the silent blocks can quickly fail. In addition, the following factors affect the durability of parts:
- The main factor that affects the service life of obviously high-quality silent blocks is driving style . If you do not pay attention to holes and other irregularities, then they will be the first to suffer in the suspension.
- Wheel alignment also affects the life of the hinges . If this is not done periodically, the wheel alignment angles will change, which will lead to incorrect operation of the suspension.
- Rubber is not very durable, especially if oil and other technical liquids get on its surface . In these cases, the surface of the silent compounds becomes covered with cracks, which can lead to ruptures.
In order to avoid problems and expensive suspension repairs, it is recommended to inspect the condition of the silent blocks at least once every six months. This will help to identify and eliminate problems in a timely manner.
What to consider when replacing
The silent blocks of the VAZ-2108 and VAZ-2110 visually seem exactly the same, but in fact their mounting dimensions are different.