The rear wheel bearing is one of the weakest links in almost all domestic cars.
And the point here is not the low quality of components (although this aspect also plays an important role), but the terrible roads of the country.
Therefore, a good driver must promptly replace the faulty element. Otherwise, this may not only lead to more serious costs in the future, but also to an accident. Let's look at the main nuances of this work.
Symptoms of a problem
So, replacing the rear wheel bearing of a VAZ 2109 may be necessary:
- when noise appears (usually manifested in the form of a strong hum) or knocking in the rear of your car;
- the appearance of play in the bearing.
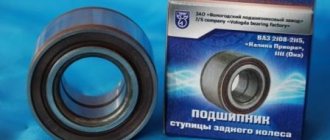
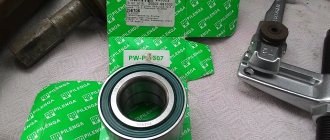
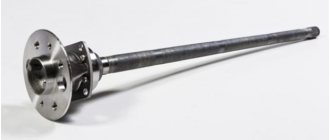
Rear wheel hub VAZ 2109
.
If you have one of the above symptoms, you need to lift the rear wheels one by one and make sure that there is a malfunction or not:
- Spin each of the suspended wheels thoroughly and listen to whether any extraneous noise appears. The presence of a clear hum indicates problems with the bearing;
- be sure to check for play (done with the wheel hanging). To do this, grab the top of the wheel and pull it away from you and towards you. If the bearing is intact, then the wheel should not play. Otherwise, you need to prepare yourself for serious work.
There are situations when there is no time for repairs. Try to lightly tighten the hub nut. Such a trick sometimes helps to remove the backlash, but not for long. In the future you will still have to make a replacement.
Important points
- The wheel nut on the VAZ 2109 is tightened very tightly, and in addition, it is often covered with rust. It may take a huge amount of effort to move it. In such a situation, WD-40 liquid can help. If you don’t have this liquid on hand, you can generously pour oil on the nut and wait 10 minutes.
- Not every car owner has a wheel bearing puller at hand. In this case, to remove the bearing, you can use a hammer and a piece of steel pipe of suitable diameter (about 4.5 cm). The main thing is not to damage the inner surface of the hub with the pipe. If scratches and gouges remain there after pressing out, the new bearing will quickly fail.
- When reassembling the hub, special attention should be paid to tightening the hub nut. If it is loosely tightened, play will occur, which will again lead to bearing wear. Therefore, with a 30 socket head, you should use the longest wrench so that the force when tightening the hub nut is maximum.
This is interesting: Lada Granta will receive an updated engine and side airbags
Replacing wheel bearings is a procedure that every owner of a “nine” will sooner or later encounter. The only question is whether he will be ready for this. If the driver prefers to repair his car himself, then it makes sense to purchase a puller for hubs and bearings in the store. This simple tool will greatly facilitate the work and also save the car owner a lot of time and nerves.
Copywriter with five years of experience.
Why is inaction dangerous?
It is better not to ignore a malfunction of the rear wheel bearing for several reasons:
- firstly, in the presence of noise and hum, driving a car is not nearly as pleasant as it might seem at first glance. To get rid of unnecessary sounds, car enthusiasts are ready to endure any costs;
- secondly, ignoring a bearing failure may lead to the need to replace the entire strut (which, naturally, entails more serious costs);
- thirdly, malfunctions of the chassis system are dangerous due to the unpredictability of the car on the road and an increase in the likelihood of an accident. Therefore, it is highly undesirable to joke with this.
Causes of rear wheel bearing failure
- The bearing failed, having completely exhausted its service life (after which so-called metal fatigue occurred).
- The bearing collapsed due to sand and dirt entering it, which began to act as an abrasive material, which led to partial or complete abrasion of the bearing parts.
- One of the bearing rings cracked due to a strong impact (which occurs when the wheel hits a deep pothole at high speed).
- The nut on the hub is loosely tightened. This leads to the occurrence of play, which gradually destroys the bearing elements.
This is interesting: Mid-engine Maserati will appear in 2015
What brand should the bearing be?
In order for the replacement of rear wheel bearings on the VAZ 2109 to be as durable as possible, it is necessary to choose the right part.
So, the design features of the part are as follows: the bearings have a closed shape (double-sided seal). Type - angular contact, ball, double row.
You can also find a roller version on sale - 537906. Its features include a lower rotation speed and a higher load capacity.
Bearings are produced at four factories - at the Saratov Bearing Plant (SPZ), in Vologda (23 gas processing plants), Samara (SPZ-4), Kursk (20 gas processing plants). By the way, bearings are no longer produced in Kursk.
As for quality, the best are the first two options. As for Samara, bearings are produced there for those who like to save money (that is, you should not expect high quality).
The nominal parameters of the rear hub bearing are as follows: diameter (inner - 30 mm, outer - 60 mm), width - 37 mm, weight - 400 grams, number of balls - 28 pieces.
Required Tools
To complete the work, nothing unusual is required - most of the tools are already in the car enthusiast’s garage:
- pliers (with their help it will be necessary to dismantle the retaining rings);
- socket wrench. If you have the whole set, great, but for this work, number “30” is especially necessary;
- spanner wrench Again, you can use a set, but one “12” key is enough for the job. Without it, it will not be possible to remove the guide pins from the brake drum;
- special puller (necessary for pressing out bearings);
- Additional tools that may be useful are a hammer, a small wooden block, a pry bar and a chisel.
Replacing the rear wheel bearing of a VAZ 2108 along with the hub
Sometimes there is a situation when a new ball bearing fits into place too easily. If there is at least some play, this means that the wear is too large and the dimensions of the diameter of the inner ring of the hub are already beyond the permissible limits. Even a serviceable element will give a runout in this state of affairs. If this is the case, replace the unit completely. If the thread is damaged, replacement is also advisable.
The process is exactly the same as mentioned above:
- Remove the wheel;
- We dismantle the brake drum;
- Unscrew the fastening nut;
- Remove the hub completely;
- There is simply no need to press out the bearing - just mount the new part in the reverse order of the first three points. The main thing is to lubricate the new elements and tighten the bolts according to the recommendations in the instruction manual.
Bearing replacement instructions
To quickly and accurately complete the job, follow these recommendations:
First, remove the protective cap and unlock the rear wheel hub (this can be done with a hammer and chisel).
Loosen the bolts on the hub and wheel. Please note that the tightening torque of the hub nut is very serious, so it would be useful to increase the “shoulder” of the wrench with an additional pipe.
Put the car in first gear and secure the car (this can be done by installing special “shoes” under the front wheels). Do not use the handbrake.
Finally unscrew all the bolts and remove the rear wheel.
Unscrew the guide pins.
And remove the brake drum.
If it cannot be removed, you can use a block (as a spacer) and a hammer. By tapping on it, or turning the drum, you can easily blow it up from its “home” place.
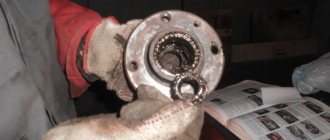
Now move on to the main part. Completely unscrew the hub nut and remove it from the axle.
If you have a puller, use it.
If not, then you can use a simpler method.
Or use a pry bar.
Put the wheel back in place, screw it to the hub with bolts (you don’t have to tighten it all the way). After this, sharply move it towards you (the hub should come off).
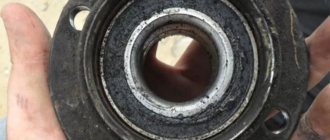
Please note that this work does not always go smoothly. In particular, the inner ring of the bearing may remain on the journal. If you are unlucky, you will have to remove it with a chisel and a pry bar.
Or you can use a puller.
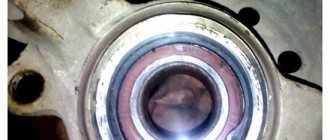
The bearing in the hub will be fixed by a special retaining ring - remove it. To do this, you can use special pliers or a regular screwdriver.
Now use a puller to press the bearing out of the hub. If you don’t have a puller at hand, then you need to find a pipe with a suitable diameter, place it and beat until “victorious”.
Or so.
Clean the inside of the hub and lubricate it well.
Press in the new bearing. There are several options here - do the work using a puller, a vice, or a hammer and a wooden or metal spacer, as in our case.
We return the locking ring to its place using a screwdriver and pliers.
We install the hub on the axle. If you can’t get the part into place manually, you can carefully tap the bearing from the inside.
Sequencing
- The hub nut is loosened using a 30mm socket and a wrench. After this, use a 22mm socket to slightly loosen the mounting bolts on the wheel.
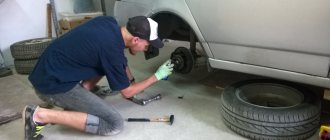
- Wheel chocks are installed under the front wheels, and the car is in first gear. After this, the rear wheel with the faulty bearing is jacked up and removed.
Brake drum cover visible - Using a 12-size open-end wrench, unscrew the 2 studs on the brake drum; after removing them, use a 13-size wrench to remove the drum itself.
Removable using a 12mm socket - After removing the drum, access to the hub nut opens. She gets out.
- Now the hub itself is removed using a puller.
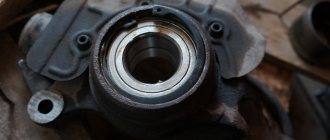
Removable using a puller - There is a retaining ring inside the hub. It is removed using pliers.
- After removing the rings, access to the faulty bearing is available. It is removed using a puller.
A puller or pipe is used for this. - Using the same puller, a new wheel bearing is pressed into its place, after which the hub is reassembled and the wheel is installed in place.
The retaining ring is visible above the orange bearing.