How to replace the alternator belt on a VAZ 2107
The quality of such a Soviet, and now Russian car, as the VAZ 2107 has been proven over the years. Over time, during the operation of any car, including foreign cars, the need arises to replace some important wearable elements. These engine elements include the alternator belt of the VAZ 2107 car. How to determine that the VAZ 2107 alternator belt needs to be replaced, what is required to carry out such a procedure, as well as the purpose of the device, we will find out in the material.
how to install (photo and video)
The gas distribution mechanism and its drive of the seven engine produced by the Volzhsky Automobile Plant remained the same - chain. Extraction and excessive wear of the timing chain on the VAZ 2107 power unit by the injector-type power supply system leads to:
- difficulty starting the engine;
- unstable operation in all modes, especially at idle;
- a sharp increase in fuel consumption;
- formation of carbon deposits on valve seats;
- Damage to the injection control system sensors and catalytic converter may occur.
In order to avoid the negative consequences of weakening or stretching the chain drive of the VAZ 2107 car engine, it is necessary to carry out routine maintenance in a timely manner. The list of maintenance operations for the power unit with the injector power system is determined by the service book. The condition of the timing chain and the gaps between the camshaft cams and valve levers is monitored every 30 thousand km.
On warranty VAZ 2107 with an injector-type power system, such work is best carried out at an authorized auto repair center. If malfunctions occur due to the fault of the car plant, they will be eliminated at the expense of the manufacturer. At the end of this period, maintenance of the timing belt and other vehicle systems can be performed independently.
Preparation for service operations
Control of the tension of the chain drive of the gas distribution mechanism begins on an engine with a power system such as an injector or carburetor, similar to each other. The operation is performed in the sequence established by the manufacturer:
We place the car on a flat area with a hard surface and fix its spontaneous movement by installing chocks under the wheels and applying the parking brake. Set the gear shift lever to the neutral position. Remove the cover from the cylinder head by unscrewing all the nuts along its contour using a tubular wrench. It is recommended to replace the old gasket; the use of sealants is not allowed. Using a key set to “38”, we turn the crankshaft of the VAZ 2107 engine in order to align the marks on the moving parts and the stationary ones
Care must be taken when performing this action, and the locations of the control points should be illuminated with a flashlight or carrying device. We combine two marks: the first is on the generator drive belt pulley with a special protrusion on the cover body, the second is on the upper sprocket of the gas distribution mechanism of the VAZ 2107 power unit with an injector power system.
With this relative arrangement of parts, the piston of the fourth cylinder is at the dead center at the top. Now you can begin performing service work on engine systems, in particular, timing belt and some others.
Performing powertrain maintenance
A number of operations and repairs are carried out on a vehicle prepared in this way, including the following:
- Tensioning the timing chain, as well as replacing its components and parts, both on power units with a carburetor-type and injector-type power supply system.
- Adjustment of the valve, or rather, the thermal gap between the camshaft cams and the rocker arm. In this case, marks on the timing parts are placed at the beginning of the procedure and at the end of it.
- When setting up the ignition system of the power unit, in this case, to achieve the best result, it is recommended to use a special device - a tester.
VAZ 2107 cars with injection engines are still produced at enterprises in our country. They are highly reliable and economical at an affordable price, which is what determines their high popularity among consumers.
The need to replace the belt
Initially, it is important to note that the generator and its drive on a VAZ 2107 car, both injection and carburetor, are absolutely similar. The only difference between an injector and a carburetor is that the injector is equipped with a crankshaft position sensor. When it is necessary to replace the alternator belt on an injection-type VAZ 2107, this sensor must be removed.
During the operation of the VAZ-2107 car, the part in question wears out. The need to replace an element can be determined by the following signs:
- the appearance of cracks;
- whistling when starting the engine, or when sharply pressing the gas pedal, or after driving through a puddle;
- disheveled;
- sagging.
It is important to know! If the alternator belt breaks on a VAZ 21074, the engine will quickly heat up, which can lead to boiling. The battery remains without recharging, so after a short period of time it will run out.
The device in question, unless of course it is a defect, has a certain resource during normal operation of the vehicle. This resource is usually 50-60 thousand kilometers, after which the belt should in any case be changed. How to do this not only correctly, but also quickly, we will consider in the material.
Instructions for replacing the alternator belt
You must initially purchase a new item. Which belt is best to install on a VAZ 2107 depends on the amount of finances available to the owner of the “Seven”. Experts recommend not saving on such an important element and purchasing a Bosch brand part. Products of this brand are of good quality, which is actually necessary to achieve a long service life of the main components of the car.
The belt cannot be repaired, so at the first sign of wear, it must be replaced.
At the next stage, you will need to make sure that you have the necessary list of materials: open-end wrenches for “17” and “19”, a pry bar and a screwdriver. Only after this we begin to replace the product:
- First, loosen the nut that secures the generator itself to the adjustment bar.
- After this, you need to use a pry bar to press the generator to the motor. On injection "sevens" it is necessary to remove the crankshaft sensor.
- Now we remove the old element and put a new one in its place.
- To tighten the belt, you will need to use a pry bar to move the generator. After the device is in place, you can fix the nut.
- If you tighten the belt, then accelerated wear of the pump bearings and the generator itself will begin, which will have a bad effect on the service life of these devices. Also, the belt itself can break very quickly.
After completing the replacement procedure, it is imperative to tension the alternator belt. We will learn further how to tighten the alternator belt on a VAZ 2107 car.
In order to perform tension, you will need to check as follows:
- To begin, take a screwdriver in your hand and then press on the gap between the pulleys, as shown in the figure above.
- After this you will need to pick up a ruler. If the deflection does not go beyond the limits, then the work can be considered completed. How to tighten the belt if necessary?
- To do this, you need to unscrew the nut securing the generator, and then move it in one direction or the other, depending on what you need to do: tighten or loosen the tension. We tighten or loosen the device, after which the tensioner nut is fixed.
Changing the strap on the “seven” is not particularly difficult. In this case, there is no need to contact specialists at a service station, because the work can be done independently.
To check the length of an element it is not necessary to remove it. Periodically during vehicle operation it is necessary to check the belt tension.
If the size of the element in question meets the standards, then it is possible not to replace it until its service life has come. Only with timely replacement of the product can unforeseen consequences in the form of element breakage on the road be avoided.
Replacing the VAZ 2107 timing chain: basic repair methods
This is the element
When operating a vehicle, the timing chain is stretched. This is due to an increase in the pitch between the links. The elongation of the chain on the VAZ 2107 must be controlled by checking the possibility of its tension
In this case, auto mechanics advise paying attention to the phases. If the mark of the timing gear sprocket coincides with the mark of the bearing housing, when this indicator on the crankshaft pulley is located 10 mm below the mark on the front cover of the engine, you will need to change the timing chain yourself
This work is also carried out when the bushings are chipped and there are cracks in the brushes. Replacement of the VAZ 2107 chain tensioner shoe is carried out when defects in this part are identified.
What is the risk of a circuit malfunction?
Due to the increase in the chain pitch of the VAZ 2107 engine, the injector operates unevenly at idle. This is explained by the fact that each link wears out differently. In some cases, the guide rail, stop pin, or corner of the shoe may break off. Replacing the VAZ 2107 timing chain is carried out taking into account these nuances.
If you jump several teeth, the car engine may stall or fail. To prevent such consequences, auto mechanics recommend adjusting the tensioner more carefully and more often. Sometimes the chain tensioner shoe is replaced.
Before installing the VAZ 2107 timing chain with your own hands, it is recommended to carefully inspect it. Links and bushings must be hardened. If raw metal is detected, this spare part will not be installed. You can check the tensioner by hand. If the deflection is 7-10 mm, it is considered new and suitable for use. The original products of this type are the products of the manufacturer Sachs.
Replacing the VAZ 2107 timing chain tensioner is done with your own hands, taking into account the length of the main part. If necessary, install the tensioner shoe. When choosing this product, you should remember the following nuance:
- 2101 and 21011 have 114 links;
- 2103 and 2106 have 116 links.
Chains are distinguished as follows: when they are stretched, the outermost links on the right and left are studied. If the links are located equally, outside or inside, then the chain consists of 116 elements. With different links, their number is 114.
Basic methods for replacing parts
Experienced auto mechanics know how to install a chain on a VAZ 2107. They distinguish 2 methods.
- Incorrect and unreliable, but fast. This method does not require the car owner to have special knowledge about the operation of engines. It provides for independent dismantling of the valve cover. To do this, you will need to disconnect the circuit installed on the motor. Do the same with a new part. Next, the two chains are connected into one. With a crooked starter, the new part is rotated until it passes completely through the engine. They are then connected and tightened. Please note that the lower sprocket is not replaceable. It is also impossible to replace the VAZ 2107 chain tensioner shoe.
- Correct. This method involves partial disassembly of the engine, including the removal of the front shield, radiator and other parts. In this case, you can install a new last sprocket. It is also possible to replace the VAZ chain tensioner shoe.
To install the VAZ 2107 timing chain, you will need the following equipment: keys, vice, pencil (chalk), ruler.
The master removes the chain
The first step of the second method is to drain the coolant from the system. It is recommended to remove the hood cover. After loosening and removing the generator belt from the engine, the cylinder head cover is dismantled. If necessary, the tensioner is replaced. To do this, you will need to align the marks on the crankshaft and the camshaft sprocket. Next, the nut is unscrewed and the pulley is removed. In this case, you will need to dismantle the radiator. If you bend the lock washer, you can unscrew and remove the sprocket from the camshaft.
Replacing the chain involves dismantling the front motor shield. You need to remember the 3 bolts from the bottom, they secure the pallet. After removing the cover, it is recommended to mark the position of the sprocket of the additional elements. This step eliminates serious ignition adjustment, which is performed after installing a new circuit on the VAZ 2107.
When installing new sprockets, the old ones must be removed. Replacing the VAZ chain tensioner shoe involves similar actions
When purchasing this part, great attention should be paid to its quality.
Replacing the timing chain of a VAZ 2107 requires installation work, and the location of the marks is taken into account. If you do not pay attention to them, the piston will meet the valves, resulting in the need for a major engine overhaul.
Checking and adjusting the tension of the generator drive belt
Checking and adjusting the tension of the generator drive belt and replacing it
Insufficient alternator belt tension impairs battery charging and leads to increased belt wear. If the alternator belt is too tight, the alternator and water pump bearings may fail.
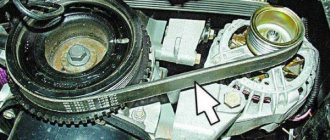
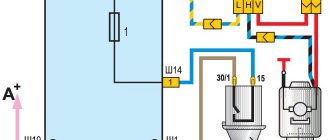
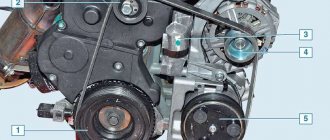
This is what the alternator drive belt looks like from the top right of the engine compartment. The generator drive belt 2 is installed on the pulleys of the generator 1, water pump 3 and the crankshaft (not visible in the photo).
NOTE Checking the tension of the generator drive belt is performed from above in the engine compartment.
Tension is characterized by the amount of deflection of the generator belt between the pump and crankshaft pulleys (deflection B) or the generator and pump pulleys (deflection A) when a force of 98.1 N (10 kgf) is applied in the middle of the distance between the pulleys. Deflection A should be 10-15 mm, deflection B -12-17 mm.
USEFUL ADVICE It is more convenient to check the deflection A.
To adjust the tension and replace the alternator belt on a VAZ car, you will need: keys “17”, “19”, and a mounting blade. Adjust the belt tension on a VAZ vehicle mounted on a lift or inspection ditch. The belt is adjusted by moving the generator relative to the engine.
Replacing the alternator belt on a VAZ 2101-VAZ 2107
Welcome! This part links the alternator pulley to the crankshaft pulley and the water pump pulley on classic models. On front-wheel drive vehicles, the pump pulley connects the timing belt. A broken alternator belt on a classic will cause poorly functioning devices, because the energy will come only from the battery, and accordingly, if the charge is poor, the devices will malfunction. On the contrary, if the battery is powerful and sufficiently charged, then the devices will not go out for some time and you may not even notice that the belt has broken. And here you need to remember about the pump and pay attention to it. Since the belt binds it, a rupture will lead to the cessation of coolant circulation in the system and the car will begin to overheat.
Note! you will need the following tools: a mounting spatula (a convenient thick stick or a small metal crowbar will do), you will need wrenches for “17” and “19”.
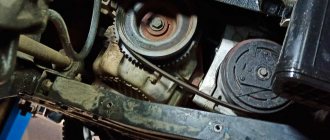
Belt location
Located in the front of the car. In the photo, the red arrow shows the radiator of the cooling system and the bar on which the battery sits (now removed). The belt connecting the three pulleys is indicated in the photo with a blue arrow.
When to change the belt?
The main reason is wear: various kinds of cracks, worn edges, worn teeth. We do not recommend delaying the replacement of the belt, otherwise a rupture will lead to overheating of the engine and even boiling during extreme heat. The battery will quickly discharge in the absence of support from the generator, which will stop spinning and giving out energy.
Note! Have you ever heard a car whistle? The timing belt makes a sound; it occurs for various reasons:
- severe wear often leads to whistling;
- water or any liquid getting on it (for example, coolant gets on the belt when the cooling system pipes are worn out and leaking. Inspecting the belt and pulleys for moisture will help identify the problem);
- low belt tension (adjustment will come to the rescue, read below);
- poor quality of the belt, sometimes it’s just an oak belt (by the way, it hardens in cold weather).
Most cars in the winter make a whistle when starting the engine, but a warm car no longer whistles - a sign of a stiff belt.
The video below can save you in an emergency: if your belt suddenly breaks on the road and there is no spare, a regular belt or tie will come to your aid! Watch the video in detail and remember, you never know, anything will come in handy in life.
Changing the belt on a VAZ 2101-VAZ 2107
Removal
It is necessary to have access to the top and bottom of the car. If you have a crankcase protection installed at the bottom, then you will have to remove it accordingly; read the details in the article: “Replacing the crankcase protection on a VAZ.”
Note! Removing the battery will make the belt easier to access. The process is described in the article: “Replacing the battery in cars.”
Evaluate the appearance of the belt. If the condition is good, check the tension and tighten it if necessary. It’s easy to check: press the belt with your fingers with a force of 10 kg anywhere. Either in place “A” the distance by which the belt should bend will be 10-15 mm, or in place “B” 12-17 mm (see picture).
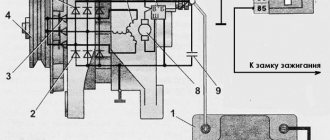
Alternator belt VAZ 2107
A malfunction of the VAZ 2107 alternator belt can be expressed in two manifestations:
In the first case, the generator stops rotating and producing electricity, which is indicated by a warning lamp on the instrument panel. Moreover, since the VAZ 2107 generator belt transmits torque from the crankshaft to the water pump, if it breaks, the pumping of coolant through the cooling radiator and cylinder block stops, which leads to rapid overheating of the engine. Therefore, if the belt breaks, the vehicle cannot be used.
Belt slipping is often a harbinger of a break. This malfunction is easily recognized by the characteristic “sound accompaniment”, which especially often occurs at high air humidity (especially in rainy weather, when splashes from puddles enter the engine compartment) and at increased load on the generator when powerful consumers of electric current are turned on - headlights or cooling fan. A loud whistle occurs when a weakened belt rubs against the pulleys, which is accompanied by unstable operation of the generator, expressed in voltage drops in the on-board network.
The drive of the generator and pump on the injection and carburetor variations of the VAZ 2107 is identical. Therefore, their problems are the same. The only difference between the injection model is the presence of an engine crankshaft position sensor, which has to be removed during the operation to replace the alternator belt.
Design and features of the timing belt drive of the VAZ 2107 car
Production of the 8-valve 1.3-liter VAZ power unit with a belt instead of a timing chain began in 1979. Initially, the VAZ 2105 internal combustion engine was produced with the index 21011 and was intended for the Zhiguli model of the same name, but was later installed on other Tolyatti cars - the VAZ 2107 sedan and the VAZ 2104 station wagon. The decision to install a belt drive instead of a timing chain drive was caused by the increased noise of the latter. The engine, which was not the quietest, began to make even more noise as the mechanism parts wore out. The modernization made the power unit more modern, but in return it required increased attention to the condition of individual structural elements.
A timing belt drive has the advantage of reduced metal consumption and quieter operation, but is inferior to a chain drive in terms of reliability.
The functions that were previously performed by the chain were assigned to a belt drive. Thanks to it, it is set in motion:
- camshaft, through which the opening and closing timing of the valves is regulated. To transmit torque from the crankshaft, a toothed belt and a pair of the same pulleys are used. One cycle of operation of a four-stroke internal combustion engine is carried out in two revolutions of the crankshaft. Since each valve needs to be opened only once, the camshaft speed should be 2 times lower. This is achieved by using toothed pulleys with a gear ratio of 2:1;
- the drive shaft of auxiliary units (in garage slang “pig”), which transmits rotation to the oil pump and ignition distributor of carburetor engines, and also ensures the operation of the fuel pump.
When developing the design of the timing belt drive, VAZ engineers used the experience of FORD car developers
Transverse teeth on the timing drive parts prevent slipping of the rubber structural element and ensure synchronous operation of the crank and gas distribution mechanisms. At the same time, during operation the belt stretches, so to prevent it from jumping on the pulley teeth, the drive was equipped with an automatic tension unit.
In order to prevent damage to the parts of the crank and gas distribution mechanisms if the belt breaks, the pistons of the VAZ “belt” engine were equipped with special grooves, which drivers often call counterbores or scrapers. After the rotation of the crankshaft and camshaft is desynchronized, the recesses in the piston prevent it from hitting the open valve. Thanks to this little trick, you can restore the performance of the power unit in less than an hour - just set the mechanism according to the marks and replace the damaged part.
Interchangeability of VAZ timing belts
The prototype of the VAZ “belt” engine was the OHC power unit, which was installed on the FORD Pinto passenger car. Its timing mechanism drove a fiberglass-reinforced timing belt that had 122 teeth. Due to the fact that the VAZ 2105 belt has exactly the same number of teeth and similar dimensions, some owners of the domestic “classic” had an alternative to Russian-made belts. Of course, only a few had such an opportunity - in times of total shortages, one had to be content with less reliable products. Initially, only belts from BRT were installed on the engine, but a little later, more durable belts from Gates, which is the world leader in this market segment, began to be supplied to the conveyors of the Volzhsky plant.
Today in the retail chain you can find VAZ 2105 timing belts from not only domestic, but also well-known global manufacturers
Today, the owner of a VAZ 2107 has a huge selection of spare parts, including for the timing belt drive. When purchasing, you must keep in mind that the VAZ 2105 power unit is suitable for timing belts with catalog number 2105–1006040 (in another spelling 21051006040). It has already been said above that rubber products produced by Gates and Bosch are considered to be some of the best. The products of global industry giants such as Contitech, Kraft, Hanse, GoodYear and Wego are no less high-quality. The cheaper offers of domestic Luzar cause the most criticism, despite the fact that they are not represented in the retail network as widely as the market leaders.
On my own behalf, I can add that owners of “sevens” can use a standard timing belt from FORD cars. Belts from OHC engines of Pinto, Capri, Scorpio, Sierra and Taunus cars of 1984 and later are suitable for the “five” engine. Please note that until 1984, the 122-tooth belt was installed exclusively on power units with a volume of 1800 cm3 and 2000 cm3. The drive element of the weaker 1.3 and 1.6 cc power units was shorter and had 119 teeth.
Tension mechanism
In order for the timing belt of the VAZ 2107 to be constantly tensioned, a simple (one might even say primitive), but at the same time extremely effective and reliable design is used. Its basis is a shaped metal plate (hereinafter referred to as the tensioner lever), on which a smooth roller with a pressed-in rolling bearing is mounted. The plate base has a hole and a slot for movably attaching the lever to the cylinder block. The pressure on the belt is carried out thanks to a powerful steel spring, which at one end is connected to a bracket on the rotating plate, and at the other is rigidly attached to a bolt screwed into the cylinder block.
The tension roller from the VAZ classic is also suitable for later, front-wheel drive models VAZ 2108, VAZ 2109 and their modifications
During operation, both the surface where the roller contacts the rubber belt and the bearing wear out. For this reason, when replacing the timing belt, be sure to check the condition of the tensioner unit. If the roller is in good condition, then the bearing is washed, after which a fresh portion of lubricant is added. At the slightest suspicion, the rotating structural element should be replaced. By the way, some drivers prefer to install a new roller at the same time as replacing the belt, without waiting until its bearing fails. It must be said that today the cost of this part ranges from 400 to 600 rubles, so their actions can be considered quite appropriate.
How to tighten the alternator belt on a VAZ 2107
If you correctly determine what exactly is causing the slippage, it is quite possible to fix the problem yourself. There are two reasons why the alternator belt slips:
- Weak tension.
- Contamination (usually motor oil).
Also, a whistle, similar to the sound of slipping, can be produced by a faulty generator bearing.
In any of these cases, repairs do not require particularly high qualifications and do not take much time. Specialized devices and instruments are also not required. You will need a pry bar and two open-end wrenches (or heads) for 17 and 19. The easiest way is to eliminate the weak tension of the generator belt. Usually, over time, the belt stretches a little and begins to slip on the pulleys, producing an unpleasant whistle. The VAZ 2107 generator belt, the size of which exceeds the maximum permissible, must be replaced. You should also change the belt if it is cracked or has noticeable damage.
To check the length of the alternator belt, it is not necessary to remove it. We can assume that if the belt can still be tensioned, its length is within acceptable limits. To tension the belt you will need to do the following:
- Using a 17mm wrench (socket), loosen the nut that secures the generator to the bracket.
- Loosen the generator rod nut using a 19mm wrench.
- Tension the belt while moving the generator using a pry bar.
- Secure the generator to the adjusting bracket with a nut and check the tension. The deflection of the belt between the pump and the crankshaft when pressed by hand should be approximately 12-17 mm, between the pump and the generator - within 10-17 mm.
- Tighten the nuts firmly, preventing spontaneous loosening.
If a generator bearing fails, repairs are required. To do this, it is necessary to dismantle the generator by unscrewing the mounting nuts indicated above, disassemble the generator and replace the shaft bearing with a new one. This operation is not simple, therefore, if you are not confident in your skills, the best solution would be to turn to specialists. This will help to avoid problems associated with the further operation of the generator and obtain certain guarantees of the quality of repairs.
Step-by-step replacement instructions
Replacing the alternator belt on a VAZ 2107 is a very simple job and can be done in normal garage conditions without the involvement of a specialist.
Tools
To change the belt, we need:
- a set of keys;
- mount.
Keys of required sizes
Stages
- The first step is to loosen the nut that secures the generator to the mounting plate.
Loosening the nut
- Next, use a pry bar to move it towards the motor block.
- If the power unit of your car is fuel-injected, then you need to remove the crankshaft sensor.
- Remove the old belt.
- We install a new one and tighten it on all the pulleys.
- In order to tighten the belt using a pry bar, move the generator. Having reached the required tension, tighten the fixing nut.
How to replace the VAZ-2107 injector alternator belt
The belt is necessary to connect the generator and crankshaft pulleys, and on front-wheel drive classic models, the water pump pulley also takes part in the connection.
It is not so difficult to independently replace a torn or stretched alternator belt in a VAZ-2107 with an injector-type engine that has an additional carburetor.
For this you will need:
- a mounting spatula, which can be replaced with a crowbar or a strong flat stick;
- wrenches 17 and 19.
This is quite enough to carry out repairs. Of course, if you at least have an idea where this very belt is located.
How to change it yourself?
Tools
If you change the belt yourself, prepare the following:
- a set of open-end wrenches, you will need tools for 13 and 17;
- long flat blade screwdriver;
- 10mm ring wrench, you can use a ratchet head;
- key for installing the tension roller;
- wheel wrench;
- jack.
User Pro Remont shared a video that describes in detail the procedure for replacing the timing belt pulley and timing belt in a VAZ 2114 car.
Algorithm of actions
How to change a belt correctly:
- Drive the car into a garage with a pit. The surface on which work is performed must be level. Switch the gear selector to neutral position.
- Loosen the bolts on the front right wheel. Place this part of the car on a jack so that the wheel can be rotated.
- Open the hood of the car. Using a 10mm wrench, remove the three screws that secure the plastic strap protector.
- Using a 13mm wrench, you need to loosen the bolt that secures the tension roller. Remove the device.
- You can see a mark on the camshaft gear; it is made in the form of a rectangular protrusion on the edge. When performing work, it is necessary that this mark coincides with the protrusion located on the fastening of the strap casing. If these marks do not match, you need to turn the wheel until they match.
- Then find the rubberized plug installed on the top of the clutch housing; it is located to the right of the power unit’s BC. The part is carefully pryed off with a screwdriver and removed from the seat. Under the plug you can see the flywheel crown; there is a mark on this device. It should be opposite the triangular protrusion located on the left. If the marks do not match, then take a 17mm wrench and loosen the tensioner. Using a pulley removal wrench, turn the device counterclockwise to loosen the timing belt.
- When the upper part of the belt is removed from the gear assembly, take a 17mm wrench and turn the crankshaft until the flywheel marks are opposite each other. The flywheel itself must be secured in this position; to secure it, use a screwdriver and install it between the teeth. If you have an assistant, ask him to hold the tool to prevent it from turning.
- Now you can remove the right wheel. Unscrew the screws that secure the arch protection and dismantle it.
- Using a 17 mm wrench, unscrew the nut securing the generator set pulley. When unscrewing, make sure that the flywheel does not turn.
- Dismantle the generator pulley and remove it from its seat.
- Remove the timing belt from the crankshaft disc.
- Using a 17mm wrench, completely unscrew the tensioner pulley lock and remove it from its seat. If you loosen the fastening, the belt can be removed.
- Install the new product onto the crankshaft disc. When installing, make sure that the marks are not broken. Install the generator set drive pulley by first placing a strap on it.
- Place the product on the gear of the mechanism. Install the tension roller.
- The strap is being installed. During installation, the tension roller must be turned with a special tool purchased in advance at the store. If you don't have one, you can use two self-tapping screws and a screwdriver. Self-tapping screws are installed in the grooves, and a screwdriver secures them. Turning is done counterclockwise. Tension the belt using the tension roller and tighten the screw that secures the roller.
- It is necessary to set marks if they are lost during the work process. The installation procedure for all components is performed in reverse order.
In what situations is replacement necessary?
Wear of the element is characterized by such manifestations as cracks or tears in the blade, worn teeth and uneven edges. If you ignore such a deplorable state of a very important element, it will come back to haunt you with overheating and boiling of the engine, independent operation of the battery, which will lead to its rapid discharge.
If the belt is severely worn, it also shows signs of noise to the owner - it begins to whistle, especially at low speeds. Another reason for a whistling belt may be moisture getting on its surface, which occurs due to worn-out pipes of the cooling system - antifreeze begins to leak.
Some belts - oak - whistle when the car is started in frosty weather, and after warming up the sound disappears. A weak tension is expressed by a whistle, but in this case it is enough to simply tighten it.