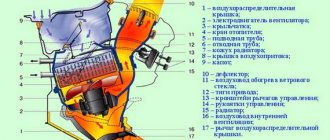
Fan replacement
The main reason for the low temperature in the car is the poor performance of the heater fan, which forces warm air through it into the cabin. In addition, being directly inside the car, it operates quite loudly at high speeds and whistles unpleasantly, especially in winter. Therefore, it is replaced with a fan from a VAZ-2108 (“eight”) car, which together with the casing is often called a “snail”. Their sizes differ slightly, so installing a new one is quite simple, with minor design modifications. Place the fan in the engine compartment, inside the air intake. This significantly reduces the noise from it. The heater radiator shutter needs to be removed.
You can leave the standard two-speed airflow mode switch
or replace it with a three-position (and, if desired, four-position) installed on 2108, adding an additional resistor from the “eight” to the fan circuit.
They place it inside the air duct, since it needs airflow.
The cross-section of the wires suitable for it needs to be increased, since the new motor consumes more power.
The outer openings for air passage in the hood must be sealed to reduce the flow of cold air through them to the stove by half.
Modification of the stove Niva 2121, VAZ 2131
2121, 2131
tuning
salon
Refinement of the stove blower
Do-it-yourself tuning of the Niva 2121 interior, tips for interior modifications, internal tuning of the Niva 2131, VAZ 2121. Modification of the heater blower Modification of the interior, interior tuning of the Niva 2121, Niva 2131, Niva 4×4 photo tuning interior, modernization
I have always been amazed by the fact that a completely tolerable stove blows into God knows where, and not on my feet. Frozen, in short. I always wanted to somehow direct the flow. The solution was suddenly found in a plumbing store - 2 corners 32mm*45* + 2 adapter pads 32>40.
The elastic band was removed from the corners and the cuffs were cut approximately in half length. In the side walls of the stove body we cut two holes with a diameter
40 mm, insert the cuffs, and our corners into the cuffs, with the thick side. You also need to remove the handle and ribs on the sides from the lid. The lid itself must be firmly fixed with self-tapping screws. It’s convenient to do all the operations at home, warm, with the case removed, but I did it by car.
As a result, we get a flow of warm air directly to our feet.
Tuning the interior of VAZ 2121, VAZ 2131
Additional instrument panel
Installation of an additional instrument panel Niva 2121, VAZ 2131
Installing a new beard
New beard from 21213 on Niva 2121, VAZ 2131
Modification of the interior heater
Installation of an additional fan to improve interior heating of Niva 2121, VAZ 2131
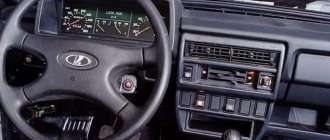
Instrument panel from Gas 3110 instead of the standard panel
Dashboard of GAZ 3110 instead of the panel of Niva 2121, VAZ 2131
Illumination of the ignition switch from VAZ-2110
Installation of ignition switch illumination from 2110 on Niva 2121, VAZ 2131
Refinement of the stove blower
Modification of the stove Niva 2121, VAZ 2131
Improved instrument lighting
Refinement of instrument lighting of the old panel Niva 2121, VAZ 2131
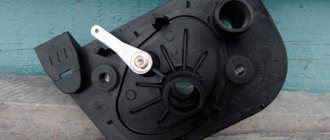
Installing a new heater volute
Heater snail from 2108 on Niva 2121, VAZ 2131
Fuel consumption indicator
Installation of fuel consumption indicator Niva 2121, VAZ 2131
Electric trunk lock
Installation of an electric trunk lock drive Niva 2121, VAZ 2131
Installation of headlight hydraulic corrector
Hydrocorrector of headlights Niva 2121, VAZ 2131
Window lifters
Installation of window lifters Niva 2121, VAZ 2131
Tuning Lada 2121, photos of tuning Lada 21213, modification of Lada 2131
Tuning VAZ cars is an increase in the factory characteristics of the car. Refinement of the Niva 2121 is, first of all, the installation of new bumpers, crankcase protection, and a winch. If desired, the owners of these SUVs install additional fog lights. Our sections describe instructions and tips for modifying the Niva 2131 of various units, such as the transfer case, etc. Even a car enthusiast can do complex tuning of vases with his own hands. You will also find categories for engine tuning, gearbox tuning, interior and exterior tuning, as well as many photo reports of VAZ 2121 tuning. Thanks to interesting solutions, Niva tuning will give you a lot of pleasure and benefits. If you have photos of tuning vases, send them to us by email.
engine, modification and tuning with your own hands
transmission, tuning
brake system, tuning and adjustment
suspension, adjustment and tuning on your own
interior, modernization
external body tuning
photo of tuning 2121
tuning, photos 2131
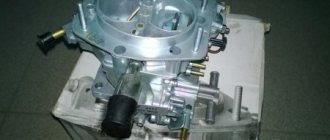
Replacing the heater tap
The standard heater tap on Niva 21213 does not do its job. Since it has a small cross-section, coolant flows quite slowly through the radiator. In addition, it often becomes a place for coolant to leak into the cabin. Therefore, car owners prefer to exchange it for similar models from other AvtoVAZ, Volkswagen, Toyota or Opel cars. For example, the ceramic faucet installed in 2108 has a large diameter passage opening, which increases the performance of the stove. It is better to install it in the pipe that supplies coolant to the stove, otherwise even if it is closed in the warm season, heated air will still flow into the cabin.
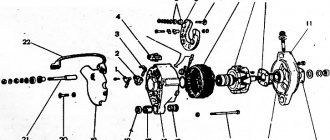
Technical details of the procedure
The efficiency of the new heating system on Niva will be determined not by the cost of the purchased parts, but by their quality. To operate, you will need the following elements: a car resistor, a figure-eight heater and a “snail”. It is a mistake to believe that only “original” spare parts are suitable for repairing a heating device. The main requirement is technical compatibility.
If in doubt, a drawing of the heating system will provide clarity. The further procedure is as follows:
- Cut a new mounting hole. This is done carefully, because the reliability of the heating system’s operation depends on the quality of the preparatory process. It is recommended to place the engine as low as possible in the air duct, otherwise the device will rest against the hood. This should not be allowed to happen, otherwise the stove fan will not last long.
- Smoothly remove engine power from the air duct. An outlet is used for this.
- Proper installation involves securely securing the motor to the duct. After this, all fastening points without exception are sealed with automotive sealant. It is highly recommended not to miss anything. Otherwise, due to vibration loads and the influence of external factors, the stove connection diagram will be disrupted.
- Take 2 stainless steel plates that adapt to the size of the nozzle and the upper opening. Measurements are carried out several times. Pedantry will eliminate the need for subsequent revision.
- Using a wrench and a screwdriver, remove the factory-installed valve. Tools must be used carefully. One careless movement is enough for 21213 to require expensive repairs.
- It is recommended to avoid having another heating device in the car. The second stove will not add heat, but it will increase the load on the engine several times.
- The process is completed by installing a new air duct with the engine.
And also interesting: External tuning of Chevrolet (Lada) Niva 2123 | Motorring online store
The heating system of a new model is checked by test switching on. It is recommended to switch modes smoothly. The device must remain on each of them for at least 5-7 minutes. The driver’s task is to make sure that the operation of the system is not accompanied by extraneous noise and vibration.
Other details
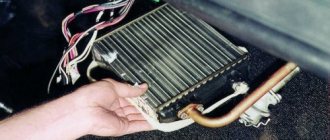
The standard heater radiator and thermostat are also replaced. Preference is given to three-row copper radiators. They are more efficient in operation and leak less often. The thermostat is replaced with an analogue one or its thermal insert is modified.
Do-it-yourself modification of the stove on Niva 21213 with your own hands is quite labor-intensive and takes a lot of time. To modify the heating system of this car, you can find ready-made kits on sale that make this work easier. The procedure is presented in the video “Remaking the stove on Niva 21213 with your own hands: video instructions.”
Fault Diagnosis
The stove supplied as standard will need to be modified for preventive purposes. The procedure will not take much time, but it will prevent many problems in the future. Driving experience suggests that the first severe frosts will undermine the “health” of the device. The list of main weaknesses is as follows:
- the optimal operating temperature range for model 2121 is from -5 to 10°C;
- inability to warm up the air in the cabin if outside is -8°C or lower;
- when the blowing power increases, the temperature does not increase;
- When driving in 2nd gear, the noise from the Niva's stove becomes significant.
That is why it is better to take the necessary measures in advance. The driver has few alternatives. On the one hand, everything remains in its place. The heating device is used at minimum power. During mild winters this is still tolerable, but with the onset of real cold weather the conditions will become unbearable. On the other hand, it's easy to spend a few hours rectifying the situation.
Further developments proceed as follows. If the heating in the car is running at ½ power, you can limit yourself to minor repairs. The main thing is to make sure that there are no noises or extraneous knocks, otherwise the Niva 21213 should immediately go for a technical inspection.
Also interesting: Buy electric winches for Niva in Balashikha in the online store