The gearbox is one of the most important components of a car, the smooth operation of which determines the durability and reliability of the car. If it becomes necessary to remove the gearbox to replace it or carry out repair work, you should be sure that in this case it is impossible to do without dismantling the gearbox, since removing the gearbox is a rather complex and time-consuming process, especially if it is performed for the first time. Replacing or repairing a gearbox at a service station is an expensive undertaking, so many owners of VAZ-2107 cars prefer to carry out this work themselves. What should a car owner know who will remove the G7 gearbox for the first time without outside help?
- Fastening the VAZ-2107 gearbox
Video: how to remove and replace the VAZ-2107 gearbox cushions
- What tools will you need?
- Clutch disc alignment
Video: removing and installing the VAZ-2107 gearbox control lever
When it may be necessary to dismantle the VAZ-2107 gearbox
Dismantling the VAZ-2107 gearbox may be necessary if necessary:
- replace or repair the clutch;
- replace the crankshaft and gearbox input shaft seals;
- replace or repair the gearbox itself.
In the case of replacing the clutch, you don’t have to remove the box completely, but only move it to the side so that the gearbox input shaft comes out of the clutch basket, but access to the clutch parts in this case will be limited. Complete dismantling of the gearbox allows in this case to carry out a visual inspection of components such as the clutch housing, as well as the oil seals of the gearbox input shaft and crankshaft, and, if necessary, replace them.
Signs that the gearbox itself needs to be repaired or replaced may include oil leaks, extraneous noises, wheels locking when driving, etc. When the first symptoms appear, you should not delay repairs in order to prevent the gearbox from failing.
The gearbox is one of the key components of a car
Fastening the VAZ-2107 gearbox
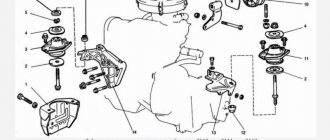
The front part of the box is fixed to the engine with clutch housing bolts. When removing the gearbox, these bolts are unscrewed last. From below, the box is supported by a cross member or bracket, which is attached to the body with 13 bolts and nuts. The cross member has a part called a cushion: it is on it that the body of the gearbox rests. When the pad wears out, vibration may occur during movement, so it should fit snugly against the gearbox housing. The cushion is attached to the bracket with two 13mm bolts. The rear part of the gearbox is connected to the driveshaft with three 19mm bolts.
Video: how to remove and replace the VAZ-2107 gearbox cushions
The procedure for removing the gearbox
So, having installed the car on a pit or overpass, let's get started. The first thing we do is remove the driveshaft.
Secondly, we remove some elements of the exhaust system (muffler, “pants”, etc.).
You can, of course, only disconnect the “pants” from the resonator, but if the work is carried out without assistants, it will not be particularly convenient.
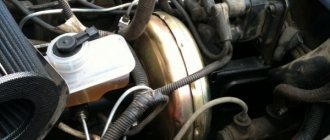
The next step is to remove the gearbox working cylinder (it is also convenient to remove it from the pit).
The cylinder can be easily unscrewed with a 13mm spanner; two bolts need to be unscrewed. The gap adjustment is not affected. The next step is the process of unscrewing the bolt securing the ground wire.
Having unscrewed the clutch slave cylinder and the ground wire, we move them to the side so that they do not interfere with us. There is no need to remove them completely, just secure them to the side. Then we remove the “chips” of the reversing light switch terminals.
All that remains is to disconnect the speedometer cable, which is attached to the gearbox.
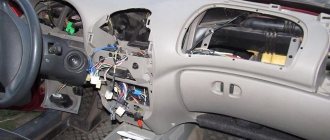
While the work carried out from the pit can be considered completed, we move upstairs. We begin to disassemble the gearshift lever, this is done from inside the cabin. Remove the decorative cover and rubber seal.
After this, the lever itself is “pulled off” from the wings. To do this, pry off the nylon ring with some sharp object.
After removing the lever, rubber seals and nylon clamps will remain on the rocker; it is better to replace them with new ones, having previously purchased a repair kit for the rocker.
After completing the “upper” preparatory work, we go down into the pit again, we have to carry out the main part of the work - free the box from the main fastenings - these are four bolts that secure the gearbox bell to the engine (the first attachment point).
The lower bolts unscrew easily; we tear them off with a spanner. But the upper bolts are more “problematic”. To unscrew them, it is better to use a wrench with a head, or you will suffer with a regular cap, but it needs to be wound from the top.
Important! Before removing the gearbox, set the linkage to 5th gear. If the gearbox is 4-speed, then to the 3rd. Otherwise, it will be inconvenient to remove the gearbox.
Now we free the gearbox from the second mounting point, this is its rear support, the so-called “swallow”.
They are held on by 13mm nuts, which we pre-lubricate with WD-40, as they often turn sour and can be torn off.
After carrying out all these procedures, we carefully examine the “bell” of the box. We need this to make sure that we have disconnected all the wires and unscrewed the bolts and drives.
Advice! If there is engine protection, then it is advisable to lay a wooden block between it and the oil pan. This will help keep the motor in its original position, making it easier to attach the box to the motor in the future.
Now we proceed directly to removing the box. Having firmly grasped the gearbox housing with your hands and slightly lowered its rear part to remove the rocker, we move the box back, removing it from the splines.
Do not forget that the box and unit is not light, and it is better to invite an assistant to remove it. Installation occurs in reverse order. Advice! Before installing the gearbox, clean the threaded connections and lubricate the shaft splines; this will make installation and fastening of the gearbox easier.
Something else useful for you:
Video: How to remove the gearbox of a VAZ classic.
How to put the gearbox in place
Install the gearbox in the reverse order.
Clutch disc alignment
If the clutch was removed during the dismantling of the box, then before installing the gearbox in its place, the clutch disc will need to be aligned. It is known that on the “seven” (as well as on the rest of the “classics”) the input shaft of the gearbox protrudes beyond the gearbox and is driven by the driven clutch disc using splines. Even further down, the input shaft is located in the crankshaft bearing. The point of centering is that the feredo should hit the center of the crankshaft bearing. If this does not happen, installing the input shaft of the box will be impossible: even if you hit the splines, the shaft will not fit into the bearing.
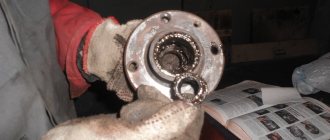
To center the clutch disc, you will need a metal rod, for example, a piece of the gearbox input shaft
To center the disk, you will need any metal rod (optimally a piece of the old gearbox input shaft). The feredo is placed inside the basket, after which the basket is suspended from the engine housing. The rod is inserted into the hole and seated in the bearing. In this position, the basket is firmly fixed to the body.
When centering the clutch disc, the rod must be inserted into the hole and seated in the bearing, after which the basket must be secured
The fact is that, as I already said, classic gearboxes are practically eternal. Axles can change, engines, bodies can change, but the gearbox lasts the longest. And it doesn’t happen that it works halfway, either it works or it doesn’t, therefore, from disassembly you can buy a gearbox in good condition with no defects at all. You can, of course, buy a new one, but it was already made in Russia, and those that were disassembled were taken from Soviet-made cars, so I would trust them more.
Kolya Goffman
https://blamper.ru/auto/lada-vaz/2107/qa/remontirovat-li-kpp-5494c151fa1ad9625b8b457b
Installation of gearbox and gearbox control lever
Before putting the gearbox in place, it is necessary to clean the gearbox input shaft and apply a layer of CV joint-4 lubricant to it. All steps to install the box in its place are a mirror image of the points performed during disassembly, i.e. the reverse sequence of actions is carried out. After installation, pour the required amount of oil into the box.
To reinstall the gearbox control lever, it is necessary to place all the previously removed bushings inside the lever housing in the reverse order. After this, the lever is mounted on the gear shift mechanism and is fixed to it using stuffing. Next, the lever covers are restored and the removed mat is laid.
Video: removing and installing the VAZ-2107 gearbox control lever
If the VAZ-2107 gearbox is being removed (let alone installed) for the first time, it is better to do this with the help of an experienced specialist, so as not to damage any expensive part or injure yourself. If the driver is bothered by any noise, vibration or other malfunctions of the car, he should try to eliminate them in more accessible ways, and only if the measures taken do not produce results, proceed to repair the gearbox. The VAZ-2107 gearbox is considered to be a fairly reliable, but at the same time complex unit, so it is not recommended to disassemble it without an experienced specialist.
Increased noise
After disassembly, you need to troubleshoot the box parts. If severe wear of the gear teeth is noticed, they must be replaced. It is better to replace gears one by one. So as not to confuse the gears.
Many gears have retaining rings. Synchronizers also undergo the same troubleshooting. If they notice even slight wear or damage, they are replaced.
Particular attention should be paid to the condition of the bearings. They should not have any play or the appearance of deep treadmills of balls.
Although, even if the bearing looks good on the outside, it is better to replace it. This eliminates the possibility of noise occurring after the box is assembled.
Spontaneous speed shutdown
If the repair of the VAZ-2107 gearbox is associated with the spontaneous shutdown of any gear, then in this case the sliders and clamps need close attention.
It is necessary to inspect the condition of the fastener seats. If the edges of the seats are heavily worn, then the sliders need to be replaced.
Another method of restoring seats is used by some craftsmen. To do this, a layer of metal is applied to the seats using a welding machine. And then, using a grinder, new seats are cut out in the applied metal.
The method is quite simple, but not very effective, since the applied metal is softer in structure, which means it will wear out much faster.
It is advisable to replace the clamps during repairs, as well as the springs that press them to the slides.
This is done because the springs are constantly pressed and shrink over time, which is why they do not create the required force on the clamps.
If you had problems with play in the bushings, then you need to purchase a repair kit for the VAZ 2107 gearbox handle in advance and after dismantling it.
Before starting work, prepare a screwdriver.
- Set the box to neutral.
- Slide the cover.
- Push the damper locking sleeve down with a screwdriver.
- Remove the rod with the knob.
- Remove the remaining bushings from it.
- Replace them in reverse order as shown in the picture.
Before reinstalling, fully assemble the rod and bushings, slide it onto the lever, and push down sharply to seat it in place.
If you need to completely replace the rocker, then add a 10mm wrench to the screwdriver (preferably a socket or socket):
- remove the decorative panel;
- unscrew the boot;
- use a 10mm key to unscrew the mechanism;
- remove it from the box.
After repair or replacement, assembly is performed in the reverse order.
The quality of bushing repair kits leaves much to be desired and the backlash of the rod remains quite large, so some, instead of plastic and rubber bushings, simply select a simple hose according to size and attach it to it.