How to remove axle shafts on a Niva Chevrolet
Axle puller; Mandrels for pressing bearings. Next, we insert the axle shaft back into the bridge; it is advisable to lubricate the surface of the rolling element with oil to simplify installation. To minimize the risk of breakdowns, it is better to carefully follow the instructions.
How to remove an axle shaft, tips for dismantling, VAZ. Replacing the rear axle gearbox seal of a Chevrolet Niva -…
This is done in the following sequence: To replace the bearing, you should use a mandrel. Then we install a jack under the rear axle and raise the axle a little.
Muffle furnace or gas burner or gasoline blowtorch.
Then you select the height of the socket head bushing. Having everything available in 2 copies.
Removal and installation of Chevrolet Niva axle shaft
Tools:
Parts and consumables:
Notes:
The axle shaft assembly with bearing is replaced if there is increased noise from the rear wheels of the car, both when driving in a straight line and when cornering, compared to normal. At the same time, increased axial and radial play of the axle shaft is observed. An axial clearance of no more than 0.7 mm is allowed.
Helpful advice:
Editing the axle shaft and replacing its bearing is labor-intensive and requires special equipment. Therefore, we recommend that if axial or radial play of the axle shaft appears, replace the axle shaft assembly.
1. Remove the wheel and brake drum as described here.
2. Remove the four nuts from the axle bearing mounting plate bolts.
3. Install the support and lift the rear axle.
4. Remove the shock absorber bracket from the axle bearing mounting plate bolts.
5. Remove the axle shaft using an inertial puller.
Helpful advice:
If there is no puller, install the wheel on the axle shaft and secure it with three nuts, without fully tightening them so that there is a gap between the wheel and the axle shaft. Press the wheel against the axle shaft and then sharply pull the wheel towards you. In most cases, after several attempts, the axle shaft can be removed.
Warning:
If you are not going to change the oil seal, be careful not to damage its working edge. If the seal is damaged or requires replacement, replace the seal as described here.
6. Secure the brake mechanism with wire.
Replacement
To change a worn part, you need to remove the wheel, then unscrew the brake drum and axle shaft. To do this, you need to jack up the rear of the car.
Removal of the axle shaft is carried out in several stages:
- Using a jack, the axle is raised so that when the axle shaft is removed, oil does not leak out of it.
- By unscrewing the nuts to 17, the axle shaft is unscrewed
- If the repair is carried out on time and the axle is not jammed, then it can be knocked out with a hammer and a wooden board.
If the vehicle is equipped with an ABS system, the following procedure is necessary:
- checking the condition of the bearing
- the oil seal is removed
- The axle shaft is secured in a vice, after which the retaining ring is knocked out using a hammer.
- The bearing is removed.
- The new bearing is lubricated and replaced with a new one
- For better installation, the retaining ring is heated with a blowtorch and set in place.
- The axle shaft is pressed into place using a tube.
During work, it is necessary to carefully inspect the axle shaft for cracks and chips.
If the vehicle is equipped with an ABS system, the following procedure is required.
Also interesting: Chevrolet Niva wheel sizes - Size tables
When it is necessary to replace the rear axle axle seal of a Niva Chevrolet, the owner does not have to immediately contact a service station. This operation refers to work that does not require high qualifications and special equipment, and if desired, it can be done with your own hands. This also applies to motorists driving regular Nivas - VAZ 21214 and 21213.
Basic parameters of factory parts for repair
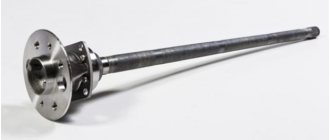
Main technical indicators of the unit: diameter and length of the axle, number and length of the spline belt, type of bearings and sealing seals. These indicators are determined by the design features of the system and the calculated traction forces under comparable operating conditions at the time of design and production.
Often, under the influence of large loads, deformation of the axle shafts occurs, premature wear and jamming of the support ball bearings occurs, deformation and fatigue wear of the sealing seals, followed by leakage of transmission oil from the axle.
Factories producing spare parts for the domestic automotive industry are constantly striving to improve manufactured vehicle components and assemblies. They regularly offer consumers a newer, more reliable, more modern product.
Preparation and disassembly
To independently remove a leaking rear axle oil seal on a Niva Chevrolet, you will need the following tools:
- standard set of wrenches;
- slotted screwdriver and wheel wrench;
- jack;
- hammer;
- wooden stand;
- cloth gloves.
Never neglect gloves when repairing a car: they will protect your hands from damage due to accidental impacts. The height of the wooden stand should be enough to support the rear axle with the wheel removed and the shock absorber unscrewed, otherwise oil will leak from it.
DIY Chevrolet Niva axle bearing replacement
The SUV class car has all-wheel drive on all four wheels. This mechanism causes the presence of a rear axle, which is designed to transmit torque from the gearbox to the driving rear wheels. The rotation of the wheels is ensured by the presence of gears and axle shafts in the bridge.
The axle shaft is connected to the wheel and sets it in motion. But why is an axle bearing in the axle needed? Since the topic of the article is called the axle bearing, it is this that will be discussed further. Let's take a closer look at this mechanism in the design of the rear axle, its purpose, design (size, number, etc.
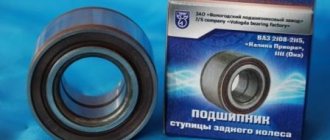
Replacement kit for cars with abs
Purpose of the axle bearing
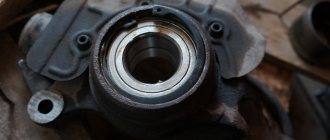
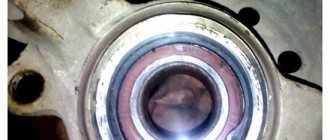
The bearing is located in the rear axle structure of the Chevrolet Niva, closer to the outer edge. Like all bearings, it performs the function of supporting and smoothing the torque of the rear axle axis. One part of the axle (internal) engages with the gears (has splines), and the second comes out of the bridge, and a flange, brake drums and a Chevrolet Niva wheel are attached to it. To ensure that the axis rotates smoothly and does not move inside the structure, there is a ball bearing.
The bearing is located in a special socket in the bridge structure, where it performs its direct function. To prevent it from moving inside the bridge, there is a special rigid fixation on the axis, which is a locking sleeve. Thus, it has a double fixation. There is also an oil seal on the axle shaft, which provides a tight connection to the rear axle structure.
Important! If the seal is damaged or worn out, there is a direct negative impact on the bearing, causing the latter to fail. Therefore, it is necessary to replace the oil seal.
When using a Niva Chevrolet frequently, it is necessary to monitor the condition of the bearing and oil seal, and if they are damaged, replace them immediately.
Also interesting: Renault Duster and Chevrolet Niva comparison of cross-country ability video
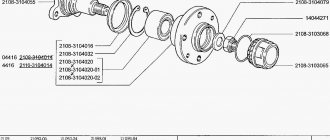
Design
1. number;2. internal and external size;3. height.
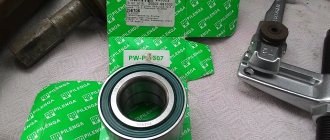
This data is necessary not only so that the bearing can be installed in the seat of the axle shaft and axle, but also so that it performs its intended functions. But it is worth noting that if one of these data is known, then the second need not be calculated. So, for example, the axle bearing has catalog number 2121-2403080.
D internal = 40 mm; D external = 80 mm; Height (thickness) = 23 mm.
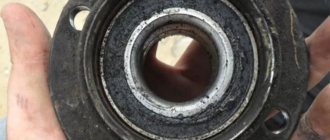
Bearing faults
Failure of an axle bearing can result in a wheel seizing on the road, which is dangerous. It’s good if the speed of a moving car is low and somewhere outside the city, but the Chevrolet Niva is used not only at low speeds and off-road. Therefore, it is very important to monitor such an important part and replace it prematurely.
faulty bearing
Failure can be determined by the characteristic sound from under the wheels, as well as by the presence of increased radial and axial play.
Important! The axial clearance should not exceed 0.7 mm.
To determine it, you don’t need to pick up speed to hear a crackling or rumble, just turn on the rear wheel drive and drive a couple of meters. A hum or crackling noise occurs when there is a lack of lubricants, which leads to the product crumbling.
Important! If you notice an uncharacteristic noise in the rear area, you should immediately make sure that the bearings are in good condition.
Removing the axle shaft and replacing the bearing
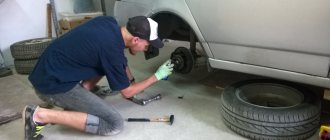
In order to replace a failed bearing, it is first necessary to remove the wheel, brake drum, and axle shaft, and only after that it is replaced. The Chevrolet Niva is installed on a flat surface and the rear part is jacked up. The wheel and drum are removed; the procedure for removing them can be read in the relevant articles. Therefore, we will not dwell on this, but will immediately proceed to removing the axle shaft.
Removing the axle shaft
1. The second jack lifts part of the bridge to avoid oil leakage when removing the axle shaft.2. The axle shaft is secured with four nuts at “17”. Using a socket wrench, remove the nuts along with the groovers.3. The axle shaft is removed. If it is jammed and cannot be removed, then we try to knock it out using a hammer and a beam.
The Chevrolet Niva is equipped with drum brakes on the rear wheels, both with and without an ABS system. Even the first Sheviks were without an abs system. ABS is an anti-lock braking system that prevents loss of vehicle control. The difference between the axle shaft of a car with an ABS system and a simple one lies in the design of the retaining ring.
retaining rings with and without abs
So, let's look at how to replace a bearing on a Chevrolet Niva SUV with an abs system.
1. The suitability of the bearing is checked. After removing the axle shaft, do not forget about the oil seal. It is pressed into the brake shield.2. The oil seal is removed using a screwdriver and hammer. After replacing the bearing, a new oil seal must be installed.3. The axle shaft is clamped in a vice.4. The knurled retaining ring is removed, which secures the bearing. We knock it out with a chisel and a hammer.5. The bearing is removed in the same way as the ring.
Important! Check the axle shaft for cracks and chips. There should not be any, otherwise boring will be required.
6. Now you need to replace the old bearing with a new one. Before installing it, check the presence of lubricant inside. Add if necessary.7. The bearing is pressed onto the axle shaft. You can use a pipe of the appropriate diameter and length not less than the axle shaft.8. Installation of the retaining ring is best done by heating it. The ring is heated with a blowtorch for 5-10 minutes up to 200 degrees.9. The ring is installed on the axle shaft and pressed into place with a tube.
Now the axle can be reinstalled in the reverse order of removal. At this point, the replacement is complete, all that remains is to install the drum and wheel, and begin replacing the other side of the Niva Chevrolet car.
After installation, check the functionality of the replaced parts. After driving a few hundred meters, you need to listen to see if there are any extraneous noises coming from under the wheels. If no noise is detected, then everything is done correctly. Happy renovation work!
The axle shafts in the rear axle of the Niva Chevrolet experience very serious loads. The oil seals and, naturally, the bearings, which we will talk about today, get a fair amount of damage. If there is a conversation about replacing them, the manufacturer modestly advises changing them along with the axle shafts. It’s not cheap, so today we’ll try to replace the axle bearing on a Chevrolet Niva, look at the article numbers and manufacturers, and listen to the advice of experts.
Also interesting: LADA 4×4 Bronto – Review – Official LADA website
Enhanced modifications
Why are reinforced collapsible axle shafts of the unloaded type better than standard ones:
Practicality - replacing the bearing is much easier since there is no need to heat the retaining ring and drain the oil, this simplifies the repair process. An installed double row bearing is easy to find at almost any auto parts store.
It is worth noting other manufacturers of reinforced mechanisms for the rear axle:
How to determine that it is time to change the wheel bearings on a Chevrolet Niva and how to carry out the replacement yourself?
Installation and replacement of steering rods and ends on a Chevrolet Niva with your own hands
Detailed instructions for replacing the input shaft bearing of a Chevrolet Niva gearbox
Niva and Chevrolet Niva Tuning Shop +7 from 10:00 to 18:00
Many people, when they see certain products, immediately have a question - “What does regular, reinforced or unloaded or semi-unloaded mean? How are they different and which ones are right for me?”
Let's take a step-by-step look at what types of axle shafts exist, how they differ, and which products can be classified as which types:
1.1. Axle shaft, semi-balanced, reinforced
This type of axle may have a slight difference in design and in the more durable material of the finished product, which allows for a greater torsional moment, unlike a standard axle shaft. The torsion limit requirement for a standard axle shaft is 250 kg; manufacturers of reinforced axle shafts, according to their data, can increase this limit by using more durable materials to 350 kg.
2. The axle shaft is unloaded by 34
The design of such axle shafts differs from semi-balanced ones in the following features. The first difference (the most important): There will be a hub between the axle shaft and the bearing, the bearing will be double-row and when installed, the inner races of the bearing will have direct contact with the shaft and the hub (the hub will clamp the inner race from the outside, the shaft from the inside). Second difference: The design is dismountable - the axle shaft, hub and bearing will be separate elements, the axle will be secured to the hub with a nut. Third difference: This axle shaft will have two splined parts, one on the differential side, the other in the hub, the hub itself is similar to the one used on the front axle of a car. Thus, some more of the bending force can be removed from the axle shaft to the bearing, which will already be double-row and ready for this, which is why such axle shafts are called unloaded by 34.
3. Completely unloaded axle shaft.
The main difference between this design and all others is the independent installation of the bearing from the axle shaft. As a rule, such axle shafts have a pin, which is installed on the bridge stocking and on which the hub is mounted; the bearing itself is not located outside the hub, but from the inside. The bearing is clamped by the hub into the working position onto the axle and only after that the shaft is installed. This way the shaft will be completely freed from bending moments.
Total for a complete understanding: Semi-unloaded axle - the bearing is completely installed on the shaft. 34 balanced axle - the shaft has direct contact with only one side of the bearing. Fully balanced axle - the bearing is installed independently of the axle shaft.
What I would like to note additionally about standard axles and why all those reinforced and structurally different products appeared on the market: As a rule, standard axle shafts cannot be repaired and if the bearing fails, they must be replaced with a new product. But despite this, many car services and private mechanics service these axles and can replace the bearing with a new one - using an angle grinder, a torch, a sledgehammer (and such and such a mother), which in some cases then leads to the breakdown of the retaining ring and the axle shaft can suddenly separate away from the car and drive away with the wheel in an unknown direction. Standard axle shafts rarely break on a regular car; much more often this happens on prepared vehicles with inter-wheel locks. A common place for an axle to break is along the splined side of the differential. The most common cause of a break is a critical torsional load due to the inter-wheel locking. A common defect is that the hub disk bends relative to the axle shaft due to vehicle overload. Not every owner of a Niva has experienced problems with the axle shaft itself; usually the bearing fails much more often. But those Nivovodys who broke their axle shafts often come to search for more durable products, and another criterion for selection is maintainability, that is, the ability to replace one or another part of the axle shaft in case of wear, breakage or defect, without resorting to a complete replacement of the product, so There is now a wide range of different axle shafts on sale for Nivovods.
Replacing the drive, oil seal and bearing
The need to replace the axle shaft and its components may be caused by increased extraneous noise in the rear axle, wear of both the spline joint, and fatigue failure of the support bearings.
Deformation of the sealing gland also often occurs. As a result, the transmission oil level decreases, which can lead to failure of the entire system. Regular inspection and diagnostics of the rear axle will help you avoid complex, expensive repairs in the future.
Purpose of marking
Each gearbox at NIVU has a specific marking:
- 2101, 2102 (not produced);
- 2103 with gear ratio Z=4.1, which means 10 teeth on the drive gear, 41 teeth are placed on the driven gear;
- 2106 with a gear ratio Z=3.9, i.e. 11 teeth on the drive gear, 43 teeth on the driven gear.
Marking 2103 indicates that these are higher-speed gearboxes, and 2106 are more traction ones.
Gearbox for Niva
When replacing one of the units, you need to pay attention to the meaning of the gear ratios: they must be the same for the front and rear axles. If the gear ratios are different, then the wheel axles rotate at different speeds
One gearbox breaks quickly.
The markings of the front and rear components of the NIVA vehicle must match and have the same gear ratios. If units marked 2101, 2102 were previously installed, replacing it with a part with a different marking (2103, 2106), then both gearboxes must be replaced.
How to remove the front hub on a Chevrolet Niva
The transmission became noisy, and wheel play appeared when hanging. I was stalling for a long time, there was no money, the time for TO3 passed, during which it was necessary to change the grease of the bearings. In short, I decided to change. I bought 4 bearings and 4 oil seals from the Sibtransavto dealer for 2076 rubles, paid about 100 rubles for 2 wheel hub nuts,
, in principle, everyone uses Litol24 - no one complains. The main thing in this matter is the tightness of the seals. I watched videos on YouTube and found important information on the forum www.chevy-niva.ru/viewtop...=0&postorder=asc&start=30 I adjusted the instructions posted on the forum for myself. There were also some ambushes. So. We drive the car into the garage, stop it with the handbrake, and put stops under the rear wheels.
Who would have thought at this point I had a blockage. When removing the caliper bracket, it is necessary to pull out the caliper pressure lever axis. Well, she didn’t want to go out, she turned everything around and barely pulled it out. I had to buy more later, a new one costs 50 rubles.
We turn the wheel in the direction opposite to the one being changed. Unscrew the ABS sensor (bolt No. 8).
Unscrew the hub nut head No. 27. Unscrew 3 bolts No. 13 securing the upper and lower ball joints. We do not touch the nuts of the ball pin itself.
Separate the brake disc from the hub. We remove the caliper protective screen, unscrew it and remove the bipod of the steering mechanism.
If the bearings are in good condition, then simply remove the old seals, take out the inner races of the bearings, wash everything and go to step 15.
We disassemble the new bearings. We press the outer bearing races into the hub. For pressing, we use the outer races of old bearings or a suitable mandrel. It must be taken into account that new races should be installed with the wide edge inside the hub. We try not to crush the outer narrow edge of the clip when pressing it. Before pressing, you can heat the hub with a blowtorch.
On one side of the hub we install the inner race of the bearing, the ring and press in a new oil seal. We press the new oil seal using the old one. On the other side of the hub we perform the same operation. The hub and knuckle are assembled and ready for installation. Without making significant efforts, we install the steering knuckle with the hub back onto the CV joint splines and tighten the hub nut. We fasten the ball joints and bipod of the steering mechanism. We put the caliper bracket in place, under the 2 bolts of which the caliper protective screen is installed. We bend the antennae of the screen at the edge of the bolts, thereby locking the bolts. We return the caliper and brake pads to their place. Check all connections again. Use a jack to lift the car off the stand and install the wheel. By hitting the wheel at 12 and 18 o'clock alternately or simply turning the wheel, we tighten the hub nut. Adjust the tightening of the hub nut.