Algorithm for replacing the front springs of a VAZ 2107
Prepare the simplest tool for the job; every car owner who at least sometimes repairs his iron horse should have it.
You will need:
- A set of keys (you should have it in your trunk);
- jack;
- a brush with metal bristles;
- wheel wrench;
- hammer;
- wire hook;
- mount;
- insulating tape.
The sequence for replacing the front springs is as follows:
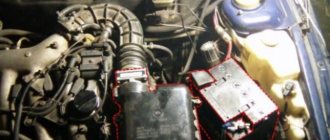
1. Remove the shock absorber from the desired side and remove the wheel.
2. Next, you need to slightly unscrew the nuts securing the lower arm.
Place a lifting device under the lower arm and lighten the suspension (this is necessary to simplify the task of removing the stabilizer).
3. Unscrew the pair of nuts that hold the fixing bracket on the stabilizer pad.
4. Now remove the retaining bracket from its place, and then the cushion (stabilizer bushing).
5. Slightly loosen the ball nut that secures the steering knuckle and the lower hinge pin. Be careful. The nut must be unscrewed until it coincides with the end of the pin. Once this happens, lower the jack that is located under the lower control arm slightly.
6. Take a hammer and make several strong (and most importantly, sharp) blows to the outer part of the fist. Thanks to this action, you will achieve the release of the pin from the rotary cam.
7
Pay attention to the lower arm. At the moment when the pin is knocked out it will be on only one nut, you need to slightly raise the jack under the lower part of the lever
But there is no need to heavily load the suspension.
8. Unscrew the pin nut and lower the lower part of the lever as low as possible. Then, using a mounting tool, move the stabilizer (more precisely, its rod) over the stud. Now remove the jack and let the lever lower.
9. Take and make a hook out of wire and secure the upper lever with it. Please note that in this case there is no need to disconnect the steering knuckle. Try to mount the lever so that it is as high as possible - this will simplify access to the spring.
10. Pry the spring from below and pull it out from the bottom. There is a rubber spacer on the upper part of the support located on the body; remove it. If it is badly cracked, replace it. Now you have an idea of how to remove the front springs on a VAZ 2107.
Lower arm repair
If the lower arm is slightly bent and no other damage is detected, then you can continue to operate the car, you just need to check the wheel alignment. Repair or replacement of this element of the front suspension is carried out in the following cases:
- severe damage to the lower arm;
- appearance of cracks.
To complete the work you will need the following tools:
- set of open-end wrenches;
- set of heads;
- metal brush;
- jack;
- puller for pressing out silent blocks;
- device for removing ball joints;
- mounting blade;
- penetrating liquid;
- hammer;
- vice.
Removing the lever
The need to dismantle the lower arm arises when the specified element fails to replace the axle or silent blocks.
Work order:
- Raise the front of the car. To do this, use a jack, but you can also use a lift.
- Remove the wheel.
- Unscrew the lower shock absorber mount.
- Loosen the nuts on the axle.
- Release the stabilizer pad mounting.
- Lightly load the suspension. To do this, you will need a reliable support, which is placed under the lever and the car is lowered slightly.
- Unscrew the nut on the support and press out the pin. This is done using a special puller.
- Unload the suspension. This must be done smoothly. Gently pull back the stabilizer to move it through the pin located on the lower arm.
- Remove the spring. To do this, it is pryed up and removed from the support cup.
- Unscrew the axle mounting bolts. Under them there are washers that are used to adjust the camber angle of the wheels. You need to remember their location, otherwise you will have to make adjustments again.
- Remove the lower arm. To do this, use a mounting spatula, which is used to gently press out the axle.
Video: sequence of dismantling the lower arm
Replacing the ball joint
You can replace the ball joint on the lower arm without removing it. Since we have already removed the lower arm, it will be much easier to change the ball joint on it:
- Clean the ball joint mounting nuts. This is done using a metal brush; you can also lubricate the threads with WD-40.
- Remove the support. To do this, unscrew the three fastening nuts and remove the indicated element. Carefully inspect the lever to detect possible damage and cracks.
- Install a new ball joint and tighten all nuts.
The new ball joint already comes with lubricant, so there is no need to lubricate it additionally. Some supports have an oil nipple in the lower part, through which you can additionally fill it with lubricant over time.
Video: replacing the ball joint
Replacing silent blocks
The sequence of work to replace silent blocks on the removed lower arm:
- The lever is securely fixed in a vice.
- Using a puller, the old hinges are pressed out.
- Inspect the lever for damage.
- One silent blocks are inserted. A puller is also used for this.
- The axle is inserted into the hole along with the washers.
- Press in the second hinge. They do this in the same way as in the previous case.
Video: replacing silent blocks
Experts recommend that after replacing the ball joint and silent blocks, use only new nuts.
Lever Installation
After repairing the lever body, replacing silent blocks or a ball joint, installation of the lower lever is performed in the reverse order:
- The axle and the lever are secured using bolts.
- The lower edge of the spring is installed in the support cup. After this, they begin to tighten the lower lever. Make sure that the stabilizer does not catch on the bushing.
- Insert the threaded part of the ball joint and fix the nut.
- Fix the stabilizer pad.
- Install the shock absorber and tighten the nut.
- Check the tightness of all nuts. They must be clamped securely and firmly.
- Install the wheels and remove the car from the jack.
At this point, the replacement of the lower arm is considered complete, and you can continue to operate the car safely and comfortably.
Video: installing the lower arm
By regularly inspecting the condition of the front suspension on the VAZ 2107, you can notice and eliminate any malfunctions in time. Even a novice car enthusiast can replace the lever, ball joint or silent blocks on his own. Keeping the suspension in good condition ensures not only comfortable, but also safe operation of the vehicle. The use of high-quality parts from trusted manufacturers will significantly increase their service life and repairs will need to be performed much less frequently.
Rear axle gearbox shank oil seal: how to replace video AvtoNovator
How to install a window regulator on a VAZ 2107 on your own
The rear axle gearbox shank oil seal is a seal located on the inside of the axle bearing. Like any oil seal, its main function is to create a seal, or rather, it prevents the leakage of transmission oil, which is located in the rear axle.
The main function of the gearbox oil seal
If depressurization occurs, then all the grease in the bearings is incredibly quickly washed out, and, as a result, they are destroyed. The main sign that the gearbox seal needs to be changed urgently is an oil leak. It is quite easy to detect this; a simple visual inspection is enough: if drops of oil are found on the surface of the gearbox housing, then you cannot hesitate. However, it should be taken into account that a thin oily film does not at all indicate the presence of a leak and is in no way a reason for carrying out repair work.
Please note that it is not always possible to limit yourself to just replacing the oil seal, since quite often it is also necessary to repair the gearbox, and this is best left to professionals. Despite the fact that replacing the rear axle gearbox seal is a rather responsible procedure that requires patience and attention, this does not mean that it cannot be done at home, you just need to strictly follow all the instructions.
Getting close to the rear axle gearbox shank oil seal
First of all, you should start by selecting the necessary tool; for this you will need a torque wrench, a two-jaw puller and, of course, a new oil seal and lubricant. Next you need to proceed in the following order. Place your “iron horse” on an overpass or inspection hole. You need to drain the oil that is located in the rear axle into a special container, now you can climb inside the car.
The first step is to disconnect the propeller shaft from the gear flange, turn on the parking brake and use a socket wrench to unscrew the nut securing the gearbox shank. In order to avoid turning the shank, it is not necessary to use a handbrake; you can also insert two bolts into the holes of the flange, and hold it with a mounting spatula or other suitable tool.
You will need a two-jaw puller to use it to press the shank flange off the gear. Sometimes this can be done without a tool, just with your bare hands, but, more often than not, you can’t do it without a puller.
Replacing the rear axle gearbox seal - the final stage
Everything is ready to dismantle the flange along with the dirt deflector and washer. Using a screwdriver or other suitable tool, pry up the old oil seal and remove it. The next step, of course, is to install a new seal. However, before you do this, it is worth checking the condition of the flange surface, as you can often find signs of wear and corrosion, which can be removed quite easily by grinding.
Now you need to apply grease to the working edge and seating surface of the new oil seal. Using a hammer and a special bushing, we press it into place. Only the blows should be soft and applied evenly over the entire surface in order to avoid unwanted distortions. All the removed parts of the shank are mounted in their original place, and it is advisable to replace the fastening nut with a new one.
Now the rear part of the car is hung out, and the axle shafts are disengaged from the gears. Use a dynamic wrench to tighten the shank nut, while its flange must be held by the bolts. Next, by rotating the flange by hand, we check the resistance; it should be uniform and light, no jamming or clicking is allowed. Finally, you need to check that there is no play.
When it's time to replace
VAZ 2107: replacing crosspieces on your own
There are several signs by which you can determine that it is time to replace the springs. These signs are:
- Detection of damage and defects in the product design. This malfunction can be determined by visual inspection, but first you need to put the VAZ 2107 car on an overpass.
- Their significant subsidence. If the vehicle's ground clearance decreases significantly, this indicates sagging of the devices in question. Springs quickly sag in such cases when the car is used to transport heavy loads every day. Also, those cars that are used as taxis also require frequent replacement of the devices in question.
If you find a problem with the springs on a VAZ 2107, then you should replace them without delay. This will extend the life of other suspension elements and save money. It is recommended to replace devices in pairs, since replacing only one element will cause the body to skew, which will negatively affect driving. In some cases, spacers help when the springs have sagged but are not deformed. Experts believe that you should not get carried away with spacers, since the physical properties of a car with spacers are many times worse. As a result of such modifications, the suspension does not function correctly, which affects many factors: from control to comfort. Therefore, if necessary, it is better to replace the springs, both rear and front. We will learn how this is done on a VAZ 2107 from this material.
Replacing the front springs of a VAZ 2107
Replacing the front suspension elements on the “seven” is carried out according to the following scheme:
- First, you need to install the car on an inspection hole or overpass, and then begin to remove the wheels, having first jacked them up.
- The front shock absorber needs to be removed.
- The nuts that secure the lower arm to the axle are loosened.
- Using a second jack, you need to place it under this lever, thus adding the suspension load. This is done to make it easier to disconnect the stabilizer.
- At this moment, you can use special spring ties (if available) to secure the springs in a compressed state. This will make further removal actions much easier.
The front springs of the VAZ 2107 need to be changed in pairs, just like the rear ones.
Signs of spring replacement
There are 3 main signs that indicate problems with the front springs. The presence of any of them or a combination of several indicate one thing - not everything is in order with the car.
Rolling the car to one side
To check the car for the presence of this defect, it is enough to place the vehicle on a flat surface without additional cargo inside. The unnatural skew of the car instantly catches your eye. If the body “leans” heavily on the left or right side, the front springs on the VAZ 2107 need to be replaced. A similar situation concerns an excessive slope on the front or rear axle.
But you definitely shouldn’t blame them alone, and here’s why. The design features of the suspension of VAZ cars from the “kopek” to the “seven” include a landing part in the upper part of the spring (popularly it is nicknamed “glass”). It acts as a top stop. During long-term operation of the vehicle, the glass tends to “fall through”. Externally, the body tilts to one side. The cause of the problem can only be diagnosed by removing the rubber cushion and glass. Typically, the failure of the glass occurs on the front springs, and especially often on the left wheel.
Extraneous noise in the suspension
A breakdown can be signaled by extraneous sounds, the source of which is located in the suspension area. This may include an obvious rattling or clanging sound, or a subtle knocking or grinding noise. Noises occur when the car drives on uneven sections of the road. For example, when hitting a bump or a wheel falling into a hole.
If atypical sounds are detected, a complete diagnosis of the vehicle's suspension and steering should be carried out. The source of the noise may be a ball joint, tie rods, or worn rubber gaskets. If everything is fine with them, the reason lies in the malfunction of the springs.
Extraneous sounds often indicate a split in a certain location. But sometimes the part breaks exactly in two. Then the car body looks skewed to the “sore spot”.
Metal fatigue
Auto mechanics often say that metal is “tired.” What does it mean? Metal fatigue means the loss of its initial properties due to prolonged use. Over time, the element copes worse with its assigned responsibilities.
Several extreme turns on both sides of the part fall into the risk zone, since they bear the main load. At the moment of compression, the rings are pressed tightly and hit each other. After some time, mining areas appear at the contact points of the rings. There is a transformation of the round rod, which gradually takes on a flattened shape.
A spring with a defect does not fully respond to road unevenness, and the suspension gently “sags.” If such a malfunction is detected, it is recommended to replace the part with a new one.
What you need to consider when installing rear disc brakes on a VAZ 2107
- Disc brakes are more efficient than drum brakes. Therefore, after installing disc brakes on the rear wheels, it is necessary to adjust the pressure regulator of the rear brake circuit, otherwise the rear brakes may operate earlier than the front ones, which may cause the rear axle to skid.
- To install disc brakes, you will have to carry out welding, milling and turning work, which will require special equipment. If it is not there, some of the work will have to be ordered externally.
- A car with a modified brake system (with disc brakes instead of drum brakes provided by the manufacturer) will not pass inspection.
- The requirements for the condition of the rear wheel hub bearings increase when installing disc brakes. The small amount of play allowed on drum brakes can cause damage.
- Tampering with the brake system is a dangerous step. If you are not confident in your capabilities, it is better to refuse to install disc brakes yourself or entrust the job to professionals.
Sequencing
How to change the oil in a manual transmission on a VAZ 2107 with your own hands?
To work, we will need the tools listed in the list above. In addition to them, we will need a rust cleaning liquid. It's better if it's WD40.
- The car is jacked up and the rear wheels are removed. Provides access to the brake drums and rear axle shafts. The axle shafts are thoroughly wiped off from dirt using a rag, and if necessary, treated with WD40. The best way to clean rear axle shafts is with WD40.
- The brake fluid from the system is drained into a previously prepared container. The pads are removed from the brake drum, then it is removed along with the axle shafts so that only the brake pipes remain. The first step is to remove the rear brake pads from the drum.
- The mounting rings and wheel bearings located under the rings are removed from the axle shafts. Green wheel bearings are visible under the retaining rings and need to be removed.
- Now the axle shafts are ground on a lathe so that their diameter matches the diameter of the selected brake disc (at this stage of the work, the car owner will need the help of a qualified turner). After this, holes are drilled in the axle shafts for the brake disc mounting bolts. Boring the rear axle shafts of a VAZ 2107 - work for a qualified turner
- The axle shafts improved in this way are installed back on the rear axle of the VAZ 2107. A brake disc is installed on top of them and screwed with a pair of mounting bolts as shown in the photographs above. After securing the discs, disc calipers with pads are installed on them, the rear wheels are installed in their regular places and the car is lowered from the jacks.
Video: setting rear disc brakes to “classic”
So, even a novice car enthusiast can change the front brake discs on a VAZ 2107. All that is required is the ability to use wrenches and a minimal understanding of how a disc brake system works. As for replacing rear drum brakes with disc brakes, it will not be possible to do this without the help of a qualified turner.
Sources
- https://bumper.guru/klassicheskie-modeli-vaz/tormoza/kak-snyat-tormoznoy-baraban-na-vaz-2107.html
- https://provaz07.ru/tormoza/snyatie-tormoznogo-barabana-vaz-2107.html
- https://semerkavaz.ru/tormoznaya-sistema/kak-pomenyat-tormoznojj-baraban-na-vaz-2107/
- https://avto-idea.ru/remont/zamena-zadnih-tormoznyh-kolodok-vaz-2107-svoimi-rukami/
- https://semerkavaz.ru/tormoznaya-sistema/zamena-kolodok-na-vaz-2107/
- https://semerkavaz.ru/tormoznaya-sistema/zamena-zadnikh-tormozov-na-diskovye-vaz-2107/
- https://bumper.guru/klassicheskie-modeli-vaz/tormoza/zadnie-diskovyie-tormoza-na-vaz-2107.html
Removing the spring
On both sides of the car, spring removal is carried out in the same way. When replacing the front springs of a VAZ, you need to have a minimum set of tools on hand. A screed is a must—you can’t do without it. Further actions:
Place the ties opposite each other and compress the spring as evenly as possible. Using a 10mm wrench, unscrew the nuts that secure the stabilizer pad. Completely dismantle the cushion and stabilizer bracket. Loosen the lower ball joint to the control arm. Lower the second jack located under the lever. Once the lever is lowered, the spring can be removed.
There is no point in pressing the ball joint out of the steering knuckle - this is a very difficult task and requires a puller. It will be much easier to unscrew the three bolts that secure the cage to the lever. The spring should be compressed as much as possible. Be sure to remove the spacer from the top cup. If it is damaged or deformed, it should be replaced.
PURPOSE OF SUSPENSION VAZ 2107
The suspension of the VAZ Seven, like any other car, is necessary for safe and comfortable movement. Its design may seem complicated at first glance, but in reality it is not. The front and rear suspensions are a set of elements whose purpose is to provide an elastic connection between the wheels and the chassis of the car. The main function of the suspension is to reduce shock, vibration and jolts that occur when driving over uneven surfaces, which is inherent in roads with poor quality surfaces. It is worth looking at faults, repairs and modernization of the rear suspension in more detail.1
FRONT SUSPENSION
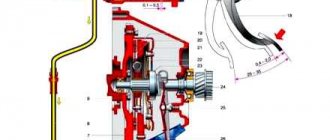
The VAZ 2107 has a double-wishbone independent suspension with an upper and lower wishbone at the front. The first of them is fixed through the mudguard strut, the second - to the front beam connected to the power elements of the body. The upper and lower arms are secured to each other by means of a steering knuckle and ball joints. To rotate the levers, the suspension design includes silent blocks made of rubber and a metal bushing. The softness and smoothness of the suspension is determined by elements such as springs and shock absorbers, and the stability of the car on the road is determined by the anti-roll bar.
The front suspension of the VAZ 2107 bears greater loads than the rear, so its design is made independent
REAR SUSPENSION
The rear of the car takes up less load than the front, so the suspension has a simpler design - dependent. The wheels of the rear axle of the “seven” have a rigid connection with each other. Such a system today, although outdated, still has positive aspects - high reliability and ease of maintenance.
How to raise or lower the suspension of a VAZ car with your own hands
How to independently replace the front and rear silent blocks on a VAZ 2110
Sooner or later the time comes to modify the car’s suspension, or, more simply, the motorist is ready to tune the suspension of his VAZ
It doesn’t matter what the reasons are that the motorist decided to raise or lower the car’s suspension: both suspensions are possible, or only the front or rear
You need to understand what responsibility the motorist will have if he decides to lower or raise the car’s suspension. Technologically, lowering or raising a car's suspension is not that difficult, even if the driver has little experience as an auto mechanic. The meaning is different.
How to lower the suspension of a VAZ car
Tuning a car's suspension has some features. Before you lower or raise your car's suspension, you need to think about what the results will be after modifying the suspension. You need to understand that changing the factory standard parameters of the car will lead to a change in the physical properties that were originally included in the design.
Lowering the suspension not only improves the vehicle's handling, but also changes the appearance of the car. There are some peculiarities in lowering the suspension. When lowering, the motorist reduces the ground clearance (clearance). You also need to understand that when the suspension is lowered, the car will not drive on German autobahns and European roads.
There are potholes on our roads, and you will also have to cross tram rails. First, to lower the suspension, you must first diagnose the suspension and calculate the installation gaps between the wheel arch and tires.
It should also be taken into account that the tires will have to be changed to low-profile with high-profile
This is important to consider
Before raising or lowering the suspension, it is worth taking into account popular experience, which shows that all suspension components need to be changed at the same time. If you change suspension elements selectively, this will give the opposite results
How to raise the suspension of a VAZ car
If the car suspension is raised, then you need to make sure that the car does not lose its characteristics. The main suspension components need to be replaced:
- Shock absorbers, when replacing there is no need to do anything on your own. In the catalog you need to select those shock absorbers that the manufacturer offers for a specific car model.
- But to raise the suspension, stiffer and shorter shock absorbers are chosen.
- Anti-roll bar. It is better to change the stabilizers together with the struts.
- The springs are chosen to be stiffer and shorter.
The suspension of a VAZ car is raised for several reasons. As a rule, car owners decide to raise the suspension in 2 cases: to increase load capacity and increase ground clearance (cross-country ability). Most often questions arise about how to properly raise the rear suspension. There are lift kits on the market today for different car models. These kits allow you to raise the suspension to a certain height.
We must not forget that an increase in vehicle clearance is accompanied by some changes in the physical properties of the car. For example, the center of gravity increases. This may negatively affect the vehicle's performance when cornering at certain speeds.
The important thing is that before you raise or lower the suspension yourself, you need to take into account a very important value - weight redistribution, which matters when turning the car
Weight redistribution is affected by lowering the center of gravity and increasing the distance between the wheels. Increasing the distance between the wheels is done by switching to wider tires. But this method is limited by the dimensions of the car. Lowering the vehicle's center of gravity can be achieved by installing short struts. This reduces the suspension travel. The racks must be chosen sufficiently rigid.
If the motorist is not ready to calculate all the relationships between parts, physical properties of the car and suspension components, then in order to raise or lower the suspension, you need to choose the second option - purchasing a complete suspension package for a specific car model. On request, as a rule, there are various proposals for modifying the suspension. Specialists will select components for the VAZ based on their preferences and the requirements of the car owner.
But you will need to install them yourself. If you think that raising or lowering a car’s suspension is just a matter of replacing springs and shock absorbers, then this will be a big mistake. Suspension tuning requires making changes to the type of tires and wheels, calculating how the behavior of the car will be affected by changing the suspension. This is provided that the result of the modification is necessarily positive.
xenon-kiev.com.ua
When to change springs
Two main signs that the VAZ 2107 springs need to be replaced::
- Damage appeared on the springs. This can be determined by visual inspection.
- The springs sagged a lot. This is noticeable in the reduction in ground clearance of the “Seven”, especially under load, and in the frequent breakdowns of the suspension when driving on a bad road.
In both cases it is necessary to make a replacement. Sometimes VAZ owners try to restore the stiffness of sagging springs using spacers. This decision is not entirely correct. The dynamic properties of a working spring and a spring with a spacer are different, which is why the suspension does not work quite correctly. In addition, cracks may soon appear on the reinforced sagging spring.
Helpful information
A short rod unscrewed from the stocking will facilitate dismantling and installation. For ease of assembly, a new rubber spacer and a metal lining are fixed to the spring with electrical tape or tape. Reinforced springs with VAZ 02 - 04 will increase the load capacity, but the car will become rougher to drive. It is easier to replace the torque rods with new ones without wasting time pressing the bushings in a vice. When experimenting with the height of the springs, you should remember the length of the shock absorber stroke. They may have to be lengthened or different ones used. During disassembly, the brake hose receives extra stress, which can lead to damage.
Read, it may come in handy: Replacing the elastic coupling, suspension bearing. Features of replacing the joints of the cardan shaft crosspieces
Follow safety precautions and replacing rear springs will not be a hassle.
What to look for when choosing parts
There are several factors to consider when choosing springs.
This is interesting: Handbrake: self-adjustment of cables
Rigidity
Rigidity affects not only the comfort when driving in a car, but also when there is a load on other elements of its chassis system. It is more comfortable to ride on soft springs, especially on poorly paved roads. However, it is not advisable to install them on a car that often carries significant loads. Conversely, it is better to install stiff springs on cars designed to transport heavy objects. This is especially true for rear shock absorbers.
In the context of rigidity, another situation is relevant. Often, when purchasing new springs (especially for VAZ classics), a pair of identical springs included in one set may have different stiffnesses. Naturally, this leads to the car tilting to the right or left. It is almost impossible to check them when purchasing, so there are two ways to solve the problem.
The first is to install the spacers mentioned above. With their help, you can level the vehicle's ground clearance and achieve uniform suspension stiffness. The second way is to buy higher quality springs, usually from trusted manufacturers, usually foreign.
Stiffness is a physical quantity that in springs depends on the following parameters:
- Rod diameter. The larger it is, the greater the rigidity. However, here you need to take into account the shape of the spring and the diameter of the rod from which each coil is made. There are springs with variable overall diameters and rod diameters. More on them later.
- Outer diameter of the spring. All other things being equal, the larger the diameter, the lower the rigidity.
- Number of turns. The more there are, the lower the rigidity. This is due to the fact that the spring will bend along its vertical axis. However, additional parameters need to be taken into account here. In particular, a spring with a small number of turns will have a short stroke, which in many cases is unacceptable.
Length
The longer the springs are, the greater the vehicle's ground clearance will be. For each specific car model, the corresponding value is directly indicated in its technical documentation. In some cases, the length of the front and rear springs will be different. Ideally, the manufacturer's recommendations should be followed. Deviation from them is possible only for tuning or in the case of using the car for cargo transportation.
Turning parameters
The general name in this case refers to the diameter and number of turns. The overall spring stiffness depends on these two parameters. By the way, some spring models have an uneven shape with coils of different diameters. In particular, with narrow turns at the edges and wide ones in the middle.
However, such turns also have different diameters of the metal rod. Thus, the large-diameter coils located in the middle of the spring are made of a large-diameter rod. And the outer small turns are made from a rod of small diameter. Large rods work on large irregularities, and small ones, respectively, on small ones. However, due to the fact that small bars are made of thinner metal, they break more often.
Such springs are mostly original, that is, those that were installed from the factory. They are more comfortable to drive, but their service life is lower, especially when the car is constantly driven on bad roads. Non-original springs are usually made from a rod of the same diameter. This reduces the comfort of driving the car, but increases the overall life of the spring. In addition, such a spring will cost less, since it is technologically easier to manufacture. What to choose in this or that case is up to everyone to decide for themselves.
Springs and shock absorbers for the front and rear suspension of VAZ 2106, 2107, 2101, 2105
Well, spring has come, I decided to do the suspension. First of all, I spent a couple of days surfing the Internet. You need a sports suspension so that the car behaves steadily on the highway at least up to 160 km/h and has the least amount of roll when cornering. At the same time, I want a more or less comfortable ride in the city, over bumps, etc., I also go to the country. There is no need for a big understatement. The money factor is also important...
SHOCK ABSORBERS FOR CLASSICS VAZ 2106, 01, 05, 07, 03 – PLAZA SPORT, SINGLE-PIPE, GAS-OIL.
{loadposition user20}
In the picture above there is an ammo of the old and new batch (yellow and orange).
Monotube shock absorbers are better and more reliable than twin-tube shock absorbers. And of course gas-oil ones! First of all, I spent a couple of days surfing the Internet. The main fluctuations were between KYB and PLAZA. PLAZA won. In the Internet community there is a prejudiced attitude towards these shock absorbers, namely, that when buying them you are playing the lottery. Some drive perfectly for more than 100 thousand, some break down in the first thousand. Having reasoned logically, summarized the information and read the official explanations from PLAZA representatives, I came to the conclusion that the culprit is:
- Fakes. Questionable shock absorbers were purchased at markets, small shops, etc. Often the seller himself is confident in the originality of the shock absorber. To combat counterfeits, PLAZA changed the labeling and color of ammo. Now plaza sports are yellow (formerly orange), and plaza standard are orange (formerly yellow). I just got Plaza Sport front ones from different batches (one orange, one yellow). So take a look at the box before you buy it. And yet, in each box with a shock absorber there is a piece of paper with the serial number of the shock absorber with a stamp.
- Incorrect pumping. Many “tuners” don’t even know that shock absorbers need to be pumped before installation! Such shock absorbers have a high probability of failure in the first thousand. Bleeding shock absorbers before installing them on a car. I’ll briefly describe it: Turn the ammo head down, squeeze it all the way, 3-4 seconds. Hold, turn back, 3-4 seconds. hold, release (let open) and so on 6-7 times. To check whether it is pumped, we press sharply in the working position - if there are no dips, the stroke is uniform, then everything is fine. If there is, we pump it further. After bleeding, the shock absorber should remain in working position. Do not turn!
place only vertically
old shock absorber
The shock absorber on a VAZ classic is easy to install. Unscrew a couple of nuts on each - and you're done. This is in theory. In practice, everything is more complicated. The front shock absorber mounting bracket (new!) was broken during a previous repair at a car service (more precisely, a pin), and then carefully welded to the lower arm, instead of drilling and screwing. I deliberately left the first part of the description of the pendant, where I rejoiced at the good craftsmen. I forgot that I live in Russia and everything here is done through the ass. The main thing is that they didn’t tell me anything! There were also no new silent blocks. They simply weren’t installed, leaving the old ones!!! I'm just being crazy! It’s too late to figure it out, and it’s useless. I had to buy and install new silent blocks, steering rods and lower control arm.
rear
front, welding visible on left
SPRINGS FOR CLASSICS VAZ 2106, 01, 05, 07, 03 - SIRIUS, PROGRESSIVE or regular, you can FOBOS, but I was afraid to drive with FEAR springs, and they say they break often, maybe fakes?...
Sirius springs
I installed the front springs with variable pitch (progressive), the rear ones - regular ones. Replacing springs is much more difficult than replacing shock absorbers. The rear springs can be changed using a single jack.
You'll have to tinker with the front ones. You also need a shock absorber spring compressor. It's hard to find at 1am, so stock up in advance.
Now about the exhaust of all this tuning. The car is simply beyond words, elastic and moderately tough. Vibrations are at a normal level, there are no breakdowns in the suspension (I haven’t noticed it yet). Holds the track like a glove. By the way, the car turned out to be lowered (Sirius springs), let's see what happens next. In a coupe with a tuned engine, it handles no worse (or maybe better) than a budget foreign car! I want to ride and drive.
The cost of the upgrade is about 6,000 rubles. Definitely worth the money spent.
Replacing the front suspension shock absorber on a VAZ 2106
Replacing the rear suspension spring on a VAZ 2106 car
Replacing the front suspension spring on a VAZ 2106 car
Replacing shock absorbers and when spring replacement is required.
If the shock absorber is faulty, it should be replaced. The best option when replacing is to also change the springs, but this is not necessary and is quite expensive, especially since it is not always possible to visually determine some of their characteristics, for example, metal fatigue.
Springs may lose their properties as a result of:
- its wear and tear;
- mechanical damage;
- frequent heavy overload of the vehicle;
- driving at speed on rough roads with obstacles;
- fatigue and metal corrosion.
When a spring loses its properties, it sag. As a result, the vehicle handles worse on the road, its braking performance decreases, and the shock absorbers wear out faster.
Do-it-yourself suspension spring replacement
Do-it-yourself suspension spring replacement
Due to compression and stretching, the spring dampens unevenness, potholes on the road, as well as vibrations of the car body. Since the springs take the heaviest impacts, they often burst, although this is very difficult to detect until it is removed. Experienced drivers can guess the problem by bumps in potholes, car pulls, or noise in the chassis. Replacing a suspension spring with your own hands is not difficult if you follow the preliminary steps. With the appropriate equipment, it is accessible even to beginners.
Let's consider the stages of removing and replacing the front and rear suspension springs of a car. The procedure is similar for almost any car brand.