When to change pads
The frequency of replacing rear pads is 2 times less than the front ones. Since they have less load when braking.
On average, the mileage they can cover without replacement is 60-90 thousand km. Of course, these figures are approximate, since the operating conditions and driving style of each driver are individual. There are cases where the pads can be worn out by 30,000 km.
It is necessary to change the pads if:
- The thickness of the lining is less than 1.5mm. With such a thickness, the block no longer performs its functions and is simply not able to effectively brake the car.
- The overlay begins to peel off from the base. Using a pad with such problems is unacceptable. The pad can come off and get caught in the rotating parts, causing the wheel to wedge.
Overlay thickness
There is no need to remove the drum to check the thickness of the lining. You just need to remove the special rubber plug behind the drum and assess its condition.
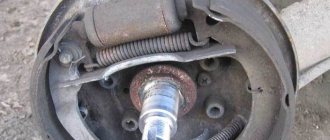
Plug for checking the condition of the rear pads
Periodicity of pad replacement
There are several main factors that influence how often you should replace your brake pads. These include:
- quality of parts;
- driving style;
- frequency of emergency braking;
- type of vehicle, etc.
How often to change brake pads
But there are also standardized data from manufacturers. For example, pads from domestic brands can last no more than 15,000 km, foreign ones - from 20,000 km. For sports cars, pads need to be changed every 5,000 km, and this does not depend on the pad manufacturer. There is also a difference between disc and drum brakes (drum brakes have about 10 times more mileage than disc brakes).
Frequency of replacing pads on a car
Important! The pads on the front wheels wear out much faster than on the rear wheels. This is due to the fact that the front pads are subject to more intense loads.
Differences
Priora pads have different designs and it is very important to know which ones are installed on your car. If the car is equipped with an ABS system, then the pads must be purchased specifically for cars with ABS; they will not work for Priora modifications without an anti-lock brake system (ABS).
The pads have a specific design for cars with and without ABS. The difference is that the pad with the anti-lock braking system has a special hole for the ABS sensor, while the regular one does not.
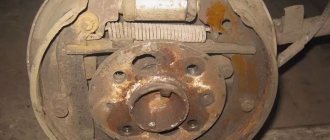
You can see the differences between the pads in this photo.
Elements of the rear brake mechanism: 1 - front block of a car without ABS; 2 — front block of a car with ABS; 3 — pad spacer; 4 — upper tension spring of the pads; 5 — handbrake drive finger; 6 — pin washer; 7 — pin pin; 8 — rear block of a car with ABS; 9 — rear block of a car without ABS; 10 — hand brake drive; 11 — lower tension spring of the pads;
How to extend the life of pads?
Only experienced drivers know what to do to extend the life of their brake linings. There are several simple recommendations for this.
Car brake system care
- Running in new pads. Immediately after installation, new linings need to be broken in. To do this, you should accelerate the car to 50-60 km/h and, by smoothly braking, reduce the speed to 10 km/h. Repeat the procedure several times.
- Calm driving style. It is necessary to avoid an aggressive driving style, thereby preventing overheating of the linings.
- Engine braking (gearbox ). The driver must learn to reduce speed not only by pressing the brake pedal, but also by pressing the engine, that is, by timely removing his foot from the gas pedal.
- Cooling of brake linings. You should not leave your car in a parking lot or garage with hot brake components, especially after aggressive driving. It is necessary to cool the pads and discs while driving.
- Avoid contact of pads with water. You should avoid driving through puddles so that water does not fall on the heated friction surface. Otherwise, heating with rapid cooling will make the metal more brittle.
How to extend the life of brake pads
Following these simple recommendations will significantly extend the life of the pads and discs. And everyday driving will become more enjoyable and safe.
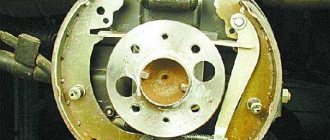
Arrangement of elements of the rear brake mechanism
This picture shows a detailed arrangement of the elements of the rear brake mechanism with a description of each element. This will be necessary to understand the principle of operation of the mechanism.
Elements of the rear brake mechanism with ABS: 1 — brake mechanism protection; 2 — ABS system sensor; 3 — front block; 4 — pad spacer; 5 — rear wheel brake cylinder; 6 — hand brake drive; 7 — rear block; 8 — ABS sensor disc; 9 — rear brake drum;
Signs of Brake Pad Wear
The condition of the brake pads can be assessed not only by visual inspection, but also while driving. There are a number of signs:
- the appearance of chips or cracks on the surface of parts;
- triggering of the lining wear sensor signal;
- the presence of metal shavings on the surface of the disk;
- increased braking distance;
- the appearance of shocks during sudden braking;
- reducing the amount of brake fluid;
- squeaking pads when braking;
- inadequate operation of the braking system.
Signs of Brake Pad Wear
On a note! Due to constant contact of the wire with moisture, the brake pad sensor may not operate correctly, so a visual inspection is very important.
Preparing for replacement
Before changing the pads, it is necessary to prepare the car.
Preparation
- It is necessary to pump out some of the brake fluid from the reservoir using a syringe or bulb. This is necessary to prevent excess fluid from leaking out of the top when the brake cylinder is compressed.
- Next, we loosen the handbrake cable; if it is too tight, it will be impossible to compress the brake cylinder, which will complicate the work process.
Read how to adjust the handbrake here.
- Then we prepare the necessary tools
Required tools:
- Head on "7"
- Torx head "E8"
- Open-end wrench "10"
- Ratchet
- Large flathead screwdriver
- Two mounts
Step-by-step instruction
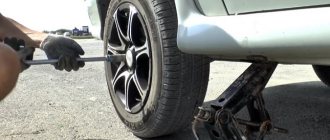
- Jack up the wheel and remove it (remember to put chocks under the wheels of the car).
- If the car is equipped with an ABS system, then it is necessary to remove the ABS sensor so as not to break it when removing and installing the pads.
- To do this, you need to unscrew the sensor with the “E8” head and pull it out of the drum.
- Using a ratchet with a head set to “7”, unscrew the guide wheels (in some models of vases the guides are made for an open-end wrench set to “10”).
- Next, you need to dismantle the drum. To do this, you can use a wooden block or mallet and strike the end of the drum until it comes off.
Attention:
After the drum is removed, do not press the brake pedal under any circumstances, as the piston of the brake cylinder may fall out of the cylinder.
Make sure that the car is released from the handbrake. Otherwise the drum will not be removed.
- We remove the drum; if the car is equipped with ABS, we remove the ABS sensor master disk.
- The next step is to compress the brake cylinder. We take two pry bars and squeeze the pads so that the cylinder is compressed, as shown in the picture.
- Next we proceed to disassembling the rear brake mechanism.
- Remove the upper tension spring with a screwdriver and take it out.
- We take out the spacer bar by spreading the pads.
- Use a screwdriver to remove the front pad pressure spring.
- Remove the front block.
- Remove the rear pad pressure spring and release the pad down.
- We remove the handbrake drive lever from the handbrake cable engagement and remove the shoe.
- Unbend the cotter pin and pull it out of the pin hole.
- Remove the washer and handbrake drive, and then the finger from the block.
The next step in replacing the rear pads is to reassemble them in reverse order.
To make tensioning the compression spring more convenient and easier, you can use a piece of wire or rope to engage the spring with the block.
After the pads have been replaced on both sides of the vehicle, the handbrake needs to be adjusted. You can read how to properly adjust the handbrake here.
The brake pad replacement process is complete.
What do you need for work?
Proper preparation will allow you to replace the pads more efficiently. So, for work you need to prepare the following:
Tools for replacing brake pads
- wheel wrench;
- wheel chocks (a brick will do);
- flat screwdriver;
- a set of keys;
- work gloves;
- jack;
- set of brake pads;
- lifting supports;
- pliers.
A set of new brake pads
Repairing the brake system, in particular replacing pads, is not always a long and difficult process. With proper preparation and careful adherence to instructions, you can get the job done in a short time and make your car safer.
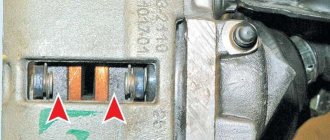
Tool for screwing in rear brake pistons
Important! You may also be interested in our article on replacing ball joints.
How do rear brakes work?
The rear brakes of the “seven” consist of two important elements: the brake drum and the brake mechanism located in this drum. Let's look at each element in more detail.
Brake drum
This is a device that is attached to the rear wheels and rotates with them. When this device is blocked, the rotation of the wheel slows down. Structurally, the device has a simple appearance, and is presented in the form of a massive round metal part with holes for mounting pins.
When considering the brake drum of the seven, it is important to mention the main dimensions of this device:
- The internal diameter of the brake drum is 250 mm. The maximum permissible diameter, taking into account the boring, is 2.2 mm larger.
- The internal height is 57 mm.
- The total height is 69 mm.
- The external size of the brake drum is 305 mm.
- The total number of holes is 8, four of which are needed for the studs that secure the wheel.
The operating principle of this device is quite simple - a locking mechanism (pads) acts on the inside of the part, slowing down the rotation of the device along with the wheel. This is how the car slows down.
Rear wheel brake
Knowing the design of the part, you need to find out how the blocking or braking process occurs. This function is realized due to a special design that is securely attached to the wheel hub. This design is based on the following components:
- Brake pads - there are 2 of them, which are shaped like a crescent. The outer part of the shoes is in contact with the inner part of the round base of the drum, reducing its rotation speed.
- Return springs - ensure that the pads return to their original position when the brake pedal is released.
- Rear wheel brake working cylinder.
- A handbrake cable, which secures the wheels (and the car) when the handbrake is engaged.
The principle of operation of the mechanism is simple, and is based on the transmission of force from the pedal to the executive body. The force is transmitted using brake fluid, which acts on the working cylinder of the mechanism, driving the pads. Also, the pads are driven not only through the hydraulic system, but also through the handbrake cable, which is called the parking brake.
Knowing the design and operating principle of the brake drum, you can proceed to the next stage - identifying the need to replace the mechanism.
Front TC
When starting to replace the front TCs, remember that they are changed only in pairs. Buy new pads rather than old ones that have not yet served their useful life just because they are cheaper. Don't skimp on your own safety.
- Place wheel chocks under the rear wheels. The machine must be stationary. If you have a working handbrake, apply it.
- Disconnect the negative terminal from the battery by de-energizing your VAZ 2109.
- Check the current level of fuel fluid in the expansion tank. If the fluid is at or near the MAX mark, part of the brake fluid should be drained. Otherwise, when the pistons are compressed, the fuel fluid will begin to pour out.
- Loosen the tension on the wheel bolts, raise the car, and then remove the first wheel you start with. Next, following the same instructions, change the TC on the second wheel.
- Thoroughly clean the surface of the brake disc and caliper from accumulated dirt. No mineral solvents. Dry clean only.
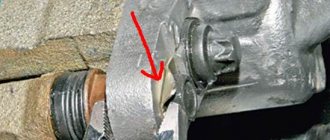
- Remove the rubber seal (also known as the brake hose holder) from the bracket located on the rack.
- Bend the antennae of the lock washer of the bolt responsible for fixing the guide pin.
- Unscrew the bolts and remove the housing.
- You have freed up access to the front fuel tanks, so nothing prevents you from dismantling them.
- If you need to remove the TC, but you are not going to change them, be sure to put marks on them. If you mix them up during assembly, the consequences may not be the most pleasant.
- Measure the thickness of the friction layer on the TC. If it is less than 1.5 millimeters, the pads must be replaced. Replacement is also required if there are clearly visible chips, scratches, or defects on the surface of the pads.
- Before installing new brake brakes, carefully remove all dirt from the brake mechanism.
- Using a mounting spatula and one of the old TCs installed in its socket, press the piston into the cylinder, thereby fully preparing the site for reassembly with a new block.
- Assembly is performed in the reverse order of disassembly.
When driving on the roads, you are not only responsible for yourself. Therefore, your car should always be in good condition.
https://youtube.com/watch?v=1M8iKMFVM0
If you change your brake pads in a timely manner, you guarantee the safety of yourself, your passengers and other road users.
Symptoms of malfunction, resource
Another sign is the car’s responsiveness to the brake pedal. So, when the rear pads wear out, the car will slow down slower. And if the linings are worn down to the metal base, then the problem will be accompanied by creaking and overheating of the drum. The latter factor can lead to the brakes jamming, which is extremely dangerous.
The manufacturer notes that the minimum thickness of the pads on the rear drums should be 1.5 millimeters.
It is worth noting that the design of the brakes on the 14th Lada is identical to the “eights” and “nines”.
With the front pads, everything is simple - you can determine their wear visually by removing the stamped disc. And if the car has a “casting”, then without dismantling the wheel at all. With drum pads everything is much more difficult. They are hidden under the lid. Not every car owner will remove it in the hope of detecting imminent wear and tear.
There are only two characteristic signs. The first is a weak handbrake. Many will think that the cable has stretched (after all, the mileage is no longer low) and, having tightened it, will continue to use the car. But the cable is not always the cause of the malfunction. If the thickness of the pads is minimal, the travel of the parking brake lever will increase, since more force is required to compress them.