Replacing front brake pads on VAZ 2113, VAZ 2114, VAZ 2115
Welcome! Front brake pads are one of the most important elements of the braking system, because if there are no pads, then the front wheels will not brake at all, so if the pads on your car have become unusable over time, in other words, worn out, then these pads it is necessary to change it and quickly with new ones, because you never know, and you don’t need to play with the brakes either.
Note! To replace the front brake pads, you will need to stock up on: A wheel wrench to remove the wheel on which you are going to replace the pad, as well as a jack to lift the car, and also take with you a basic set of wrenches, a screwdriver, as well as If possible, stock up on some kind of lubricant like WD-40, or even that!
Summary:
What causes brake pads to wear out? Their wear can only occur due to several reasons, namely due to sudden braking, as well as due to constant braking, and their wear can also occur very, very quickly due to any metal object getting into them. for example, due to a nail getting into them, which at the first braking will most likely go into the inner part of the block and during further braking will make itself felt by making a grinding noise.
Note! Under no circumstances should you ever drive a car with your foot on the brake pedal or, indeed, on other pedals, this is due to the fact that there are a lot of people in the world who have the habit of constantly keeping their foot mainly on the clutch pedal, and there are also those who keep your foot is constantly on the brake pedal, this is strictly forbidden, because the parts that relate to the clutch system and the braking system very quickly become unusable and thus have to be constantly replaced!
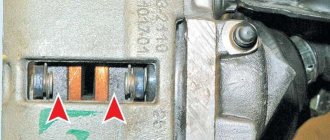
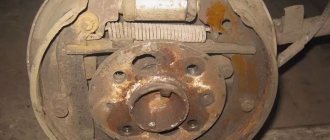
Where are the front brake pads located? These pads are located in the front part of the car, by the way, this can also be understood by reading the question, but few people know their more precise location, so for those people who don’t know yet, these pads are located in the inner part of the wheel, and they are clamped there into the caliper, in In general, for a more detailed location, see the photo:
Note! In this image above there is an arrow, and this arrow points to the same caliper, inside of which there are two brake pads that have to be changed from time to time!
When do you need to change front brake pads? They need to be changed only when, when braking, the front wheels begin to make a noise that will be similar to metal touching each other, and this noise will also resemble some kind of grinding of the same metal among themselves.
Some people say exact numbers for which pads need to be replaced, for example, many say that after 15,000 thousand mileage the pads need to be changed urgently, but the point is that there are no exact numbers for replacing pads and never have been, because as has already happened It was said a little earlier that the pads wear out only from the intensity of driving and we are not talking about any numbers here and will not talk about them.
Note! By the way, it is very easy to check the pads for wear, to do this, first remove the wheel from the car and then look at the window (Indicated by the arrow) which is present in the brake caliper, and through this window you should be able to see the brake pads, which can be visually very easily identified wear!
VAZ 2114, 2115, 2113 replacement of front brake pads. Video and photo instructions
We will show you how to correctly and quickly replace the front brake pads on VAZ 2114, VAZ 2115, VAZ 2113 cars in the field.
We tear off the wheel bolts, lift one side of the car on a jack, unscrew the bolts and remove the wheel.
We put wheel chocks under the rear wheels; if they are missing, ordinary bricks will do. So that the old pads can be easily pulled out, you need to use a strong screwdriver or other suitable object to loosen them, pressing the cylinder:
We bend the washer, loosen the lower bolt a little, unscrew the upper one completely, using a 13mm wrench:
We move the caliper a little to the side and take out the old brake pads. We thoroughly clean the seats from accumulated dirt, shavings, etc. For these purposes, we used a screwdriver and sandpaper, but a metal brush works best:
We check the operation of the guides; they should move smoothly. In any case, every time you replace the pads, it is better to take them out, clean them and re-lubricate them; this will not take much time and effort, but you will be confident in their operation. Do not use lithol as a lubricant; you need a special high-temperature lubricant for calipers and guides; some manufacturers put a small bag along with a set of new pads.
It is convenient to tighten the boots with a screwdriver, at the same time check their integrity so that there are no even small holes, change them if necessary, they cost a penny. Now we need to completely press the brake cylinder inward, we do everything in the field with our own hands, so we use a wheel wrench for this purpose, but it is much more convenient to do this with a regular clamp.
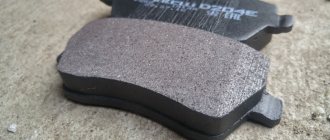
We put the new pads in place and lower the caliper. We assemble in reverse order. I recommend lubricating the threads of the bolts with copper grease so that they do not stick during operation and can always be easily unscrewed.
Before you start driving, press the brake pedal all the way down several times.
Video of replacing front brake pads in VAZ 2115, VAZ 2114, VAZ 2113:
Backup video on how to replace front brake pads in VAZ 2115, 2114, 2113:
When is it necessary to change front brake pads?
There is no exact number of kilometers traveled for the pads; a lot depends on the manufacturer, the driver’s driving style, the general condition of the brake system, etc. The most important rule that must be followed is that the thickness of the lining should not be less than 1.5 mm. If you drive on worn linings, in addition to increasing the risk of getting into an accident, your caliper may also jam, and replacing it is expensive and time-consuming. Read times: 1,691; Today: 1
How to replace the front brake pads on a VAZ 2113-VAZ 2115?
Note! Always remember a few things, firstly, try to always replace the pads on your car on both front wheels at once, even if it is expensive but it is still necessary, because if you replace the pads only on one side and not on the other, then this will lead to uneven braking of the car, that is, one wheel will slow down much more strongly than the other. Because of this, during sudden emergency braking, the car can very easily drift in any direction but not in a straight path, and in connection with this you will create other people an emergency situation that can lead to different outcomes!
And secondly, after replacing the pads with new ones, always remember that the first 100 km of the car will need to be driven moderately, because at the very beginning the new brake pads will first have to get used to the worn brake disc and until they get used to, you will have the car braking is bad, so after replacing, try to drive carefully, and as smoothly as possible press the brake pedal until the car comes to a complete stop, thereby you will reduce the mileage it takes for the new pads to wear in, and thus literally after 50 km, the car will brake as it should !
Removal: 1) Before you begin replacement, be sure to remove the wheel from the car. (For information on how to remove a wheel, see the article: “Replacing a wheel on a VAZ”)
2) Next, when the wheel is removed from the car, take a wrench in your hands and use it to completely unscrew the upper bolt that secures the caliper bracket.
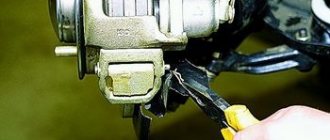
Note! You won’t be able to just take and unscrew this bolt, and all this is because it is secured against turning off when driving, with a counter-key, so if in order to unscrew this bolt, you will first need to bend the tip of this same counter-key and After that, start unscrewing this bolt!
3) After the top bolt is completely unscrewed, move to the bottom one and use a wrench to loosen it slightly, while bending the same counter key.
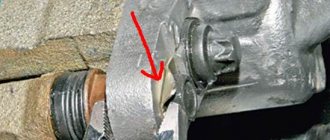
4) Then find the hose that is attached to the shock absorber strut, and after finding it, pull it slightly and thereby remove it from the bracket to which it is attached. (Just under no circumstances disconnect this hose from anything, just remove it from the bracket and that’s it)
Note! When the hose is removed, the following situation may occur: the reservoir in which you have brake fluid is filled (If it is full), then some of this fluid may go out through the cap and some will pour out of the reservoir, so to prevent this from happening in the first place open the reservoir containing the brake fluid (shown in the photo below) and use a rubber bulb to suck out some of it, and after everything has been replaced, pour the fluid back in! (In general, in fact, it is best to pour new fluid into the reservoir, because the old one may already contain air particles, so it is better to generally try to take a little from the reservoir or do not take anything from there at all, but just carefully watch how the brake fluid level rises if too high, then insert the hose into place and collect a little fluid from the brake reservoir)
Never take all the fluid from the tank, empty it only halfway, and if all the fluid is drained from the tank, then bleed the brakes on the car! (For information on how to bleed the brakes, see the article: “Bleeding the brakes on a VAZ car”)
5) Next, grab the metal bracket with your hand and then pull it up and thereby fold it away.
6) When the caliper is folded back, remove both brake pads by hand and replace them with new ones.
Installation: Installation of new brake pads occurs in the reverse order of removal.
Note! When you put the new pads in place, make sure that they fit tightly and that there are no stones or other debris that will interfere with braking!
Additional video clip: For more information on how to replace the pads with new ones, see the video clip located just below:
Replacing Rear Brake Pads on a VAZ 2114
Replacing rear brake pads on a VAZ 2114
Every motorist must be prepared for the need to timely replace one or another part in order to maintain the working condition of his car. One of these parts that requires special attention and timely replacement are brake pads.
How to replace brake pads? This type of work should not cause any particular difficulties; it is even very easy to do it yourself.
Lifetime
Any automotive part has its own service life, which is influenced by external factors. Normal brake pads last for a mileage of up to 10 thousand km. Of course, no one can give an accurate forecast of how long they will last, because...
wear is influenced by many factors: the climatic conditions in which the car is directly operated, the condition of the road surface, the manner of driving the vehicle also plays an important role, the quality characteristics of the models themselves, and how professionally their replacement was carried out.
When operating a vehicle, the degree of wear of the brake pads is periodically checked, and only then can the further service life be determined.
Rear models are less susceptible to wear compared to front ones. The residual thickness for normal vehicle operation is more than 1.5 mm.
If the thickness is less than 1.5 mm, this indicates that it is necessary to replace the rear brake pads on the VAZ 2114. Some models are equipped with an indicator that detects wear.
They have a metal plate built into them; as a result of complete wear of the pads, it rubs against the disc, creating an unpleasant grinding noise.
What are the pads for?
This part is an integral and important part of the car's braking system. The importance of the operation of these parts is to stop the machine in a timely manner.
They operate quite simply: when you press the brake pedal, the braking force is transmitted to the pads, as a result they are pressed very tightly against the drum and do not allow it to spin, as a result the wheel stops and the car slows down.
Let's move directly to the question: how to change the rear pads on a VAZ 2114?
Changing the rear braking system
When purchasing a car, you should immediately check the condition of the brake pads.
Just a note! In the case when the size of the brake pads on the car does not reach the permissible size, i.e. their thickness is less than 1.5 mm, do not operate the car under any circumstances until they are completely replaced. The lives of the driver and passengers, as well as other road users, directly depend on this!
Replacing brake pads on a VAZ 2114 is necessary immediately after purchasing the car. It is necessary to regularly monitor the condition of the brake system to ensure your own safety when operating your car.
The rear brake pads on the VAZ 2114 are changed a little differently than the front ones; it is necessary to expend more physical and moral strength. It is more convenient to carry out this kind of work on an overpass.
Possible difficulties during the replacement procedure:
- The brake drum is worn out; its internal diameter is more than 200.5 mm; accordingly, it must be replaced.
- There is a leak in the cylinder, which means it needs to be replaced urgently.
- The drum is stuck, in this case you can use a sledgehammer and a block.
- And etc.
Adapter for car diagnostics Auto parts here Auto accessories and...
REPLACING REAR PADS ON A VAZ 2115 PART 1
The video showed the removal of the rear
VAZ
trims , so that the video does not turn out to be long and tedious, I decided...
VAZ 2114 replacement of rear brake pads
Rear brake system removal procedure:
- First, you need to put the car on a car overpass and install the gear, put a support under the front wheels to prevent it from rolling away.
- We check the removal of the manual brake and move under the car to work.
- Next, we remove the pipe from the muffler in the area of tension of the manual brake system.
- We loosen the manual braking system; to do this, you need to unscrew the nut that serves to tension the cable, which is then completely loosened for subsequent smooth installation.
- Using a wheel wrench, loosen the rear wheels.
- Using a jack, you need to lift the car and completely remove one wheel first.
- The guide bolts from the drum are completely unscrewed.
Replacing rear brake pads on a VAZ 2114
- To understand how to remove the rear drum on a VAZ 2114, you need to rotate it about 30 degrees in the reverse order and tighten the bolts at the same time. This corner does not have special holes, so when the bolts are tightened, they rest against the casting and push out the drum.
If you encounter problems when removing the drum, for example, as a result of boiling it does not turn, you can use a sledgehammer and a handle. We place the handle on top of the drum and try to turn it with a sledgehammer, and thus we pass over the entire surface of the drum until it begins to turn.
Important! Under no circumstances should you hit the drum directly with a sledgehammer, because it will simply break.
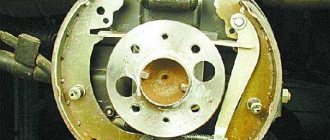
- After removing the drum, two shoes, a brake cylinder and springs are exposed. First you need to unfasten the springs.
- Remove the tension spring.
Replacing rear brake pads on a VAZ 2114
- Remove the pads along with the lever; later it will transfer to a new model.
Replacing rear brake pads on a VAZ 2114
- After removing worn parts, it is necessary to compress the cylinder grooves. The new set of parts must be installed strictly in the cylinder grooves; the handbrake bar must fit into the grooves on the blocks. Then the springs are installed in their place. The cable from the manual braking system must be hooked to the drive lever.
Rear brake system installation procedure:
- Having installed the new parts in their places, you need to squeeze them together and press on the brake cylinder so that it snaps into place.
- The brake drum is mounted in place. If you have problems with its installation, you need to check the tension level of the handbrake cable; most likely it is too loose, or it is stuck, or the brake cylinder may not be fully clamped.
- The wheel is installed back. After this, you need to press the brake several times, this is necessary for the pads to fall into place.
- Spin the wheel by hand to make sure that nothing is interfering with it; rotation occurs without much effort, without touching the pads.
The same manipulations are carried out with the second wheel. After finishing the work, you need to make sure that the hand brake is working.
To do this, install a jack under the wheel, then spin it out, after which it is necessary to tension the manual braking system. Naturally the wheel will stop and lock.
To be more sure, you can try to spin the wheel; if it does not move, then the manual braking system is in perfect order.
If after replacing the rear brake pads the wheel does not spin, you need to check the quality of the work done. The installation and reassembly of the rear brake system may have been carried out incorrectly. Or the handbrake is too tight; as a result, a new set of parts is fixed on the brake drum and does not allow the wheel to move freely.
Price for rear brake pads VAZ 2114
How much rear brake pads cost on a VAZ 2114 depends on the manufacturer, car model, and product quality. The price for rear brake pads of a VAZ 2114 varies from 300 rubles to 500 rubles, depending on the model.
Source: https://5net.ru/zamena-zadnih-tormoznyh-kolodok-na-vaz-2114/
Timely replacement of brake pads on VAZ 2114-2115 vehicles is the key to safe driving
Serviceable brakes are a prerequisite when operating a vehicle. Timely replacement of brake pads (front and rear) will help avoid an accident. This process is simple, but has some nuances and features. Preliminary familiarization with them will allow you to avoid typical mistakes when working with the VAZ 2114 and related models.
Replacing rear pads
The algorithm for removing old parts is as follows:
- Forward gear is engaged;
- The handbrake is turned off;
- The exhaust pipe is removed from special rubber cushions;
- The handbrake tension nut is unscrewed;
- The rear wheel bolts are unscrewed;
Remove the wheel, do not forget about the stops
Unscrew the drum mounting bolts
Disc with cover removed
The springs and spacer bar are removed. When assembling the pads you will need to align
The fasteners themselves are removed from the old pads and put on new ones.
Installation of new overlays is carried out as follows:
- After installing new parts in place of the old ones, they are necessarily compressed (closed) together;
- We press on the brake cylinder - this will allow them to be installed in place;
- The brake drum is put on;
- The wheel is installed in place and free rotation is checked.
If possible, please read the installation manual in advance.
How to change the rear ones with your own hands: video
Replacing brake pads on VAZ 2114 and 2115 is performed identically for both wheels.
Replacing rear brake pads on VAZ 2108, 2109, 21099 and VAZ 2113, 2114, 2115
≡ 4 November 2015 Category: Repair
Replacing rear brake pads begins with removing the wheel. Please note that when replacing rear brake pads, the handbrake must be released, the car must be in first gear, and thrust blocks must be installed under the front wheels.
First (before jacking up the car), loosen all four wheel bolts. Next, we hang the rear of the car on a jack.
and unscrew the four cone bolts securing the wheel, and then remove it.
Removing the brake drum is carried out as follows. We unscrew the two guide pins with a socket or a 12-mm open-end wrench.
These pins are screwed into the hub and attract the brake drum to it. After unscrewing them, remove the drum. If it cannot be removed, then you need to screw the pins into the holes corresponding to their diameter (M8). Only now the thread should be on the brake drum.
We screw in both guide pins until they stop or until the drum begins to move. Now, one by one, we screw them in further, thereby pressing the drum off the brake pads.
Now you need to release the parking brake cables. To quickly loosen, you need to use an extended 13mm socket, two extensions and a ratchet wrench.
This will allow you to relax the parking brake cables within a minute, without resorting to removing the muffler and other labor-intensive procedures.
Using two 13mm open-end wrenches, loosen the locking nut and twist it:
Now we install the prepared extension cord, as shown in the figure, and twist the nut almost to the end.
Now we proceed directly to removing the brake pads. We take out the plinth from the pin holding the parking brake lever and push this pin deep into:
Using pliers, remove the lower tension spring.
Using pliers, release the spring at the front brake pad, which keeps the pad from moving horizontally.
We release the pads from the upper tension spring using pliers or a screwdriver.
Remove the front pad.
Remove the spacer plate.
Remove the drive lever by removing it from the cable end.
Using pliers, release the spring at the rear brake pad, which keeps the pad from moving horizontally.
And remove the brake pad.
We install everything in the following order. First, we connect the new pads together using the upper compression spring, and then insert the spacer plate into the groove.
Now, slightly expanding the upper compression spring, insert the spacer plate into the opposite groove. It is necessary to insert the securing pin of the parking brake drive lever into the connected pads.
We install the assembled pads, passing the compression spring and plate between the hub and the brake cylinder. Please note that there is a concavity on the plate; when installing, it should be directed towards the hub.
Having inserted the pads into the grooves of the brake cylinders, we also install them in the lower grooves:
Install the lower compression spring.
We use pliers to install springs that prevent the brake pads from moving horizontally.
We press the finger inside, holding it so that it does not fall out. We insert the drive lever into the eye of the cable, insert it into the slot in the plate and bring it to the pin.
From the reverse side we squeeze the finger out, it should go through the hole in the lever. We put the washer on top and install the pin.
We remove the dowel pins from the brake drum and place the drum on the brake pads.
Holding the hub with your hand, rotate the drum so that the unthreaded holes on the drum coincide with the threaded holes on the hub. Screw in the mounting pins.
Install the wheel. Please note that the mounting screws must be tightened crosswise. After some time, check the tightness of the screws and, if necessary, tighten them.
We tighten the lever cables in the same way as we used to loosen them. The parking brake is considered tight if the number of clicks when lifting its lever is 2-4.
(25 vote, average rating: 4,48
Source: https://asonline.ru/remont/zamena-zadnih-tormoznyh-kolodok-na-vaz-2108-2109-21099-i-vaz-2113-2114-2115.html
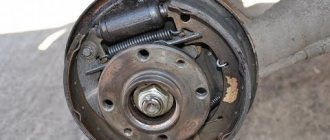
How to remove and replace front pads
The process of replacing front brake pads is usually carried out 5-7 times more often than rear ones. The main reason for this is the operating conditions. Abrasive gets between the pad and the brake disc. The rear wheel drum isolates the linings from microparticles.
The process of removing the front pads and installing them on the VAZ 2114 and 2115 is as follows.
- The wheel bolts are unscrewed, and the car is first placed on a jack;
- Use a spanner to unscrew the bolt securing the caliper bracket;
Loosen and unscrew the caliper mounting nuts
Protect the hose from damage by removing it
Remove worn out pads
The process of replacing the front pads is easier than the rear ones, but you should do everything as carefully as possible.
Video on how to change the front ones
Replacing brake pads VAZ 2114
Replacing brake pads is a periodic necessity, which is carried out every 20-30 thousand kilometers. It should be noted that each owner of this car can independently carry out such work on a VAZ 2114.
The note! If you have never replaced brake parts before, contact a service station where they can help you with this procedure.
When is it time to change the pads on your car?
Wear of parts depends on the following factors:
- driving style;
- quality of material;
- technical condition of the car.
Thus, without the help of specialists, it is almost impossible to determine exactly when it is worth changing system parts. That is why it is periodically necessary to contact service station specialists, where they will help diagnose and replace any parts. If such operations at a service station are beyond your means, you can learn how to determine their wear yourself!
Front brake pads
Signs of an imminent replacement:
- 1. Residual thickness less than 1.5 mm;
- 2. Presence of scratches and chips;
- 3. Characteristic sound (creaking) when braking;
- 4. Curvature of the discs and a decrease in their thickness;
- 5. Presence of oil on the surface of the pad and disc;
- 6. Lack of contact between the pads and the base.
In order to find out about all the defects, first we remove the wheels and carry out an inspection.
The note! Replacement and maintenance of the brake system is necessary: every 10-15 thousand km - for the front pair of wheels and 50-70 thousand km - for the rear pair. That is why, if you hear a squeak, do not rush to buy new brake pads; perhaps you just need to clean the discs from any remaining debris.
Stages of replacing brake pads on a VAZ 2114 car
Replacing rear and front pads is done differently. In order to learn this procedure, you need to understand all the intricacies.
Replacing front pads on a VAZ 2114:
- 1. Loosen the bolts on the wheel.
The note! You need to start unscrewing the bolts from the lock washer. It is necessary to loosen this washer gradually, so you can prevent possible damage to it.
- 2. Using a jack, lift the wheel on which the replacement will be made;
- 3. Remove the wheel and turn the car’s steering wheel in the direction on which you are replacing;
- 4. Find a bolt with a counter key, bend it and remove the bolt;
- 5. Next, check the brake fluid level in the reservoir.
To replace the caliper piston must be pushed in
The note! If the fluid level remains low, there are leaks in the system.
- 1. Push the caliper piston deep into the cylinder, remove the fasteners from the brake hose.;
- 2. Remove the caliper, brackets and pads;
- 3. Install the new pads tightly into the grooves.
The note! Before installing new parts on the VAZ 2114, it is necessary to clean the guides from dirt and reaction products. This can be done using regular sandpaper or a metal brush.
- 4. Install the caliper in place.
- 5. Return all parts back to their place.
Advice! If you drained the brake fluid, be sure to add it back.
The note! There are many ways to replace parts. It is worth noting that to install or remove the pads it is not necessary to completely unscrew the bolts. Sometimes it is enough to make just a few turns of the bolt, then pull out the brake hose and pads. Of course, this method is perfect for owners of VAZ 2114 cars who have already changed them several times.
Replacing rear pads:
- 1. Remove the wheel;
- 2. Near the cable tensioner there is a nut that secures it. Loosen this nut. To do this, it is recommended to use key number 13;
- 3. Having loosened the rear wheel mounting bolts, lift it using a jack;
- 4. Remove the wheel and unscrew the bolts on the brake drum;
- 5. Remove the drum;
- 6. After this, you must first remove the spring, and then the remaining parts along with the lever;
- 7. Start cleaning the grooves where the old pads stood;
- 8. Finally, install new pads and reassemble the entire structure in reverse order.
It is worth remembering that if you have not performed this procedure yourself before, enlist the help of experienced mechanics or contact a service station!
If something went wrong
Difficulties often arise in the process of replacing front and rear pads. The most common problems and ways to solve them are below.
Brake drum won't come off
- It is necessary to loosen the handbrake cable;
- WD-40 is used;
- If both of the above methods did not help, you need to carefully hit the wooden lining with a hammer several times.
The fluid level in the brake reservoir has dropped
- The required amount is added;
- The brakes are being pumped;
- Brake fluid is added again.
The brake drum does not fit
The handbrake cable needs to be loosened.
Timely replacement of worn brake pads is the key to the safety of the driver and passengers. Jamming or other problems associated with these vehicle parts can lead to an accident or even rollover. All replacement work must be carried out in accordance with the regulations.
How to replace front brake pads on a VAZ 2115 at home
It’s probably not worth talking about how important serviceable brakes are for a car; this is already clear to everyone. Another thing is replacing brake pads, which you will have to do whether you like it or not, and as practice shows, not every motorist knows about it. There are two options here, either with your own hands or at a service station. The first option for VAZ owners is, as a rule, more suitable, unless of course your arms grow out of your shoulders and you are not a glamorous blonde. Just kidding, of course, everyone decides for themselves how it is more convenient for them to monitor the serviceability of their “four-wheeled dinosaur”.
If the option of replacing the pads at a service station is more suitable for you, then you are unlikely to find anything interesting for yourself on this site. If you like to do everything yourself, then most likely you are in the right place and something tells me that you will like it here. Well, that's sorted out, now let's get straight to the point.
Once upon a time I remember, by popular demand, I already wrote about how to replace brake pads with your own hands, only then it was Kalina, but the meaning and principle are the same, there are no fundamental differences. The symptoms of malfunction or wear are exactly the same:
- Whistling, squeaking during braking, brake disc wear, poor braking, etc.
There are indeed cases in which everything indicates that the pads are “flawed,” but upon a detailed inspection of the pads it turns out that they are in perfect order. In this case, the reason is most likely that the surface is oily or that they have become worn after driving on a dusty road. This is treated in the following way: remove the pads and wash off or rip off the “glassy” layer of dust, which is the cause of the squeak, then put everything back together. Be sure to read about why brakes squeak, the article will be very useful for those who are tired of squeaking brake pads.
To replace brake pads on a VAZ 2115 you will need the following tool:
- Balloon (I think there is no need to explain what it is!?);
- Jack;
- Flat screwdriver;
- Key to “13”, “17”;
- Support stand;
- Well, and a caliper, WD-40 (preferably);
- You also need to buy brake pads for the VAZ 2115.
Replacing brake pads on a VAZ 2115 is done in pairs, that is, on both sides at once, and not first on the right side, and after a couple of months on the left.
Brake pads of the middle price segment VAZ Lada part 2
The cheapest pads. The most expensive pads.
Let's compare the properties of shoes, measurements of which were made in the following order: 1. The coefficient of friction of a pair of shoe discs with cold brakes (no more than 50 degrees Celsius). 2. The friction coefficient of a pair of shoes and discs on hot brakes (up to 250 degrees Celsius).
3. When cyclic braking (up to 50 times at 100 km/h at 50 km/h) 4. Operate after cooling to ambient temperature.
1. Rona Beautiful Hungarian lasts. Good results for all parameters. 2. TIER They don't have too much friction properties. With cyclic braking and the lower the norm.
3. STS Frictional qualities are almost as good as imported analogues. Recovery almost to the original level. 4. VATI hot pads work much better. And after the restoration of the property, it even improved.
This can be explained by the imperfection of the friction material in production, which runs out after heating. 5. ATE champion in terms of friction properties.
It works a little worse when warm, but there is a high coefficient of friction. 6. Bosch operates exclusively when cold. When heated, they lose their properties almost 2 times. High price and unsatisfactory quality.
7. EZATI Usually all parameters. Not just a huge percentage of fake pillows from this brand. 8. Rulunds. Well made Danes, happy with the current European level of quality.
9. Ferodo Good pads, but in a warm state the balance is at a low level of the standard for the VAZ 2115 Which brake pads are chosen for the VAZ 2115? From Russian I can recommend STS. Low price and good quality speak for themselves. Egorievsk EZATI will also look good on the car.
But TIIR should not be accepted. From the import leader. ATE brand. Good German quality. Wonderful and Danish Rulunds. Gaskets from these manufacturers will ensure driving safety on the VAZ 2115 at the highest level.
Replacing brake pads on a VAZ 2115 - step-by-step instructions
1. Place the car on a flat surface, then install wheel chocks under the rear wheels and tighten the handbrake. Before starting disassembly, I recommend treating all threaded connections to be disassembled with WD-40 penetrating fluid, this will make your work easier.
2. We tear off the wheel mounting bolts while the car is not jacked up; when you lift it with a jack, it will be more difficult to tear it off, and besides, there is a possibility of the car falling off the jack during sudden jerks.
3. Next, jack up the side (left or right, whichever is more convenient for you) from which you are going to replace the pads. Install a stop or block that will protect you from sudden failure of the jack or other unforeseen situations.
4. Now completely unscrew the mounting bolts and remove the wheel.
5. Take the brake mechanism and wash it with water and detergent, then let it dry.
Attention! Under no circumstances use gasoline, diesel fuel or solvents for washing, otherwise, in addition to the pads, you will also have to change all the rubber seals and anthers. I also recommend checking the wear of the brake pads before replacing them ; to do this, use a caliper that can be installed in the hole in the brake caliper. If the thickness of the friction linings (and not the pads themselves, this is important!) is less than 1.5 mm, it is necessary to change the brake pads.
6. Let's move on. We release the brake hose from the bracket, which is attached to the shock absorber strut.
7. Using a flathead screwdriver, pry the pads away from the brake rotor.
8. On the lower bolt, bend the locking plate of the caliper guide pin, then unscrew this bolt, holding the pin from turning by its hexagonal part.
9. Lift the brake caliper up and lock it in this position.
10. Take out the old pads. Before replacing the brake pads of the VAZ 2115, it will not be superfluous to measure the thickness of the brake disc at four opposite points using a caliper. The minimum acceptable thickness is: 10.8 mm. If necessary, replace the brake disc.
11. Clean all mechanisms and parts of the brake mechanism, paying special attention to the seats of the brake pads. Difficult movement or accumulation of dirt can cause misalignment and subsequent jamming of the pads, as well as uneven wear. Make sure that the removed guide pin is in good condition; if necessary, replace it with a new one. If you change the pin, do not forget to lubricate its surface with graphite lubricant before installation.
12. In some situations, it is necessary to press the piston inside the caliper, because when the pads are worn too much, it comes out strongly, which makes it impossible to install new brake pads. When pressing in the piston, be careful not to damage the boot and piston seals. In addition, check the brake fluid level; if it is high, then when the piston is pressed in, fluid may leak out of the expansion tank of the GTZ. This issue is solved with the help of a syringe, unscrew the cap and pull out a couple of cubes of “brake fluid” with the syringe, and add it back with a squirt.
13. Prepare a new set of brake pads and begin installing them. When installing the pads, pay attention to the location of the pressure springs; the correct position is when they are parallel to the top edge of the pads.
14. Return the brake caliper bracket to its place.
15. Install the guide pin bolt and then tighten it. It is advisable, of course, to use a torque wrench for this; the tightening itself is carried out with a torque of 30–40 Nm.
16. Using a screwdriver, bend the locking plate, thereby securing the bolt from possible spontaneous unwinding.
17. Reinstall the wheel and tighten the mounting bolts.
Now we can say that everything is ready! Now all the above operations must be performed in relation to the other side of the car. Before driving, depress the brake pedal several times to return the brake pistons to their operating position. Don't forget to also add brake fluid.
That's all. We check the work in practice, see how the brakes work with new pads. I will say right away that at first the brakes may squeak, this is normal, this is how the pads grind into the brake disc, after a week, or maybe even earlier, the extraneous sounds will disappear.
How to replace the front brake pads on a VAZ 2115 yourself
As soon as you start to hear squeaking in the wheel area, be sure to check the brake pads without delay. If the brake pads are severely worn, they must be replaced immediately. Serviceable brakes on a car mean the safety of both the driver and his passengers. Replacing brake pads on a car is possible both at a service station (service station) and at home on your own.
Brake pad wear on the VAZ 2115 is characterized by the following main symptoms: squeaking when braking, whistling, poor braking or brake disc wear.
Although in practice there are situations when all the signs indicate that the pads are out of order, but in fact, upon careful inspection, it turns out that they are in order. In such cases, this is most likely due to oiliness of the pads or their rubbing after driving on dusty roads.
Everything is simple here - remove the pads, then wash them or peel off the “glassy” layer of dust that causes squeaking, and put everything back together. If the pads are worn out, replacing them with new ones is simply necessary.
A set of tools that you will need for work:
- jack
- flat screwdriver
- open-end or socket wrench for “13” and “17”
- spray bottle
- calipers
- WD-40 penetrating fluid (preferably anyway)
- support stand.
Very important:
- The pads are replaced in pairs, that is, on the right and left simultaneously (and not after some period of time).
- It is unacceptable to change the outer and inner pads between each other, as well as change the pads between the right and left wheels. These substitutions may result in uneven braking.
Considering that the force transmitted to the front pads during braking is greater than to the rear ones, and the front wheels begin to lock earlier, the front brake pads on the VAZ 2115 wear out faster.
The work of replacing brake pads on a VAZ 2115 takes place in several stages
- The car is placed on a flat surface, the handbrake is tightened, and wheel chocks (wedges) are installed under the rear wheels. Before starting disassembly, to make the process easier, it is recommended to treat all threaded connections that will be loosened with WD-40.
- Next, the wheel bolts come off.
It's easier to do this before the car is jacked up. In this case, there is less risk that the car will fly off the jack due to sudden movements. - The side on which you plan to replace the pads will be jacked up. Be sure to secure yourself with a support (support stand) to avoid possible sudden failure of the jack.
- The fastening bolts are unscrewed, after which the wheel is removed.
- Wash the brake mechanism with water and detergents and dry thoroughly. In this case, gasoline, diesel fuel and solvents cannot be used for washing, since the rubber seals will also have to be changed.
- Remove the rubber seal with the brake hose from the bracket.
- Using a flathead screwdriver, remove the brake pads from the disc.
- Using a screwdriver, carefully bend the locking plate of the brake caliper guide pin on the bottom bolt and unscrew this bolt, holding the pin by the hexagonal part.
- Lift the caliper up and lock it in this position.
- Get out the old pads. When replacing pads, it is recommended to measure the thickness of the friction linings and brake disc with a caliper. If the thickness of the friction linings (not brake pads) is less than 1.5 mm, replacement of the brake pads is necessary. The minimum permissible brake disc thickness is 10.8 mm, therefore, if necessary, replace the brake disc as well.
- Thoroughly clean all elements of the brake mechanism, especially the brake pad seats, from dirt and rust. Accumulation of dirt and difficult movement can cause misalignment, jamming of the pads and uneven wear. You also need to make sure that the removed guide pin is in good condition and, if necessary, replace it with a new one, having previously lubricated it with graphite lubricant.
- When installing new brake pads, it is necessary to press the piston into the caliper, as in some cases it can come out strongly and make it impossible to install new pads. Pressing the inner pad with a screwdriver and pushing away from the brake disc, press the piston inside the cylinder. This must be done very carefully so as not to damage the dust cap and piston seals, and also to prevent brake fluid from splashing out of the reservoir. To avoid fluid leakage, you can first remove a couple of cubes of brake fluid from the expansion tank with a syringe, and then add it back.
- Prepare a new set of brake pads for installation. When installing, pay attention to the correct location of the pressure springs: they should be parallel to the upper edge of the pads.
- Return the caliper bracket to its place, install the guide pin bolt and tighten it. It is better to do this with a torque wrench, and tighten with a torque of 30-40 Nm.
- Use a screwdriver to bend the locking plate to prevent spontaneous loosening of the bolt.
- The wheel with new brake pads is installed in place and tightened with bolts.
The same set of works is done with the other wheel.
After completing the work of replacing the brake pads on both wheels, to set the brake pistons back to their working position, you need to depress the brake pedal several times. At first, the brakes may squeak as the new pads are grinding into the brake disc. In a few days the squeak will go away.
Also read with this article:
Source: https://videovaz.ru/vaz-2115/1624-kak-samostoyatelno-zamenit-perednie-tormoznye-kolodki-na-avtomobile-vaz-2115
Brake pads for VAZ 2115
When it comes time to change parts on a car, owners are faced with the problem of finding the necessary part. Brake pads are the most common spare part for a car, especially if the car is of domestic origin. To replace brake pads on a VAZ 2115, both original versions and their analogues are used. Instructions for replacing parts yourself will save money.
Replacement of the front brake pads occurs if these parts are worn out. Often, high-quality spare parts on the brake system can last several tens of thousands of kilometers, but if there are characteristic squeaks and squeaks, it is recommended to change the pads. Part wear occurs due to sudden or constant braking, or metal objects entering the vehicle structure.
In order to change the front brake pads, you can use several options offered on the car market: original spare parts and their analogues. Precise indications of article numbers and approximate costs will help you not make a mistake in your choice.
How to change the front brake pads of a VAZ 2108-09, etc.
I’ll explain how to change the front brake pads on a VAZ 2109 yourself, but since the brake system design in front-wheel drive VAZs is the same, this option is suitable for other VAZs, but on the classic VAZ 2101-07, the system for replacing pads is slightly different.
Replacing the front brake pads does not require special tools, so anyone can easily do this operation at home.
Photo. VAZ front brake pads.
How to determine brake pad wear
The question always arises of when to change the front brake pads; careless drivers begin to change them when they have worn down to metal, thereby creating a metallic squeak when braking.
And a good driver can easily determine the wear of the front brake pads by looking into the hole in the wheel disc, as shown in the photo below; if the pads are very worn, then the metal part of the brake pad will be very close to the brake disc, this is a sign that the brake pads need to be changed.
Photo. Visual inspection of the brake pads without removing the wheel.
Replacing front brake pads
To replace the front pads, you need to jack up the wheel and remove it. But inexperienced drivers often face the problem of unscrewing the wheel bolts after lifting the wheel on a jack. Therefore, first remove the bolts from their place without lifting the wheel as shown in the photo below.
Photo. Loosening wheel bolts.
After you remove the wheel, you will see the brake caliper; the photo below shows with arrows which bolts need to be tightened to remove the brake pads.
Photo. The arrows indicate the bolts holding the brake caliper.
To unscrew the caliper bolts, you will need a 13mm and 17mm wrench, the photo below shows how to insert the keys, hold the 17mm wrench, and unscrew the bolt with the 13mm wrench.
Photo. Shows how to unscrew the brake caliper.
The bolts have been unscrewed, now you need to press the brake cylinder into the caliper; if this is not done, it will not fit on the new brake pads. You can press it in like this: remove one old pad, put on the caliper, insert a thick screwdriver as shown in the photo below, press the caliper away from the brake disc with a screwdriver, press the cylinder. But don’t try to press the cylinder in with blows, you’ll ruin everything.
Photo. Pressing the brake cylinder into the caliper.
Now you can install new brake pads, as shown in the photo below. The photo also shows the pressed-in brake cylinder with an arrow. All that remains is to put the caliper in place and tighten the bolts and wheel. The brake pads have been changed.
Photo. Installed brake pads.
Warning
After replacing the brake pads, be sure to press the brake pedal several times until you feel the brakes appear, since the pressed brake cylinder in the caliper should come out and rest against the pads.
I saw a case, a guy changed the pads, but did not bleed the brake pedal, accelerated the car to check the brakes, crashed into a tree, breaking the front of the car.
How to bleed the front brakes if the fitting does not turn on a VAZ?
Of course, this is not very good, but it is possible, remove the brake pads, press the brake pedal several times so that the brake cylinder comes out a little (but be careful, you can push it out completely), then press the brake cylinder back into the caliper. This will remove air from the brake system. That's it, we bled the brakes in the caliper where the fitting does not spin.
Replacement of VAZ front brake pads. Video.
Original spare parts: article number and price
The VAZ 2115 is similar in design to the traditional “nine”, which is why some working units were installed similarly to the predecessor model. This also applies to the brake system of the car, so it makes sense to purchase original brakes. The demand for front brake pads for cars remains high, since they are the ones that are best suited for maintaining, repairing and operating the car.
When purchasing original pads, it is recommended to pay attention to their article number. As a standard, it starts with the car model, then the series. Since the VAZ 2115 car was partially assembled on the basis of the “eight” or “nine”, the brake pads of the original type will have the following part numbers:
The cost per part will vary depending on the chosen place of sale, but the average range starts from 480 rubles for 4 pieces per package.
What rear brake pads can be installed on a VAZ 2115
Replacing the front pads often entails replacing the rear parts of the brake system. Undoubtedly, the front brakes wear out faster, but the rear brakes also wear out over time. You can tell that parts need replacing by hearing a creaking or whistling sound in the rear of the car when braking.
As in the case of the front part of the brakes, parts can be replaced with new original spare parts or analogues. Some modern replacements are of high quality and often last longer than the original factory versions.
Replacement of Rear Brake Pads of VAZ 2115
Replacing rear brake pads on VAZ 2113, VAZ 2114, VAZ 2115 Welcome! Rear brake pads play a very important role in a car, but unlike the front ones, they cannot quickly stop the car (Remove the pads from the rear of the car and try to brake and do the same experience with the front part, the difference is very noticeable, even if the brakes both in front and behind will be completely similar) and do not wear out so quickly (the front ones wear out quickly, since they are constantly under a very large load), therefore, unlike the front ones, they have to be changed half as often, but choosing new pads is not so it’s simple, since now there are a lot of fakes being created for them, but in this article we took all these aspects into account and therefore at the end we placed a small video clip, which explains how to really distinguish unique brake pads from a fake. Note! To carry out the work of replacing the pads , you will need to stock up on the following set of tools: Firstly, you will definitely need wrenches, you will also need pliers and a bit (If there is no bit, then you can use a screwdriver instead)! Summary: Where are the rear brake pads located? They are hidden under the rear brake drums and therefore, without removing the wheels and without removing the drum itself, you will not see them. For clarity, in the photo below, the brake drum has already been removed from its place where it is located, and the arrows indicate exactly two brake pads (On one there are two on each side and on the other, with the front wheels everything is exactly the same, but only there the pads have a completely different shape) we will now outline the removal of which in this article. When do you need to change rear brake pads? Unfortunately, realizing that the pads have become unusable (Especially the rear ones) is not very easy, but although at first a squeak appears in the rear when braking (You need to hear it, but normally you can hear it only the pad is completely worn out, in this case it it will be very audible) and having heard it, you can already remove the brake drum and look at the pads themselves (But when the brake drum is removed, you can immediately and effortlessly realize whether the pads have become unusable or not yet), the pads themselves are divided into several components, and specifically on the friction lining and on the base, so it’s on the lining that you will need to direct your attention (If you don’t understand what kind of lining we are talking about, then in that case read the article: “What are brake pads ?” it has all the details described), if it is very thin (less than 1.5 mm, by the way this thickness is very easy to measure with a ruler), then in this case this block must be replaced, and also there should be no cracks, deep grooves or chips on the lining, otherwise the block will it must be replaced, and this pad must fit snugly to the base; if you notice that it has moved a little away from the base, then we also recommend replacing the pads with new ones. Note! By the way, when you remove the brake drum (we'll talk about how to do this a little later), be sure to inspect the friction lining and if it is in any fluid (it could be in the brake fluid), then this indicates that there is something wrong with your brake system (In this case, most likely the working brake cylinder is leaking, which is located just above the pads , read about how to replace it in the article: “ Replacing the working brake cylinder on a VAZ”), also the pad lining may be in oil (You also need to look for the reason why this happened) and in this regard, this pad will not really slow down and by the way, it is recommended to immediately replace such pads with new ones, even after the problem is fixed!
REPLACING REAR PADS ON A VAZ 2115 PART 1
The video showed the removal of the rear
VAZ 2115
trims so that the video doesn’t turn out to be long and tedious.
Replacement of Rear Brake Pads VAZ 2114 - 2115
Adapter for car diagnostics Cool DVRs here Gps.
How to replace rear brake pads on a VAZ 2113-VAZ 2115?
Note! If you decide to replace the rear pads, then immediately reserve time (in 1, 2 hours, if you have never made such a replacement before, you may not even be able to do it, so immediately set aside a whole day for yourself and only then carry out the replacement work) and also Anyway, when replacing the rear pads, you need to change them all on both wheels (We mean all four, otherwise the car will brake unevenly and when braking it will still pull to the side) and under no circumstances swap them (Suppose you and two pads have been removed from the right wheel and you want to install them in place, in this case put them in the same places) otherwise the car will not brake evenly and there will be a possibility of it skidding during sharp braking! Removal: 1) Before you begin the operation itself, you need to prepare for it, namely, at the beginning we recommend placing anti-roll stops under the front wheels so that the car does not drive away and also turn on the car’s gear (Be sure to first), then look at the parking brake handle, it must be completely lowered (otherwise the brake drum ), if it is not lowered, then lower it, then remove the rear wheel you need (For information on how to properly remove a wheel, read the article: “Correct replacement of wheels on the car") and the brake drum , cleanly wipe off any dirt stuck to it, then open the hood and see how much brake fluid is in the reservoir (the reservoir is indicated by a red arrow in the photo), if the fluid is brought to the MAX mark (There are marks on the side of the reservoir itself) , then pump it out a little (it can be pumped out perfectly with a syringe or a rubber bulb), otherwise when brake pads , this liquid will flow over the edge, and this is all due to the fact that the pistons of the brake working cylinder will have to be recessed into the inside of the cylinder itself (When recessed , the liquid is poured back into the reservoir). 2) Now let’s move on to the replacement itself, first the brake drum from the car (For information on how to remove the brake drum , read the article: “ Replacing the brake drum on a car”), then use a screwdriver or bit to disconnect upper and lower tension spring (see. photo 1, there these springs are indicated by arrows) and after that remove them, then grab the guide spring with pliers and remove it from the hole in the front block that it attaches (see photo 2), as soon as the spring is disconnected and set aside, the front block with remove the car, then remove the expansion bar that is located across both pads (see.
photo 3) and proceed to removing the last, rear brake pad, it is removed in principle in the same way, the guide spring is disconnected and moved to the side, then the pad itself is removed and there will still be a lever on it to which the parking brake cable is attached, so here you are Disconnect this cable from the lever (see photo 4) and you can safely remove the last rear block.
Installation: The entire process of installing both brake pads is carried out in the reverse order of removal, by the way, if you need to remove the lever from the rear pad (For example, you bought new pads and you don’t have this lever on the rear brake pad, so you will have to move it from the old one to new), then remove the cotter pin with pliers (This is a small wire twisted in half, you will immediately see it) and then remove the support washer located behind it (see photo 1), as soon as the washer is removed, press on the pin itself (see photo 2 ) that secures the lever and then remove the lever from the rear pad and remove the pin itself (Install the pin and lever in the reverse order of removal), but if you don’t need to remove anything, but just need to install new pads, then be sure to follow a few rules, and when installing, make sure that the upper ends of the pads fit into the grooves of the piston, as you can see in Figure 3, and you will also need to bring the pads together when you install them, they are brought together using two mounting blades or you can replace them with two pry bars, For more details on how the pads need to be brought together, see photo 4 (The pads are brought together all the way until the pistons of the working cylinder are completely recessed). Note! When everything is assembled, press the brake pedal a couple of times so that the working cylinders come into operation and the car brakes for you (it’s just that the first two times it may not even really brake, so you need to press the brake), we’ll add something else, the first time after installing new pads , your car may not brake well, don’t pay special attention to this (the pads are grinding in), just drive carefully, but although with the rear pads this will practically not be noticeable, because as we said earlier, the front ones do the main work They do it, and the rear ones just slow down the car so that it doesn’t skid! Additional video clip: clearly see the entire process of replacing these rear brake pads in the video clip that is posted on our website just below:
Original rear pads: name and price
As mentioned above, some original parts on the VAZ 2115 were borrowed from the main design components of other series of this manufacturer. Therefore, the rear pads will have the following article number: AD 21083502090. An additional article for searching for a product in various catalogs is the name 2108-3502090.
According to reviews from the owners of this car, all factory brake pads when purchasing the car had to be immediately replaced with new ones from another manufacturer. The cost of new original spare parts, consisting of a set of 4 pieces per car, will be equal to 600 rubles. At the same time, the Lada manufacturer recommends contacting only trusted places of sale, confirmed by the manufacturer’s certificate, so as not to run into a fake.
Substitutes for originals: list of analogues
Among the analogues in the vastness of the country, there are several foreign options from the company Ferodo, Akyoto and other brands that have already proven themselves to be the best. A list of articles and approximate prices will help you navigate the choice of parts:
- ARTEX – from 500 rubles per set.
- AT 2090-008BP – from 490 rubles.
- MASTER SPORT 2108-3502090 – from 480 rubles.
- QAP 03-622 – from 350 rubles.
- Zollex Z2108B – from 580 rubles.
Foreign brands offer higher quality products than their Chinese counterparts. Before choosing, it is recommended to familiarize yourself with the compatibility of the brake pads to avoid any troubles in the future.
How to independently replace the front and rear pads on a VAZ 2115
Not every motorist wants to go looking for a trusted service station in order to entrust the mechanics with changing the brake pads. Therefore, car enthusiasts can perform this procedure on their own. To do this you will need to acquire the following tools:
- balloon;
- jack;
- flat screwdriver;
- wrenches 13 and 17;
- If desired, you can use WD-40.
Having prepared all the tools and driven them into the car in the proper place for maintenance, you can begin replacement. The procedure consists of the following steps:
- Remove the bolts from the right and left wheels.
- Raise the car with a jack and put “insurance” under it - you can use the same wheel as it.
- Release the brake hose by bending the locking plate on the upper bolt.
- Unscrew the bolt and bend the caliper down.
- Remove the block closest to the piston.
- Install the caliper into the hole where the pad was.
- Press in the piston, install a new pad and install the wheel back.
- Change the pad on the other side of the car.
The rear pads are changed a little differently: to do this, you need to remove the brake drum from the car and disconnect the tension springs with a screwdriver. Next, you need to remove the guide spring using pliers to remove the front part of the part. Then you need to remove the expansion bar and pull out the second part of the block.
If difficulties arise during the process of changing parts, it is recommended to watch a video that describes in detail how to replace the pads on a VAZ 2115 car. This must be done in a timely manner so as not to endanger your life and the lives of passengers.
The process of replacing the front brake pads of a VAZ 2115
Let's start with the indications for replacing pads:
- brake pad surface in oil
- there are grooves on the linings or worse, they burst
- The brake lining does not connect tightly to the pad base
- overlay thickness less than 1.5 mm
Now let's get to work.
1. Disconnect the "-" from the battery.
2. Raise the handbrake and place supports under the rear wheels.
3. Remove the front wheel. Use a soft brush to remove dirt and dust from the brake mechanism.
4. If the brake fluid level is at the MAX mark, then pump out some fluid, otherwise when the piston is retracted it will go over the edge.
5. Remove the rubber seal from the bracket in the pile with the hose.
6. Take a screwdriver and bend the tendril of the lock washer of the upper mounting of the guide pin. (bolt)
7. Unscrew the upper bolt of the guide pin, hold the pin by the hexagon with a wrench.
8. Open the caliper.
9. Remove used brake pads.
10. Use a brush to clean the seating areas of the brake pads.
11. To install new brake pads, you need to recess the brake piston. You can drown the piston with a clamp or special tool. tool.
12. After you install the new pads, make sure that the pressure springs are parallel to the top edge of the pads.
13. Close the caliper and screw in the guide pin.
14. Bend the lock washer, install the wheel, and lower the car to the ground.