A car is a whole complex of complex systems, components and mechanisms. An integral part of any vehicle is the braking system. On VAZ cars of the “tenth” family, disc and drum mechanisms are installed on the front and rear axles, respectively. The pads are compressed by a hydraulic drive.
Over time, these elements wear out and require replacement. In today's article we will find out how to replace the rear brake pads on a VAZ-2110. See photos and instructions below.
Main features
There are several symptoms by which you can determine the wear of these elements:
- Increased brake pedal travel. It becomes softer and only grips at the end. This reduces the braking efficiency of the vehicle. This significantly affects traffic safety. Similar symptoms can occur with brake fluid leaks. But if its level is in order, and there are no drips on the tubes and connections, then the rear brake pads on the VAZ-2110 need to be replaced.
- Increased travel of the parking brake lever. If the pedal can be soft even if the front pads are worn out, then a weak handbrake indicates wear on the rear ones. How to determine whether the lever stroke in a car is normal? To do this, place the car on an inclined surface (at least ten degrees) and tighten the handbrake. If the car rolls down, it means the cable is loose or the rear pads are worn out. You can also count the number of clicks on the lever. In normal condition there should be 3-4. If there are 5 or more of them, then you need to replace the rear brake pads on a VAZ-2110.
- Characteristic creaking noise when braking. Subsequently, it can develop into vibration. In this case, the friction material is completely worn out, and the lining is in contact with the drum mechanism with bare metal. Driving with such a symptom is extremely dangerous. At one point, the pads can simply jam, not to mention the crazy wear caused by metal-to-metal friction.
- Minimum thickness of friction material. Unlike previous cases, this can only be found out by removing the drum cover. Experts note that the thickness of the friction material on the rear drum mechanisms of the “tens” should be at least one and a half millimeters.
When to change the rear brake pads on a VAZ-2110
According to technical regulations, replacement of the rear pads should be carried out when the thickness of the friction linings approaches the critical level of 1.5–2 mm.
It is impossible to measure the thickness of the linings without disassembling the brake mechanism, but in this case the handbrake will help. If, when tightening the handbrake, the equalizer nut rests against the end of the rod, but the wheels are still far from being completely locked, and the wheels are not blocked when the handbrake is fully tightened, most likely the pads have worn out to the limit.
Knocks and squeaks
In addition, knocking in the rear brake mechanisms, squeaking when braking, contact with brake fluid or oil on the lining, chips and cracks on the surface, as well as jamming of one of the wheels due to a torn lining will force us to replace the pads.
Let's get started
So, how do you replace the rear brake pads on a VAZ-2110 with your own hands? First we need to place the car on a flat and hard surface. The presence of a hole is not necessary.
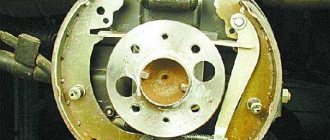
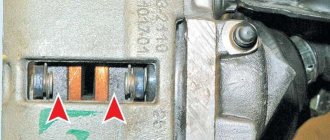
We remove the car from the handbrake and put it in gear. For greater stability, we install anti-roll bars in front. Then we remove the wheel bolts from the rear and lift the wheel. Next, we take it completely out and start working with the drum. We need to unscrew its guide pins. Please note that they may be difficult to remove. Use liquid key lubricant. As a last resort, unscrew the rear hub nut using a 30mm wrench with a long lever (on a dressed wheel). Next, take out the drum cover and, using long-nose pliers, remove the cotter pin from the left side. Using pliers, disconnect the lower spring that tightens the pads.
How do you then replace the rear brake pads on a VAZ-2110? After that, we move on to the springs located on the sides. They hold the brake pads for greater stability. We also remove them out using pliers. At the next stage, we push the lining from above. To do this you need to make every effort. When the pads are stretched, the plate will fall down. Next, the pads can be safely removed out.
But replacing rear brake pads on a VAZ-2110 does not end there. Below we highlight some points that should be taken into account when installing new pads on a car.
Tool
For work, it is most convenient to use a lift or inspection hole, since some operations must be (or more convenient) performed from under the machine.
For our work we will need the following set of tools:
- plumber's hammer;
- rubber straightening hammer or wooden spacer;
- steel rod with a hook at the end for removing and installing springs;
- mount;
- standard set of tools and penetrating lubricant.
Essential tool for replacing pads.
Work algorithm
If you have all this at hand, including new pads, let's get to work:
- We put the car on a lift or inspection hole and remove the wheel bolts.
- We hang one side on a jack if we are working in a pit.
- We remove the wheel.
Jack up part of the body and remove the wheel.
Using a 12mm wrench, unscrew the two guide pins and remove the drum.
But if it doesn’t give in, we go down under the car and tap the perimeter of the drum with a rubber or wooden hammer. If it doesn’t work, generously apply penetrating lubricant to the place where the drum fits on the hub, wait 5–10 minutes and repeat the procedure. You can take a heavier hammer, but you can’t hit it directly on the drum, it will crack. We hit it through a wooden spacer, turning it evenly.
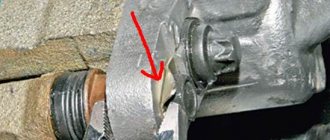
Remove the expansion bar.
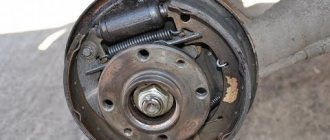
Having disconnected the guide spring from the rear brake pad, we remove the manual brake pad drive lever from the cable end.
We inspect the pads and brake mechanism for damage, leaks, etc.
After dismantling
After dismantling, we thoroughly clean and check the condition of the brake mechanism, boots and working cylinder.
Pay attention to the condition of the brake cylinder and boots.
- We look at the brake fluid level; if the reservoir is full, we take a small amount with a syringe.
- We remove the handbrake drive lever from the old block and install it on the new one.
Installation of new pads is carried out in the reverse order , but during installation it is necessary to recess the pistons of the working cylinder as much as possible. This can be done with a pry bar, resting it against the side of the brake flap and a new pad. Don’t forget to adjust the tension of the handbrake cable after installation.
Video about replacing the rear brake pads of a VAZ-2110
Installation
Now we take a set of new friction linings out of the box and put them in place. We will need to install the cotter pin and drive arm pin support washer. The upper ends of the pads must fit exactly into the grooves of the piston. The slightest distortions are excluded. To bring the pads together, you need to move the piston to the center of the cylinder. To do this, you can use a mount. To finally bring the pads to the drum, press the brake pedal two or three times. Further assembly is carried out in reverse order. If the pads are difficult to get in, your handbrake cable may be too tight. It needs to be loosened and then adjusted. How to do it? We will talk about this below.
Setting up the parking brake
To do this, we need access to the bottom, so we put the car in a pit or lift it up as much as possible. To adjust the handbrake on the “ten”, it is enough to have two open-end wrenches “13” and pliers. First, we sit down in the cabin and pull the lever until the first click. Then we go down into the pit and find the tension adjustment nuts on the bottom.
First, unscrew the locknut. Next, use the second key to screw the main one clockwise. This is how we tighten the handbrake cable. Then we sit back in the cabin and check the handbrake movement. It should work in 3-4 clicks. If the lever stretches further, go down and loosen the nut by rotating it counterclockwise. Having set the normal position, tighten the locknut. This completes the adjustment procedure.
Order of Operations
Compared to repairing the front pair on the above VAZ models, working with the rear elements is more difficult, since they have a drum structure. To ensure ease of operation, you need to place the machine on a level floor and jack up the rear part.
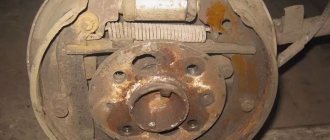
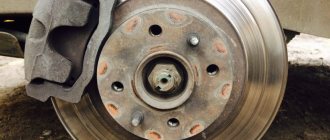
First the wheel is removed. Behind it there is access to the dirty drum. It is necessary to completely loosen the handbrake cable, otherwise there will be problems with dismantling. The studs on the brake drum are loosening. If they are heavily oxidized, you can remove the part together with the hub; to do this, you also need to unscrew it.
First you need to try to remove the drum. If that doesn’t work, you can coat the acidified areas with a brake or aerosol compound. This will increase the repair time, but will make the work easier. Then tap the part with a hammer through a mounting blade or a wooden block.
Attention! At this stage, you need to assess the safety of the brake drum, that is, understand whether it needs to be replaced or can continue to be used. If there are deep scratches, chips, cracks, or grooves on the body, then the old part must be replaced.
After removal, you can assess the condition of the entire mechanism. If there are leaks, you will need to eliminate the cylinder malfunctions. It is necessary to remove dirt and check the integrity of the anthers. If everything is normal, you can continue replacing the pads. Use pliers to remove the cotter pin, remove the tip and disconnect the spring
It is important to save the puck. You will have to tinker with the spring; you may need a long screwdriver or a strong awl
The spacer bar is then removed and the parts are removed from the body.
You need to clean the shield from dirt. The condition of the linings should be assessed. Manufacturers recommend replacing them with a thickness of one and a half millimeters, but practice shows that it is advisable to use new ones even with a thickness of 3 millimeters. The new part is now being installed. But first you need to completely clamp the cylinder piston, otherwise the drum simply will not install.
New pads are mounted, the rod is pinned, the spring is installed with a screwdriver. Care must be taken to ensure that the cable housing does not come into contact with moving parts. Important! When making repairs, you should act carefully; liquids and lubricants should not come into contact with the surfaces. Otherwise, the performance of the brakes will be reduced.
See the order of events in this video:
note
When replacing rear brake pads on a VAZ-2110, other difficulties may arise (for example, dirty cylinders in the drum). Do not use gasoline, kerosene or other mineral solvents to clean them. Use only specialized products that are sold in spray form. The product is called “Brake Cleaner”. Judging by the reviews, products from TRW have proven themselves well.
Also note that the pads are replaced in pairs on both wheels. This way you will eliminate problems with the effectiveness of the handbrake and the operation of the system as a whole. In total, you will need 4 pads to replace (two on each side). Their cost for the “ten” is small - about 500-700 rubles per set. As for manufacturers, many motorists recommend installing pads from NIPPON (Japan).
During replacement, carefully inspect the condition of other elements. The piston should not have any drips, and there should be no risks on the inside of the drum. If any, the mechanism should be sharpened or replaced with a new one. The cost of a new brake drum is 700-850 rubles. By the way, an element from Grants or Priora is ideal for the “ten”. After replacing the pads, bleeding the brakes is not necessary. The same applies to the front ones. Bleeding is carried out only when there is severe airiness (soft pedal) or during a routine fluid change (every 2 years, or 60 thousand kilometers).
Choosing the best pads
Despite the fairly long service life and relatively low loads during operation, you should not waste time when choosing rear pads.
After all, brakes are about safety. The market offers about two dozen different pads, differing in price, country of production and brand status. True, the difference in prices is not so great, as can be judged from the list of the most popular kits:
- The most inexpensive pads can be bought for 480–500 rubles a set. They are produced by the domestic company ARTEX . The catalog number of all ten rear pads is 2108–3502090 . The pads are not remarkable for anything except that they are afraid of overheating - they lose about 40% of their friction properties at 150 degrees.
- VAZINTERSERVICE kit , at a price of about 580–600 rubles, showed itself to be worthy. The only negative is their low resource and they also don’t like high temperatures.
Rear brake pads VAZINTERSERVICE.
Rear brake pads FERODO.
Rear brake pads ALLIED NIPPON.
LUCAS brake pads.
Good luck to everyone, stable brakes and sunny roads!
Video which pads are better
Welcome! Brake pads - they are used to stop the car, and they are also the basis of the braking mechanism; absolutely any car is equipped with them, from budget cars to expensive premium foreign cars; in addition, a lot depends on the quality of the pads, for example, how quickly will the car slow down, will it brake with a squeak and will the pads eat up the brake drum or brake disc (It all depends on what mechanism they are installed on; if there are disc brakes, for example, and poor, low-quality pads, then over time they will wear out the brake brake to such an extent disk, that the car will no longer even be able to be driven), so approach the choice of new pads very carefully and before purchasing them, make sure which part is in front of you, the original or the original (They are very easy to distinguish if you know some of the nuances, more about this described “in this article”).
Note! To replace the brake pads with new ones, stock up on the following tools: Pliers and wrenches, in principle, you don’t need anything else besides these tools, but still, just in case, take WD-40, otherwise you never know what happens, suddenly the bolts securing the brake the drum is stuck!
Summary:
Where are the rear brake pads located? They are located under the brake drum and when braking they press against it and thereby the car stops. We won’t show where exactly this drum is located, because it doesn’t make any sense, since everyone knows its location, but we’ll still say a few words and we will give advice, from time to time we recommend looking at the drum itself and, if possible, removing it, because when everything gets stuck, there is a chance that you will not remove it at all, but you need to look at the brake drum for this purpose, with a strong When it wears out, the walls of the drum become very, very thin, and therefore it can begin to crack and eventually break, which will lead to very bad consequences and may even lead to an accident.
When do you need to change rear brake pads? They need to be replaced when the thickness of the linings has become less than 1.5 mm (Each pad has a lining that slows down the car) and when the lining peels off from the metal body of the pad, they also need to be replaced (We’ll immediately explain why we wrote they and not she , when replacing the pads, if you decide to do this replacement, you definitely need to change all four, that is, if you change in the rear, then four pads in the back must be replaced, if in the front, then all four must also be replaced, otherwise the car will not slow down evenly and it will be pulled to the side during emergency braking) and we wanted to give you one more piece of advice: when you remove the drum, check its internal diameter with a ruler or something else (How to check the internal diameter, see the photo below) but only it check in several places at once, and not in just one, because the brake drum, like the pads themselves, does not wear out evenly and by the way, the internal diameter of the drum should not exceed 201.5 mm, and the drum should not have defects, chips or should not be po kotsan.