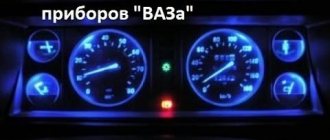
LED backlighting of the instrument panel (optitron)
An optitron is a special illumination system for the instrument cluster. It works this way: when the car's ignition is turned off, the instrument cluster remains invisible. After turning the key, the arrows on the instruments should come to life first, and only after them the instruments themselves - the speedometer, tachometer and other sensors.
Optitron has a special anti-reflective background, thanks to which all signs are clearly readable in any conditions.
Next, we’ll look at how to make such a backlight for the dashboard with your own hands.
How to tune the instrument panel
I would like to say right away that the boundaries of tuning the instrument panel are limited only by your imagination, the taste and color are up to you to choose.
But still, for the most part, we can highlight the replacement of standard lighting, the addition of lighting for sensors, arrows and other components. In addition to lighting, you can change the appearance of the panel by adding special stickers to the devices. Thus, the appearance of the instrument panel will change. Some car enthusiasts manage to make such stickers themselves by printing them on a laser printer on self-adhesive paper.
The third method, and the most expensive, is to completely replace the instrument panel with a tuned one. Most often, this may be a completely different arrangement of devices, multi-colored lighting, or the presence of additional devices. The most modern option is to install a large display instead of analog instruments, but such pleasure will cost a lot of money.
Required Components
The Mayak lamp is a donor of lighting components.
Lighthouse lamp, rear view.
SMD LEDs are exactly what I was looking for in a lamp. The size is about 3 by 4 mm.
Entire lamp, consumption in “dimensions” mode.
Entire lamp, consumption in stop light mode.
LEDs, 330 Ohm resistors.
Printed circuit board blanks, cut on a lathe.
The boards are marked for installation of components. The black dots between the tracks are where the LEDs are installed.
Marking of “tracks” on the board. Here is the fifth, the inner track is superfluous, I wanted to do a two-color backlight first, but I changed my mind.
Arrangement of LEDs 3 in a cluster.
Alternatively, you can place the LEDs on one track in series, it will be even simpler plus saving one track, but my option is more reliable.
Making an optitron
I'm trying to clean the filter at the edge of the scale. The peculiarity of these scales is that they are designed for the use of ordinary light bulbs, so they have an additional layer of dark filter (dots) applied to them, which ensures uniform illumination (closer to the light bulb, darker). A yellow filter is also visible under the white scattering layer. I would leave the yellow one, but removing black and white without affecting the yellow is unrealistic.
This is what it looks like in the light. Despite the white backlight, the numbers are still yellow thanks to the yellow filter, so you will have to remove it, although I didn’t want to.
Illuminated fuel and temperature gauges. I was afraid that there would not be enough three LEDs for the scale, but it turned out to be in vain - the scale is illuminated evenly, the gradient is not noticeable to the eye. Yes! As a result, only 3 tracks remained.
Rear temperature and fuel gauges. The light filter has been partially removed in the right places.
Ready-made temperature and fuel scales.
I remove the light filter on the tachometer. I use nail polish remover and pieces of cotton pads (we take everything from my wife/mother/sister’s arsenal). The technology is as follows: soak the pieces in liquid and apply to the area for a minute. While we are making the next one, the previous one soaks and the coating can be easily removed with a fingernail. Carefully! The front side is very sensitive to solvents, especially alcohol!
Installing tachometer backlight. Hot glue from a “gun” serves as supports and at the same time fasteners. The downside is that in this version the tachometer is not removable.
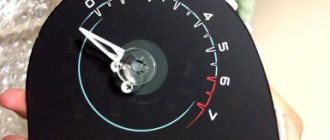
Finished tachometer scale.
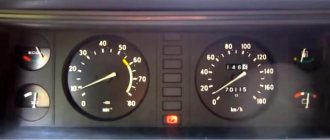
"Combined" lighting. LED tachometer, regular speedometer. The temperature scale and fuel gauge are double backlit. Here the photo does not convey the effect quite correctly.
Speedometer backlight board. The main difficulty, it turned out, was precisely here. Due to the built-in odometer, the speedometer device is very bulky and there is very little space left for illumination. As a result of trimming and pointing, very little remained of the scarf.
Rear speedometer backlight board. I had to restore the path this way
I'm installing the speedometer light. Two lights didn’t fit, so I moved them to the side surface
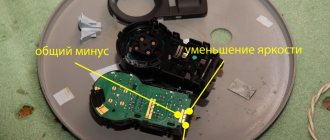
I turn on the speedometer light and check it. Between the tachometer and speedometer, the common plus and minus are brought out into the T10 socket; a protective diode and a common current-limiting resistor (all from the same lamp) are also installed in it, plugged into the standard socket from under the backlight lamp.
Finished speedometer scale
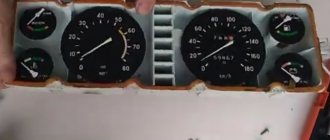
Complete tidy. Currently in finished condition.
Schemes for smooth switching on of the backlight
To smoothly turn on the backlight of the scale and arrows, you need to spend a little effort, and more specifically, re-solder the circuit.
Below are two diagrams, in the first case - the dashboard, and then - the arrows. The circuits can be implemented on small pieces of a circuit board, which are sold in radio parts stores.
Consider one important factor: if the LEDs differ in power, they will not light up at the same time, some ahead of time, others late, but in general the backlight will turn on smoothly. This also applies to the LEDs on the scale.
Scale manufacturing process
Hello!
Often people who contact us for the first time ask: “How to order?”, “Where to start?”. In this post I will try to describe in detail the process of creating a scale, the main several stages. It’s good when the catalog already has a layout of your original instrument scale. Then we go straight to point No. 2. If your panel is not there, then read from the very beginning.
- Creation of an original layout. As an example, let's take the scale for the Kia Rio. To create a layout, a scanned image of the original instrument scale is used.
Image format - TIFF, resolution 300 dpi, color, front and back . This image is converted into vector format using the Corel Draw program.
The resulting layout of the original instrument scale will be used as a basis for further work. Editing the layout taking into account the client's wishes. An important feature of our company is the production of individual instrument scales. You can change the background colors, characters, their shape and content, replace fonts and add any logo or inscription. So, the client wanted a design in the style of Audi instrument panels, a very neat and strict style. As a result, we got the following layout
- Approval of the layout and agreement on the final cost of the order. Despite the fact that the cost is fixed within one category, depending on the client’s wishes, the cost can be increased (white surface of the scale, background color other than black, texture pattern).
- Payment for the order. Depending on where you live, there are several payment methods available. You can read more about payment methods in the Payment section.
- Manufacturing. The instrument scale is made by layer-by-layer printing with ultraviolet ink on transparent matte heat-resistant plastic 0.4 mm thick.
After printing, the blanks are cut along the contour using precision laser equipment. If necessary, a transparent adhesive layer is applied to the back of the scale.
- Delivery. As a rule, we ship products using Russian Post throughout Russia and the CIS. Privately, other delivery options are possible. Read more about delivery methods in the Delivery section.
- Joy from the received product. We are always happy to help you make your wishes come true, even if it’s at least simple scales with an individual design. We are doubly pleased if you share with us photos of the installed scales and tell your friends about us!
That's all, I hope after reading you have as few questions as possible about the scale ordering process. Thanks for your attention, bye!
Purchase and installation of a new dashboard
The popularity of this method of interior tuning is quite high, which determined the appearance of quite a large number of purchased dashboards. You can find them both in specialized stores and on the Internet.
The features of this tuning method include:
1. There are a large number of dashboards of different designs and capabilities on sale. An example is the installation of a panel that has a built-in screen or electronic dial. When choosing, it is worth considering that unusual versions with additional functions will be quite difficult to install, since you will have to upgrade the wiring. For example, it is not advisable to purchase a model with a screen in this case due to the fact that the car does not have electronic sensors that would display information on the monitor.
2. The process of installing the dashboard, which has all the standard scales, is quite simple. You can carry out the procedure for dismantling the old dashboard and installing and connecting a new one yourself if you have the most common tools.
3. The design of purchased dashboards can be very diverse, which makes the tuning method in question the most attractive.
The only drawback of this method of changing the interior of a vehicle is that the cost of instrument panels can be quite high.
Sidebar: Important: When choosing, you should pay attention only to high-quality options, since cheap ones may not last long: backlight burnout, incorrect readings and other problems will appear gradually.
Scale manufacturing process
Hello!
Often people who contact us for the first time ask: “How to order?”, “Where to start?”. In this post I will try to describe in detail the process of creating a scale, the main several stages. It’s good when the catalog already has a layout of your original instrument scale. Then we go straight to point No. 2. If your panel is not there, then read from the very beginning.
- Creation of an original layout. As an example, let's take the scale for the Kia Rio. To create a layout, a scanned image of the original instrument scale is used.
Image format - TIFF, resolution 300 dpi, color, front and back . This image is converted into vector format using the Corel Draw program.
The resulting layout of the original instrument scale will be used as a basis for further work. Editing the layout taking into account the client's wishes. An important feature of our company is the production of individual instrument scales. You can change the background colors, characters, their shape and content, replace fonts and add any logo or inscription. So, the client wanted a design in the style of Audi instrument panels, a very neat and strict style. As a result, we got the following layout
Where to start tuning?
Whatever the car enthusiast decides to do, he needs to first prepare the tools that will be needed during work:
- hair dryer used in construction;
- an ordinary stationery knife or, as a last resort, a new blade;
- wiring and controls;
- soldering iron
Most likely, other materials will be needed, which will depend on the preferences of the car owner. It is better to purchase and prepare in advance the tools that will be needed to disassemble the panel, remove the casing and unscrew the elements that need to be replaced.
Incredible ideas for transforming and improving the dashboard - tuning
To make their car stand out from the gray mass, many car owners do tuning. However, today tuning means not only improving the appearance of the car, but also improving the interior of its cabin. One of the options for improving the interior is tuning the dashboard. You can learn more about this procedure, as well as upgrade options, from the material provided.
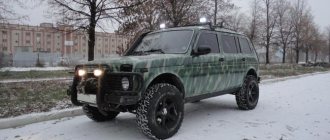
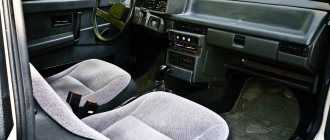
Tuning a VAZ-2114 torpedo with your own hands
This gives the entire front part of the car a unique appearance.
The AMC-2 dashboard, the central instrument of which is the tachometer, has proven itself very well in the domestic market. The entire product has a sporty look, which is complemented by white arrows. LEDs are used to illuminate the shield. The product should only be installed by a professional. Without experience with this shield model, you can damage the torpedo.
The last model in our review will be the STREET STORM model, the peculiarity of which is its impressive color design. When examining the shield, you can immediately notice that the manufacturer placed the main emphasis on the color of the product.
All devices remained in their places. The backlight of the shield deserves special attention. During the day, the front of the cabin glows exclusively red.
Towards evening, the driver can change not only the shade of the backlight, but also its intensity.
All of the shield models listed above cost around 3–9 thousand rubles. You can order them in different ways: either on the Internet or in the manufacturer’s store.
Shields of the so-called European type appeared on our market relatively recently. However, they very quickly managed to gain popularity among buyers. The main reasons for this are the creative appearance, the ability to install products without the risk of damaging the structure of the windshield wiper blades.
However, the main reason for the high demand of Europanels among buyers is the material from which it is made. This is no longer hard, unpleasant plastic that begins to rattle after the first three hundred kilometers traveled. The shield of European standards is made of a material that is much softer and more pleasant to the touch and appearance.
Positive emotions are also caused by interior ventilation with such a product.
The disadvantages of the Europanel include too tight movement of the levers, an almost invisible torpedo and the presence of extra drawers for small things. The latter are inconvenient because after several thousand kilometers they can simply fall off.
Finalization
When carrying out complex tuning of the VAZ-2114 panel, it is necessary to take into account the nuances of the design of this unit.
The main task is to correctly disassemble the element, select and install the necessary components, and mount everything back correctly. It is advisable to think through all manipulations in advance.
Modernization of this part of the interior includes the removal of the main components, allowing access to the main instruments and their subsequent modification. Some parts are connected with screws, bolts, nuts and plugs. During disassembly, it is advisable to mark fasteners and associated elements to avoid confusion during assembly.
Read more: How to remove the VAZ window lifter handle
The disadvantages of the “native” dashboard include several points that can be eliminated by tuning the VAZ-2114 dashboard. Among them:
- lack of steering wheel adjustments, which covers a significant part of the sensors;
- the instrument panel is displayed on the windshield, which creates certain difficulties when driving;
- the external coating leaves much to be desired; after a few years the appearance is almost completely lost;
- “original” plastic is of disgusting quality (creaks, scratches, knocks);
- poor fixation of the glove compartment, causing it to open spontaneously;
- the ventilation system does not make it possible to regulate the correct distribution of warm air (this is especially noticeable in winter).
Backlight
When tuning the instrument panel of a VAZ-2114 with your own hands, first of all, a visual transformation is assumed. One of the most effective and simplest options is to improve the backlight.
Unlike modern foreign cars, in which the lighting has a complex design with functionality worked out to the smallest detail, on domestic cars this unit is structurally simple and has ineffective lighting.
Below is one of the options for improvement in this direction.
The work begins, as in other cases, with dismantling. The shield is removed completely along with the protective glass. The operation must be performed carefully, since most of the parts are fragile. Then simply replace the original green lamp with a red or other light element, preferably LED.
Instrument arrows
In addition to tuning the instrument panel of the VAZ-2114, work is being done to change the color of the speedometer needles and other instruments. The color combination on the original block is poorly thought out.
When driving for a long time at night, the arrow blends into the general background and is difficult to notice. The situation can be improved by installing red LED elements.
They will create an excellent contrast in the lighting of the vehicle assembly.
The parts are fixed directly under the arrow, a special thermal shrink is attached to the top, and the power supply is connected to the heater backlight.
Thanks to the additional shrink element, the light will not be scattered, but will be focused on the arrow. This modernization looks quite attractive, the readability of instruments is noticeably increased, and visual fatigue is reduced.
At the final stage, the structure is assembled in a mirror order.
Finished shields
Do-it-yourself tuning of a VAZ-2114 panel is often carried out by replacing the standard unit with ready-made, improved versions. The main thing here is to choose a modification that is suitable in design and design features. Below are several versions of the shields suitable for the vehicle in question:
- AMC panel. This part is supplied to order, indicating the design features of the shield. A nice bonus of the panel is the presence of an oil indicator, which is not present on the standard version. This indicator was introduced into the design, taking into account the wishes of users who recommended including it in the instrument panel. Design features - a combination of a color scale with chrome lining.
- The PRO-Sport version is a special tuning overlay for the instrument panel of the VAZ-2114. The modification has an original design; models are offered with a dark or light backing, which is an additional advantage of the shield. The design includes a backlight mechanism that can be adjusted in brightness. The base color is blue, the scale is glued after installing the insert.
Below are several more modifications of ready-made shields:
- The AMC-2 modification is a rather original version for tuning the VAZ-2114 panel, since the tachometer has become the main device. The white scale is designed in a sporty style. The color of the product makes it easy to read information, and it has its own LED backlight. It is worth noting that it is quite difficult to install this model yourself, since it requires a radical alteration of the standard shield.
- The STREET STORM panel will delight car enthusiasts with a variety of colors. All parts of the dashboard are placed in a classic configuration, which cannot be called a disadvantage of this version. Another nuance of the design is the backlight, which is relatively light during the day with red symbols, and at night the degree of illumination and color can be changed.
- “North Wind” is a sporty version of the dashboard modernization with a complex backlight configuration. This option is popular as it creates a very attractive and unique effect at night.
All of these elements can be installed independently without any problems; minor difficulties sometimes arise with connecting the backlight.
Europanel
The problems of a standard dashboard on a domestic car can be solved by installing a Europanel. High-quality plastic is used in its manufacture, and the assembly is much better. After installing the unit, some problems disappear, including shortcomings in the ventilation system. However, you should not count on the maximum effect in terms of thermal and noise insulation.
Features of tuning the VAZ-2114 panel using the specified method:
- domestic assembly will still make itself felt in small details and related elements;
- the control levers for adjusting the position of the air grille have a rather tight movement and often do not reach the edge of the intended depression;
- the glove compartment will also not be perfect; after a while it begins to open on its own again;
- with inappropriate care, the appearance of the plastic also deteriorates (to avoid this, special compositions in the form of sprays should be used).
tight fitting
This way of upgrading the dashboard involves equipping the fixture with carbon fiber or leather. First, cutouts are made in the prepared material, after which the finished pattern is carefully glued onto the dashboard.
In addition to LEDs and imitation devices, the panel is decorated with special overlays and light filters with transparent elements. Such parts must be installed correctly and without overdoing.
Otherwise, the illumination may be uneven or the light may be too bright.
Painting
One of the simplest and most affordable types of tuning a VAZ-2114 panel is painting the device with a suitable coating. To do this you will need:
- Clean the surface from dirt and dust.
- Apply sandpaper treatment followed by degreasing.
- Apply sealant.
- Paint directly.
It is not very difficult to do this process yourself, but it requires certain skills. If you are not confident in your abilities, it is better to contact a specialist.
Recommendations
There are several ways to tune the VAZ-2114 dashboard yourself. The owner chooses it himself, taking into account personal preferences, financial and other capabilities. Originality is given by combining and combining different colors and materials. The better the components and the more professional the work, the longer the updated dashboard will please the motorist.
Before you begin modifying the torpedo, you need to study the vehicle passport and traffic regulations. All alterations must comply with current legislation.
Other compounds will simply begin to disintegrate when exposed to heat from a stove or direct sunlight.
conclusions
Decorative tuning method
If you decide to tune the dashboard, then you must first ensure the optimal combination of the device with the interior interior. In addition, ultimately, the dashboard must in any case meet all passive safety requirements.
So, the process of decorative improvement itself consists of adding external elements to the existing control panel, for example:
you can carry out the procedure of sticking special overlays on the scales;
Anti-slip mat for the dashboard
Please note that in order to perform tuning yourself, in any case you will have to either partially or completely dismantle the tidy. Next, we will briefly talk about each of the methods.
Tightening the tidy
The procedure for re-upholstering a PP is relevant if the device has lost its original appearance and there are defects on its surface. As a material for upholstery, you can use leatherette, leatherette or other materials. But you need to take into account that some materials, after reupholstering, can create glare in the sun and also emit an unpleasant odor. Therefore, the issue of material selection should be approached responsibly.
For example, if you decide to use leatherette for upholstery, then first you should cut it, taking into account the size of the PP, as well as its shape. This is done so that the leatherette does not stretch and does not gather in folds, so to reupholster you always need to dismantle the tidy. In this case, you can make more neat and even seams and joints, and you can use regular cardboard for cutting. All components of the cutting are sewn into one whole, and all seams must be hidden inside. The sheathing material itself can be fixed with glue or self-tapping screws (the author of the video about reupholstering is the Puls Avto channel).
Difficulties of functional tuning
Often, functional tuning is limited only to replacing older or faulty car devices with newer and more modern ones. However, we should not forget that functional tuning also includes the installation of additional vehicle control elements such as an immobilizer, on-board computer or built-in additional devices. The main problem with such modification is not so much the choice of components as their proper installation. Most often, novice tuning enthusiasts who want to carry out such an installation at home will have to face such a problem as difficulties in calibrating devices. Imagine that the speedometer will show an inadequate speed of the car or the fuel gauge will deceive you at the most inopportune moment.
Separately, it is necessary to say about such a point as the legality of modifications. That is, if the design of the car provides for a speedometer or tachometer of the exact model that is installed at the factory, it will be quite difficult to explain its replacement during maintenance. Therefore, it is better to carry out aesthetic tuning of devices that have already been installed on the car, and place additional ones either on top of the dashboard or in those places that are still free. Aesthetic question
When carrying out aesthetic tuning, you need to carefully plan everything, because you will need no less skills than when carrying out a functional improvement of the dashboard, and in addition to it you will also need an excellent sense of taste. If you yourself know what you want, all that remains is to prepare the necessary materials and elements, and we’ll talk about this a little later, but if you don’t have a clear plan, then it’s worth developing it in advance.
First of all, look for inspiration on car forums or ask for advice from motorist friends who have tuned their cars. Naturally, each person has his own taste, but someone’s ready-made improvements may well lead you to an interesting solution that you can later implement. In addition, knowing what you want to achieve with your car, you can easily select the necessary materials and apply certain solutions related to the manufacture of elements necessary for tuning.
Installation of LEDs
A DIY LED panel is also quite simple and one of the most common tuning options.
This procedure is carried out as follows:
- First, the PP must be dismantled, all standard light bulbs must be removed.
- Next, you need to determine the places where you will install diode lighting sources - of course, for better visibility they should be placed around the perimeter.
- Decide on the color of the diodes - it should provide comfortable conditions while driving, without disturbing the driver.
- Next, you have two options - either simply replace the light bulbs with diodes, buying the appropriate ones in the store so that they fit the standard sockets, or install diodes in new places. To do this, you will need to drill holes on the PCB where the light source will be installed. Of course, the first option is simpler, there is nothing complicated in its implementation, but we will consider the second method.
- After the holes are drilled, the light sources should be connected to each other using soldering - for the connection you can use a flexible wire, its thickness should be small.
- So that you can subsequently adjust the brightness of the lighting, you can add a variable resistor to the circuit. Depending on the model, an auto rheostat installed during production can be used for this purpose.
- If you use white light sources, then in order to provide a different shade, you can paint the light bulb with varnish or special paper.
- The diode elements should be soldered to the power circuit, and then connected to the PCB; it is important to observe polarity.
- Then the control panel’s performance is diagnosed and its further installation on the car (the author of the video is Lesha Master).
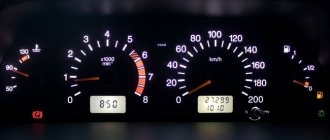
LED-based instrument lighting
It often happens that the dim factory backlight of the instrument panel confuses the instrument indicators or is not visible at all.
Also, due to such illumination, the driver’s eyes get tired, which can lead to an accident. The most modern method is LED lighting based on strips. Firstly, they are easy to buy at any auto store, and secondly, they are quick and easy to install. The first thing we need is to remove the instrument panel, depending on the make and model of the car, the panel is removed in different ways, so we will not describe the process of unscrewing and removing the panel.
Now, having removed the panel, unscrew it to the base, so that you can easily get to the standard lighting. As a rule, in passenger cars the power supply is 12V, the same power supply is used for the LED strip.
Next, you should be good with a soldering iron; you will need to remove the standard light bulbs and solder an LED strip in their place. As a soldering fastener, you can use two small wires, but not very thin ones; they can burn out due to the load. It is advisable to place the LED strip evenly over the entire surface. As practice shows, it is better to solder several short strips than one long one, and the likelihood of combustion is less, and there will be no load on one power supply.
If you are not comfortable with a soldering iron, then it is better to turn to experienced ones, since here you need to be careful and careful, the slightest short circuit can burn the entire instrument panel.
Once all the strips have been soldered, it’s worth checking, connecting the instrument panel with a surface-mounted installation and turning on the backlight; if everything is done correctly, all the strips will glow. The strips themselves can be attached using double-sided tape, so the backlight will be distributed evenly across all devices. All that remains is to put everything back together in reverse order, tighten the instrument panel and enjoy.
Painting the tidy
Another option is to paint the instrument panel, or rather, the scales themselves - tachometer, speedometer, you can also paint temperature sensors, fuel volume, etc. If you install diode lighting sources in the panel, then painting the PP (necessarily with luminescent paint) will give the device a brighter and more modern look. It is necessary to paint carefully so as not to splatter the paint on the shield, otherwise not only the scales will stand out, but also traces of the paint, and this will not look aesthetically pleasing.
Replacing the instrument panel with a new one
As we previously recalled, in addition to the suggested methods, there is also the most expensive, but also the highest quality option, which is a complete replacement of the instrument panel.
Nowadays, instrument panels that are based on a large display instead of analog instruments are in fashion. Even on domestic cars you can install such a miracle and the panel will take on a modern look. When choosing, it is worth remembering all the parameters of your car, since even different engines can play a role in the choice. Such a panel allows you to completely customize the devices to your taste, their location, lighting and other parameters. In a word, do everything to the driver’s taste. Below we have provided a video example of the operation of such an instrument panel on a VAZ 2114 car.
This technology is based on a large display covering the entire instrument panel, a minicomputer based on Android and a set of devices, Wi-Fi, Bluetooth.
Such a replacement is usually short-lived, but expensive, so first you should think about whether you need it or just for beauty.