Why do rear pads wear out rapidly?
Several factors influence the wear rate of the rear pads. In the first place here is the driver’s illiterate work with the brake system. Considering the fact that the Priora is equipped with a fairly powerful engine, most drivers prefer aggressive driving with rapid acceleration and sharp braking. With this type of driving, the operation of the car’s braking system leads to the fact that the rear pads wear out very intensively. Many inexperienced car owners, due to ignorance, practically do not use engine braking.
The second factor is the replacement of the rear pads on the Priora with low-quality spare parts. Questionable manufacturers of cheap elements may use low-quality and sometimes simply unsuitable materials to produce the friction layer of linings. This can not only reduce the manufacturer's recommended replacement schedule, but also render the brake drums unusable. Let's look at the main signs that require urgent replacement of the rear brake pads on a Priora.
Replacing rear brake pads on VAZ-2110, 2111, 2112
One of the most popular models on the domestic market today is still a simple, practical ten.
This machine began to be designed back in 1983 as part of a new plant development project. Assembled on the basis of the VAZ-2108, the model became its improved version, which received not only a modern image, but also a richer technical content. But, like the eight, and like all AvtoVAZ cars, the ten also has a number of shortcomings. In particular, these are weak rear brake pads, which quite often fail and need to be replaced.
We will talk about how to replace parts yourself in this article.
Rear brake pads and their types
Brake pads are the most important element of the braking system, ensuring the process of slowing down and stopping a vehicle. Pads are divided into two types:
- on the front wheels (disc)
- on the rear wheels (braking occurs using linings adjacent to the drum)
It is the latter type that we are talking about today.
The principle of operation of the pads is that when the driver presses the brake pedal, the impulse from it is transmitted to the brake system, to the pads.
Fitting tightly to the drum (this is the case with the rear units, and the disc, if we talk about the front units), the pads act as a barrier that prevents the wheel from spinning, as a result of which the car stops. If the pads fail, this has the most negative impact on the operation of the braking system, which can lead to serious consequences, such as loss of control of the car while on the road and an accident. That is why it is so important to keep under control the condition of the vehicle’s brake system components, as one of the most important systems responsible for traffic safety.
You can determine that the components are out of order by a characteristic squeaking noise, which intensifies as the car accelerates.
There are two ways to solve this problem:
- Contact a mechanic
- Fix the node defect yourself.
But contacting a specialist can cost a pretty penny, because, to hide it, our country has now taken the path of market relations, where man is a wolf to man, which is not good, and sometimes in auto repair shops they also increase the price for the simplest work.
Doing this work yourself will not be so difficult, it is only important to be patient, have the necessary equipment, read the instructions in detail, and also purchase new rear pads.
There is a large selection of these parts on the car market. But most often motorists give their preference to three options:
- Pilenga, of high quality and good service life, the price per part is 580-600 rubles.
- Allied Nippo, cost about 1000 rubles.
- Tornado - sold at a price of 950-1000 rubles.
The pads have been purchased and a free day has been carved out for work. Here we go?
How to remove the pads
In order to remove defective rear pads from a VAZ-2110, you need to prepare the following arsenal of a car mechanic:
- a jack is needed to raise the rear of the car
- key 12, it will become the main tool in our business
- pliers are useful for removing parts
- hammer, yes, you will have to make physical efforts to knock out old parts
- a screwdriver, a good helper in removing old pads
- the block is an excellent stand.
Work begins
- The very first thing you need to do is put the car on a jack.
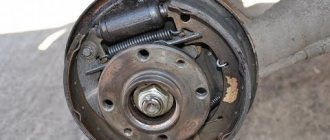
- Remove the rear wheel and disc. We can see the drum ( 6 ), which is attached to the entire structure with two bolts (cotter pins ( 7 )). These need to be removed. Here you will need a 12mm wrench (you can also use a 12mm wrench
 , it is just suitable for working with tens pads.
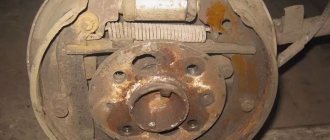
 - Remove the brake drum ( 6 ). This is probably the most difficult thing in the process of replacing the rear pads, because over the years of the car’s service the drum “sticks” almost tightly, and in order to remove it without damaging it, you will have to work hard. A hammer will help here by tapping the drum, but before doing this, it is important to place a previously prepared block to prevent deformation of the drum, otherwise it won’t take long and break into pieces, which we, of course, don’t need.
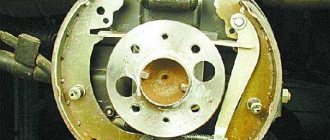
- Carefully and slowly remove the spring securing the rear pads of the car. The spring is removed using pliers or a simple screwdriver( 9).
- Now you should disconnect the spring ( 8 ) fixing the block on the shield ( 1 ).
- Loosen the upper spring ( 3 ), which secures the unit. In order to weaken the spring, you need to turn the block a little to the side, about 50-60 degrees .
- To remove the unit, carefully remove the part from the support and brake cylinder ( 2 )). To do this, you need to grab the block ( 4 ), which is not connected to the handbrake (a sorcerer in common parlance). We pull the part as if we are trying to move the pads apart from each other. You will have to loosen the part several times until it is disconnected and pulled out.
- In order to remove the second block, we disconnect the handbrake rod (sorcerer) from the cable. Now the block is easy to pull out
The process of removing the units is completed, now you can begin replacing the old pads with new ones.
Installation
Installation is always carried out in the reverse order of dismantling. But in order not to get confused in this work, we will discuss this issue in more detail.
- To begin with, we need to push the piston of the brake system cylinder all the way inside.
- It is necessary to attach the handbrake rod to the new rear block. This must be done in exactly the same way as was the case with the old node, and in no other way.
- We put the cotter pin in place.
- How much we suffered before we pulled out the guide spring. Now it's time to bring her back. We attach it to the block.
- The cable is connected to the handbrake rod.
- The previously removed upper spring is now attached to the pads at one end and the other.
- Now get ready to perform the most important stage of the work: we place the block on the brake cylinder, in the place where it should be. We tighten it a little from below so that the spring stretches and makes it possible to place a spacer bar in the niche. We insert the bar. After this, we put the second block in place, but only so that it does not fit into the hole of the strip.
- Armed with pliers, we engage another spring with the assembly. But here, keep in mind one important nuance: the cable should under no circumstances touch the parts of the drum that are in motion , otherwise it can lead to serious consequences.
- We are approaching the end of the work process. We install the drum in place, fasten it with bolts, and install the wheel.
The work is completed. For the first time, it is better to put detailed instructions in front of your eyes, so as not to get confused and make a mistake, it would be good to also watch video materials on installing brake pads.
The second time, this work will be performed automatically and will take no more than half an hour. The main thing is not to delay replacement: brake pads are a serious matter that cannot be tolerated, because they ensure the safety of the vehicle.
Pad diagnostics
You can assess the degree of wear of the rear pad by the condition of the front one - on a similar AvtoVAZ model it wears out much faster than the rear one. For this purpose, the brake mechanism has a special window with a rubber plug.
The last one needs to be pulled out. Through the viewing slot you can roughly estimate how much time is left before replacing the rear pads on the Priora. If the thickness of the lining is 1.5 millimeters or less, then the front pads also need to be changed. They also require replacement if the linings on them are oily or have deep chips or grooves. It happens that the friction lining peels off from the metal base. This is also a reason for replacement.
To assess the condition of the drums and pads, you need to remove the rear wheel and drums. There should be no mechanical defects on the surface of the latter. If the wear on the working surface is quite severe and there are deep grooves on it, then the part needs to be replaced.
It is also a good idea to check the brake fluid level. The new pads are thicker than the old ones, and to replace the rear pads on a Priora, you will need to press the brake pistons into the cylinder. Liquid may leak from under the expansion tank cap. The handbrake should be released. The parking brake cables must be released as much as possible.
Replacing brake pads on Lada Priora: selection, recommendations -
Every 40,000 km the car requires replacement of brake pads. So, for some car enthusiasts, this becomes a real test. On the Lada Priora it is quite easy to change both the front and rear pads with your own hands. The only nuance remains the correct selection of parts, since you should not skimp on safety.
Every 40,000 km, the car requires replacement of brake pads. So, for some car enthusiasts, this becomes a real test. On the Lada Priora it is quite easy to change both the front and rear pads with your own hands. The only nuance remains the correct selection of parts, since you should not skimp on safety.
The reasons that can lead to failure are known to almost every motorist. On Priora they are practically no different from other cars. But, it’s worth taking a closer look at exactly what reasons contribute to the fact that it’s time to change the pads:
1.Wear. When the friction part reaches a limit of 1.5 mm, this signals that the product needs to be replaced.
2. Factory defect, namely a crack during use. Usually they appear after the pads have worn in, but could not withstand the load and cracked. This is a common occurrence for the Lada family of cars.
3.Brake fluid gets on the friction part of the pads.
All the reasons for the failure of the pads are considered, and you can proceed directly to the choice.
The choice of brake pads, regardless of rear or front, must be approached carefully and seriously, since this is primarily safety. For Priora, there are original parts and replacement parts that can also be used for installation on a car. They have almost the same resource, but you shouldn’t go to extremes and buy too cheap pads. Let's look at what spare parts are recommended to be installed on the Lada Priora. Let's start with choosing the front brake pads:
replacing the rear pads of a Priora with abs
When braking, the car begins to make an unpleasant sound, or upon inspection you find that your pads are worn out, which means it’s time to change them. Front brake pads last approximately 3050 thousand km, rear brake pads last 6090 thousand km. Let's consider replacing brake pads
front-wheel drive VAZ cars using the Lada Kalina as an example.
If the work is not done on a lift, we secure the car with wheel chocks, remove the wheel using a jack, and for safety we place an additional support under the body. The pads should only be replaced as a set, otherwise the car may pull to the side during braking. Well before you start replacing the pads, you should check the condition of the brake water level; if the level is at the MAX mark, then you will need to remove a little water from the reservoir, pump out the liquid, of course, either with a syringe or a rubber bulb. If you do not pump out the liquid, then when the piston is pressed in, excess water will begin to flow out from under the lid. First, we bend it with pliers in another way, carefully using a hammer through the beard of the edge of the locking plate, which secures the lower cylinder mounting bolt. This bolt secures the caliper to the lower guide pin.
Peculiarities
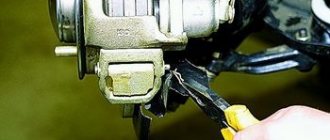
The first step is to remove the rear wheel and fix the car. If the vehicle is equipped with an anti-lock braking system, then the rear brakes have design features, and this must be taken into account. On a car with ABS, disconnect the wheel speed sensor from the brake shield. This is done so as not to damage the sensor or wiring. Under the drum there is a master disk for the ABS sensor. How to dismantle it? Remove the sensor using the E8 head.
What rear brake discs can be installed on the Lada Priora?
Initially, in the stock version of the car with r14 wheels, there is a brake drum on the rear axle. But there are many dedicated rear wheel disc brake kits on the market. You can purchase them at any time. The installation process is quite complicated, but even an ordinary driver can do it. You need to stock up on special tools.
Original
Despite the lack of a standard, stock model with rear disc brakes, purchasing the originals will not be difficult. Since parts from other cars produced at the AvtoVAZ plant are suitable. it is possible to use the following:
| Name | vendor code | Cost, rubles |
| Lucas with ABS is the official supplier of AvtoVAZ | DF2586 | From 2 thousand rubles per pair |
Substitutes
There is a wide range of analogues on the market. Purchasing a suitable model is not difficult. It is only important to familiarize yourself with all the nuances of the choice in advance. Since the stock version of the car does not have such brakes. Particular attention should be paid to the dimensional parameters. If they do not match, it will simply be impossible to install them in place.
| Name | vendor code | Cost, rubles |
| N.K. | 202264 | From 2.7 thousand rubles per pair |
| Ferodo | DDF1096 | From 3.1 thousand rubles per pair |
| REMSA | 6144.10 | From 2.3 thousand rubles per pair |
Replacing rear pads without ABS and with ABS
Using a 7 key or similar head, unscrew the guide wheels. You need to unscrew it carefully. If it cannot be unscrewed with a key, then it is better to use the head - the threads can be easily damaged. Then the drum is dismantled. If it does not come off, then hit it with a hammer from the back side through the bars. The blows must be applied evenly. When replacing the rear pads on a Priora with ABS, you must also remove the disc.
Then the pistons of the rear brake mechanism are compressed. This can be done with two screwdrivers. The piston should be recessed inside the cylinder on each side. To carry out a similar procedure, you can press on the pads with screwdrivers. It is convenient to rest the latter on the shoulder of the brake flap.
Then, using a screwdriver, disengage the hook of the upper tension spring. The latter will be connected to the block. And after that you can remove the spring. The upper stops of the pads are removed from the piston slots and the spacer bar is removed. Similar operations are carried out with the lower tension spring.
Using the same screwdriver, disengage the pressure spring. It is also connected to the block. Now you can remove the front pad. If you release the spring from the rear block, you can remove it too. The handbrake drive lever can be removed from the hole in the cable end. Then you can proceed to installing new parts. It is definitely recommended to change the pads only as a set on the left and right wheels. A total of four pads are changed.
How to replace a brake disc on a VAZ 2170-VAZ 2172?
Note! If you are planning to change the brake disc in the front part, then it is better to take your time and save up some money to buy a second exactly the same disc, we will warn you right away, it is best to change two discs in the front part and not one, as many do, since the discs are erased at the same time (Unless, of course, one was replaced before, otherwise in this case uneven erasing will result) and most importantly, the car can brake on each brake disc with different strength (Manufacturers make them with different compositions and some brake more strongly, and some on the contrary, it’s worse), and because of this, the car will be pulled away from a straight-line course during emergency braking, so to prevent this from happening, it’s best to change both discs at the same time and the car will start to slow down much better and will not be pulled away from straight-line motion at all (First 100 km ., this may be due to the fact that the brake pads will be worn in)!
Removal: 1) First, you will need to remove the wheel from the car and then the brake pads (How to remove a wheel, read “here”, and how to remove the pads, read “here in this article”), when the operation has already been carried out and the pads are in place will be to the side (By the way, if you have the means, you can buy new pads, it’s just that when replacing brake discs, the pads are also mostly affected and replaced with new ones), use a 17-size wrench to unscrew the two bolts that secure the brake pad guide (The location of the bolts is indicated in the large photo with arrows, and in more detail the location of these bolts is shown in the small photo which is located in the corner) and immediately after that remove it from the brake disc, as it will get in the way very much and under no circumstances let the guide hang on the brake hose (it may burst), but best of all, tie it to the spring with a wire carefully so that it does not hang down, but stays there tightly.
2) Now, taking the wrench and putting a “7” socket head on it (If there is no wrench, then ordinary keys will do), unscrew the two guide pins that secure the disk (see small photo), but they will only be very difficult to unscrew , if the car is no longer young (In this case, a penetrating lubricant will help, such as WD-40 or something like it), and as soon as the pins are unscrewed, take a hammer (a rubber one is best, if you don’t have one, then also stock up on a piece of wood) and with its help, knock the brake disc out of its seat (the seat is indicated by a blue arrow, by the way, we also recommend that you lubricate it with penetrating lubricant so that the disc can be easily removed), but only when you hit, do not do it all in one place, but in different, otherwise you will be pounding on it for a long time and there will be practically no benefit from it.
Installation: Install the new disk in its normal place, in the reverse order of removal, but if it turns out that you will be installing the old disk again (For example, you removed it to get to the hub, etc.), then be sure to carefully remove the shoulder from it with a file, which formed as the brake disc wears out.
Additional video: You can see how to clearly replace a brake disc with a new one in the video below:
Symptoms: the front wheel practically does not brake, there is no braking effect by the front wheel, vibration in the front wheel drive when braking.
Possible cause: The brake disc is damaged or worn.
Tools: set of sockets, set of wrenches.
Note. After dismantling the disk, inspect its working surface for burrs, deep grooves, cracks, chips and other defects. You should also check the thickness of the disc (minimum permissible thickness is 17.8 millimeters) and its axial runout (runout exceeding 0.15 millimeters is not allowed). If defects are found, the disk should be replaced.
The discs should be replaced in pairs (i.e., one for each brake mechanism of the front wheels), otherwise the car may skid when braking.
1. Remove the wheel and brake pads.
2. Unscrew the two brake pad guide mounting bolts to the steering knuckle using a 17mm wrench.
3. Remove the front wheel brake assembly without removing the brake hose from the wheel cylinder.
4. Hang the brake mechanism to the front suspension telescopic strut using a rope or wire. Do not over-tighten or kink the brake hose.
5. Clean the brake disc from dirt. Lubricate the guide pins and the interface between the disc and the hub with liquid. Wait a while for the liquid to dissolve traces of corrosion.
6. Unscrew and remove the two guide pins using a 7mm wrench.
7. Remove the brake disc of the front wheel brake mechanism.
8. Install the new disk in the reverse order of removal.
Brake discs always wear out; on the Lada Priora their diameter reaches the minimum permissible size, which is about 17.8 mm. Beyond this limit, the brake disc becomes ineffective and it is time to change it. How to do it?
The usual method of replacing Priora brake discs involves dismantling the caliper; for this you will need a 7 key. Then we proceed in this way: using a previously prepared key, we unscrew the guide pins and manually remove the brake disc. And in case of difficulties, we knock it down with a hammer or sledgehammer.
After this, we unscrew both guide pins. Subsequent steps should be performed in strictly reverse order. In this case, all mating surfaces of the hub and disk must be cleaned of dirt, rust and scale. The smallest particle of unwanted impurities can lead to vibration and beating of the brake disc during braking of the car. If you want your car's brake system to work like a clock, completely replace the set of brake pads.
Setting the parking brake
After replacing the pads, the handbrake may need to be adjusted. Adjust it with an adjusting nut. The full travel of the parking brake should be approximately 2-4 clicks. A properly adjusted handbrake should not block the wheels when lowered. They should rotate easily.
After replacing the rear brake pads on a Priora, extraneous sounds may appear when braking - this is normal. The parts should rub against the drum. After some time (300 kilometers) such sounds should disappear.
How to replace brake discs on a Lada Priora yourself?
You probably know that disc brakes are used to block the wheels during braking. When you press the brake pedal, the braking system, hydraulically transmitting the force produced by the driver to the pistons, forces them to press on two brake pads (which are covered with a friction abrasive layer), and they, in turn, grip the surface of the disc, which is rigidly attached to the wheels. Thus, the car slows down.
On the Lada Priora, the front axle brakes are also disc brakes. At the same time, they are ventilated (small blades are located between the two walls of the disk, which, when rotating, are designed to cool the disk - after all, braking inevitably leads to heating of the metal of the disk). To prevent the disc from rubbing against the brake pads due to dirt, weather or other reasons, it is located at a distance from them (for this, a rubber ring located in the groove of the cylinder is used.
There is no exact data on when work should be done to replace brake discs - it all depends on your driving style.
On average, a car travels at least 60 thousand km until the discs need to be replaced with new ones. However, if the owner likes to drive (and, therefore, is forced to brake sharply), wear of the discs can occur after 20-25 thousand km (it happens earlier).
The only thing that is regulated is the minimum permissible disk thickness. It must be at least 18 mm.
If your car has alloy wheels, you can evaluate the condition of the brake discs through the holes in them - the surface should be smooth, without strong flaws and obvious signs of wear. If you have the slightest hint that there is a problem with the brake disc, remove the wheel and carry out more meticulous diagnostics.
If you are the owner of stamped wheel rims, it is quite difficult to see the brake discs through them - in this case, you will still have to remove the wheel to assess the condition of the brake discs.
Of course, discs can become unusable even before 20 and 60 thousand km. Defective discs, counterfeit ones, damaged for some reason - this also happens. It happens that owners, hearing an incomprehensible grinding sound in the area of the front brakes, attribute everything to “a pebble that will fall out by itself,” and before they realize that the discs are wearing out badly, time will pass - as a result, the discs will have to be sharpened at best, but most likely they will have to be replaced. Bad weather, foreign objects jammed into the brake assembly (and their negative effect is not always heard as extraneous noise).
Remember that discs can become unusable, not necessarily in pairs - it happens that one wears out badly, and the second is in excellent condition. You should also know that discs from the same manufacturer have different properties (even depending on the production batch), so regardless of the degree of wear of the second disc, they are replaced only in pairs. Remember also that when replacing brake discs, you should also replace the brake pads with new ones.
Today the market offers a huge number of brake discs, and indeed, there is plenty to choose from. So, let's say you purchased new discs and pads.
Before the replacement procedure, you need to prepare the following tools:
Using a cross wrench, loosen the 4 bolts that secure the wheel.
Place a jack under the wheel, then lift the car on it. Unscrew the bolts completely. For greater safety, place the wheel under the bottom of the machine.
Disconnect the brake hose by pulling it out of the bracket.
Using a 13mm wrench, remove the upper caliper guide bolt.
Use the second wrench (17) to hold the guide pin on the other side.
Remove the two bolts that secure the bracket to the steering knuckle.
Clean the disc from dirt and rust deposits.
Move the gearshift knob to first gear. Use a size 7 wrench to unscrew the two brake disc guide pins.
Start pulling the disc towards you to remove it. If it is difficult to remove the disk, you should carefully tap the back of it with a hammer.
Remove the brake disc completely.
If necessary, clean the installation site from dirt. After this, install a new brake disc. Then screw in the two guide pins using a size 7 wrench.
Install the brake caliper back onto the disc. Using a hammer, press down on the brake cylinder until it presses inward. At the same time, hold it with your other hand on the reverse side.
Replace the brake pads with new ones.
Next, assemble all the parts in the reverse order of the installation procedure.
Welcome! Brake disc - it mainly consists of cast iron, quite rarely of ceramics (This is on expensive cars), the operating principle is as follows: when the car needs to be stopped while moving, two brake pads grip the disc on both sides and thereby braking occurs, over time the disc wears out very badly and there is a need to replace it, the frequency of disc replacement depends on you, if you brake constantly (use the brakes very often, even when it is not necessary), if you brake with all your force (emergency braking), then the brake discs will have to be changed much more often than in the case when the car is not operated at high speed and is subjected to braking much less often, so after installing new discs, take this into account.