Low illumination of Kalina: factors of problems
The most common malfunction in vehicles is burnt out light bulbs. Sometimes this happens quite often, indicating the appearance of an auxiliary cause that caused the breakdown.
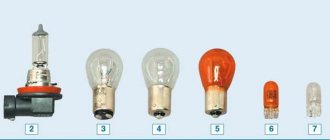
Note: When dismantling halogen light bulbs, you need to ensure that the bulb is sterile. It is very important to keep debris and dirt out. Therefore, sometimes the touch of fingers can play a cruel joke.
Low beam lighting on the Lada Kalina refuses to shine in the following cases:
- The fuse that protects the light bulb's power circuit fails.
- The headlight housing has become depressurized, dirt and foreign particles have gotten inside. The reflector along with the bulb bulb becomes clogged, and this leads to overheating and, accordingly, damage to the filament.
- Unstable operation of the generator voltage stabilizer. As is known, power surges significantly increase the breakdown of halogen light bulbs.
- The power supply to the lighting equipment has been damaged, for example, oxidation has occurred, a wire has broken, or the contact of the light bulb plugs does not work.
This is interesting: Why does white smoke come out of the exhaust pipe on a diesel engine?
Installing a new one: sequential instructions
The procedure for removing and installing a headlight, which is located on the right or left side, is not particularly different from each other. It is only important to act strictly according to the instructions. When installing a new light bulb, you must only hold it by the base and do not touch it with your hands. When removed, you can completely hold it in your hands.
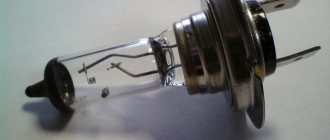
Note that for the Lada Kalina (16-valve engine) a lamp with an H7 socket is required. Install the new one as follows:
- Determine the seat so that the protrusion in the base coincides with the groove on the headlight. It must be firmly fixed. Only then will it be clear that the protrusion has fallen into the groove;
- press the latch against the lamp so that the center of the base is between the antennae of the latch;
- snap the latch into place;
- connect both wires to the clamp and close the lid tightly.
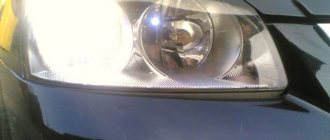
After completing this procedure, you need to turn on the headlights at close range and check their operation. If everything is fine, then the installation was completed correctly. Otherwise, you will have to take the car to a car service center and pay money for it. Lamps should only be purchased in special stores. It is advisable to give preference to well-known manufacturers and models with a guarantee. Osram H7 12V 55W headlights for the Lada Kalina Cross are very popular today.
You should not save money and purchase low-quality headlights, as they will not last long and will require frequent adjustment or replacement. It is important to understand that not only your safety, but also that of pedestrians depends on these light bulbs. It is especially important that the lighting is of high quality at night in order to avoid tragic consequences.
Angel eyes
Aesthetic appearance, attractive design and functionality – these are the distinctive features of this type of tuning. It was first introduced on BMW cars. Such an improvement can be carried out on Kalina. To create the effect you will need:
- transparent plastic rod;
- pliers, wire cutters or metal saw;
- construction hair dryer;
- soldering iron;
- insulating tape;
- 220 Ohm resistors;
- 3.5-volt LEDs (4 pcs.);
- wires and connectors.
First you need to choose the length of the rod. This can be done by measuring the circumference of the illuminator with a thread or using the formula 3.14xD, where D is the diameter of the headlight. The rod needs to be heated with a hair dryer or boiled so that it becomes soft. Next, you should select a tin can or other round container, the diameter of which coincides with the diameter of the headlight. Wrap the rod around this container so that it takes the shape of a circle.
Now you need to solder the resistors to the LED legs. Only 4 LEDs are required (2 for each headlight). When soldering, polarity must be observed, otherwise the homemade product will not work. After this, connect the element to the power source. If the diodes light up, it means everything was done correctly.
The third stage is cutting. The circumference of the rod must be evenly cut, the depth of which does not exceed 1/3 of the diameter of the thickness of the rod. This is necessary for the formation of radiant light.
Next comes the installation of homemade angel eyes in the headlight. The rod must be positioned so that the diodes are not conspicuous. The rings do not require fasteners - they are pressed against the glass.
The Lada Kalina headlights have a fairly simple structure, and if necessary, any car owner can carry out their own repairs. Maintenance and timely troubleshooting are the key to long-term operation of the machine’s lighting equipment.
The efficient functioning of the lighting devices of the Lada Kalina car is a guarantee of safe movement. Over time, light bulbs reach the end of their lifespan and require replacement. Here, the practical domestic model Lada Kalina cannot be included in the cohort of exceptions. Low beam bulbs in the car we are considering play an important role, since in the daytime they allow you to identify the vehicle, and at night they illuminate the roadway in traffic or in suburban areas. Please note that regulatory regulations prohibit operation with low-beam mode bulbs that are not working or not turned on. The low beam lamp can also be replaced by hand.
Snapshot
Block headlight (left): 1 — ventilation tube; 2 — low beam section cover; 3 — cover of the high beam section; 4 — light beam regulator in the vertical plane; 5 — lamp socket for side light and daytime running light; 6 - electrical connector; 7 — regulator of the light beam in the horizontal plane; 8 - turn signal lamp socket
Block headlight (left): 1 — ventilation tube; 2 — low beam section cover; 3 — cover of the high beam section; 4 — light beam regulator in the vertical plane; 5 — lamp socket for side light and daytime running light; 6 - electrical connector; 7 — regulator of the light beam in the horizontal plane; 8 - turn signal lamp socket
Block headlight (left): 1 — ventilation tube; 2 — low beam section cover; 3 — cover of the high beam section; 4 — light beam regulator in the vertical plane; 5 — lamp socket for side light and daytime running light; 6 - electrical connector; 7 — regulator of the light beam in the horizontal plane; 8 - turn signal lamp socket
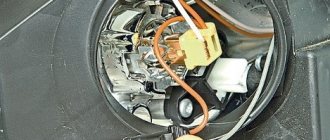
We show the replacement of lamps on the left headlight unit. For better access, move the air filter to the side. To replace the lamp in the right headlight unit, this is not necessary. For clarity, we show the work on a removed headlight. We change the lamps in the right headlight in the same way.
To replace the low beam lamp, remove the larger diameter rubber cover from the headlamp housing.
Possible causes of malfunction
So, if the low beam in one of the headlights of a Lada Kalina does not light up, then the reason most likely lies in a burnt-out light bulb. Replacing it will not be difficult for every car owner.
However, unfortunately, there are a number of other reasons for this malfunction, the most common of which are the following:
- The contacts in the plug block are oxidized or burnt;
- The fuse has blown;
- Open circuit;
- The relay has failed.
Below we will look at how to fix all these problems.
Replacing the lamp
Replacing the low beam on Kalina is quite simple. Moreover, you will only have to spend a few minutes of your time on this.
The only thing is that before replacing old lamps, you need to purchase new ones of the H7 standard. It is advisable to install new bulbs on two headlights at once so that they provide the same glow.
Note! On sale you can find several types of H7 standard bulbs - halogen, xenon and LED, for example, for fog lights on a VAZ 2110. All types have different prices, but most importantly, they have different characteristics. On our portal you can familiarize yourself in detail with the features of all these lamps.
Replacement instructions are as follows:
- First of all, you need to remove the rubber plug located on the back of the headlight. To do this, you must first open the hood.
- Then you need to remove the positive and negative terminals from the contacts.
- Next, you need to press the spring bracket with your own hands and remove it from the seat.
- After this, you need to remove the old light bulb and put a new one in its place.
- Then you need to replace the bracket, put the terminals on the contacts and install the plug.
Note! When replacing light bulbs, do not touch their glass bulbs with your fingers, otherwise they may quickly burn out.
When replacing light bulbs, you need to pay attention to the quality of the contacts. If the contacts are oxidized or burnt, they must be cleaned.
Replacing the fuse
If, after replacing the lamps, the low beam headlights in the Lada Kalina still do not work, you should check the fuses. They are located in the mounting block under the steering wheel.
The lamps are protected by different fuses:
- Right lamp – F12
- Left lamp – F13
It must be said that it is not always possible to visually identify a blown fuse. Therefore, even if it has no external defects, you should check the voltage at the terminals with a test lamp or multimeter.
Note! If, after replacing the fuse, the lighting turned on, but after a while it disappeared again, it is necessary to measure the voltage that the generator produces. It is advisable that when the engine is running it does not exceed 14.4 volts. If the voltage is higher, you can try replacing the control relay.
Open circuit
If the fault cannot be eliminated, then you need to find an open circuit.
You can do this as follows:
- If there is no voltage at the fuse terminals, you need to ring the wire that goes from F13 to contact No. 56 of the lighting control unit, since you can turn on the low beam headlights on Kalina using switch No. 5.
- If the wire is intact, but 2 headlights do not light, then switch No. 56 must be replaced. However, you should first check whether voltage is supplied to the switch itself.
- If voltage is supplied to fuses F13 and F12, you should check whether there is voltage at the relay output. Let us remind you that the low beam relay in the Lada Kalina is located in the mounting block.
- If there is no voltage, you should check the area from F12 to contact No. 56 of switch No. 4, which is located on the steering wheel, as well as the area from terminal No. 56a to terminal 1 of relay K7. It is also quite possible that switch No. 4 or the relay itself is not working.
Replacing the latter is not difficult, since it is simply inserted with contacts into the socket.
- In cases where there is voltage at the relay output, you should check the wiring of the machine from the mounting block to the headlights according to the diagram.
Note! If the low and high beams on Kalina go out in one of the headlights, then perhaps the contact at the ground terminal has lost. To check it, you need to disassemble the headlight unit.
As we can see, finding an open circuit or a faulty part is not difficult. To do this, you only need a low beam circuit on Kalina and a multimeter or test light. These are, perhaps, all the main reasons for this malfunction on the Lada Kalina car.
How to change lamps
- Remove the protective cover.
- Disconnect the block with wires from the lamp.
- Move the spring clip to the side by pressing it.
- Remove the low/high beam lamp by the base.
Installation of lamps is carried out in reverse order. The headlight lamp is halogen. You cannot touch its glass flask with your fingers, because... There will be marks on it that will impair the illumination of the headlight. You can clean the lamp with a clean rag soaked in alcohol. The process of replacing headlight bulbs is also shown in the video:
Let us remind you that replacing lamps on all Lada cars is similar, so the process of removing and installing lamps can be seen in the video in the article about the Lada Granta.
Keywords: headlights Lada Kalina | external lighting Lada Kalina
10
1
What is the price of Lada 4×4 in Germany after the cessation of exports
Removing the glove compartment Lada Kalina 2nd generation
How much does it cost to overhaul a VAZ and foreign car engine?
History of the creation of Lada 4×4
Design and features of optics on Kalina
Before you disassemble the front or rear lights or change the bulbs in the optics of the Kalina station wagon, sedan or hatchback, let's understand its structure:
- external glass designed to protect light sources and prevent moisture and dust from entering them;
- a plastic case onto which the main components are fixed;
- a rubberized seal between the headlight housing and the glass is used to ensure the tightness of the structure;
- low and high beam lighting sources, as well as turning lights;
- a plastic reflector located inside the housing, characterized by the presence of a mirror surface and used to reflect light from lamps.
If the lights are not adjusted, this can cause inconvenience not only to the car owner, but also to drivers of oncoming cars. If the car owner can properly adjust the headlights, this will allow optimal illumination of not only the road, but also the side of the road. At the same time, the optics will not blind oncoming drivers.
When the low beam is operating, only the corresponding bulbs turn on. If the driver activates the high beam, then the high and low beam sources are turned on. The headlight itself for Kalina is equipped with an electromechanical drive and can be easily adjusted using a corrector. The corrector itself is installed on the center console, so adjustments are made from the passenger compartment. The regulator is connected to the drive located directly in the headlight using wiring (the author of the video is the Lada Kalina channel).
Removing and installing Kalina size lamps
To replace the side light bulbs in the headlight, you will need to remove the protective rubber cover by pulling one of its three blades.
- Remove the bulb socket.
- Remove the lamp from the socket.
This is interesting: How a hydromechanical gearbox works
2302-18-10-(Copy)
Remove the low beam lamp from the headlight housing.
Remove the low beam lamp from the headlight housing.
Remove the low beam lamp from the headlight housing.
Attention! Low and high beam lamps are halogen. Do not touch their glass bulb , as fingerprints will cause the lamp to darken when heated. You can remove dirt from the flask with a clean rag soaked in alcohol.
We install the new H7 lamp in the reverse order.
To replace the high beam lamp, remove the rubber cover of a smaller diameter from the headlight housing.
How to replace the lamps yourself?
How to change lamps yourself? Before replacing the low beam lamp, we recommend performing a number of simple preparatory steps. For work you will have to acquire the following list of devices and tools:
- new light bulbs, or rather a set (it is recommended to replace both headlights at once);
- screwdriver and pliers;
- a bottle of alcohol-containing substance, rags and gloves.
Also, the LADA Kalina car itself needs preparation:
- we place it in the middle of a flat area;
- activate the handbrake and install wheel chocks under the rear wheels;
- the engine is switched off.
Replacement.
- Open the hood and disconnect the power from the battery. This action will prevent the risk of a short circuit.
- Now remove the washer reservoir from its seat.
- The lamp can be replaced either with dismantling the headlight unit or without performing this action.
- If the optimal decision is made to replace without unnecessary dismantling, then first remove the rubber plug from the end of the headlight housing. To do this, pull the corresponding petal.
- The time has come to remove the electrical connectors from the base terminals of the lamps. We do this without forgetting to remember or mark the belonging of the switching elements to their current collectors (light bulbs).
- We release the spring retainer from its lock. We act with extreme caution in order to prevent the fixing element from spontaneously falling into the lighting device.
- We take out the lamp and install a new low beam lamp in its place. We carry out the action with gloves to prevent unwanted formation of fatty deposits on the surface of the flask. This aspect inevitably leads to a decrease in the resource indicator of the product we are considering. For preventive purposes, at the end of the procedure, it is recommended to wipe the surface of the flask with an alcohol-containing solution.
- Now we perform all assembly procedures in reverse order. This is a complete list of work related to how to change low beam bulbs in a car.
2302-18-10-(Copy)
Pulling the lamp, remove it from the socket.
Pulling the lamp, remove it from the socket.
Pulling the lamp, remove it from the socket.
We install the new W21/5W lamp in the reverse order.
Replacing headlight bulbs on a car manufactured before 2013
The only difference in the procedure for replacing lamps in the headlight of a car manufactured before 2013 is that the side light lamp is located under the high beam lamp cover, and the daytime running light lamp is simply absent.
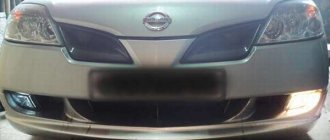
We will show you the replacement of the side light lamp on the right headlight unit.
Removing and installing Kalina taillight lamps
- Remove the socket with the parking and fog light bulb by turning it counterclockwise.
- Remove the lamp from the socket by pressing it and turning it counterclockwise until it stops.
- The combined parking and fog light lamp has 2 protrusions located at different levels. When installing it, the protrusions must fit into the corresponding grooves of the cartridge.
- The grooves on the flashlight body have different widths; this should be taken into account when installing the lamp socket.
Which lamps are best to use in Kalina
To find out which lamps are installed in Kalina during assembly, you need to remove the cover and pull out the part. The name, model and type of spare part are printed on the case. AvtoVAZ uses products from Philips as the main light. However, some models contain parts from Osram.
When searching for light bulbs in Kalina, you should be guided by proven options:
- number on the Kalina body or in the vehicle passport;
- a burnt-out sample previously removed from the lantern.
Lada Kalina: lamps and their replacement
Let's start with the fact that in addition to the low beam, other bulbs Kalina 1, Kalina 2, etc. may need replacement. To complete the picture, below we will consider replacing the low and high beams, as well as turn signals, headlight glass, the entire headlight itself, etc. So, the first thing you should do is disconnect the negative terminal from the battery. Only after this can you begin to carry out certain work.
- First, let's move on to replacing the turn signal bulbs. First of all, you should turn the turn signal socket 45 degrees counterclockwise. After this, it can be removed from the headlight housing.
- If the low beam lamp on a Lada Kalina needs to be replaced, then replacing the low beam lamps begins with removing the protective rubber cover from the headlight housing. To remove the cover, just pull the characteristic petals that are made on it.
Now you should disconnect the wire tips from the lamp contacts, remove the spring clamp from engagement with the hooks (2 hooks), and then remove the clamp from the lamp.
Low beam lamps, their types and malfunctions
Lada Kalina is a budget project of the domestic AvtoVAZ plant, and as befits an economy-class car, it cannot please you with high-quality components that can last at least a couple of years without interruptions. Most often, low beam lamps fail. There may be several reasons for malfunctions. This:
- The headlight is not sealed, which leads to its clogging. Dust settles in the lamp and leads to destructive overheating.
- Increased voltage in the on-board network, which is directly related to the operation of low beam headlights. In order to find out what voltage the generator produces, you need to diagnose it using a tester. The voltage should not exceed 14.4 V.
- Overvoltage causes the fuse to overheat.
- Violation of the electrical circuits of the right and left lamps.
- Oxidation of contacts.
There are other reasons, but these are the most common.
In order to find out whether the lamp needs to be replaced, or whether the breakdown lies in other parts, for example, in a defective fuse ( F12 and F13 ), you must first check it with a multimeter, put it on a continuity test and touch the parallel contacts on the fuse or lamp if it rings Either it works properly, it is silent, then you need to change the faulty part.
It is important to find out whether voltage is supplied at all to all terminals. If voltage is not supplied, then you need to ring the wire until the cause of the breakdown is discovered .
Here it is worth clarifying that driving without low beam lamps is categorically unacceptable, since in the dark, such an omission can lead to a serious accident.
At the moment there is a wide range of lamps. Experienced motorists put the following on the Lada Kalina:
- Lamps from Osram, which cost about 310 rubles.
- Narva, which cost a little less, 290-300 rubles.
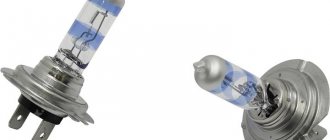
- An excellent option for the Lada Kalina are Philips H7 halogen lamps, costing 290 rubles. a piece.
There are also all kinds of modifications: all-weather lamps, improved visual effect, heavy-duty, designed for round-the-clock operation, etc.
Replacement process
The lamp replacement process lasts 5-10 minutes. Experienced motorists can do it in two. No tools are needed. Let's start the replacement process:
- Open the hood.
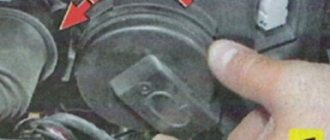
- We remove the plug from the headlight where the replacement will be carried out. It is not necessary to adjust the headlights after replacing the lamp.
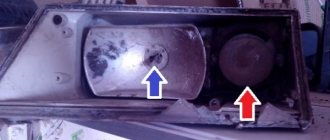
The plug is marked with an arrow
The plug is removed, the cartridge is close
Move the latch aside
Thus, the lamp is replaced and the car is ready for further use.
Lamp selection
Bulb type H7, do not mix it up
The low beam lamp is marked - H7.
It is quite easy to find in the car market or in spare parts stores. The most common manufacturer remains OSRAM.
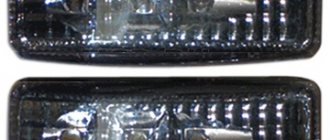
On the left is a Chinese lighthouse, on the right is a domestic OSRAM
These are domestically produced lamps that have gained popularity due to the price-quality ratio.
Other good manufacturers are:
These are already higher quality lamps, which are also more expensive than the popular OSRAM. Thus, the choice of lamps is quite wide, and every car owner will have something to choose from.
LED lamps for low beam
Controversial issue. It is difficult to choose the optimal ones in terms of quality.
Replacing the low beam lamp on Kalina is quite easy and simple. The main thing is to choose the right lamp, which must be marked H7 . The most common manufacturers chosen by motorists are OSRAM and Philips.
Reasons for loss of low beam
There are several reasons for the low beam to malfunction, some of which lead to the usual burnout of the lamps. It should be noted that there is a likely tendency for a similar malfunction to recur on Kalina with an enviable frequency - one and a half to two months. Reasons for this:
- Lack of tightness of the headlight (dust or moisture entering the bulb settles on the reflector mirror and the lamp bulb, which leads to its overheating. You can learn more about the reasons and ways to eliminate fogging of headlights at the link);
- An upward change in voltage in the vehicle network (a voltage surge also causes the halogen headlight bulb to burn out).
There are other possible problems that cause the lack of low beam:
- failure of the fuse responsible for the proper functioning of optical devices;
- violation of the connection of the lamp plugs (oxidation or burning of contacts).
Which lamps are best to use in low beam headlights?
As a rule, on the Lada Kalina, halogen type H7 lamps from the German company OSRAM (12-volt, 55 Watt) are installed in the low-beam headlights. You can replace it with an equivalent lamp from a German manufacturer or choose, for example, a halogen light source from Philips Extreme Vision, which is distinguished by its brightness and exorbitant price. But you can approach this issue from a less expensive side, purchase, for example, lamps from GE SportLight or even simpler: buy domestic halogens. Despite the low cost, the products are in no way inferior in lighting brightness to their famous competitors.
Despite the low cost, the products are in no way inferior in lighting brightness to their famous competitors
Replacing the low beam lamp on Kalina is quite easy and simple. The main thing is to choose the right lamp, which must be marked H7 . The most common manufacturers chosen by motorists are OSRAM and Philips.
Replacement process
The lamp replacement process lasts 5-10 minutes. Experienced motorists can do it in two. No tools are needed. Let's start the replacement process:
- Open the hood.
- We remove the plug from the headlight where the replacement will be carried out. It is not necessary to adjust the headlights after replacing the lamp.
The plug is marked with an arrow
The plug is removed, the cartridge is close
Move the latch aside
Thus, the lamp is replaced and the car is ready for further use.
Lamp selection
Bulb type H7, do not mix it up
The low beam lamp is marked - H7.
It is quite easy to find in the car market or in spare parts stores. The most common manufacturer remains OSRAM.
On the left is a Chinese lighthouse, on the right is a domestic OSRAM
These are domestically produced lamps that have gained popularity due to the price-quality ratio.
Other good manufacturers are:
These are already higher quality lamps, which are also more expensive than the popular OSRAM. Thus, the choice of lamps is quite wide, and every car owner will have something to choose from.
Guide to replacing low beam bulbs
LBS without boot
The replacement process is quite simple and is carried out in several basic steps.
- First you need to open the hood. Find the LBS rubber boot under it and remove it.
- Next, simply remove the block and put it aside.
- The lamp is secured with a spring clip. You should simply press down on it, then move it slightly to the side and then lift it up.
- The next step is to remove the old light bulb.
- When dismantling is complete, it's time to install a new part. All installation is carried out in the reverse order indicated above.
As you can see, dismantling the old part and installing a new one can be done very simply in just a few minutes. Once you do it once, you can always repeat it. The task is also made easier by easy access to the headlight in Kalina (the author of the video is the Auto Repair channel).