Replacement of rear brake pads VAZ 2113, 2114, 2115
Safe and comfortable driving of a VAZ 2113, 2114, 2115 car largely depends on the rear brake pads, which must be replaced in a timely manner, without bringing them to a state of complete wear.
Depending on their quality, the pads have a noticeably long service life, so it is worth choosing new spare parts that have been certified by the car manufacturer and have its part numbers.
How to remove and replace front pads
The process of replacing front brake pads is usually carried out 5-7 times more often than rear ones. The main reason for this is the operating conditions. Abrasive gets between the pad and the brake disc. The rear wheel drum isolates the linings from microparticles.
The process of removing the front pads and installing them on the VAZ 2114 and 2115 is as follows.
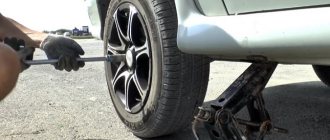
- The wheel bolts are unscrewed, and the car is first placed on a jack;
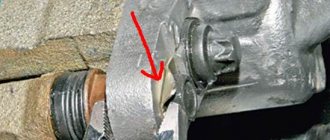
- Use a spanner to unscrew the bolt securing the caliper bracket;
Loosen and unscrew the caliper mounting nuts
Protect the hose from damage by removing it
Remove worn out pads
The process of replacing the front pads is easier than the rear ones, but you should do everything as carefully as possible.
Video on how to change the front ones
List of necessary spare parts and tools for work
When selecting new parts for replacing the rear brake pads on a VAZ 2114, video instructions for the stage of work are given at the end of the article, you should pay attention to the availability of original part numbers for the following spare parts:
- Set of rear pads (art. 2108 – 3502090 – 55)
- Brake drums (art. 2108 – 3502070) which may be needed in case of severe wear of old parts due to long service life
Replacing parts does not require specialized tools; all work is carried out using the most common kits, namely:
- wheel wrench;
- jack;
- Screwdriver Set;
- 12 mm head and knob;
- pliers;
- rear brake drum puller if available, or you can use a hammer;
- protective gloves.
Having purchased all the necessary new spare parts and tools, carrying out all the repairs yourself will not cause problems and will help you save money, since at the end of 2021, replacing rear brake pads in official Lada car repair shops costs from 1,500 to 2,000 rubles, and in private repair shops, this the service will cost approximately 1000-1200 rubles.
Installation
After dismantling the old elements, we compress the side parts of the brake cylinder with a slotted screwdriver. Be careful - make sure that the new pads fit exactly into the grooves of the cylinder, and that the strip hits the connector. After this, you need to hook the springs into place. We perform this operation with both lower and upper overlays.
After dismantling the old elements, we compress the side parts of the brake cylinder with a slotted screwdriver. Be careful - make sure that the new pads fit exactly into the grooves of the cylinder, and that the strip hits the connector. After this, you need to hook the springs into place. We perform this operation with both lower and upper overlays.
Then we check again that the elements are installed correctly and install the drum cover. Please note - it may be difficult to enter. In this case, you need to check whether the brake cylinder is fully clamped and whether the handbrake is loosened. Perhaps the cable is jammed and because of this the cover does not fit into place.
Having fixed the problems, we put the drum and wheel in place. Before lowering the car from the jack, check how easily it rotates. The wheel should spin without jamming or rubbing the pads. Next, the rear brake pads are replaced on the VAZ-2114 from the opposite side. Remember that elements are changed in pairs, even if the wear on the adjacent wheel is less significant. The procedure is carried out in a similar way. But that's not all. The final step will be adjusting the handbrake.
Stages of independent work
Having carefully studied the following stages of work on replacing the pads, any car owner will understand how to fix this breakdown and continue to operate his car safely, namely the following:
- The car is driven onto a flat surface into a room, preferably with an inspection hole. The important point here is that you need to wait some time for the brake drums to cool down; during driving and constant braking, they heat up and in order to carry out work, they need to cool down.
- Having placed a wheel chock under the front wheel, loosen the wheel mounting bolts with a wheel wrench, jack up the car, and completely dismantle it.
- Having removed the wheel, we proceed to dismantling the brake drum, having first checked whether the car is on the hand brake, otherwise this will cause great difficulty in removing it and can lead to mechanical failure of the part. The drum is attached to the rear hub with two 12 mm bolts, unscrew them, treat the seat with a brush and remove it with a specialized puller. If you don’t have a puller, you can use a hammer and tap it through the piece of wood from the back side, constantly rotating it after each blow.
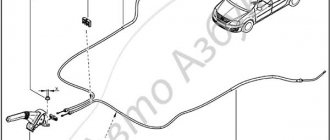
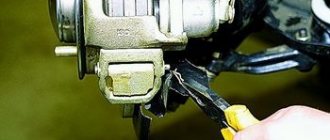
After removing the drum, it is necessary to loosen the tension on the parking brake cable; this is done on a special adjusting pin located under the bottom of the car, next to the middle part of the muffler.
Having loosened the handbrake cable, we begin to remove the brake pads. First of all, we pull out the fixing pin on the parking brake mechanism pin on the rear block, then press out the fixing spring (the so-called soldier), remove the lower and upper return springs from the bottom of the block, the brake mechanism spacer bar and remove the old, worn pads from their seats brake cylinder.
- Having removed the old pads and carefully inspected the brake cylinder drum for wear, it is necessary to thoroughly clean the protective shield and all seats of new parts from old dirt. Next, we proceed to install new pads; it is advisable to assemble the entire brake mechanism in advance (spacer bar and upper return spring) and then mount everything in its seats. Having carefully installed the new pads, we fix them with a lower spring and soldiers, after which we mount back the brake drum and all previously removed parts. Having completely assembled one side, we proceed to replacing the pads on the second side, performing all the steps again.
- Having changed the pads, we begin to adjust the handbrake, pulling the cables until the lever in the car's interior rises two-thirds up or until four clicks of its ratchet.
Also watch a detailed video of replacing rear brake pads on VAZ 2113, 2114, 2115 cars:
Let's get started
To perform this operation, we do not need to have a pit or a lift. A smooth and hard surface is sufficient. So, loosen the wheel bolts on one of the wheels and jack up the rear of the car. First, we put stops under the front tires, or put the car in first gear (so that the car does not roll spontaneously). Next, remove the wheel and remove the muffler from the cushions. We leave the outermost one, which is located under the bumper, so that the exhaust does not hang in the air.
Why do we need a muffler? Next to it are the handbrake tensioner nuts that need to be loosened. This is done so that you do not experience additional difficulties during installation. Loosen the nuts as much as possible. To do this we need a key “13”. How to further replace the rear brake pads on a VAZ-2114? Then we move on to the drum itself. We unscrew the guide bolts on it and rotate the cover 30-40 degrees. This way we can get it out.
But sometimes the drum can become sour. To do this, take a handle (or a short wooden beam), a hammer and begin to apply small blows to the lid. We apply them from different planes until the element begins to scroll. The beam will be a kind of damper, since a hammer can easily damage the element.
Correct replacement of rear brake pads on a VAZ 2114
The brake system must be maintained in good condition, as it is directly related to traffic safety. And because brakes are not something to joke about, it is necessary to change the brake pads on time, monitor the condition of the disc and drums, and check the operation of the hand brake. Not only the condition of the car, but also the safety of its passengers depends on how carefully the maintenance is carried out and the timely replacement of parts.
The device of the rear wheel brake mechanism on a VAZ 2114
What are they needed for
Rear pads are an important element of the braking system, which allows you to stop the car in a timely manner. Its action is quite simple - when the brake pedal is pressed, the braking force is transmitted to the pads, which are pressed against the drum. This stops its rotation and the machine stops.
Preparing for replacement
The principle, although simple, does not make the pads lose their great importance for the braking system.
BRAKE SYSTEM VAZ 2114
The brake system of the VAZ model 2114 is hydraulic type, dual-circuit. The contours of the front and rear wheels are separated from each other, discs are installed on the front suspension of the car, and drums are installed on the rear suspension. The system is equipped with a vacuum booster to reduce the effort required to press the brake pedal. The master cylinder ensures stable operation of both circuits. The front working cylinders in the brake system are made in the form of calipers, the rear ones are made in the classic shape of a cylinder, inside each of which there are two pistons with cuffs.
Let us remind you how to check the condition of the brake system without leaving the garage.
A situation arises when the engine is idling and the gear lever is in neutral. The driver must press the brake pedal and hold it in this position for several minutes. If the pedal falls very easily, then there is reason to suspect that there is a malfunction in the system
You need to think about how to replace brake hoses on a VAZ 2114, which specialist you should trust to solve an important issue. The contents of the master brake cylinder are checked regularly; if the fluid level drops, you need to sound the alarm and take the car to a service station using an emergency light. Even if there is a slight decrease in the level of contents in the tank, this condition can still be considered a sign of wear on the brake system components
This means that you need to decide how to replace brake hoses or pads on a VAZ 2114. If you notice the rapid disappearance of liquid from the barrel in a short period of time, this means that there is a leak, and it is strictly prohibited to drive such a machine. We remind you that depressurization of the system can be internal or external, and the first can only be recognized by the condition of the tank, while the second leaves its traces in the area of the wheel mechanisms.
Brake fluid VAZ 2114
An important rule for a novice driver is to learn how to check the condition of the hydraulic and parking brakes. It wouldn’t hurt to know how to regulate them
And the aerobatics for a newbie in the car industry is to know how to replace brake hoses on a VAZ 2114, especially since this car brand is a debut for many. It is imperative to inspect the condition of the wheels and “adjacent areas” before leaving. If you notice dampness on the surface being inspected, react immediately - check and figure out how to replace brake hoses on a VAZ 2114. Beginners should also study the control panel inside the car. Sensors there are always triggered if any of the important parts are worn out or suddenly fail. Always pay attention to the warning lights of the brake system. So, for example, at the moment the ignition signal is given, the brake warning lamp should be on, and go out when the car starts and starts moving. Then everything is in order and there is no need to think about how to replace the brake hoses on a VAZ 2114 this time.
REAR BRAKES, REPLACING PADS
Unlike disc pads and discs themselves, drum pads and drums have a longer lifespan. But sooner or later a replacement still has to be made.
In this article we will look at how to replace the rear brake pads on a front-wheel drive VAZ family car. It should be immediately noted that the rear suspension of models 2108, 2109, 2113, 2114, 2115 is no different.
REAR PADS
There is no strict framework for how long it takes to change the rear brake pads, but usually replacement for the VAZ 2114 is done somewhere after 70 thousand kilometers. But the frequency may be different, this is influenced by various factors:
Constant emergency braking leads to premature wear of the friction layer of the pads; the rubbing elements of the brake system operate faster in wet, rainy weather. A brake drum on a VAZ with uneven wear on the inner surface also wears the pads unevenly.
Rear brake pads for the VAZ 2114 are now manufactured by various companies, and the quality of the products also varies. The most proven and reliable parts are those produced by AvtoVAZ. The companies TRIALLI and ALLIED NIPPON have proven themselves to be quite good; the cost of a set of pads can range from 700-1200 rubles. You should not be tempted by cheap goods - there are various nuances here:
- Rear brake pads may squeak due to poor quality friction linings;
- Also, due to poor quality, the pads will wear out quickly.
Replacement of brake pads (rear and front) in St. Petersburg at a reasonable price
The braking system of a car is the main element of driving safety, and therefore its serviceability is one of the main concerns of every motorist. Timely replacement of brake pads and discs can guarantee a quick stop of the vehicle, including in emergency mode.
Front pads are replaced more often than their rear counterparts.
The main working elements of the braking system are brake discs and pads, which stop wheel movement due to friction. Naturally, in such an operating mode, these devices are subject to severe and fairly rapid wear. Moreover, the replacement of the front brake pads must be carried out in a timely manner, before they are completely worn out, since in this case the load on the brake discs increases many times, and the matter may end in an expensive replacement of these parts.
Prices for replacing brake pads
| Name of works: | Domestic cars: | Foreign cars: | SUVs, minibuses |
| BRAKE PADS - removal/installation | |||
| — Front | from 500 rub. | from 800 rub. | from 800 rub. |
| — Rear disc | from 600 rub. | from 1000 rub. | from 1500 rub. |
| — Rear drums | from 1000 rub. | from 1300 rub. | from 1500 rub. |
| BRAKE DISC - removal/installation | |||
| — Rear | from 900 rub. | from 1000 rub. | from 1300 rub. |
| — Front | from 900 rub. | from 1000 rub. | from 1300 rub. |
Replacing rear pads - pay attention to their design
The pads for the rear wheels are designed according to a slightly different principle than for the front ones, but they perform a similar function - they stop the movement of the wheel. There are 2 main types of rear parking brake pads:
- Disc (like the front wheels);
- Drums.
The difference between the first type and the second is that the drums are expanded to create friction from the inner surface of the drum. And although such elements wear out much less, the rear disc pads must still be replaced on time, otherwise you can damage the brake drum and end up with long and expensive car repairs.
Replacing brake pads - determine the need for this procedure
The need to replace the pads is determined, of course, by the degree of wear. However, there are some universal recommendations from professionals that say that these parts need to be changed every 15 thousand km of the car.
But most car enthusiasts and qualified craftsmen determine the need to replace brake pads based on the following criteria:
- Strong grinding and squealing when braking;
- Notifying the on-board computer about the need to check the brake system;
- Visually or instrumentally recorded thinning of these parts.
We will dwell on the latter in more detail. It is not always possible to reach into the caliper with a caliper to measure the thickness of the friction layer of the pad - its main working element, consisting of tiny pieces of metal, welded onto each other and turned into a kind of conglomerate. It is this friction lining of the pad that is involved in the braking process itself, subject to strong friction. For new pads, the thickness of this layer is about 5 mm, and when it reaches a thickness of 1.5 mm, an urgent replacement of the front or rear brake pads of the car is required.
You can visually see the wear of the friction linings by the absence of special grooves on the pads, which are cut just 1.5 mm to the base of this layer. That is, the grooves have worn out and disappeared - you urgently need to replace the brake pads at a car service center!
Cost of replacing pads and complexity of this procedure
If you have the appropriate skills and the necessary equipment, replacing the pads is a simple process from a technological point of view, however, only professionals can guarantee the reliability of fastening and correct installation. And the cost of replacing brake pads at a car service center is entirely justified by the quality of the work and installed parts.
In any “Maximum Security” car service, the brake pads are replaced, and the price of this service perfectly correlates with the high quality of all work and the exceptional qualifications and experience of our technicians! Our car services repair the car’s brake system, including replacing brake pads, and the price of this services are available for drivers of a wide variety of cars:
- VAZ (including VAZ 2110);
- Ford (including Ford Focus 2);
- Audi;
- BMW;
- Kia;
- Mazda;
- Chevrolet (including Chevrolet Lacetti);
- Nissan;
- Skoda (including Skoda Octavia);
- Opel (including Opel Astra);
- Renault;
- Toyota (including Toyota Corolla);
- Peugeot;
- And other brands and models of cars.
ADVIСE
Let's look at how to remove the rear brake drum on a VAZ 2114 in a little more detail. To move it, instead of guides, you can use other bolts with the same threads, but longer. When the bolt is tightened to its full length, the drum will move forward. Just don’t use too much force when tightening, otherwise you can break the bolt. It is necessary to tap the drum only through a drift or wooden beam and not on one side, but over the entire surface.
It is possible that the drum also needs to be changed and it is changed if its internal diameter is more than 200.5 mm . The distance is measured using a caliper. If after replacement the wheel does not spin, you should check the correct assembly and also make sure that the hand brake lever is fully released.
If the rear brake cylinder on a VAZ is even a little wet, it needs to be replaced.
Changing the rear braking system
When purchasing a car, you should immediately check the condition of the brake pads.
Just a note! In the case when the size of the brake pads on the car does not reach the permissible size, i.e. their thickness is less than 1.5 mm, do not operate the car under any circumstances until they are completely replaced. The lives of the driver and passengers, as well as other road users, directly depend on this!
Replacing brake pads on a VAZ 2114 is necessary immediately after purchasing the car. It is necessary to regularly monitor the condition of the brake system to ensure your own safety when operating your car.
The rear brake pads on the VAZ 2114 are changed a little differently than the front ones; it is necessary to expend more physical and moral strength. It is more convenient to carry out this kind of work on an overpass.
Possible difficulties during the replacement procedure:
- The brake drum is worn out; its internal diameter is more than 200.5 mm; accordingly, it must be replaced.
- There is a leak in the cylinder, which means it needs to be replaced urgently.
- The drum is stuck, in this case you can use a sledgehammer and a block.
- And etc.
Replacing rear brake pads on VAZ 2113, VAZ 2114, VAZ 2115
Welcome! Rear brake pads play a very important role in a car, but unlike the front ones, they cannot stop the car quickly (Remove the pads from the rear of the car and try to brake and do the same experiment with the front, the difference is very noticeable, even if the brakes both front and rear will be absolutely identical) and do not wear out so quickly (the front ones wear out quickly because they are constantly under a very large load), so unlike the front ones, they have to be changed half as often, but choosing new pads is not so it’s easy, because at the moment there are a lot of fakes made on them, but in this article we took into account all these nuances and therefore at the end we placed a short video clip, which explains how you can distinguish original brake pads from a fake.
Note! To carry out the work of replacing the pads, you will need to stock up on the following set of tools: Firstly, wrenches are a must, pliers will also come in handy and a bit (If there is no bit, then you can use a screwdriver instead)!
Summary:
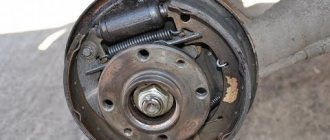
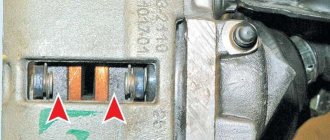
Where are the rear brake pads located? They are hidden under the rear brake drums and therefore, without removing the wheels and without removing the drum itself, you will not see them. For clarity, in the photo below, the brake drum has already been removed from its place where it is located, and the arrows indicate just two brake pads (On one there are two on each side and on the other, with the front wheels everything is exactly the same, but only there the pads have a completely different shape) we will describe the removal of which today in this article.
When do you need to change rear brake pads? Unfortunately, it is not very easy to understand that the pads have become unusable (Especially the rear ones), but although at first a squeak appears in the rear part when braking (You need to hear it, but normally you can hear it only when the pad is completely worn out, in this case it is very will be heard well) and having heard it, you can already remove the brake drum and look at the pads themselves (But when the brake drum is removed, you can immediately and easily understand whether the pads have become unusable or not yet), the pads themselves are divided into several components , namely on the friction lining and on the base, so it’s the lining that you will need to turn your attention to (If you don’t understand which lining we are talking about, then read the article: “What are brake pads?” it describes everything in detail ), if it is very thin (less than 1.5 mm, by the way, this thickness is very easy to measure with a ruler), then in this case this block must be replaced, and also there should be no cracks, deep grooves or chips on the lining, otherwise the block is the same must be replaced, and this pad must fit snugly to the base; if you notice that it has moved slightly away from the base, then we also recommend replacing the pads with new ones.
Possible problems during the replacement process
Usually the entire process of removing old pads and installing new ones goes without problems. However, according to reviews from car enthusiasts, some difficulties and problems may arise. They can often be easily resolved and corrected.
Inability to remove the drum on the rear system. One of the most common problems. To solve it you need:
- Release the handbrake tension.
- Apply and apply VD-40 lubricant.
- In cases where none of the above options are suitable, a few light blows with a hammer can help. However, it is important to use a softening pad, for example, a wooden block.
A drop in the amount of liquid in the tank - this problem is less common, but it does occur. You can solve it like this:
- Add fluid until the norm is reached.
- Bleed the brakes by pressing the pedal a certain number of times.
- Add a little more brake fluid.
Difficulties in putting the drum in place are also common. In this case, you should loosen the handbrake cable.
Brake pads should be changed according to the regulations. If they are worn out ahead of schedule, then you should not wait, but replace them immediately. This is very important, because the life of both the vehicle driver and passengers depends on the correct operation of the system.
How to replace rear brake pads on a VAZ 2113-VAZ 2115?
Note! If you decide to replace the rear pads, then immediately reserve time (in 1, 2 hours, if you have never made such a replacement before, you may not even be able to do it, so immediately set aside a whole day for yourself and only then carry out the replacement work) and also Anyway, when replacing the rear pads, you need to change them all on both wheels (We mean all four, otherwise the car will brake unevenly and when braking it will still pull to the side) and under no circumstances swap them (Suppose you and two pads have been removed from the right wheel and you want to install them in place, in this case put them in the same places) otherwise the car will not brake evenly and there will be a possibility of it skidding during sharp braking!
Removal: 1) Before you begin the operation itself, you need to prepare for it, namely, at the beginning we recommend placing anti-roll stops under the front wheels so that the car does not drive away and also turn on the car’s gear (Be sure to first), then look at the parking brake handle, it must be completely lowered (otherwise you will not remove the brake drum), if it is not lowered, then lower it, then remove the rear wheel you need (For information on how to properly remove a wheel, read the article: “Correct replacement of wheels on the car") and the brake drum, cleanly wipe off any dirt stuck to it, then open the hood and see how much brake fluid is in the reservoir (the reservoir is indicated by a red arrow in the photo), if the fluid is brought to the MAX mark (There are marks on the side of the reservoir itself) , then pump it out a little (it can be pumped out perfectly with a syringe or a rubber bulb), otherwise when you install new brake pads, this liquid will flow over the edge, and this is all due to the fact that the pistons of the brake working cylinder will have to be recessed into the inside of the cylinder itself (When recessed , the liquid is poured back into the tank).
2) Now let’s move on to the replacement itself, first remove the brake drum from the car (For information on how to remove the brake drum, read the article: “Replacing the brake drum on a car”), then use a screwdriver or a bit to disconnect the upper and lower tension springs (see. photo 1, there these springs are indicated by arrows) and after that remove them, then grab the guide spring with pliers and remove it from the hole in the front block that it attaches (see photo 2), as soon as the spring is disconnected and set aside, the front block with remove the car, then remove the expansion bar that is located across both pads (see photo 3) and proceed to removing the last, rear brake pad, it is removed in principle in the same way, the guide spring is disconnected and moved to the side, then the pad itself is removed and There will still be a lever to which the parking brake cable is attached, so you disconnect this cable from the lever (see photo 4) and you can safely remove the last rear block.
Installation: The entire process of installing both brake pads is carried out in the reverse order of removal, by the way, if you need to remove the lever from the rear pad (For example, you bought new pads and you don’t have this lever on the rear brake pad, so you will have to move it from the old one to new), then remove the cotter pin with pliers (This is a small wire twisted in half, you will immediately see it) and then remove the support washer located behind it (see photo 1), as soon as the washer is removed, press on the pin itself (see photo 2 ) that secures the lever and then remove the lever from the rear pad and remove the pin itself (Install the pin and lever in the reverse order of removal), but if you don’t need to remove anything, but just need to install new pads, then be sure to follow a few rules, and when installing, make sure that the upper ends of the pads fit into the grooves of the piston, as you can see in Figure 3, and you will also need to bring the pads together when you install them, they are brought together using two mounting blades or you can replace them with two pry bars, For more details on how the pads need to be brought together, see photo 4 (The pads are brought together all the way until the pistons of the working cylinder are completely recessed).
Note! When everything is assembled, press the brake pedal a couple of times so that the working cylinders come into operation and the car brakes for you (it’s just that the first two times it may not even really brake, so you need to press the brake), we’ll add something else, the first time after installing new pads, your car may not brake well, don’t pay special attention to this (the pads are grinding in), just drive carefully, but although with the rear pads this will practically not be noticeable, because as we said earlier, the front ones do the main work They do it, and the rear ones just slow down the car so that it doesn’t skid!
Features of pedal settings
The driver controls this entire complex assembly with just one pedal.
That is why it is very important to monitor the condition of these mechanisms and correct errors in a timely manner.
It is necessary to pay attention to the following features:
- Each owner of this vehicle must remember that when the engine is not running, the pedal must have free play. The adjustment can be made with the vehicle turned off. This can be done by moving the brake light switch and lowering its nuts.
- When the switch at the brake light is very close to the pedal itself, this risks the fact that it will not return to its original state. But even here there is a possibility of only partial release of the wheels when the pedal is released.
- When it was not possible to correct errors using a brake light and eliminate incomplete release of the brakes, you can simply disconnect the master cylinder at the brake drive and double-check that the adjusting bolt is not too far from the plane to which the flange of this cylinder is attached (the difference can be from 0.2 to 0.25 mm). This size will be optimal for adjusting the pedal.
How to change rear brake pads on a VAZ 2114
Every car owner should be prepared for the fact that his car will malfunction sooner or later. Consequently, you will have to carry out repairs and change some parts. Many people prefer to use the services of service stations, but in the case of cars such as the VAZ 2114, a number of repairs can be carried out with your own hands. You just need to know how to do it.
Today we will talk about how to change the brake pads on the rear of a VAZ 2114. Rear pads fail very rarely, so the problem is quite common.
Cost of rear pads and article number
When purchasing a set of rear pads, it is best to give preference to original parts. Car owners recommend them for purchase, rather than analog brands, because they have a better price-quality ratio.
You should look for the part by article number: 21080-3502090-55 . This will help you avoid running into a fake in packaging similar to the original.
It is worth noting that when replacing the rear pads on a VAZ 2114, most often a failed brake cylinder is also discovered. It becomes sour in certain positions and when the brake is pressed and does not provide a proper seal.
How long do they last?
Each element of the car has a certain expiration date. It is influenced not only by the quality of workmanship, but also by the operating characteristics of the car.
Drum device
Rear pad wear is affected by:
- The climate of the region in which you operate your VAZ 2114;
- The condition of the roads that you have to travel on regularly;
- Control features, driver skills;
- Vehicle characteristics;
- The quality of the previous pads installed;
- The quality of the brake repairs performed, if any, etc.
Symptoms of malfunction, resource
With the front pads, everything is simple - you can determine their wear visually by removing the stamped disc. And if the car has a “casting”, then without dismantling the wheel at all. With drum pads everything is much more difficult. They are hidden under the lid. Not every car owner will remove it in the hope of detecting imminent wear and tear.
Another sign is the car’s responsiveness to the brake pedal. So, when the rear pads wear out, the car will slow down slower. And if the linings are worn down to the metal base, then the problem will be accompanied by creaking and overheating of the drum. The latter factor can lead to the brakes jamming, which is extremely dangerous.
It is worth noting that the design of the brakes on the 14th Lada is identical to the “eights” and “nines”.
With the front pads, everything is simple - you can determine their wear visually by removing the stamped disc. And if the car has a “casting”, then without dismantling the wheel at all. With drum pads everything is much more difficult. They are hidden under the lid. Not every car owner will remove it in the hope of detecting imminent wear and tear.
When replacement is required
In order not to miss the moment when the pads become completely unusable and may pose a threat to your safety, we recommend periodically checking the rear pads. This way you can check how much time this node has left to “live”.
Some versions of the “fourteenth” model are equipped with a special indicator that determines element wear. When the pads are completely worn out, the metal plate begins to rub against the brake disc, producing a characteristic and unpleasant grinding noise.
How to remove the pads
In order to remove defective rear pads from a VAZ-2110, you need to prepare the following arsenal of a car mechanic:
- a jack is needed to raise the rear of the car
- key 12, it will become the main tool in our business
- pliers are useful for removing parts
- hammer, yes, you will have to make physical efforts to knock out old parts
- a screwdriver, a good helper in removing old pads
- the block is an excellent stand.
Work begins
- The very first thing you need to do is put the car on a jack.
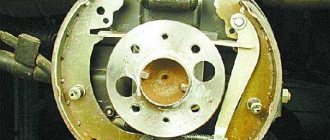
- Remove the rear wheel and disc. We can see the drum ( 6 ), which is attached to the entire structure with two bolts (cotter pins ( 7 )). These need to be removed. Here you will need a 12mm wrench (you can also use a 12mm wrench
 , it is just suitable for working with tens pads.
 - Remove the brake drum ( 6 ). This is probably the most difficult thing in the process of replacing the rear pads, because over the years of the car’s service the drum “sticks” almost tightly, and in order to remove it without damaging it, you will have to work hard. A hammer will help here by tapping the drum, but before doing this, it is important to place a previously prepared block to prevent deformation of the drum, otherwise it won’t take long and break into pieces, which we, of course, don’t need.
- Carefully and slowly remove the spring securing the rear pads of the car. The spring is removed using pliers or a simple screwdriver( 9).
- Now you should disconnect the spring ( 8 ) fixing the block on the shield ( 1 ).
- Loosen the upper spring ( 3 ), which secures the unit. In order to weaken the spring, you need to turn the block a little to the side, about 50-60 degrees .
- To remove the unit, carefully remove the part from the support and brake cylinder ( 2 )). To do this, you need to grab the block ( 4 ), which is not connected to the handbrake (a sorcerer in common parlance). We pull the part as if we are trying to move the pads apart from each other. You will have to loosen the part several times until it is disconnected and pulled out.
- In order to remove the second block, we disconnect the handbrake rod (sorcerer) from the cable. Now the block is easy to pull out
The process of removing the units is completed, now you can begin replacing the old pads with new ones.
Replacement
Now let's move on directly to how to change the rear brake pads on a VAZ 2114.
Experts recommend doing this as soon as you buy a car. Be sure to check the level of wear. It is strictly forbidden to operate a vehicle with worn rear pads.
Replacement sequence
The procedure for replacing the rear pads is different from working with the front ones. In this case, you will have to spend a little more time and effort.
During the replacement process, some difficulties may arise, such as:
| Problem | Solution |
| The brake system drum is worn out (the internal diameter is more than 200.5 millimeters) | Be sure to replace the element |
| There is a brake fluid leak in the cylinder | The cylinder must be replaced |
| The drum is stuck, it’s hard to dismantle it | Use a wooden block and a sledgehammer. Do not hit the drum itself under any circumstances, otherwise it will break. |
As for replacing the rear pads, this work is performed in the following sequence.
- Place the car on the overpass, put the car in gear and be sure to put reliable supports under the wheels. Under no circumstances should the car roll away. This is a big risk.
- Check if the handbrake is turned off in the cabin, then go under the car itself.
- Remove the pipe from the muffler where the hand brake is applied.
- Lighten the handbrake slightly. To do this, unscrew the cable tension nut. By loosening the cable, you can then easily install the block.
- Use a wheel wrench to loosen the fastenings on the rear wheels.
- Raise the car on a jack and remove one of the wheels on which you plan to replace the brake pads.
- Remove the guide bolts from the drum. They are completely dismantled and not simply weakened.
- Rotate the drum counterclockwise about 30 degrees and begin tightening the bolts at the same time. Since there are no mounting holes, when tightened, the bolts will hit the metal and push the drum out.
- When the drum is removed, you will see a brake cylinder, springs and a pair of pads. The springs are removed first.
- The pads are removed along with the lever. It will then need to be put on new pads.
- Remove worn brake components and then compress the cylinder grooves.
- New parts must be installed in these grooves; the handbrake bar fits into the grooves on the pads. After this, the spring is put in place. Don’t forget to also hook the cable from the handbrake, which you specifically loosened or at the initial stage of our repair, to the drive lever.
What are the pads for?
This part is an integral and important part of the car's braking system. The importance of the operation of these parts is to stop the machine in a timely manner. They operate quite simply: when you press the brake pedal, the braking force is transmitted to the pads, as a result they are pressed very tightly against the drum and do not allow it to spin, as a result the wheel stops and the car slows down.
Let's move directly to the question: how to change the rear pads on a VAZ 2114?
The algorithm for removing old parts is as follows:
- Forward gear is engaged;
- The handbrake is turned off;
- The exhaust pipe is removed from special rubber cushions;
- The handbrake tension nut is unscrewed;
- The rear wheel bolts are unscrewed;
Remove the wheel, do not forget about the stops
Unscrew the drum mounting bolts
Disc with cover removed
The springs and spacer bar are removed. When assembling the pads you will need to align
The fasteners themselves are removed from the old pads and put on new ones.
Installation of new overlays is carried out as follows:
- After installing new parts in place of the old ones, they are necessarily compressed (closed) together;
- We press on the brake cylinder - this will allow them to be installed in place;
- The brake drum is put on;
- The wheel is installed in place and free rotation is checked.
If possible, please read the installation manual in advance.
How to change the rear ones with your own hands: video
Replacing brake pads on VAZ 2114 and 2115 is performed identically for both wheels.
Reassembly
Rear Brake Mechanism
The procedure for reassembling the brake system is not difficult if you have already gone through all the steps to dismantle and install new rear brake pads. But it’s still better to describe the procedure in detail.
- Install the new blocks and accompanying new elements of the brake system into place, compress them together, as it was before disassembling the unit.
- Press the brake cylinder until it fits snugly into its rightful place.
- Reinstall the brake drum. At this stage many people have problems. Here the reason may be the fact that the handbrake cable is too loose or stuck. Also, the reason often lies in the brake cylinder not being clamped tightly enough. Check out these options.
- Reinstall the wheel.
- Go inside and press the brake pedal all the way down several times. This will allow the new rear pads to sit firmly in their new location.
- Get out of the car and head to the wheel where the rear brake pads were replaced. Don't rush to remove it from the jack. Be sure to spin it by hand first. Nothing should prevent the wheel from spinning smoothly. The force applied by hands should not be strong. If the move is free and easy, you did everything right.
- Similar activities are carried out on the second wheel.
- Once the repair work has been completed, check that the handbrake is operating effectively. To do this, you need to remove the wheel again and tighten the cable of the manual braking system.
- If after replacing the pads the wheel does not spin or rotates with obvious snagging on the pads, you have done something wrong. Therefore, you will have to disassemble the system and reassemble everything again, strictly following the instructions.
How to install brake pads?
Compressing the brake pads towards the brake cylinder
- Having placed the pads, we squeeze them together in order to recess the brake cylinder once again “just in case”.
- Install the brake drum. If the drum does not fit, then the handbrake may be loose, the cable may be stuck, or the brake cylinder may not be fully clamped.
- We put the wheel on, get into the car and press the brake pedal several times so that the pads fall into place.
- Spin the wheel by hand: the wheel should spin without much effort, without rubbing the pads.
We perform the same operation on the other side and tighten the handbrake: How to tighten the handbrake? All that remains is to check the handbrake; to do this, you need to hang the wheel on a jack, spin the wheel manually, and pull the handbrake. The wheel should stop and lock firmly. To be sure, try turning the wheel manually - it should be motionless.
I found posts on the Internet about how people sand the pads with sandpaper to make the drum go in easier, we absolutely do not recommend doing this, thereby reducing the life of the pads.
Sources used:
- https://vaz-2114.info/vaz-2114-zamena-zadnih-tormoznyh-kolodok/
- https://autovaz-2114.ru/brake-system/pravilnaya-zamena-zadnix-tormoznyx-kolodok-na-vaz-2114/
- https://vaz-2114-lada.ru/2013/02/kak-zamenit-zadnie-tormoznye-kolodki/