Replacing brake pads on a VAZ 2106-03
To carry out repair work, we will need the following tools: a hammer, a screwdriver, two mounting blades, wrenches “17” and “8”, pliers, a caliper and a wheel wrench. If everything is ready, then you can start repairing:
- The first step is to remove the brake drum
- Then use a wire brush to remove dirt and dust from the brake mechanism. Attention: the use of gasoline, kerosene, diesel fuel and other technical liquids is not allowed to clean the mechanism.
- After cleaning, disconnect the ends of the tension spring from the pads and remove it
- Hold the pressure spring rod and press on the upper cup, turn it in any direction a quarter turn and remove it. Then remove the pressure spring rod and the cup itself.
- Now remove the left brake pad and disconnect the tension spring located below
- Remove the spacer bar
- By analogy with the left, remove the right spring and brake pad
- Disconnect the brake cable end, remove the washer and drive lever pin
- Now install the new block in the drive lever part. This is done in the reverse order to removal.
Now you need to install new pads on the car:
- Visually inspect the brake drum; its internal diameter should not be more than 251 mm. If everything is in order, then we get rid of the shoulder formed as a result of wear. To remove the shoulder, attach the drum to the axle flange with the back side and center it, secure it with two bolts. Then start the engine at minimum speed and engage first gear. The drum will begin to rotate, and it will be possible to cut off the collar with a file.
- The next step in the reverse order of removal is to install the right brake pad
- Then we install the spacer bar.
- We fix the tension spring
- In the reverse order of removal, install the left block and tension spring
- Putting the brake drum in place
- Install the wheels and check that they rotate easily
- The final step is to press the brake pedal. This is necessary for the pistons to take their working position.
That's all for today. Now you know in what cases you need to replace the rear brake pads and how to properly carry out the replacement work.
Replacement of rear pads on VAZ 2101-2107 (CLASSICS) (Lada).
Replacing rear brake pads on a VAZ 2107
VAZ 2106 Replacement of rear brake drums and pads
Replacing front brake pads on VAZ 2101, 2107, 2106, 2105, 2103 and 2104
replacing rear pads on a vaz 2110
I found a topic here: replacing rear brake pads on a VAZ 2106, video of sawing off part of the pad. What conclusions can be drawn based on the measurements? According to the firmware, opening the throttle, creating a direct flow of gases. Where else could there be spark plugs, carbon deposits in the cylinders? Do not cut out the lining under the instrument panel, which holds the cooling radiator in the top center with a key of eight, after which you can safely remove it by tilting the radiator towards the engine. When diagnosing, the car may be in a standing position, but on the move, and when driving, contact may be lost and ignition interruptions may occur.
Brake pad malfunctions
The following characteristic signs indicate problems with the pads:
- sounds unusual for brake operation (creaking, squealing, grinding);
- car skidding when braking;
- the need to apply more force to the brake pedal;
- black or metal dust on wheels;
- increased braking time;
- The pedal does not return to its initial position when released.
Brake pads must be changed when the friction material thickness reaches 1.5 mm. If this is not done, a grinding (squealing) sound will occur. In addition, such sounds may be present when installing low-quality pads.
Shocks when braking
The appearance of shocks during braking can be caused either by the condition of the pads themselves, or by a damaged surface of the brake disc or drum, soured pistons in the cylinders, or other malfunctions. To identify the problem, you will need to disassemble the brake mechanism and carefully inspect the parts for wear and damage.
Car skidding
There can be many reasons for skidding - severe wear of the pads, damage to the discs, loose caliper mounts or suspension malfunctions.
Once a situation arose with my car when, while braking, the car began to pull to the side. It would seem that it is necessary to diagnose the brake system. However, after a detailed examination, I discovered that the cause of this phenomenon was a damaged longitudinal rod (rod) of the rear axle. It was simply torn from the eyelet. After replacing this part the problem disappeared.
Video: why a car pulls to the side when braking
Stiff or soft pedal
If you notice that the pedal has become unusually tight or, conversely, soft, then most likely the pads have become unusable and will have to be replaced. Additionally, it is worth inspecting the hoses supplying fluid to the brake cylinders and the cylinders themselves. If the piston sticks in them, then the problem with pedal stiffness may also manifest itself because of this.
Appearance of plaque
Plaque can appear both when using low-quality pads, which leads to their rapid erasure, and with normal parts. However, in the second case it should be minimal. Dust can also appear during aggressive driving, i.e. during sudden starts and braking.
From personal experience I can say that after installing the front pads from AvtoVAZ, I observed black dust on the discs. The plaque was clearly visible because the discs were painted white. From this I can conclude that the appearance of black dust from the process of erasing the pads is a normal phenomenon. Perhaps installing more expensive parts will help get rid of this phenomenon. However, if you are sure that the car has good quality pads and their condition is normal, then there is no reason to worry.
Pedal sticking
If the brake pedal does not move back when pressed, this indicates that the pad is sticking to the disc. This phenomenon is possible in frosty weather when moisture gets on the brake elements, but it would be useful to inspect the pads. If the car cannot be stopped for a long time when you press the pedal, then the reason lies in worn out pads or air getting into the hydraulic system. You will need to inspect the brake components and possibly bleed the brakes.
Substitutes
| vendor code | Price, rub.) | vendor code | Price, rub.) |
| 0026400 TRW | 570 | 41062 | TRW |
| GDB140M ABS | 650 | ADB0281 | ABS |
| 98271307 Allied Nippon | 750 | Delphi 65139 | 780 |
| LP92/S | 800 | Delphi 0065139 | 780 |
| 98271307 Allied Nippon | 750 | Delphi 65139 | 780 |
| 98271307 Allied Nippon | 750 | Delphi 65139 | 780 |
| Allied Nippon | 65139 |
What rear brake pads can be installed on a VAZ 2106
The original rear brake pads are 3.5mm thick. With use, the friction lining wears out and is erased. When the thickness reaches 1.5 mm, the part must be replaced. Further operation of the machine is unsafe.
The process of replacing rear pads is as simple as replacing the front ones. Unless a handbrake cable is added, which should be removed. It is not necessary to have any special experience or skills. Please resort to the help of service station workers if you identify a large-scale breakdown that requires prompt intervention from professionals.
When product replacement is required
Both the front and rear wheels are characterized by the use of 4 brake pads to ensure effective braking. Only in design these products are very different, although the principle of operation is similar.
The rear pads of the VAZ 2107 are presented in the form of an arched steel structure, on the outer part of which a friction layer is applied. It is due to the friction of this layer against the inside of the drum that the car stops. If you do not replace the brake elements in a timely manner, this will be fraught with the development of unpredictable consequences, because the most important thing for any car is the serviceability of the braking system.
It will not be possible to determine this fact without removing the wheel and dismantling the drum. But this is one of the main ways to determine whether the brake system is faulty. There is a second option, which is more convenient and does not require dismantling the rear wheel. To do this, you need to listen for signs of squeaking of the rear wheels, as well as grinding and lack of braking effect, but this can lead to damage to the drum itself. You can squeeze the handbrake while standing on a slope and check that it is working correctly. Of course, the cable on the handbrake may become loose, but if you tighten it and still have no effect, then it’s time to start replacing the pads. If the rear brakes are not functioning, then it is time to change the pads. It is recommended to change them as a set on both rear wheels, since they are often worn out at the same time. What is the process of replacing rear brake pads on a VAZ 2107 will be determined further.
On a note! All four pads on the rear wheels need to be replaced at the same time, even if the friction linings are worn unevenly.
Instructions for replacing rear pads
At the beginning of the work, it should be noted that the handbrake must initially be lowered to its lowest position. This will allow you to dismantle the brake drum and thereby get to the worn parts. To begin replacing the brake pads of a VAZ 2107, it is necessary to remove the rear wheel:
- There is a drum behind the wheel, which also needs to be removed. There are no problems with this, so we move on.
- After removing the drum, it is necessary to inspect the worn pads. If the thickness of the friction lining exceeds 1.5 mm, then there is no need to replace the products. Before carrying out further work, it is necessary to clean the mechanism from dirt and dust. To do this, you can use a brush or cloth.
- If the products need to be replaced, then you need to take a screwdriver and then remove first the upper, then the lower connecting springs. If you can’t dismantle it with a screwdriver, then you should use pliers. The photo below shows the springs that should be removed.
- Next, you need to remove the clamps, which consist of a rod, a washer and a spring. These washers must be rotated 90 degrees to remove them through the slots. This is what the washers that hold the pads look like.
- Similar procedures are carried out with the second block.
- After removing the springs and clamps, the pads are removed independently.
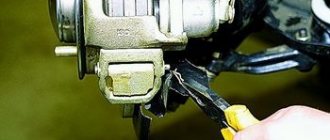
- The parking brake locking pin is straightened. The photo below shows the location of the locking pin. Now you need to unscrew the parking brake lever. This can be done using pliers. After this, the washer is removed, then the lever.
- During the dismantling process, you will have a question, what to do with the parking brake tip? It must be disconnected from the product and then left hanging.
- If necessary, it is recommended to replace all parking brake parts that were removed from the old product with new ones.
The rear brake pads on the VAZ 2107 should be installed in the reverse order of removal. Before installation, remember to bring the brake cylinder pistons as close as possible. Despite their simple design, installing them is much more difficult than the front ones.
But having completed the procedure once, all subsequent repairs will be much easier for you.
The cost of new pads starts from 800 rubles per set, but it is important to purchase high-quality products, and not Chinese “consumer goods”. Not only the service life of the products, but also the braking of the car will depend on this
This completes the replacement procedure; if you have any questions, be sure to ask them.
Substitutes
| vendor code | Price, rub.) | vendor code | Price, rub.) |
| Delphi 65140 | 850 | Finwhale 23593 | 800 |
| LS1219/S | 850 | VR311 | 800 |
| Bosch 17888 | 950 | TRW 26401 | 800 |
| 986487217 | 850 | GS8164 | 850 |
| HZTS 79927 | 800 | 2101-3502090 | 800 |
| Start 63275 | 800 | 21010-3502092 | 850 |
| MASTER SPORT 2103-3502093 | 850 | 030137-02332 | 800 |
The lists are presented for informational purposes. Before purchasing, be sure to consult with a specialist from a service center or auto store to determine the compatibility of the catalog article with the make/model of your car.
How to independently replace the front and rear pads on a VAZ 2106
Preparatory stage: a set of automotive tools, rags, new pads, liquid to remove layers of rust and corrosion.
- Place the machine on a level platform. The option with an inspection hole or road overpass is excluded due to inefficiency;
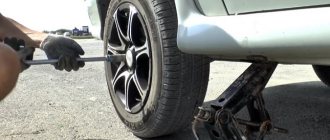
- We jack up the front wheel with a hydraulic jack, remove it, having previously installed the wheel chocks;
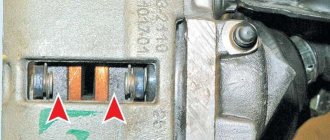
- Use pliers to remove the guide pins. Please pay attention to the pressure springs; they may fly out during the work;
- Using a flat-tip screwdriver, press the slave cylinder into its original position. We widen the gaps to remove the brake pads;
- We remove worn pads, carry out preventive maintenance on the brake caliper, and clean it from rust and deposits. If necessary, use a liquid like WD-40;
- Replace with new pads, assemble the structure in reverse order.
Subject to the above recommendations and the purchase of original spare parts, the service life of the brake system elements is 20 - 25 thousand km. mileage A moderate driving style and average ambient temperatures will increase the service life by 5 - 7 thousand km.
How to replace the front brake pads of a VAZ 2106
I don’t think you should talk about how you need to monitor your brakes, because this is your life and the life of your loved ones. I note that replacement of the front brake pads is required as a result of wear of up to 1.5 millimeters. Today I will tell you how to properly replace brake pads on a VAZ 2106 with your own hands.
Replacing the brake pads of the front wheels of a VAZ 2106 with your own hands
Raise the front of the car, install stands and remove the wheel.
1. Use pliers to remove the cotter pins from the guide pins of the brake pads.
2. Use a thin punch to knock out the fingers from the eyes, after moistening them with WD-40.
3. We remove the fingers, making sure that, once released, the pressure springs of the pads are not lost.
4. Using pliers, we press the pistons into the cylinders through the block.
5. Remove the old brake pads.
6. We install new brake pads in the reverse order of removal, having previously lubricated the guide pins with a thin layer of Litol-24 lubricant. By pressing the brake pedal several times, we “bring together” the pads.
Replacing the front brake pads of a VAZ 2106 with your own hands has been successfully completed. Let me remind you that the previous article on our website was about removing the steering wheel of a car.
Sequence of actions when replacing rear pads
Preparatory stage: a set of automotive tools, rags, liquid for removing deposits, a new parking brake cable, graphite-based lubricant.
- We install the car on the inspection hole, fix the front wheels with wheel chocks, remove the rear wheel;
- Underneath the bottom, we unscrew (loosen) the handbrake cable for the convenience of carrying out maintenance work;
- Gently tap the drum guide bolts with a hammer. During operation and installation/disassembly, the bolts stick and are difficult to unscrew. If tapping does not help, spray with liquid to remove deposits, wait 10 minutes, then start unscrewing;
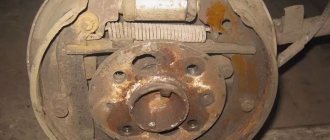
- After removing the drum cover, pay attention to the position of the parking brake lever. If it is not located near the lever, it means it is jammed and must be replaced. If you ignore this signal, it will be problematic to install the drum in its normal position;
- Remove the upper pressure spring, press the strut support, and turn it until it completely coincides with the slot. Remove the two cups and the spring from the stand;
- Disconnect the cable shank from the handbrake lever. We clean the disc from dirt, deposits, and rust;
- We carry out troubleshooting of the brake cylinder and seals. If there are signs of wear, leakage, or deformation, replace it with a new repair kit;
- We remove the parking brake lever from the old pads, take out the cotter pin and washer;
- Please note that the left and right levers are different and not interchangeable. Next, you need to install a spacer bar and move the pads apart. When installed correctly, the lugs are vertical;
- We start a new cable, fix it in the eye;
- We install new pads and assemble the structure in reverse order. If you have any difficulties with installation, it is better to watch the video presented in this manual.
The final stage: adjusting and tensioning the handbrake lever. In accordance with the requirements of the instruction manual, the handbrake should clamp the pads already at 5–6 clicks. Exceeding the norm indicates weakening, and decreasing indicates excessive tension.
DIY rear brake pad replacement
The brake mechanisms of the front and rear wheels on VAZ 2106 cars wear out unevenly, and in most cases the front pads have to be changed much more often. But you shouldn’t delay replacing the rear ones, since not only the quality of braking depends on this, but also holding the car on a slope using the handbrake.
This maintenance procedure is not very difficult to perform, but you will have to spend about an hour servicing both wheels of the car. To carry out this work we will need the following tool:
- Flat and Phillips Blade Screwdriver
- Pliers
- Long nose pliers
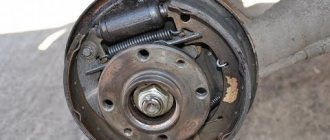
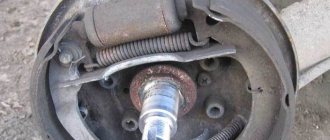
Now I will try to describe in more detail all the steps that will need to be taken to complete this work. So, the first step is to remove the rear wheel brake drum.
Then we will see the following picture:
As you can see, the pads are secured with springs, which we will need to remove. We pry up the lower spring with a screwdriver and try to rip it down; usually you don’t have to put in much effort.
After this, use pliers to turn the cotter pin, which secures a small spring that holds the block in a vertical position. This is shown more clearly in the photo below:
Then we go to the left side of the mechanism and remove the cotter pin that secures the handbrake lever:
Now we move to the top part and release the pads from the spring in this part in the same way. how they did it from the bottom side:
After removing the upper spring, the pads will fall on their own and will be completely free:
We buy new brake pads, the price of which varies from 300 to 800 rubles depending on the manufacturer, and install them in the reverse order. You can also tighten the springs with a screwdriver or long-nose pliers, here everything depends on your preference, as they say, whichever is more convenient for you.
It is worth keeping in mind that after installing new rear brake pads on a VAZ 2106, there is a possibility that it will not be possible to put on the brake drums. If this problem also affects you, then you will need to slightly loosen the handbrake cable. Read about this in more detail in the article on adjusting the handbrake.
Once the drums are on, check the effectiveness of the handbrake to ensure it is not too loose and tighten it if necessary. During the first time of operation after replacement, do not brake sharply and try not to drive at high speed, as the pads must get used to before the brakes become effective.