replacing rear brake pads on a VAZ 2108, VAZ 2109, VAZ 21099
On a VAZ-2109 car, the rear and equally front brake pads are replaced for a variety of reasons. However, as practice shows, more often this is required due to wear of the friction linings installed on them. Removing the old parts and installing new parts is quite easy. The only thing we must not forget about is caution, because you will have to work with a car mounted on a jack. It is safer to replace using a lift.
Auto repair school – DIY car repair
Sep 30, 2021 VAZ 2108, VAZ 2109, VAZ 2110, VAZ 1117 Kalina, VAZ 2170 Priora by admin
change the front brake pads in VAZ-2108, VAZ-2109, VAZ-21099, VAZ-2110, VAZ-2114, VAZ-2115, VAZ-1117, VAZ-1118, VAZ-1119 cars. But even an experienced motorist cannot replace the rear brake pads Since for this operation it will not be enough to have a jack and a pair of open-end wrenches. And in order to make your work easier and save your nerves (which, as you know, do not recover!) when replacing rear brake pads , it is better to prepare seriously and thoroughly. You can start by choosing a location for work.
And in this place there must be an inspection hole or a lift. I can explain why. You will have to perform two operations that will be not only difficult but also dangerous to do from the ground. For example, to remove the rear brake drum and replace the brake pads , you will have to release the handbrake cable . It will be very difficult to do this “from the ground”, even with a special key (without this key, getting to the equalizer and unscrewing the nut will only be possible by removing the resonator. And this is extra work that no one needs). Also, quite often it is not possible to remove the brake drum “in an amicable way”, due to the fact that it is tightly stuck. And it will not be possible to remove the drum using two M8 bolts, which are screwed into the threaded holes of the brake drum and press it from the hub (although you can try, of course). In this case, you will have to knock down the brake drum using a hammer and a wooden attachment (a metal one is not suitable, crumble the drum). And you can imagine how you can lie on the ground with a hammer and a guide in your hands, methodically tapping a drum (with two hits you may not be able to knock it down). It won't be work anymore, it will be... song! Plus, extreme elements are added to this (don’t forget that the car is on a jack).
Well, I think we have decided on the place, we can move on to the necessary tool.
Your arsenal should consist, in addition to the wheel wrench and jack: a special wrench for unscrewing the nut of the parking brake cable equalizer ( photo 1a), a hammer, a wooden adapter, a screwdriver, pliers, a steel wire bent at the end with a small hook (a very useful thing), a metal wrench for tensioning the spring (I use a homemade device to tighten the spring (it can be found in photo 1). Which you can also do yourself or with the help of a turner).
Everything seems to be done with the instrument! We bought the pads... Now we move on to the process of replacing brake pads on cars VAZ-2108, VAZ-2109, VAZ-21099, VAZ-2110, VAZ-2114, VAZ-2115, VAZ-1117, VAZ-1118, VAZ-1119 .
1) We drive the car into the inspection hole, leave the gear engaged and install anti-roll stops under the front wheel.
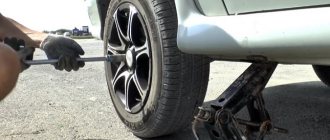
2) Loosen the wheel bolts and lift the required side with a jack, remove the wheel. We go down into the pit and, using a special wrench, unscrew the nut of the parking brake cable equalizer (photo 2).
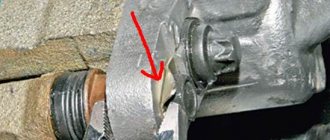
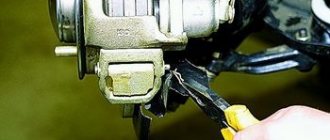
3) Using pliers, unscrew the guide bolts of the brake drum (photo 3).
4) And after that we try to remove the brake drum (I described the methods above).
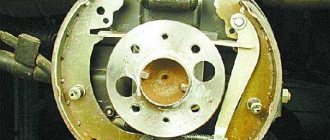
5) When the drum is removed, disconnect the guide springs (photo 4) and the tension spring (photo 5) the brake pads
6) Transfer the drive lever from the old block to the new block (photo 6).
7) When installing and tensioning the springs, make sure that the brake pads fit exactly into the grooves of the brake cylinder , and the handbrake bar fits into the slots on the pads (photo 7). Don't forget to hook the end of the handbrake cable to the drive lever on the block! After this, using a screwdriver or a pry bar, we cling to the edge of the support disk and bring the brake pads together (you can also “bring together” the pistons of the rear brake cylinder before installing the pads).
We put on the brake drum and install the wheel. We do the same work on the other side, but do not lower the wheel to the ground. Press the brake pedal several times. We go down into the pit and tighten and adjust the handbrake cable . Tighten the nut on the parking brake cable equalizer and check the tension. Raise the parking brake handle and count the clicks; if more than 8, then tighten the nut a little more and check again. The optimal number of clicks can range from 7 to 2. The main thing is that when the parking brake is raised, the wheels are blocked (the wheel is not lowered yet, we try to turn it by hand). And with the parking brake handle in the lowered position, the wheel should rotate freely, without rubbing the pads. Otherwise, when moving, the drum may heat up and jam.
When using an article or photographs, an active direct hyperlink to the website www.avtorem.info is required!
Did you like the article? Share it on your page!
Features of TC
Brake pads (TC) installed on the VAZ 2109 have their own features and characteristics, which you should know about before purchasing new parts.
- The base of the block is made of fairly durable metal.
- A friction lining is glued on top of the base using special glue under the influence of a temperature of 100 degrees Celsius.
- The rear brakes include 4 pads. The body and base are stamped from sheet metal and then welded.
- The roughness on the surface of the pads, necessary to speed up the grinding in of the brake pads, is achieved through special processing.
- Efficiency during control braking from 80 km/h - 320 Nm. The pressure inside the brake system is 40 bar. The pads are cold.
- All elements of the brake system are made in accordance with strict international standards and requirements.
- The service life of a vehicle directly depends on driving style, road conditions and a number of external factors.
The operating manual states that the service life of the TC on the VAZ 2109 is within 70-90 thousand kilometers. But in practice this period is somewhat shorter.
Rear TC kit
Golden rules
There are four golden rules that must be strictly adhered to when replacing front and rear TCs.
- When cleaning brakes, never use mineral solvents such as diesel fuel, gasoline, etc.
- When replacing pads at the rear or front, both should be changed at once.
- You cannot swap front and rear TCs, as well as left and right, and vice versa. Otherwise, braking will be uneven.
- If there is a maximum level of brake fluid in the reservoir (MAX mark), part of the brake fluid must be pumped out.
Taking into account all these rules, you can begin to replace the TC.
Rear TC
The algorithm for replacing rear TCs on a VAZ 2109 is as follows.
- Place the car on a flat surface and loosen the tension on the wheel bolts.
- Unlock the pads by fully lowering the parking brake handle.
- Raise the rear of the car with a jack and remove the wheels.
- Place wheel chocks under the front wheels to prevent the vehicle from moving.
- Unscrew the brake drum studs from the rear wheel.
- Using a wooden block and a hammer, knock the drum off the TK.
- Clean the surfaces using the dry method and compressed air.
- We begin full dismantling work.
- Remove the upper garter spring. For this you will need pliers.
- The lower spring is removed in the same way.
- Remove the front TC guide spring.
- Remove the expansion bar.
- Next, the guide spring of the rear TC is dismantled and moved to the side.
- Remove the end of the parking brake cable from the lever.
- Remove the hand brake drive. To do this, you will need to remove the cotter pin from the finger, and then remove the finger itself.
- The dismantling work has been completed, so now everything should be reassembled in the reverse order, only with a new rear TC.
- Before installing the drum, be sure to compress the cylinder pistons so that the outer diameter of the shoes is smaller than the inner diameter of the drum.
- Assemble the unit, steps in reverse order.
- Lower the car to the ground, press the brake pedal several times, which will allow the pads to fully take their place.
Perform the procedure on both wheels. The principle of replacing rear TCs is the same. Just don’t forget to bleed the brake system after completing the work.
How to replace front brakes
Replacing the front brake pads of a VAZ 2109 is carried out using the following tools:
- jack;
- wheel chocks:
- sledgehammer or large hammer;
- punches or tips;
- socket wrenches with head sizes 13 and 17;
- metal brushes or files;
- wrenches used to remove wheels;
- rags.
Replacing the front pads begins with the engine being turned off and the car being put on the handbrake. You need to put special “shoes” under the rear wheels. It is necessary to disconnect the battery and add brake fluid inside the tank. If it is full, remove the excess with a syringe or rubber bulb. Next, use a jack to lift the front of the car and remove one of the front wheels. Using a wire brush, wire brush, or rasp, clean the surfaces of the metal pad to remove any dirt, rust, or dust. Replacing front brake pads on a VAZ must be done cleanly.
Remove the rubber gasket and hydraulic tube located inside the strut bracket. Using a flat-head screwdriver and a small hammer, you need to bend the latch (cotter pin) on the retaining ring, which is located on top of the mounting bolt. Then you should unscrew the bolt itself. This must be done with caution until the finger is completely out of the groove; it is recommended to hold it with a second key. Now you can fold back the body of the parts cushion and remove the vases that require replacement.
The pads should be installed on the VAZ in the reverse order, having first cleared the space for them. Having completed the operations of replacing the front pads, you should fully depress the brake: in this case, the pistons will take their place.
Instructions for carrying out work
Replacing the Nine's front brake pads is done using a standard set of tools and wrenches available in every garage. In addition, you will need a jack with a wheel wrench and a brush equipped with soft metal bristles.
Before starting work, it is necessary to check the brake fluid level in the expansion tank. If it reaches the maximum, then you should use a disposable syringe with a capacity of 10-15 dm³ to take away some of the liquid so that during the replacement process it does not splash out over the edge. Next, supporting the rear wheels of the car with boots, you need to loosen the wheel bolts, lift one side with a jack and remove the wheel. To make work easier, you can turn the steering wheel to the right or left all the way, depending on which side the pads are being changed from.
Further actions are performed in this order:
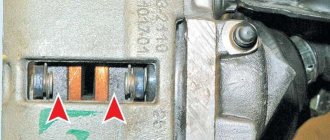
- There is an opening in the caliper bracket through which it is possible to check the condition of the VAZ-2109 pads. After making sure that replacement is necessary, remove the fluid supply hose from the bracket groove along with the rubber ring.
- Unbend the lock washer of the bracket fastening bolt and unscrew it with two keys. After this, the wheel brake housing can be “opened” by moving the bracket to the side on the axis of the lower support.
- If disassembly is carried out for another purpose and you plan to put the pads back, then mark them with a marker so as not to mix them up. Now you can pull them out and accurately measure the thickness of the lining, as well as examine its condition.
- Carefully, so as not to damage the rubber boot of the cylinder, clean the entire mechanism from rust, dust and dirt.
- Since the thickness of the new linings is much greater than the old ones, they will not fit into the sockets unless the piston is pushed deeper into the cylinder. To do this, you need to put the old pads back in place, close the bracket back and use a powerful screwdriver to push the piston in. The support is the brake disc.
- Remove the old pads and insert new ones, close and screw the bracket, and secure the lock washer.
Place and screw the wheel, then go to the other side, where you repeat the replacement operation. Then take the driver's seat and press the brake pedal several times so that the recessed pistons acquire their working position: close to the pads. The last step is to check the brake fluid level in the reservoir. If there is a deficiency, replenish it from a syringe.
Replacing front brake pads on a VAZ 2108 (2109, 21099)
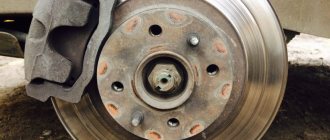
The service life of front brake pads on VAZ 2108, 2109, 21099 vehicles and their modifications is within 30,000 - 40,000 km.
It can vary up or down depending on the operating conditions of the vehicle, driving style, and the quality of the installed brake pads. The recommended frequency of checking their condition is every 15,000 km. You can time the check of the condition of the brake pads to coincide with the seasonal change of tires, since the wheels will be removed in this case.
Brake pads will have to be changed if they are worn out (the total thickness of the lining and pad is less than 6 mm), separation of the lining from the pad, uneven wear, oiling, replacement of the brake disc, vibration and beating, or extraneous noise during braking.
If the brake pad (lining and base) is less than 6 mm, then it should be replaced immediately
The front brake pads on VAZ 2108, 2109, 21099 vehicles must be changed on both front wheels at once to prevent skidding from uneven braking.
Necessary tools, devices, spare parts
— Open-end wrench at “17”
— Socket wrench or socket “13”
— Thick slotted screwdriver
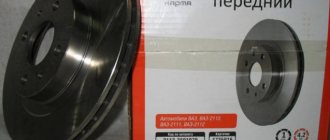
— Two sets of front brake pads
Preparatory work
— If there is an increased level of brake fluid in the reservoir on the master brake cylinder, pump out the excess using a syringe or bulb to avoid overflowing after installing new pads and strongly recessing the pistons into the brake caliper cylinders
When replacement is required
It should be said right away that the plant manufacturing the above-mentioned vehicle did not indicate the frequency of replacing brake pads. The thing is that their service life depends on a number of objective factors, including:
- driving style;
- Terms of Use;
- the quality of the friction linings and the material from which they were made.
The strongest indication of pad wear is when the car skids during heavy braking. However, this symptom is observed not only in the case of uneven abrasion, but also in the incorrect operation of the entire system.
More accurately signals the need for replacement:
- creaking when stopping;
- extraneous noise;
- weak tightening of the handbrake (provided that all its elements remain fully operational).
Very rarely, friction linings crumble due to overheating, which occurs if the car is used in extreme conditions or after prolonged braking.
How to replace front brake pads on a VAZ 2109 at home
The procedure for servicing the brakes on the “nine” is not complicated and will take no more than an hour of free time. Also, for repairs you will need a standard set of tools: a set of open-end wrenches, a long slotted screwdriver, a metal brush, a hammer, pliers, and WD-40 liquid. What is required to replace the pads on a VAZ 2109:
- First, we jack up the front part of the car and install additional support under the engine side members, after which we completely dismantle the wheels;
- Next, in the upper part of the caliper, dismantle the central fixing bolt, having first unscrewed the lock washer and disconnect the guides;
- Then we remove the brake hose from the clamps and move the caliper to the side. The brake pads can be removed;
- Now it is recommended to wipe all elements of the brake system with a wire brush to facilitate the installation of new friction linings;
- New pads with increased friction clutch thickness will be difficult to insert, so you need to press the brake cylinder with a screwdriver, using the tool as a crowbar;
- Next, install the pads and fix the caliper with the central bolt, after which we connect the brake hose. Now we assemble the wheel and bleed the brakes - it is important to check the effectiveness of the brakes before driving the car for the first time.
Note! If the brake cylinder cannot be pressed out with a screwdriver, it is necessary to reduce the volume of brake fluid in the expansion tank. It is not allowed to squeeze the cylinder with a crowbar or knock it out with a hammer, as this may damage the part.
Do-it-yourself replacement of front pads
Compared to the previous procedure, replacing the front pads will seem very easy. The wheel, of course, will also have to be removed. After which you can verify the need for repairs through a special “window”. The thickness of the friction material should not be less than 2 mm, otherwise you risk being left without brakes at any time.
- There is a single bolt at the top of the caliper, held in place by a lock washer. It is necessary to straighten it using a flat screwdriver. If it resists, use a hammer. The bolt should be unscrewed while holding the guide with another wrench.
- The brake hose must be released from its mounting. Now you can “open” the caliper by moving it to the side. Remove the old pads.
- To ensure that the new linings fit neatly into place, it is better to thoroughly clean all points of contact.
- Naturally, the new clutches are thicker than the old ones and it will not be possible to put the caliper back. Therefore, it is necessary to depress the brake cylinder. To do this you will need a large screwdriver. Close the brake mechanism without pads and press the screwdriver, like a lever, against the cylinder. It will take some effort, so be careful not to let the screwdriver come off. Then install new linings, close the caliper and tighten the mounting bolt.
Features of TC
Brake pads (TC) installed on the VAZ 2109 have their own features and characteristics, which you should know about before purchasing new parts.
- The base of the block is made of fairly durable metal.
- A friction lining is glued on top of the base using special glue under the influence of a temperature of 100 degrees Celsius.
- The rear brakes include 4 pads. The body and base are stamped from sheet metal and then welded.
- The roughness on the surface of the pads, necessary to speed up the grinding in of the brake pads, is achieved through special processing.
- Efficiency during control braking from 80 km/h - 320 Nm. The pressure inside the brake system is 40 bar. The pads are cold.
- All elements of the brake system are made in accordance with strict international standards and requirements.
- The service life of a vehicle directly depends on driving style, road conditions and a number of external factors.
Rear TC kit
Golden rules
There are four golden rules that must be strictly adhered to when replacing front and rear TCs.
- When cleaning brakes, never use mineral solvents such as diesel fuel, gasoline, etc.
- When replacing pads at the rear or front, both should be changed at once.
- You cannot swap front and rear TCs, as well as left and right, and vice versa. Otherwise, braking will be uneven.
- If there is a maximum level of brake fluid in the reservoir (MAX mark), part of the brake fluid must be pumped out.
Taking into account all these rules, you can begin to replace the TC.
Signs of wear
There are several main signs that indicate the need to replace the pads at the front and rear in the very near future.
Sign
Peculiarities
Long service life
With a significant mileage, the probability of brake pad wear gradually reaches 100%. Therefore, it is purely a matter of time. But there’s no need to delay
If the handbrake does not work properly, although everything is in order with the manual braking mechanism itself, the pads are simply worn out
Extraneous sounds from brakes
If the discs or drums begin to knock, squeak, or grind, this means there is a problem in the braking system. One of the most likely options is pad wear.
Low brake fluid level
When the pads wear out, the brake fluid in the reservoir is used up faster because consumption increases due to ineffective operation of the brake system
Small thickness of the friction layer
If the thickness of the friction layer on the pads has reached less than 1.5 millimeters, this indicates serious wear of the elements and the need to replace them
These are the main signs of pad wear that any car owner can detect without disassembling the structure.
When and why to change
Why, of course, is a rhetorical question. No motorist wants to be left without brakes. Possible complications will only lead to higher repair costs:
- one of the wheels will jam while driving;
- due to extreme wear, brake fluid will leak;
- the caliper will break.
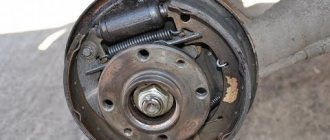
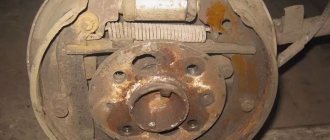
Rear wheel brake mechanism: 1 - brake shield, 2 - wheel cylinder, 3 - upper tension spring of the pads, 4 - brake pad, 5 - pad lining, 6 - brake drum, 7 - dowel pin, 8 - guide spring, 9 - lower tension spring
The question of “when” is directly affected by driving style and the quality of the pads. There are average indicators: for the front axle - 15-20 thousand km, for the rear axle (drum) - up to 100 thousand km. But this does not exempt you from regular checks.
Front wheel brake mechanism: 1 - brake disc, 2 - pad guide, 3 - caliper, 4 - brake pads, 5 - cylinder, 6 - piston, 7 - pad wear indicator (inspection window), 8 - o-ring, 9 - protective guide pin cover, 10 - guide pin, 11 - protective cover
How to replace front brake pads on a VAZ 2109
The front brake pads on the VAZ 2109 must be checked every 15,000 km. Replacement must be carried out at the minimum permissible thickness of the friction linings - 1.5 mm. Before starting to replace the brake pads, turn on the parking brakes and install support bars under the rear wheels. We clean the brake mechanism from dirt.
Do not use gasoline, diesel fuel or any other mineral solvents to clean brakes. The pads are changed on both sides of the car at once. It is not permissible to replace the inner and outer pads between each other, as well as between the left and right wheels. This may result in uneven braking.
Remove the front wheel.
Through the hole in the brake caliper body, we visually check the condition of the pads. If the thickness of the linings is about 2 mm, it is recommended to replace the pads.
We take out the rubber seal along with the hose from the bracket.
Use a screwdriver to bend the lock washer of the upper bolt.
We unscrew the upper bolt securing the bracket body, holding the guide pin by the hexagon with a key.
We rotate the bracket body down around the axis of the lower finger.
We will mark the brake pads if we install them again.
Remove the brake pads.
We check the condition of the friction linings of the brake pads.
We replace them in the following cases:
- overlay thickness less than 1.5 mm
- the surface of the linings is oily
- The linings should not have deep grooves or chips
- the friction lining is not firmly connected to the base
We clean the brake parts from dirt and rust, especially the brake pad seats. We do this carefully so as not to damage the protective cover of the cylinder.
When installing new pads, press the piston into the cylinder.
We install the worn brake pads in place (it is better to put only the base instead of the inner ones) and lift the caliper body. By pressing with a screwdriver or pry bar on the inner pad and leaning on the brake disc, carefully press the piston into the cylinder.
We install new brake pads. The compression springs should be parallel to the top edge of the pads. If we install old pads, we do it in accordance with the previously made markings.
We turn the bracket body upward and tighten the upper fastening bolt, holding the guide pin by the hexagon with a wrench.
Bend the lock washer with a screwdriver. We install the wheel and lower the car to the ground, after which we press the brake pedal several times to set the piston to the working position.
Check the brake fluid level in the reservoir and, if necessary, top up to normal.
Design and characteristics of brake pads
Rear brake pads of the VAZ 2109 consist of:
- Base made of metal.
- Friction lining glued to it.
- The rear brakes are equipped with four pads. The body and base are made from sheet steel by stamping, then they are subject to welding.
- The elements are protected from corrosion by galvanic coating.
- A friction lining is glued to the base at a temperature of about 100 degrees with special glue.
- The required surface roughness, which speeds up the grinding in of the pads, is obtained by additional processing.
- 320 Nm is the efficiency during control braking - when the car is moving at a speed of 80 km/h and 40 bar is the pressure in the brake system. In this case, the pads are in a cold state. The force with which the linings can be moved relative to the block does not exceed 210 n/cm2.
- All materials from which products are made comply with quality certificates and the international standard ISO 9001. They are carried out in compliance with UNECE Rules.
- The special material used in the manufacture of brake pads creates a minimal noise level during braking, which improves the comfort of the driver and passengers when moving in the car.
- Increased wear resistance of elements reduces maintenance costs.
- The instructions indicate that replacing the rear brake pads of a VAZ 2109 should be carried out after the car has driven 70,000 - 90,000 kilometers.
- The service life of the products depends on the care taken when driving the car and the condition of the road surface where the vehicle most often travels.
Advice: Every driver should pay attention to the condition of the brake pads when carrying out routine car maintenance.
Dismantling and installation of rear brake pads of a VAZ 2109 car
So:
- On a VAZ 2109 car, replacing the rear brake pads is carried out when the hand brake is lowered all the way down.
- First gear is engaged.
- Stands are placed under the front wheels to secure the car.
- The rear of the machine rises and rests on supports.
- The wheel is removed. All elements of the braking device are washed with detergents and then thoroughly dried.
Advice: Do not use diesel fuel, gasoline or other mineral solvents to clean brakes.
- If the brake fluid level in the master cylinder reservoir is at or close to about 0, you need to pump out the fluid from the reservoir so that it does not splash out when replacing the brake pads.
- The two guide pins are unscrewed.
- The brake drum is removed.
Tip: If you cannot easily remove the drum, you need to screw two M8 bolts into its threaded holes, and then by screwing them in, you can easily compress the element.
Using a punch or pliers, remove the tension springs - upper and lower.
- The guide spring on the front block is pulled out.
- The front block is removed.
- The expansion bar is removed.
- The guide spring on the rear block is removed.
- The drive lever is disconnected from the end of the handbrake cable.
- The cotter pin is pulled out and the support washer is removed from the pin on the drive lever of the rear brake shoe.
- The rear brake pad is removed.
- The support washer is removed.
- By pressing on the finger shown in the photo, the drive lever is removed from the block.
- The finger is pulled out of the device.
- The thickness and condition of the removed friction linings are checked and it is determined whether the pads on the VAZ 2109 need to be replaced.
- The car enthusiast can install new pads himself. The process is performed in the reverse order of removing them.
- When installing, you need to insert the upper toes of the pads into the grooves of the piston.
- When installing the drum, the brake pads are brought together using two pry bars to move the brake cylinder and its piston to the center.
- The brake drum is put in place.
- To move the brake pads to the brake drum, press the brake pedal up to three times.
- The wheels are installed in place.
- Their ease of rotation is checked.
- The car falls to the ground.
- After the rear pads have been replaced on the VAZ 2109, press the brake pedal so that the cylinder pistons can take their working position.
- Check the brake fluid level in the brake fluid reservoir and add fluid if necessary.
- The handbrake is adjustable.
How the rear brake pads are replaced on a VAZ 2109 car can be clearly seen in the video. With timely replacement of worn-out elements of the brake system, the safe movement of the car is ensured, and the cost of this repair will be significantly lower than that which may arise after an accident when driving a car with faulty brakes.
When and why to change
Why, of course, is a rhetorical question. No motorist wants to be left without brakes. Possible complications will only lead to higher repair costs:
- one of the wheels will jam while driving;
- due to extreme wear, brake fluid will leak;
- the caliper will break.
Rear wheel brake mechanism: 1 - brake shield, 2 - wheel cylinder, 3 - upper tension spring of the pads, 4 - brake pad, 5 - pad lining, 6 - brake drum, 7 - dowel pin, 8 - guide spring, 9 - lower tension spring
The question of “when” is directly affected by driving style and the quality of the pads. There are average indicators: for the front axle - 15-20 thousand km, for the rear axle (drum) - up to 100 thousand km. But this does not exempt you from regular checks.
Front wheel brake mechanism: 1 - brake disc, 2 - pad guide, 3 - caliper, 4 - brake pads, 5 - cylinder, 6 - piston, 7 - pad wear indicator (inspection window), 8 - o-ring, 9 - protective guide pin cover, 10 - guide pin, 11 - protective cover