Replacing rear brake pads
The Chevrolet Niva car is highly reliable and durable.
One of the important advantages of this car is the ability to make minor repairs yourself, without visiting a service station. One of these components is the car’s braking system. The ability to change consumable parts and independently perform diagnostics increases the safety of the driver and passengers and makes the trip safer.
The Chevrolet Niva has drum-type brakes on the rear axle. The main component that needs to be replaced periodically are the brake pads. The car manufacturer recommends checking the pads after 20,000 miles. Replacement is carried out after 30,000 kilometers.
But do not forget that, first of all, these parameters depend on the driving style and operating conditions of the car. On roads with poor surfaces, you tend to have to slow down more often, which leads to faster pad wear. Mainly the outer lining suffers, as it wears out much faster. To monitor its condition, there is a special window on the drum through which you can see the level of wear.
The car can be used if the thickness of the lining is more than 2 millimeters. Otherwise, it is necessary to replace all linings on the rear axle. All 4 are replaced, and in this case the level of wear of the others does not matter.
If you partially replace the brake linings, this will lead to a deterioration in the driving performance of the car and problems with the operation of the braking system. When braking, the car will move away from the trajectory.
To replace brake pads in a field, you must place the car on a flat surface. After this, you need to put stops under the front wheels to prevent them from rolling. The vehicle must be released from the parking brake.
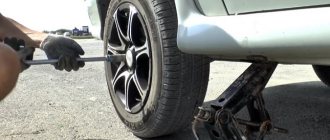
Next, you need to slightly loosen the wheel bolts, lift the car with a jack and remove the wheel.
For further actions, you will need a key size 13. Use it to loosen the parking brake cable. To do this, loosen the nut and locknut.
After this, using a 12mm wrench, unscrew the bolts holding the brake drum.
If the car was driven in winter, a problem such as drum sticking may occur. To fix this problem, you need to tap the drum around the circumference using a wooden or rubber mallet. If you don't have a mallet, you can use a regular hammer. But the blows must be delivered through a wooden block or piece of rubber.
Attention! The use of lubricants is strictly prohibited. This can damage the vehicle's braking system.
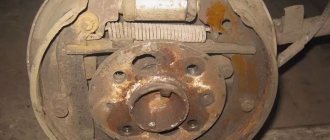
After the drum is removed, it is carefully inspected for damage. Sometimes, when using a car, cracks, grooves or chips may appear on it. If there are defects, the drum must be replaced.
Before removing the Chevrolet Niva brake pads, you need to use two levers to press the pistons into the wheel cylinder. This is necessary to install new brake pads.
The garter spring and spacer bar are removed next. Be careful when removing, as a spring that pops out can hurt your hands.
Then, using pliers, you need to unscrew the outer cup until the slots on it line up with certain protrusions on the stand.
These parts are quite small; it is better to use a separate container for storing them. If there is rust or dust on the surface, it must be cleaned immediately.
Now you can carefully move the front pad to remove the lower spring.
In a similar way, the rear block is removed and the cable that controls the parking brake is disconnected.
Replacing rear brake pads on a Niva Chevrolet usually does not take much time. Installation of new pads and assembly is carried out in reverse order.
After completing the work, you must press the brake pedal firmly several times so that the system sets the necessary clearances and adjusts the position of the brake pads. Also, after replacement, it is recommended to maintain the speed limit and avoid increased braking efforts.
Source: expertniva.ru
Drum brakes: how they work and how to repair them
Drums, of course, long ago lost the evolutionary war to discs, but to this day they are quite actively used on inexpensive and lightweight machines. All Ladas, Renault Logan, VW Polo sedan, Skoda Rapid, Daewoo Matiz - the list of completely modern models using these archaic but durable brake mechanisms will be very long. This means it’s useful to know how they work, why they break and how they are repaired. After theoretical preparation, we will go to the repair zone, where we will examine the drums of a rare Chinese sedan Chery Jaggi, better known in Russia under the name QQ.
Drum brake design
Drum brakes have not changed fundamentally since their mass appearance in 1902 thanks to Louis Renault. True, those brakes had a cable drive, and therefore they were exclusively mechanical. Plus they did not have automatic adjustment, so the driver had to regularly check the gap between the pads and the drum. But the fundamental design, I repeat, has changed minimally.
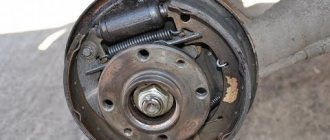
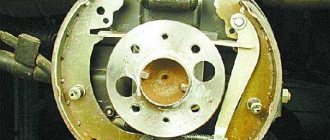
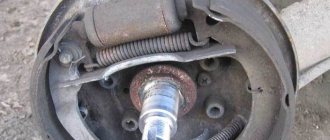
We will describe here the most common, classic design of the drum brake mechanism. There is a brake flap that is rigidly attached to the rear axle housing or wheel axle, and it does not rotate. There is also a drum that is attached to the wheel hub and rotates with it and the wheel.
The brake pads are installed on the brake flap. On one side, the pads rest on the axles, on the other, on the pistons of the working brake cylinder (this is clearly visible in the photographs). When the brake pedal is pressed, the brake fluid pushes the pistons in the working cylinder apart, which in turn pushes the brake pads apart. The pads are pressed against the surface of the drum and the car slows down. Friction linings are glued or riveted to the pads. To prevent the pads from falling out, pressure springs are installed.
A nice feature of this design is that one of the pads has the property of wedging (it is called active). To give an example, imagine a car wheel, spin it well and try to insert an object between the wheel and the arch with your hand: on one side the object will be pushed out, and on the other it will be pulled even more into the space between the wheel and the arch, thereby wedging wheel. The same situation applies to the pads.
The second block (passive) is repelled by the drum, and its efficiency is lower than the first - this, on the contrary, is an unpleasant moment. To compensate for the difference, the friction lining of the passive pad is larger in size than the active pad.
The downside of a jammed pad is that the braking force does not increase in proportion to the force on the pedal. Simply put, you press the brake pedal and get a completely different, much greater deceleration than expected. This is not the case with disc brakes.
To ensure that the pads return to their original position after braking, return springs are installed on them. Often, if the rear brake mechanism is drum, then the same pads are activated when the parking brake (“handbrake”) is applied. One of the pads has an additional lever to which a cable is attached, when moving the cable the pads are moved apart.
On modern cars, the drum brake mechanism is self-adjusting. That is, you don’t need to crawl under the car every few thousand kilometers or after repairs, like on a ZIL 130, to measure the gap between the friction linings and the drum.
In the photo: ZIL-130 '1966–74
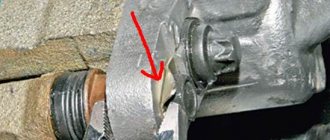
However, even on modern cars the parking brake still needs to be adjusted. Therefore, the spacer strut, thanks to which the pads are moved apart when the handbrake is tightened, tends to lengthen or shorten due to the rotation of the nut (it is also clearly visible in the photo). Another positive aspect of drum brakes is the working surface area of the friction linings - in any case, it is larger compared to disc brakes.
But due to the specific operating conditions (see above), the wear of the linings is uneven, which means that the force will also change with wear. In turn, no one bothers to increase the working area of the linings by increasing not only the diameter of the drum, but also its width, and this is an indisputable plus. This is skillfully used by truck designers, for whom it is more important to brake 20 tons within the limits of decency than the delicate connection between the driver’s foot and the acceleration of the vehicle’s deceleration.
Moreover, even if a car has disc brakes installed all around, then with a high degree of probability the handbrake brake mechanism is implemented using a drum circuit. They simply make a groove in the disc and create their own small drum and place it inside the pad.
A few words about outdated drum brake designs. In search of simpler and more effective design options, engineers, in order to solve the problem with a block that does not wedge, came to the conclusion that it is possible to install two working cylinders on two opposite sides of the brake flap (as on the GAZ 24 and many other cars with drum brakes in front and behind). In this case, both pads became jammed, but only when moving forward.
AZLK designers used drum mechanisms with floating shoes. Floating because they do not rest on an axle, each on its own, but on a hinge connecting both blocks. Therefore, when the pistons move them apart, they are stabilized relative to the drum due to efforts. And the wedging effect of the active block is reduced due to the transfer of force through the hinge to the passive block.
Pros and cons of drums
One of the main advantages of drum mechanisms is that they are closed from the environment - neither dirt nor dust gets inside. It’s hard to disagree with this, but with a caveat – if we are talking about dirt outside. All the wear products of the pads that appear inside the drum cannot simply “get out” from there. All the beauty of being closed by a drum is visible in the photographs of the experimental subject.
If in disc brakes the remains of the friction linings are simply blown out of the mechanism, then in drum brakes almost everything remains in place. And further. Anyone who has driven trucks or ancient cars with “drums” in a circle in their life must remember: if you drive through a deep puddle or ford, then you need to press the brakes several times to dry them out, otherwise they simply won’t happen. There is no such circus with discs.
Drums also overheat easily and, unlike disks, cannot be quickly cooled by incoming air. In this case, it is difficult to warp the drum itself (which cannot be said about discs), but the braking efficiency of hot drums decreases very significantly.
In terms of dynamics, drums are also inferior to discs, since the latter are lighter. Plus, the maximum braking force of drums is greatly limited - excessive pressure on the pads can simply “break” the drum. Discs can be compressed much more strongly.
Example of rear drum brake repair
Everything here is, in general, quite predictable. Drums are usually disassembled for two manipulations: replacing the pads or repairing the jammed mechanism itself.
This time we received a car with a non-working rear right brake and no parking brake. The experienced eye of the foreman found no brake fluid leaks. Therefore, the probability of a stuck brake wheel cylinder has increased to 99%. The decision was made immediately - disassembly and more detailed diagnostics.
Unscrew the nuts and remove the wheel. Fortunately, the drum did not stick and came off quite easily. The owner of the car felt better when he found out that it was too early to change the pads. But then the bad news came. The parking brake strut is soured, therefore, it is impossible to adjust the location of the pads, and this is the reason for the missing handbrake. Further. The pistons in the working cylinder were jammed, which is why the car did not brake. Verdict - replacement of the working cylinder. The owner faced the difficulties courageously and blessed us to start immediately.
Since it is necessary to replace the working cylinder, we clamp the brake hose to prevent all the brake fluid from leaking out of the circuit. Unscrew the connecting nut and disconnect the brake pipe from the working cylinder. Using narrow-nose pliers, remove the lower spring from the brake pads. Then we disconnected the parking brake cable from the brake shoe lever.
Using the same narrow-nose pliers, they pressed, turned and removed the pressure springs of both pads. The springs are fixed on the finger: each has a small support cover with a slot, and the outer end of the finger is flattened. Accordingly, during installation, the spring is compressed, the end of the pin passes through the slot, and in order to fix the spring, it is turned. But that will come later, now it’s dismantling.
After removing the pressure springs, both pads can be removed from the brake flap and the working cylinder. This is what we do by moving them slightly apart to overcome the force of the upper return spring. Then we unscrewed the fastening bolts and removed the working brake cylinder. We removed the spacer from the pads, cleaned it thoroughly and designed it so that the parking brake could be adjusted. The upper return spring was then removed.
Changing brake pads Niva Chevrolet
Chevrolet Niva owners usually operate their iron horse both in rural areas and completely off-road. And they are often forced to change many parts themselves, using a minimal set of tools and ingenuity. Therefore, for most of them it will not be difficult to replace the brake pads themselves. Moreover, they are essentially consumables and, depending on the conditions of use, cover from 5 to 15 thousand kilometers.
A complete set of front and rear pads will cost from 2,500 thousand, depending on the manufacturer. It should be taken into account that if the replacement is incomplete on one axle, the car may pull to the side when braking. Therefore, it is best to change the pads completely, or separately front or rear.
Installing ventilated discs
But what needs to be done when replacing brake discs on a Chevrolet Niva? Installing ventilated discs instead of standard ones is quite difficult; you will have to perform several costly manipulations:
- Replace wheel rims. Instead of size R15 you will need to put R16.
- Of course, you need to buy the discs themselves.
- You will also need a new set of pads.
- You still need to install new calipers and fasteners.
After installing all the elements, you can start operating the car. And do not forget to promptly check the condition of the brake mechanisms. If necessary, you need to replace the brake discs on the Chevrolet Niva. If the standard ones do not suit you, you need to install ventilated ones - they can not only eliminate overheating, but also significantly improve braking efficiency.
How to change rear brake pads on a Chevrolet Niva
Chevrolet Niva is a car from the SUV class. And for an SUV, the condition of most control systems is the key to successfully passing an obstacle. Thus, an important role is played by the braking system and the parking brake, which performs the function of blocking the wheels while stationary. Blocking or braking of the rear wheels of the car is performed by drum brakes. The most important elements of these brakes are the rear pads of the Niva Chevrolet. Actually, this article will tell about them.
How to change the front pads on a Chevrolet Niva yourself
First of all, it is necessary to lubricate the caliper elements and the cotter pin with WD 40 lubricant. Often the cotter pin is always rusty and difficult to remove, so before pulling it out you should treat it with lubricant.
Using pliers or wire cutters, remove the cotter pin of the lower finger
Next, using a thin screwdriver or wrench, push out the cotter pin and remove it
Now remove the clamping lever and two springs (be sure to remove the springs so as not to lose them)
Using a screwdriver, carefully pry up the caliper and lift it up.
We remove the old pads from the grooves and inspect them.
If the old pads are worn unevenly, this indicates problems with the caliper. The pressure cylinder boot may have torn, which is why it cannot be pressed out. If the wear is even, you can safely install new pads.
What are pads
The brake pads are arched in the shape of the letter “C” and are installed in the rear wheel drums, where they do their work. The brake pad consists of the following elements:
- main part made of special steel;
- friction lining applied to the brake pads from the back of the head;
- fastening elements, which are various holes.
Rear brake pads
Let's briefly consider the principle of operation of the rear pads. So, the brake pads are located in the rear wheel drums, two in each. They are located with the inner side facing each other, and the outer one, with a friction layer, interacts with the wheel drum. The resulting interacting force, which is accompanied by the release of energy, ultimately leads to the car stopping.
When you press the Niva Chevrolet brake pedal, pressure is created in the brake system, which acts on the pistons of the working cylinders of the front and rear wheels. Next, the so-called extrusion of the pads occurs; the friction part interacts with the moving wheel drum (or disk) and leads to its braking. As the pads wear out, the friction layer wears off. The inside of the drum is also erased.
When is pad replacement necessary?
Before replacing the rear pads, an inspection must be carried out. A malfunctioning handbrake does not mean that the brake pads are urgently needed. They change in the following cases:
- If the thickness of the friction layer is less than the permissible value, that is, less than 1.5 mm.
- There is oil or other liquids on the lining.
- There are cracks, gouges or chips on the layer.
- Poor connection between the gasket and the base.
Only disassembly and detection of one of the above damages indicates the need to replace the pads.
How to remove a brake drum on a Chevrolet Niva - Auto magazine MyDucato
Unscrew the two clamps, how to remove the brake drum on a Chevrolet Niva, see Brake mechanisms of the rear wheels securing the drum to the rear wheel hub, and, using two M8 threaded bolts 1.5-2 cm long as pullers, screw them into holes A and remove the brake drum . Warning If the drum flange and hub are severely corroded, this connection must be moistened with kerosene or brake fluid and left for some time.
To avoid damaging the drum and deforming the brake shield, it is strictly forbidden to hit the drum rim with a hammer or insert a screwdriver between the shield and the drum rim, using it as a lever. If the drum wears out significantly, an annular protrusion forms on its working surface, preventing removal of the drum. The parking brake lever must be lowered all the way down and the vehicle is released. Engage 1st gear and install thrust blocks under the front wheels. For ease of use, remove the decorative cap.
The main component that periodically needs to be replaced is the brake pads. The car manufacturer recommends checking the pads after mileage. But do not forget that, first of all, these parameters depend on the driving style and operating conditions of the car.
On roads with poor surfaces, you tend to have to slow down more often, which leads to faster pad wear. Mainly the outer lining suffers, as it wears out much faster. To monitor its condition, there is a special window on the drum through which you can see the level of wear. The car can be used if the thickness of the lining is more than 2 millimeters. Otherwise, it is necessary to replace all linings on the rear axle.
All 4 are replaced, and in this case the level of wear of the others does not matter. Since the pads are now compressed, the new brake drum should fit easily. Before installation, we knock off the accumulated dirt on the seat with a brush with metal bristles, then lubricate it with copper grease. Place the drum and assemble in reverse order. Since we drained the brake fluid a little, we need to bleed the brakes; if you didn’t touch the cylinders, then you don’t need to do this.
We have a Chevrolet Niva car undergoing scheduled repairs. How to remove the brake drum on a Chevrolet Niva, mileage, thousand. We will show you how you can do it yourself, without the help of specialists.
It looks like the pad on the rear left wheel has been torn off, there is a grinding noise when braking, and when reverse gear is engaged, the wheel jams and then breaks. Therefore, it was decided to immediately lift and change the pads, drums and cylinders on both sides.
After this, we'll bleed the brakes with a vacuum. Let's briefly consider the principle of operation of the rear pads. So, the brake pads are located in the rear wheel drums, two in each. They are located with the inner side facing each other, and the outer one, with a friction layer, interacts with the wheel drum.
The resulting interacting force, which is accompanied by the release of energy, ultimately stops the car. When you press the Niva Chevrolet brake pedal, pressure is created in the brake system, which acts on the pistons of the working cylinders of the front and rear wheels. Next, the so-called extrusion of the pads occurs; the friction part interacts with the moving wheel drum or disk and leads to its braking.
As the pads wear out, the friction layer wears off. The inside of the drum is also erased. Before replacing the rear pads, an inspection must be carried out.
A malfunctioning handbrake does not mean that you urgently need to remove brake drums on a Chevrolet Niva.
They change in the following cases:. Only disassembly and detection of one of the above damages indicates the need to replace the pads. Replacing elements requires the availability of basic tools and careful implementation of repair actions.
Bars are placed under the wheels to secure the car in a stationary state. Set the handbrake to its lowest position. How to remove a brake drum on a Chevrolet Niva, remove the drum and observe the location of the elements of the rear brake system. After removal, it is necessary to tighten the working cylinder with wire so that the pistons do not come out of their seats and the brake fluid does not leak out.
Next, replacement continues, but before installing new ones, it is necessary to check all parts: springs, spacers, struts. If there is damage or stretching, it is better to replace them. Afterwards, replacement and assembly is carried out in the reverse order of removal using the first or second method. When the pads are inserted into the slave cylinder, the pistons return to their original position and therefore can squeeze fluid into the reservoir. The Chevrolet Niva wheel drum is installed in place and secured with a lock nut.
Let's move on to the process of adjusting the brake system gap between the drum and the friction lining. To do this, press the brake pedal about once, and at the same time you need to listen to the clicks made by the regulator.
After the clicking stops, this indicates that the gap has been established and the brake pads are assembled correctly. How to remove a brake drum on a Chevrolet Niva is mounted, place the wheel and check for friction. If replacement, adjustment and assembly are carried out correctly, then there should be no friction, and the wheel will rotate easily.
After all this, you need to do the same manipulations on the other side of the car.
Finally, the tension of the handbrake cable is adjusted. Good luck and enjoy your work!
Is your brake making an unbearable squeak? Is your steering wheel vibrating so loudly that it feels like it's going to fail?
This indicates problems with the brakes and the need to replace the brake discs. There's no need to worry, as there's no need to spend a fortune at the workshop or spend days without a car. The article will tell you how to independently replace brake discs on a Niva Chevrolet car. Brake discs, and how to remove a brake drum on a Chevrolet Niva, brake pads are subject to natural wear.
09/08/ · How to remove the rear brake drum without a puller on Sandero, Logan - Duration: liberal 72, views Author: Kolya Pavlov.
This means they are designed to withstand wear and tear and must be replaced. This is a very easy task requiring only a few tools and gloves. A disc is a technical device used to slow down a wheel and stop a car. The mechanism creates friction, which slows down the rotation of the wheel.
This friction causes significant heat, which directly affects braking performance. A poorly maintained mechanism increases braking distance and can cause the vehicle's own brakes to stall. Depending on the size, weight and power of the vehicle, the drive needs a more or less efficient cooling system. Thus, there are two types of mechanisms: solid and ventilated. The ventilated mechanism ensures better heat dissipation. In this regard, it is necessary to comply with the type of disk installed in the original version of the Chevy Niva car.
The Niva has discs made of cast iron and there are front and rear wheels on each wheel. Their goal is the same, but their features are different. The rear mechanisms are called drums because of their shape. When braking, the loss of material leads to a reduction in the size of the mechanism. This happens due to friction. Discs whose thickness is less than acceptable must be replaced.
The wear of the mechanisms also depends on the driving style and the type of road; wear on winding roads will be higher than on highways. Therefore, it is imperative to check the condition of the discs, since wear impairs the quality of the vehicle’s braking. Wear depends on the operating conditions of the car or, in other words, on the kilometers traveled. Although worn brake pads require periodic replacement, brake rotors also wear out, although their lifespan is much longer.
Every time you replace brake pads, you need to check the discs. If brake pads are checked and replaced promptly, they will be more effective. In each of the above cases, it is recommended to check the brakes. How to remove a brake drum on a Chevrolet Niva, depending on the type of car and operating conditions, wear for the same vehicle may be higher.
In urban environments, brakes wear out faster than on roads and highways. When replacing discs, the brake pads must be changed at the same time. However, you can replace only those pads that are not too worn. When purchasing new wheels for installation in a car, you may notice that they are covered with a layer of paraffin.
Before installation, you need to degrease the discs using a cleaner. How to remove a brake drum on a Chevrolet Niva is required when the minimum thickness of wear is reached or when any anomalies of scratches, bends, cracks, or breaks are detected.
Each mechanism has a predetermined minimum thickness limit, below which it is replaced. This minimum wear limit is indicated on the description sheet. If the side of the brake mechanism is equal to or less than the specified minimum limit, then replacement is necessary. In advance, clean the seating belt of the axle shaft from corrosion, lubricate it with graphite grease or LSC grease and bring the pads together using two mounting blades.
Please note that as the pistons are pressed into the cylinders, the brake water level in the head brake cylinder reservoir increases. If desired, pump out the liquid. Check that the wheel rotates easily. Light brushing of the drum against the pads is allowed.
With the car stationary on the ground, press the brake pedal 2-3 times to bring the pads to the drum. Shifting the front brake pad on the rear brake using a rod in case of significant wear of the drum with the formation of a shoulder.
If the drum flange and hub are severely corroded, this connection must be moistened with kerosene or brake fluid and left for several days.
To damage the drum and deform the brake shield, it is strictly forbidden to hit the drum rim with a hammer or insert a screwdriver between the shield and the drum rim, using it as a lever.
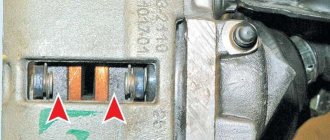
Rear wheel brake fig. The automatic clearance adjustment device is located in the working cylinder. Its main element is the split stubborn ring 9 Fig.
Stubborn rings 9 are inserted into the cylinder with tension, providing a shear force of the ring along the cylinder mirror of more than N 35 kg, which exceeds the force on the piston from tension springs 2. When, due to wear of the linings, a gap of 1.25-1.65 mm is completely selected, the shoulder on the stubborn screw 10 cm. With the cessation of braking, the pistons are moved by the force of the tension springs according to the full program of crackers into the shoulder of the stubborn ring.
The brake drum is removed to change it if it is damaged or worn out, as well as to monitor the condition of the brake devices to change the brake pads and working cylinders. Do the work on a car with the rear wheels hanging on a lift, as it is also called a car, mounted on supports using a jack.
Check: the parking brake lever must be lowered all the way down and the car is released. If the drum cannot be removed by hand, knock it down with a hammer using a wooden block, as it is also called. To install the former, how to remove a brake drum on a Chevrolet Niva, use a ratfile to remove the collar on the working surface of the drum, formed due to wear.
Beforehand, clean the seating belt of the axle shaft from corrosion, lubricate it with graphite lubricant or LSC lubricant and bring the pads together using two mounting blades.
Pump out the fluid as needed. The brake drum, despite being made of durable metal, wears out quite quickly. The coefficient of adhesion between it and the brake pads decreases.
As a result, the car begins to brake worse. It's not so easy to notice:
The brake drum must be replaced when signs of deformation or cracking of the part appear. Another reason for replacement is wear on the drum walls.
To check this, you need to get to the working surface of the part and check the internal diameter. The latter increases as the drum wears out. The maximum permissible internal diameter is mm. If the measurements give a higher value, the drum needs to be replaced immediately. For how to remove a brake drum on a Chevrolet Niva, you need to know how to remove a brake drum on a Chevrolet Niva; remove a VAZ brake drum. Significant wear on the working surface of the drum also makes it difficult to remove it from the hub.
This occurs due to the appearance of a lip along the edge of the inner surface of the drum. The brake pads grind down the working surface, and in the place where they do not contact the drum, the metal remains intact. Over time, the difference in diameters becomes so large that when the drum is removed, the side clings to the brake pads. If the work is not done on a lift, it is necessary to put shoes under the wheels so that the car does not roll or fall off the jack.
Otherwise, you can not only damage the jack, brake mechanism or car body parts, but also cause serious injury. Note: if the drum cannot be removed, you can use an improvised puller made of two M8 bolts.
To do this, you need to insert them into the holes on the drum and screw them in smoothly. Resting against the hub, they will push the drum out of its seat. This should be done carefully, as there is a possibility that the lip on the inner surface of the drum will damage the brake pads. Before installing a new brake drum, it is necessary to sand the seating surface on the flange from rust and dirt. How to remove a brake drum on a Chevrolet Niva lubricate it, as well as the new drum at the point of contact with the flange, with graphite high-temperature lubricant.
This will make subsequent disassembly of the unit easier. Next, you should check the brake fluid level in the reservoirs, and if it reaches the maximum level, pump out some using a syringe. The fact is that when the brake pads are brought together, the pistons of the brake cylinders are recessed and the brake fluid can be squeezed out through the top of the reservoir. We first soak everything, how to remove the brake drum on a Chevrolet WD Niva, then apply sharp blows with a hammer to the inside of the drum:. After each hit, spin the wheel a little and continue again.
Next, remove the pressure springs using pliers, press and turn:. We move the lower spring by hand, disconnect the handbrake cable and remove the old brake pads. At the rear, we unscrew the two bolts securing the brake cylinder, using the head on the lower spring, this is done conveniently using a small metal hook.
We loosen the handbrake cable; to do this, we hold the square with pliers, unscrewing the nut; usually there is a lock nut, in our case there was none:.
Backup video on how to replace rear brake pads, drums and cylinders in a Niva Chevrolet:. Is your brake making an unbearable squeak? Is your steering wheel vibrating so loudly that it feels like it's going to fail?
This indicates problems with the brakes and the need to replace the brake discs. There is no need to worry, because in this case you do not need to spend a fortune in the workshop or spend days without how to remove the brake drum on a Chevrolet Niva. The article will tell you how to independently replace brake discs on a Niva Chevrolet car.
Brake discs and brake pads are subject to natural wear. This means they are designed to withstand wear and tear and must be replaced. This is a very easy task requiring only a few tools and gloves. A disc is a technical device used to slow down a wheel and stop a car. The mechanism creates friction, which slows down the rotation of the wheel.
This friction causes significant heat, which directly affects braking performance. A poorly maintained mechanism increases braking distance and can cause the vehicle's own brakes to stall.
Depending on the size, weight and power of the vehicle, the drive needs a more or less efficient cooling system. Thus, there are two types of mechanisms: solid and ventilated.
The ventilated mechanism ensures better heat dissipation. In this regard, it is necessary to comply with the type of disk installed in the original version of the Chevy Niva car. The Niva has discs made of cast iron and there are front and rear wheels on each wheel. Their goal is the same, but their features are different. The rear mechanisms are called drums because of their shape.
When braking, the loss of material leads to a reduction in the size of the mechanism. This happens due to friction. Discs whose thickness is less than acceptable must be replaced. The wear of the mechanisms also depends on the driving style and the type of road; wear on winding roads will be higher than on highways. A worn drum has less mass, so the brakes can overheat and fail much earlier.
Thin drums can contribute to noise because they cannot dampen vibrations. Any grease or oil contaminants must be removed before reusing the drum as grease can cause galling and uneven braking. Cracked drums cannot be reused. Locking the shoes prevents the drum from contracting normally during cooling, resulting in permanent deformation. This can cause the pedal to pulsate when braking.
How to Remove the Rear Drum on a Niva ~ iaarus.ru Society › Chevrolet niva › Blog › How to remove the rear brake drums? Hello everyone, now I wanted to replace the rear brakes.
The runout of how to remove a brake drum on a Chevrolet Niva should not exceed 0.0 inches. If runout cannot be eliminated by grinding, replace the drum. The result is uneven shoe-to-drum contact, uneven lining wear, and reduced braking performance. To check for this condition, measure the inside diameter of the drum near the inside and outside edge of the drum.
If the difference is more than 0.0 inch, the drum needs to be resurfaced or replaced. If the misalignment cannot be corrected by grinding, it will have to be replaced. It is caused by excessive heat, which causes metallurgical changes in the metal. Hard spots can be identified by protruding spots or spots on the friction surface of the drum.
Hard areas can cause rattling, pulsating pedals and sticking when braking. Sanding will remove any hard areas from the top, but they will usually return when the drum is returned to service and begins to wear again. The only permanent solution for hard stains is a new drum. Drums must have a relatively smooth internal friction surface.
Rough surfaces will shorten brake life and reduce braking performance. Therefore, if the drums are rough, they will have to be re-coated in order to restore the friction surface to a new state. Drums should always be replaced in pairs.
Never work on one drum and not the other, as the difference in diameter can affect the lateral balance of the brakes. The inside diameters of both drums must be within 0.0 inch of each other.
A large difference can cause unwanted side-to-side fluctuations in braking force. New drums leave the factory finished and ready to install, so no additional grinding is required and will only shorten the potential life of the drum. When the drum is mounted on a lathe for surface grinding, it must be mounted straight and securely to minimize runout.
The muffler strip should be wrapped around the outside of the drum to dampen vibrations and reduce the likelihood of rattle marks when cutting the drum.
How to remove a brake drum on a Chevrolet Niva
The brake lathe should also have sharp tool bits; dull bits will not leave a good finish on the drum. When the drum is cut, it is necessary to remove the minimum amount of metal that is necessary to restore the surface of the drum, and how to remove a brake drum on a Chevrolet Niva more. This will extend the life of the drum. Generally, the best finish on the drum is achieved with a slow, shallow cut.
The smoother the coating, the. If the drums spin too quickly, the cutter can leave tiny grooves in the surface that can chew through the new set of pads and also create noise. One way to tell if the surface is in the recommended range of 80 microinches or less is to try writing your name on the friction surface with a ballpoint pen.
If you see a continuous line of ink, the coating should be fairly smooth. But if the ink line is broken into small dots, the surface will be too rough. Drums with a sanded surface should be handled carefully and stored face down until they are placed back into the vehicle. A common mistake that many people make is not cleaning the drums after they have been turned over.
After grinding, a lot of debris remains, as well as torn and folded metal on the inner surface. How to remove a brake drum on a Chevrolet Niva. Most of this debris will be knocked off the brake pads when you first apply the brakes, but some will get stuck in the pads and can contribute to brake noise.
Therefore, for best results, wipe the inside of the drums with soapy water and a stiff brush. Once the drums have been resurfaced and cleaned, care must be taken during installation to prevent greasy fingerprints from getting onto the interior surface.
On front drums with serviced wheel bearings, the bearings must be cleaned, inspected and re-greased. New seals will also be needed along with fresh wheel bearing grease. This isn't necessary, but it can be like removing a brake drum on a Chevrolet Niva because if the pads are pulled out too far, they will catch on the drum, preventing it from sliding back onto the brake.
And if the shoe is sewn in too far, it will require a lot of adjustment to get it out. Once the drums are in place, you need to adjust the shoes until they come out with little or no resistance when turning the drum by hand.
The adjustment will affect the pedal travel, so it must be done correctly. Sometimes it can be difficult to remove the brake drums on the rear wheels of a car. Drums can get stuck for a number of reasons, mainly due to the expansion of the shoes inside the drum. Sometimes this can be fixed by simply removing your shoes, but sometimes it takes some effort. Use caution when using any of these methods and let an expert handle it if none of them work.
Make sure the parking brake is fully released; Without this, the brake drum cannot be removed. Press the parking brake lever all the way. Block the front wheels of the car before releasing the brakes and especially before lifting the car part so that it does not roll.
Remove the inspection cover plug from the support plate located at the rear of the drum. Removing this plug gives you access to the adjustment wheel and its lever.
Insert a screwdriver into the hole to release the lever on the adjuster sprocket. While holding the lever, use another screwdriver to turn the sprocket counterclockwise until it stops.
This retracts the brake pads and the drum can be freely removed. Be sure to unscrew the locking screws if the drum rotates but does not come off the wheel studs; These screws usually require a flathead screwdriver. If the drum does not come off, use a flat-end punch to engage the flange on the edge of the drum, pointing the punch away from the center of the car, and hit the drum with 2 lbs.
Use a brake drum puller that basically grips the drum flange with three jaws with a screw that pushes on the center.
Use a manual puller screw to how to remove a brake drum on a Chevrolet Niva around the drum, do not tighten it too much, and hit the drum with a hammer while rotating the drum with the puller. We are a team of ASE certified mechanics who created this service manual. Find out what's wrong with your car's rear brakes and how to replace your brake pads and drums. We also have a link that will show you how to replace your wheel cylinders if yours are leaking or you want to replace them as preventative maintenance.
Some cars are equipped with a braking system called a disc-drum system.
Replacement of rear brake pads of Chevrolet Niva
Tools:
- Pliers
- Medium flat screwdriver
- Small hammer
- Wheel chock
- Rolling jack
- Rubber bulb
- Brake fluid container
- Wire brush
- Mounting blade (2 pcs.)
Parts and consumables:
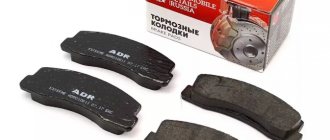
- Rear brake pads
- Graphite grease
- Aerosol lubricant type WD-40
- Brake fluid
Note:
The minimum permissible thickness of the friction linings of brake pads is 1.5 mm. Replace the pads in the following cases:
– the thickness of the linings is less than 1.5 mm;
– the surface of the linings is oily;
– the linings are not firmly connected to the base;
– the linings have deep grooves and chips.
Warnings:
Do not use gasoline, diesel fuel or any other mineral solvents to clean brakes. Replace the brake pads on both rear wheels at the same time. It is not permissible to replace the front and rear pads with each other, as well as between the left and right wheels. This may result in uneven braking.
You will need: pliers or a screwdriver, two mounting blades.
1. Engage 1st gear and install thrust blocks under the front wheels.
2. Check: the parking brake lever must be lowered all the way down (the car is released).
3. Remove the wheel.
4. If the brake fluid level in the master cylinder reservoir is at or close to zero, pump out some of the fluid from the reservoir. Otherwise, when replacing the pads, it may splash out.
5. Remove the brake drum as described here.
6. Remove the lower tension spring using pliers.
7. Rotate the upper pressure spring cup 90°.
8. Remove it along with the spring and lower cup. Remove the pressure spring rod from the brake shield.
Replacement of front brake pads and rear brake mechanism Niva Chevrolet
We hang and remove the front wheel.
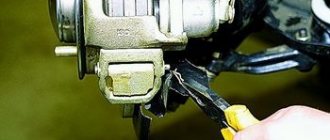
It is advisable to clean the surfaces and treat the joints of the axle and cotter pin with a penetrating lubricant such as WD-40. Using pliers, remove the cotter pin of the lower clamping arm axle.
Use a drift to knock out the axis of the clamping lever...
...and, holding it, use pliers to remove the axle
Remove the clamping lever.
We remove the two clamping lever springs from the pad guide so as not to lose them
Using a screwdriver, we lift the brake caliper...
...and place it with the cylinder block on the steering knuckle.
Remove the brake pads from the guide. Before installing new brake pads, it is necessary to move the pistons as far inside the cylinders as possible
Using sliding pliers (or a pipe wrench), press the pistons into the cylinders. You can recess the pistons into the cylinders in another way. To do this, insert the outer block into the guide and, installing the caliper in place...
…use a prying blade to press the pistons into the cylinders
To make it easier to install the axis of the clamping lever, use a file or emery to grind the end of the axis so that it forms a cone:
Pressing the lever, insert the axle