Preliminary diagnosis
Before dismantling the starter, you must make sure that this device is the cause of the malfunction. This can be done visually or by replacing the battery with a working one. It is also worth checking whether current passes from the battery to the starter: if current passes, then the cause of the malfunction is the starter, but if current does not pass, then the starter relay should be checked. If the latter malfunctions, it must be replaced. If everything works, then the next step is to remove the starter.
How to remove the Niva Chevrolet starter
To remove the starter, you need to do the following:
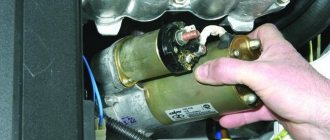
- Disconnect the wires from the battery and starter (you can use a wrench of the required size).
- We unscrew the starter, which is attached with three bolts to the box body. It can be removed through the top or bottom, however, motorists believe that it is more convenient to remove it through the bottom. It's difficult to do this without a pit. Air conditioning can be another obstacle. If it is present, you will also need to remove the warm air intake hose. The clamp that secures it to the engine can be loosened using a flathead screwdriver.
Now you need to determine the cause of the failure. There may be several of them:
- Faulty brushes. If they are worn out and do not reach the anchor, they should be replaced.
- Faulty retractor. In this case, replacement is necessary.
- Knocked out guide bushings also require replacement.
- The cause of the breakdown may be a burnt-out winding or a burnt-out armature. It is difficult to repair such a malfunction at home; it is better to contact a specialist.
The wires leading to the starter need to be cleaned and lubricated, and also checked to see if current is flowing through them. If necessary, it is better to replace the power cord, because it can cause poor operation of the device.
If the cause of the breakdown is identified and eliminated, then the next step is to install the starter. You need to do this in reverse order:
- Connect the wires first, then mount the starter and tighten the three bolts;
- screw back the rod that covered the starter outlet and the engine protection;
- connect the battery and check if everything works.
Removal on a Chevrolet Niva with air conditioning
The above is the sequence for removing the starter from a car without air conditioning. On a Chevrolet Niva with air conditioning, the sequence is the same, with the exception of two points.
- The starter heat shield on a Niva with air conditioning has a slightly different shape and is 3 cm shorter.
- In order to gain access to the upper mounting bolts of the starter, you will first have to remove the warm air intake hose. The clamp that secures it to the engine is loosened using a flathead screwdriver and the hose is removed, revealing access to the starter mount.
As you can see, the main problem is not to remove the starter from the Chevrolet Niva, but to get to it. It should be noted here that the above method for removing the starter is not the only one. Some car enthusiasts prefer to remove the starter from the top, without using an inspection hole. However, it takes more time and requires considerable experience to carry out this procedure. It is for this reason that the article presents the traditional version of the “bottom” removal of the starter.
Also interesting: Power bumper for Niva: buy or make it yourself
Recommendations for using the starter
To make your starter last
l longer, you need to follow a few simple recommendations:
- If you turn on the engine, then this should be done no longer than 15-20 seconds, and repeated no earlier than after 25-30 seconds. If after three times the engine does not start, you need to check the ignition and power system. If such faults are detected, they must be corrected.
- Do not use the starter to move the vehicle. This puts a lot of stress on the trigger mechanism.
- If you have successfully started the engine, turn off the starter, as the overrunning clutch may jam due to frequent rotation of the starter drive gear by the flywheel.
Anyone who has already removed and installed the starter at least once is unlikely to want to do it a second time. Although this work is not difficult, it requires a lot of effort and sometimes money. Follow these simple rules to avoid such breakdowns.
How to quickly and without errors replace the starter on a Chevrolet Niva
Sooner or later, a situation arises when your favorite Chevrolet Niva stops starting or begins to start intermittently. There are various reasons - problems in the fuel or electrical system, or all at the same time.
One of the most common and quite easy to diagnose on your own is a malfunction of the Chevrolet Niva starter. But for correct full diagnostics, it requires its removal, disassembly and often replacement.
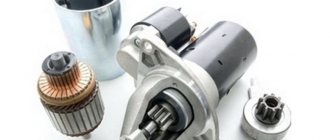
The starter device is a direct current electric motor, which is excited by permanent magnets, combined with a planetary gearbox, as well as an electromagnetic two-winding traction relay.
Before proceeding with dismantling, you need to make sure that the reason for the engine not starting is the starter. This can be determined visually and by replacing the battery with a known good one.
Starter on Niva Chevrolet
It happens that the car starts intermittently or does not start at all. One of the common reasons for this may be a faulty starter on a Chevrolet Niva. To accurately understand whether there is a problem or not, you need to dismantle it and carry out diagnostics.
This part is a direct current electric motor and is activated by a permanent magnet combined with a planetary gearbox and relay. Before dismantling, it is advisable to understand whether this is the reason why the power unit does not want to start. This can be understood both by its appearance by conducting diagnostics and by replacing the battery with a new one.
Diagnostics
- All connections between the battery and the starter should be checked, as if there is poor contact there may not be enough power to crank the crankshaft. This problem can be solved by cleaning the contacts.
- It is necessary to check the battery, and if it is faulty, replace it
Replacement
If you are wondering how to remove the starter on a Chevrolet Niva, then you will find the answer to this question below:
- First of all, to prevent a short circuit, disconnect the battery
- The crankcase has a protection that needs to be removed
- Unscrew several bolts that secure the starter.
- Removing thermal protection
- Pull the part to be replaced towards you and disconnect the wires from it
- We clean the power wires since they could be the cause of unstable operation
When the part has been removed, you can diagnose it and try to repair it.
If you decide to try to make repairs, first of all pay attention to the planetary mechanism; you can understand the condition of the parts of this unit by disassembling it; just unscrew a few bolts. Most craftsmen claim that this mechanism cannot be repaired and in case of breakdown it is better to immediately replace it with a new one.
Most craftsmen claim that this mechanism cannot be repaired and in case of breakdown it is better to immediately replace it with a new one.
Retractor
To ensure that the starter does not experience additional loads, a special Niva Chevrolet starter relay is installed, it is also called a solenoid relay, consisting of:
- Two windings
- Magnet
- Anchors
- Springs
When power begins to flow, the armature, under the influence of an electromagnetic field, begins to compress the spring, which leads to the rotation of the bendix. When the engine starts, the power is turned off and the spring relaxes.
Malfunctions
- Burnout or oxidation of contacts
- The winding is damaged
- The armature with the spring wears out
- The hull is destroyed
It consists of a solid body, so if it breaks, it is impractical to repair it.
You can understand that replacement is required by the following signs:
- Bendix does not return when starting the engine, and a whirring sound can be heard under the hood
- When the starter is working, the power unit does not work
- When turning the ignition key, clicks are heard, but the element itself does not rotate.
Check and replacement
To check, just take a screwdriver and close its contacts, which are located on the back of the device. When the circuit is closed, the starter should work, but if it remains stationary and only a click is heard, then it should be replaced.
In order to replace the starter relay on a Chevrolet Niva, you need to do the following:
- Unscrew the three bolts that secure the part
- Removing the relay
- Installing a new part
- Checking the work
If everything is done correctly it should start
If you have an idea of how everything works and you are sure that the cause of the malfunction is in the retractor, then you can safely proceed to replacement and repair. If there are any doubts, then you need to check it on a stand under load, since it happens that without load it works perfectly, but under load it stops working.
Starter on Niva Chevrolet Link to main publication
Preliminary diagnosis
First you need to check all electrical connections connecting the battery and starter. There are often cases when insufficient contact of the wires - ground or positive - leads to partial operation of the device - clicks of the solenoid relay. In this case, the starter does not turn the engine crankshaft. This can be eliminated by cleaning the contacts of the battery, starter, ground wire and sometimes the contacts of the ignition switch group.
If you eliminate poor contact in the wire connections and there is no positive effect, you need to check the battery. This can be done using a load fork or simply replacing it with a proven working one. If there is no result, the unit will need to be removed and possibly replaced.
Removing and installing the starter
Before removing the starter, be sure to disconnect the cable from the negative terminal of the battery. If this is not done, then replacing the Chevrolet Niva starter may result in replacing electrical wiring or creating fireworks under the hood.
Removal and replacement of the part is possible both through the top and through the bottom.
According to reviews from motorists, replacing the starter through the bottom of the car is considered the most convenient. In this case, you must use either an overpass or an inspection ditch.
After disconnecting the battery terminals, it is necessary to remove the lower crankcase protection. For convenience, it is advisable to use either a ratchet wrench or a socket wrench. It is better to carefully fold the fastening bolts so that during installation you do not have to look for replacements for them.
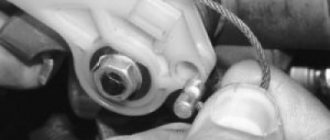
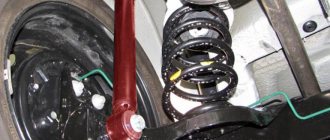
When removing the starter, the spacer (rod) of the intake pipe will certainly interfere. Before dismantling the starter, it must be removed completely or, by unscrewing the lower mounting bolt, moved to the side.
The starter mount consists of three bolts, by unscrewing which you can remove the Chevrolet Niva starter from the bottom of the engine. The lower fastening bolt is unscrewed from below using a ratchet wrench. Access to it is simple and does not require much effort. The remaining two bolts are unscrewed from above using spanners with a bent head or heads with an extension with a cardan. The most problematic is the top bolt, which requires a special approach with a curved key. The key fits onto it quite easily, but to unscrew it the lever travel is small, so you have to turn it for quite a long time.
After unscrewing all three fastening nuts, it is necessary to dismantle or bend its thermal protection. From the side of the box, it will be enough to simply bend the tin, and from the bottom you will need to unscrew the bolt securing it. It is a bolt, since the protection nut is welded and if you try to turn it, the fastening ear will definitely be broken.
Then the Chevrolet Niva starting unit can be carefully removed from its place along with the wires. The wires are long enough to carefully disconnect them on the removed device. There are two of them - one is small red, which you can simply remove from the connector by gently pulling it towards you. This is the wire that comes from the ignition switch. The second, large one, is screwed onto a nut. He is strong. You need to unscrew it and calmly remove the starter for inspection. This wire has a rubber cap that protects the mount from dirt, which must first be carefully moved without damaging it. By the way, the weak contact of these wires may be one of the reasons for the poor operation of the starter mechanism. By cleaning them from contaminants, lubricating them, and fully tightening them, you can eliminate the problem of poor engine starting.
Step-by-step removal and installation of the Chevrolet Niva starter
Before starting dismantling work, you must disconnect the battery by removing the negative terminal.
Also interesting: Chevrolet Niva central locking – Auto workshop online
A new or repaired starter is installed in its original place in the reverse order. When connecting wiring to the relay contacts, it is recommended to first clean the terminals and treat them with an anti-corrosion compound.
DIY repair
After removing the Chevrolet Niva starter, you can try to repair it yourself or at a specialized service. If you have experience working with a similar mechanism and are confident that the cause is, for example, a faulty retractor relay, then everything is quite simple. It is enough to remove the cover from the relay and clean the contact plates. But to be completely sure, especially since the unit has already been removed, it is advisable to check it on a stand under load, because it can work properly when idling, but not when under load.
Another malfunction may be damage to the planetary mechanism, which has plastic parts. Its damage can be seen by disassembling the starter into two halves. To do this, simply unscrew the two nuts from the back of the unit and split it in half.
According to reviews, the Chevrolet Niva starter cannot be repaired, since spare parts for it cannot be purchased. But time passes, everything changes, it is possible that this is no longer the case. However, after repair or replacement, it is installed in the reverse order.
Recommendations for use
To prolong the operation of the starter, you should follow simple rules:
- When starting the engine, the starter must be turned on for no more than 10-15 seconds, and again only after 20-30 seconds. If the starter operates continuously for a longer period of time, this may cause overheating of its armature and stator windings. If the engine does not start after three attempts, you should check the ignition system with the power supply system. If any faults are found, fix them.
- After a successful start, it is necessary to immediately turn off the starter, since if the starter drive gear is rotated for a long time by the flywheel, the overrunning clutch may jam.
- Do not use the starter to move the vehicle. This causes a very large load on the trigger mechanism, causing it to overheat and fail.
By following these simple tips, you can significantly extend the life of the Chevrolet Niva starter, avoiding its replacement.
How to replace the starter on a Niva Chevrolet
It may happen that the Chevrolet Niva does not start, or starts, but with periodic interruptions. This may be due to a failure, for example, of the electrical or fuel system. The most common failure is when the starter fails. But in order to correctly and fully carry out diagnostics, it is necessary to remove the starter; the Chevrolet Niva is no exception.
This device is an electric motor with direct current, which is activated by a permanent magnet, which is combined with a planetary gearbox, plus a two-winding electromagnetic relay. Therefore, before dismantling, you should understand whether this is the reason that the engine does not want to start. This can be determined both visually and by replacing the battery.
Why is starter protection needed on Niva Chevrolet?
Apparently the engineers thought that the thermal protection of the starter should remind of itself, so they made such a short-lived mount. Due to the fact that the protection flies off the eye, a nasty rattling sound appears.
The layout of the attachments under the Niva's hood was clearly adapted to the shape of the wheel arches, so some components remained out of reach. Starter, including. The exhaust manifold hangs above it, from below it is covered with a mudguard and front axle protection and sandwiched between the engine support cushion and the pump.
Ingenuity + spring = Russian know-how!
The shield is attached to two nuts and is a casing stamped to the shape of the starter. Its task is to protect the starter from overheating, since in injection engines with a catalyst the temperature of the exhaust manifold is an order of magnitude higher than in carburetor engines.
Danger of driving without starter protection
The danger of driving without a protective shield is that under high loads and in difficult operating conditions, the starter can critically overheat, which will lead to melting or cracking of plastic parts, insulation on the windings, as well as burnout of the insulation on the wires that power and control the starter.
This is interesting: Selection of Kayaba shock absorbers by car brand
As a result, this can lead not only to failure of the starter, but also to a short circuit in the wires, then you will have to become familiar with the principle of operation of the fire extinguisher. The main problem with the shield is that the mounting lugs are held in place by two spot welds. After a year or two of use, they inevitably fall off due to vibration and the casing begins to rattle and ring, which few people like. Hello engineers, now let’s remove the starter protection on the Chevrolet Niva.
Preliminary diagnostics
A number of actions need to be taken:
- We check all the existing electrical connections that connect the starter and the battery, since it happens that poor contact between ground and positive leads to poor operation of the device, and the click of the retractor relay is heard, thereby not enough power to crank the crankshaft in the engine. This problem is eliminated by cleaning the contacts of the starter, battery, and various groups of contacts.
- We check the battery itself; it is necessary to replace the load plug itself with a proven one that is working. If there is no result, then it is necessary to remove the unit and replace it.
Replacing and removing the starter on a Chevrolet Niva
To make a replacement you must:
- We disconnect the terminals from the battery; if this is not done, a short circuit may occur, which will lead to a complete replacement of the electrical wiring
- Using a ratchet wrench, remove the crankcase protection
- Loosen the three bolts that secure the starter.
- We dismantle thermal protection
- Together with the wires, carefully pull out the unit; after pulling it out, carefully pull the wires toward you and disconnect them from the device.
- The power wires that are connected can be cleaned; perhaps the reason that the engine starts unstably lies in poor contact.
After it has been removed, diagnostics and subsequent repairs can be made.
Replacing the starter on a Chevrolet Niva
Before I started replacing the starter, I disconnected the battery. First, I removed the entire lower engine protection.
The starter is secured with three bolts; after they are unscrewed, it can be pulled out from below the engine, but a rod will interfere with this. So I immediately unscrewed it.
First the nut from the bottom.
Then the bolt on top.
Now you can unscrew the starter. The bottom bolt is fairly easily accessible from below. I unscrewed it with a small ratchet.
I unscrewed the remaining two bolts from above. This is what the starter looks like from above.
Here I have already used a spanner wrench. The key part of the key is slightly bent, otherwise it would be impossible to get to these bolts. The middle bolt is also more or less accessible.
The top bolt is the most difficult to reach of the three. But in principle, the key was easy to throw onto it, only the key stroke was very small and it took a long time to turn.
When all three bolts were unscrewed, the starter easily came out of its place.
But in order to get it out of there, the protection of the starter from heat interfered. These are sheets of metal around it. On the side of the box, the starter rested against the protection with its protrusions into which bolts were screwed. At this point I simply bent the protection with my hands. On the other side, the protection at the bottom is secured with a nut. I tried to unscrew it with a large ratchet. She didn't give in. Then I pressed a little harder and it seemed to turn. And when I looked, I saw that the nut did not even think of turning away, but I simply twisted the eye to which it was attached. True, the protection bent back and allowed the starter to be removed, and the mount itself did not break off at all and seemed to be holding tightly and not rattling. I then left it all like that.
(It turns out I was wrong here. The nut shouldn’t have been unscrewed; it is welded to the mount. But you need to unscrew the bolt that goes into this nut on the other side.)
Now the starter easily pulled out of its place. The wires that go to the starter allow you to remove it without disconnecting them.
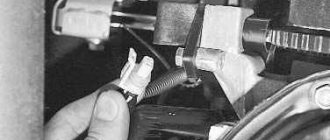
There are only 2 wires going to the starter. One small red one, which is simply plugged into the connector. We easily disconnect it by pulling the connector. The second one is healthy, screwed on with a nut covered with a rubber nozzle, and by unscrewing it I completely removed the starter.
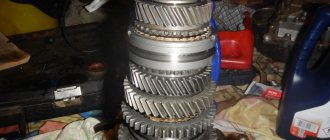
Having unscrewed two nuts from the back of the starter, I disconnected its two halves and saw this picture.
It turned out that inside it there is a plastic part in the form of a glass with teeth, along which three gears run. So it broke into pieces and these gears therefore did not run in a circle and therefore did not rotate the gear that meshes with the flywheel.
And the gear that turns them also lost one tooth, but most likely this is due to flying plastic fragments.
This photo report shows in detail how to replace the starter on a Chevrolet Niva with your own hands. It is worth noting that replacing the starter is quite a rare need. In 80% of cases the starter can be repaired. In our case, there was a mechanical failure of one of the starter drive gears. This spare part is not sold separately, so I had to replace it with a new starter.
There is nothing complicated in the starter replacement procedure. He can handle it quite well on his own. Tools you will need:
- Ratchet wrench and sockets for 10, 12;
- Phillips and flathead screwdrivers;
- A penetrating lubricant like WD-40 may be needed;
We also recommend that you familiarize yourself with our video about starter malfunctions and the main possible causes.
How to make repairs yourself
When the starter is removed, you can try to repair it yourself or take it to a specialized service center. If you have experience and an idea of how everything works and you, for example, are sure that the cause of the breakdown, for example, lies in a malfunction of the solenoid relay, then you can start repairing it yourself. But in any case, to be sure that this is the problem, it should be checked on a special stand where there is a load, since at idle it can work as it should, but not under load.
Another reason for poor ignition may be a malfunction of the planetary mechanism, which has plastic parts. You can understand what condition they are in by unscrewing the unit and disassembling it in half; to do this, simply unscrew a couple of nuts in its rear part.
As the experts say, the Chevrolet Niva starter is unsuitable for repair, since spare parts for it are not sold, but time does not stand still and you can do everything yourself. After the repair is completed, everything is assembled and put back in place in the reverse order.
Replacement
If you are wondering how to remove the starter on a Chevrolet Niva, then you will find the answer to this question below:
- First of all, to prevent a short circuit, disconnect the battery
- The crankcase has a protection that needs to be removed
- Unscrew several bolts that secure the starter.
- Removing thermal protection
- Pull the part to be replaced towards you and disconnect the wires from it
- We clean the power wires since they could be the cause of unstable operation
When the part has been removed, you can diagnose it and try to repair it. If you decide to try to make repairs, first of all pay attention to the planetary mechanism; you can understand the condition of the parts of this unit by disassembling it; just unscrew a few bolts. Most craftsmen claim that this mechanism cannot be repaired and in case of breakdown it is better to immediately replace it with a new one.
see also
The starter turns poorly
- 5 0 3k
Starter solenoid relay
- 82 0 87k
Bendix starter
- 74 1 81k
How to check the starter
- 140 1 177k
Starter malfunctions
- 227 2 187k
This photo report shows in detail how to replace the starter on a Chevrolet Niva with your own hands. It is worth noting that replacing the starter is quite a rare need. In 80% of cases the starter can be repaired. In our case, there was a mechanical failure of one of the starter drive gears. This spare part is not sold separately, so I had to replace it with a new starter.
There is nothing complicated in the starter replacement procedure. He can handle it quite well on his own. Tools you will need :
- Ratchet wrench and sockets for 10, 12;
- Phillips and flathead screwdrivers;
- A penetrating lubricant like WD-40 may be needed;
also recommend that you familiarize yourself with our video about starter malfunctions and the main possible causes.
Before I started replacing the starter, I disconnected the battery. First, I removed the entire lower engine protection.
The starter is secured with three bolts; after they are unscrewed, it can be pulled out from below the engine, but a rod will interfere with this. So I immediately unscrewed it.
First the nut from the bottom.
Then the bolt on top.
Now you can unscrew the starter. The bottom bolt is fairly easily accessible from below. I unscrewed it with a small ratchet.
I unscrewed the remaining two bolts from above. This is what the starter looks like from above.
Here I have already used a spanner wrench. The key part of the key is slightly bent, otherwise it would be impossible to get to these bolts. The middle bolt is also more or less accessible.
The top bolt is the most difficult to reach of the three. But in principle, the key was easy to throw onto it, only the key stroke was very small and it took a long time to turn.
When all three bolts were unscrewed, the starter easily came out of its place.
But in order to get it out of there, the protection of the starter from heat interfered. These are sheets of metal around it. On the side of the box, the starter rested against the protection with its protrusions into which bolts were screwed. At this point I simply bent the protection with my hands. On the other side, the protection at the bottom is secured with a nut. I tried to unscrew it with a large ratchet. She didn't give in. Then I pressed a little harder and it seemed to turn. And when I looked, I saw that the nut did not even think of turning away, but I simply twisted the eye to which it was attached. True, the protection bent back and allowed the starter to be removed, and the mount itself did not break off at all and seemed to be holding tightly and not rattling. I then left it all like that.
(It turns out I was wrong here. The nut shouldn’t have been unscrewed; it is welded to the mount. But you need to unscrew the bolt that goes into this nut on the other side.)
Now the starter easily pulled out of its place. The wires that go to the starter allow you to remove it without disconnecting them.
There are only 2 wires going to the starter. One small red one, which is simply plugged into the connector. We easily disconnect it by pulling the connector. The second one is healthy, screwed on with a nut covered with a rubber nozzle, and by unscrewing it I completely removed the starter.
Having unscrewed two nuts from the back of the starter, I disconnected its two halves and saw this picture.
It turned out that inside it there is a plastic part in the form of a glass with teeth, along which three gears run. So it broke into pieces and these gears therefore did not run in a circle and therefore did not rotate the gear that meshes with the flywheel.
And the gear that turns them also lost one tooth, but most likely this is due to flying plastic fragments.
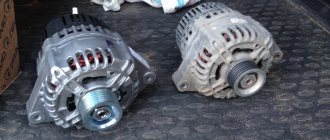
Replacing the starter on a Chevrolet Niva
This photo report shows in detail how to replace the starter on a Chevrolet Niva with your own hands. It is worth noting that replacing the starter is quite a rare need.
In 80% of cases the starter can be repaired. In our case, there was a mechanical failure of one of the starter drive gears. This spare part is not sold separately, so I had to replace it with a new starter.
There is nothing complicated in the starter replacement procedure. He can handle it quite well on his own. Tools you will need:
- Ratchet wrench and sockets for 10, 12;
- Phillips and flathead screwdrivers;
- A penetrating lubricant like WD-40 may be needed;
We also recommend that you familiarize yourself with our video about starter malfunctions and the main possible causes.
Before I started replacing the starter, I disconnected the battery. First, I removed the entire lower engine protection.
The starter is secured with three bolts; after they are unscrewed, it can be pulled out from below the engine, but a rod will interfere with this. So I immediately unscrewed it.
First the nut from the bottom.
Then the bolt on top.
Now you can unscrew the starter. The bottom bolt is fairly easily accessible from below. I unscrewed it with a small ratchet.
I unscrewed the remaining two bolts from above. This is what the starter looks like from above.
Here I have already used a spanner wrench. The key part of the key is slightly bent, otherwise it would be impossible to get to these bolts. The middle bolt is also more or less accessible.
The top bolt is the most difficult to reach of the three. But in principle, the key was easy to throw onto it, only the key stroke was very small and it took a long time to turn.
When all three bolts were unscrewed, the starter easily came out of its place.
But in order to get it out of there, the protection of the starter from heat interfered. These are sheets of metal around it. On the side of the box, the starter rested against the protection with its protrusions into which bolts were screwed.
At this point I simply bent the protection with my hands. On the other side, the protection at the bottom is secured with a nut. I tried to unscrew it with a large ratchet. She didn't give in. Then I pressed a little harder and it seemed to turn.
And when I looked, I saw that the nut didn’t even think of turning away, but I just twisted the ear
Now the starter easily pulled out of its place. The wires that go to the starter allow you to remove it without disconnecting them.
There are only 2 wires going to the starter. One small red one, which is simply plugged into the connector. We easily disconnect it by pulling the connector. The second one is healthy, screwed on with a nut covered with a rubber nozzle, and by unscrewing it I completely removed the starter.
Having unscrewed two nuts from the back of the starter, I disconnected its two halves and saw this picture.
It turned out that inside it there is a plastic part in the form of a glass with teeth, along which three gears run. So it broke into pieces and these gears therefore did not run in a circle and therefore did not rotate the gear that meshes with the flywheel.
And the gear that turns them also lost one tooth, but most likely this is due to flying plastic fragments.
https://carfrance.ru/snimaem-zashhitu-startera-na-niva-shevrole-svoimi-rukami/https://proteu.ru/chevrolet/niva/%D0%BA%D0%B0%D0%BA-% D1%81%D0%BD%D1%8F%D1%82%D1%8C-%D0%B7%D0%B0%D1%89%D0%B8%D1%82%D1%83-%D1%81% D1%82%D0%B0%D1%80%D1%82%D0%B5%D1%80%D0%B0-%D0%BD%D0%B8%D0%B2%D0%B0-%D1%88% D0%B5%D0%B2%D1%80%D0%BE%D0%BB.htmlhttps://autovizov.ru/chevrolet/%D1%81%D0%BD%D0%B8%D0%BC%D0%B0 %D0%B5%D0%BC-%D0%B7%D0%B0%D1%89%D0%B8%D1%82%D1%83-%D1%81%D1%82%D0%B0%D1%80 %D1%82%D0%B5%D1%80%D0%B0-%D0%BD%D0%B0-%D0%BD%D0%B8%D0%B2%D0%B0-%D1%88%D0% B5%D0%B2%D1%80%D0%BE.htmlhttps://avtoremont13.ru/chevrolet/%D0%BA%D0%B0%D0%BA-%D1%81%D0%BD%D1%8F% D1%82%D1%8C-%D1%81%D1%82%D0%B0%D1%80%D1%82%D0%B5%D1%80-%D0%BD%D0%B8%D0%B2% D0%B0-%D1%88%D0%B5%D0%B2%D1%80%D0%BE%D0%BB%D0%B5.htmlhttps://fizicheskij.okd1.ru/konsultacziya/zashhita-kollektora-niva -chevrole/
How to remove the starter on a Chevrolet Niva with and without air conditioning
However, you won’t be able to see it, since it is covered with a heat-protective casing on top. It is also impossible to see it from below, since the crankcase protection covers it there.
So the only way to get to it is to remove all these protective devices. Tools needed: Medium flat blade screwdriver. Set of socket heads with ratchet. Set of open-end wrenches. Then the nuts of the tie rods are unscrewed and the starter gearbox with drive is removed. To pull the gearbox out, carefully pry it off with a screwdriver.
Next, we check the condition of the gearbox gears and change them if they are worn out. To disassemble the unit further, to the armature, you need to remove the limiter and locking ring from the starter shaft using a flat screwdriver. Then everything is extracted almost by itself, the only important thing is not to lose anything.
If you have to change the complete system, keep in mind that the price of a starter for a Chevrolet Niva when ordering via the Internet exceeds rubles. This may be caused by a faulty starter. In such a situation, it should be removed, disassembled and possibly partially replaced. Removing the Niva Chevrolet starter with your own hands will not be any problem. Preliminary diagnostics Before dismantling the starter, you need to make sure that this device is the cause of the malfunction.
This can be done visually or by replacing the battery with a working one. It is also worth checking whether current flows from the battery to the starter: If the latter is faulty, it must be replaced.
If everything works, then the next step is to remove the starter. How to remove the Niva Chevrolet starter To remove the starter, you need to perform the following steps: Disconnect the wires from the battery and starter, you can use a key of the required size. We unscrew the starter, which is attached with three bolts to the box body.
You can remove it through the top or bottom, however, motorists believe that it is more convenient to remove it through the bottom. It's difficult to do this without a pit. Air conditioning can be another obstacle.
If it is present, you will also need to remove the warm air intake hose. The clamp that secures it to the engine can be loosened using a flathead screwdriver. Now you need to determine the cause of the failure. There may be several of them: Faulty brushes.
If they are worn out and do not reach the anchor, they should be replaced. Faulty retractor. In this case, replacement is necessary. Knocked out guide bushings also require replacement.
The cause of the breakdown may be a burnt-out winding or a burnt-out armature. The wires leading to the starter need to be cleaned and lubricated, and also checked to see if current is flowing through them. If necessary, it is better to replace the power cord, because it can cause poor operation of the device.
If the cause of the breakdown is identified and eliminated, then the next step is to install the starter.
This should be done in the reverse order: Recommendations for using the starter To make your starter last longer, you need to follow a few simple recommendations: If you turn on the engine, then do this for no longer than seconds, and repeat no earlier than after seconds.
If after three times the engine does not start, you need to check the ignition and power system. If such faults are detected, they must be corrected. Do not use the starter to move the vehicle. This puts a lot of stress on the trigger mechanism. If you have successfully started the engine, turn off the starter, as the overrunning clutch may jam due to frequent rotation of the starter drive gear by the flywheel.
Anyone who has at least taken a video of how to remove the starter protection on a Chevrolet Niva once and installed the starter in place is unlikely to want to do it a second time. Although this work is not difficult, it does require a lot of how to remove the starter protection for a Chevrolet Niva video, and sometimes money. Follow these simple rules to avoid such breakdowns. There is a special offer on our website. You can get a free consultation with our corporate lawyer by simply submitting your question in the form below.
We remove the starter protection on a Niva Chevrolet with our own hands. An automobile engineer is a person who receives a meager salary and hiccups for the rest of his life, because grateful car enthusiasts remember his work with warmth and love. Here it is - closer to home: For reference, power characteristics: We install a new miracle in the same sequence and... nothing happens.
How to remove the Niva Chevrolet starter with your own hands
Has your Chevrolet Niva stopped starting or is running intermittently? This may be caused by a faulty starter. In such a situation, it should be removed, disassembled and possibly partially replaced. Removing the Niva Chevrolet starter with your own hands will not be any problem.
Preliminary diagnosis
Before dismantling the starter, you must make sure that this device is the cause of the malfunction. This can be done visually or by replacing the battery with a working one. It is also worth checking whether current passes from the battery to the starter: if current passes, then the cause of the malfunction is the starter, but if current does not pass, then the starter relay should be checked. If the latter malfunctions, it must be replaced. If everything works, then the next step is to remove the starter.
How to remove the Niva Chevrolet starter
To remove the starter, you need to do the following:
- Disconnect the wires from the battery and starter (you can use a wrench of the required size).
- We unscrew the starter, which is attached with three bolts to the box body. It can be removed through the top or bottom, however, motorists believe that it is more convenient to remove it through the bottom. It's difficult to do this without a pit. Air conditioning can be another obstacle. If it is present, you will also need to remove the warm air intake hose. The clamp that secures it to the engine can be loosened using a flathead screwdriver.
Now you need to determine the cause of the failure. There may be several of them:
- Faulty brushes. If they are worn out and do not reach the anchor, they should be replaced.
- Faulty retractor. In this case, replacement is necessary.
- Knocked out guide bushings also require replacement.
- The cause of the breakdown may be a burnt-out winding or a burnt-out armature. It is difficult to repair such a malfunction at home; it is better to contact a specialist.
The wires leading to the starter need to be cleaned and lubricated, and also checked to see if current is flowing through them. If necessary, it is better to replace the power cord, because it can cause poor operation of the device.
If the cause of the breakdown is identified and eliminated, then the next step is to install the starter. You need to do this in reverse order:
- Connect the wires first, then mount the starter and tighten the three bolts;
- screw back the rod that covered the starter outlet and the engine protection;
- connect the battery and check if everything works.
Recommendations for using the starter
To make your starter last
l longer, you need to follow a few simple recommendations:
- If you turn on the engine, then this should be done no longer than 15-20 seconds, and repeated no earlier than after 25-30 seconds. If after three times the engine does not start, you need to check the ignition and power system. If such faults are detected, they must be corrected.
- Do not use the starter to move the vehicle. This puts a lot of stress on the trigger mechanism.
- If you have successfully started the engine, turn off the starter, as the overrunning clutch may jam due to frequent rotation of the starter drive gear by the flywheel.
Anyone who has already removed and installed the starter at least once is unlikely to want to do it a second time. Although this work is not difficult, it requires a lot of effort and sometimes money. Follow these simple rules to avoid such breakdowns.
How to remove the starter from a Chevrolet Niva
The squeal is gone. Don't break! All blessings! Replacing the starter on a Chevrolet Niva Before starting to replace the starter, I disconnected the battery. First I removed the entire lower engine guard.
The starter is secured with three bolts, after they are unscrewed, it can be pulled out from below the engine, but a rod will interfere with this. So I immediately unscrewed it. First the nut from the bottom. Then the bolt on top. Now you can unscrew the starter. The bottom bolt is fairly easily accessible from below. I unscrewed it with a small ratchet.
I unscrewed the remaining two bolts from above. This is what the starter looks like from above. Here I have already used a spanner wrench. The key part of the key is slightly bent, otherwise it would be impossible to get to these bolts.
We independently remove the starter from a Chevrolet Niva car
The middle bolt is also more or less accessible. The top bolt is the most difficult to reach of the three. But in principle, the key was easy to throw onto it, only the key stroke was very small and it took a long time to turn. When all three bolts were unscrewed, the starter easily came out of its place.
But in order to get it out of there, the protection of the starter from heat interfered. These are sheets of metal around. On the side of the box, the starter rested against the protection with its protrusions into which bolts were screwed. At this point I simply bent the protection with my hands. On the other hand, how to remove the starter protection for a Chevrolet Niva video below is secured with a nut. I tried to unscrew it with a large ratchet.
She didn't give in.
How to remove the Niva Chevrolet starter protection: photos and videos
Then I pressed a little harder and it seemed to turn. The danger of driving without starter protection Starter protection The danger of driving without a protective shield is that under high loads and in difficult operating conditions the starter can overheat critically, which will lead to melting or cracking how to remove the Chevrolet Niva starter protection video parts, insulation how to remove the Chevrolet starter protection niva video windings, as well as insulation burnout on the wires that power and control the starter.
As a result, this can lead not only to failure of the starter, but also to a short circuit in the wires, then you will have to become familiar with the principle of operation of the fire extinguisher. The main problem with the shield is that the mounting lugs are held in place by two spot welds. After a year or two of use, they inevitably fall off due to vibration and the casing begins to rattle and ring, which few people like. Hello engineers, now let’s remove the starter protection on the Chevrolet Niva. How to remove the starter thermal casing on a Chevrolet Niva Based on the experience of Chevrolet Niva owners, it turns out that there are two ways to dismantle the ill-fated casing - pick it out with a pry bar and dispose of it, but then the starter will be left without protection, or spend several hours dismantling it.
After a year or two of use, they inevitably fall off due to vibration and the casing begins to rattle and ring, which few people like. Hello engineers, now let’s remove the starter protection on the Chevrolet Niva. How to remove the starter thermal casing on a Chevrolet Niva Based on the experience of Chevrolet Niva owners, it turns out that there are two ways to dismantle the ill-fated casing - pick it out with a pry bar and dispose of it, but then the starter will be left without protection, or spend several hours dismantling it.
Under no circumstances should contacts be cleaned with sandpaper. It is necessary to use gasoline, and then apply Solidol to the cleaned contacts. You can also check the quality of the contact nuts, as they tend to loosen over time, especially if there is no groover in the stud design.
If, after the procedures have been carried out, the same inoperability of the device is observed, then it is worth replacing it.
How to remove the starter on a Chevrolet Niva video
Knocked out guide bushings also require replacement. The cause of the breakdown may be a burnt-out winding or a burnt-out armature.
The wires leading to the starter need to be cleaned and lubricated, and also checked to see if a Chevrolet Niva goes through them: how to remove a starter video. If necessary, it is better to replace the power cord, because it can cause poor operation of the device.
If the cause of the breakdown is identified and eliminated, then the next step is to install the starter. This should be done in the reverse order: Recommendations for using the starter To make your starter last longer, you need to follow a few simple recommendations: If you turn on the engine, then do this for no longer than seconds, and repeat no earlier than after seconds. If after three times the engine does not start, you need to check the ignition and power system.
If you find a Niva Chevrolet how to remove the starter video faults must be eliminated. Do not use the starter to move the vehicle. This puts a lot of stress on the trigger mechanism.
The middle bolt is also more or less accessible. The top bolt is the most difficult to reach of the three. But in principle, the key was easy to throw onto it, only the key stroke was very small and it took a long time to turn.
When all three bolts were unscrewed, the starter easily came out of its place. But in order to get it out of there, the protection of the starter from heat interfered. These are sheets of metal around. On the side of the box, the starter rested against the protection with its protrusions, Niva Chevrolet how to remove the starter video which screws in the bolts. At this point I simply bent the protection with my hands. On the other side, the protection at the bottom is secured with a nut. I tried to unscrew it with a large ratchet. She didn't give in.