Replacement
We hang and remove the front wheel. Clean the surfaces of the mechanism from dirt.
|
|
|
|
|
|
|
Source: https://lada-niva.ru/niva/20-3.html
Replacing front brake pads on a Niva
Brake pads are consumables. They take on the load that is formed during braking - the friction linings on the pads rub against the brake discs, stopping the car's wheels as a result.
Many car enthusiasts prefer not to carry out replacement by an official car service center or workshop, but to carry out this operation themselves. The price tag for replacing pads (without the cost of taking into account the products themselves), even in an unofficial workshop, starts from 500 rubles. for a couple.
You can save that money - it's really easy to replace the front pads yourself. Below we will talk about the procedure for replacing the front pads on a Lada 4×4 car (aka Niva 2121). The front pads for the Chevrolet Niva model are changed in exactly the same way, since the calipers of the models are completely the same.
It is recommended to change the front pads on the Niva every 10 thousand km. However, you can check their wear during maintenance or just from time to time. Remember that the more active the driving style (and, therefore, braking), the faster the pads wear out, and, therefore, replacement may be required after 5 thousand km or after 25 thousand.
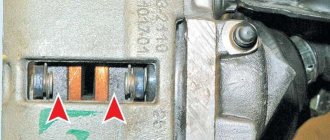
The minimum friction lining thickness, after which the pads must be replaced, is from 1 to 2 mm.
Otherwise, you risk encountering complete wear of the friction layer, as a result of which the metal part of the pads, left without wear-resistant protection, will rub against the brake disc, also made of metal - we will not write about the consequences of metal-on-metal friction during braking in this material. , but we think it’s clear that nothing good will come of this.
Remember that although the replacement operation is not particularly difficult, everything should be done carefully and without unnecessary fuss. Don't forget that good brakes are your safety.
First you will need to select new pads. Their cost ranges from 300 to 700 rubles per pair (but can be higher). It is advisable to give preference to those products that have proven themselves well. Car enthusiasts usually try to purchase products from the following manufacturers: Ferodo, Finwhale, Nippon, Nachalo, TRW, Dafmi, etc.
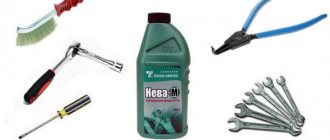
The tools we will need are:
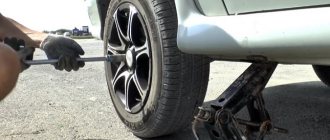
Apply the parking brake lever. Next, using a crosspiece, slightly unscrew the nuts securing the wheel to the hub.
Using a jack, lift the car, then unscrew all the nuts completely.
Then remove the wheel. For greater safety, it can be placed under the car.
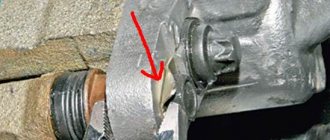
Using a lubricant like WD-40, clean the joint between the cotter pin and the clamp arm shaft.
Then, using pliers, remove the clamp arm shaft cotter pin.
Next you will need to pull out the axis of the clamping lever. If it fits tightly, then you can tap the axle from behind or, if necessary, knock out the axle with a drift.
Pull out the lever shaft using pliers.
Then remove the clamp arm itself.
After this, remove the caliper. If necessary, use a slotted screwdriver to pry out the caliper if it does not budge. To keep the caliper out of the way, rotate it towards the cylinder block.
Then you will need to remove the old pads.
Before proceeding with installation, use a pry bar or a heavy screwdriver to press the caliper pistons so that they go as far into the cylinders as possible.
After the piston goes into the cylinder, it will be useful to measure the amount of brake fluid. The level should be checked after each pressing of the cylinder.
- If the liquid level is exceeded, the excess can be collected with a rubber bulb.
- We install new pads.
Then we return the caliper back. Before inserting the axle into the lever, it is recommended to process its edge so that the end of the axle is slightly hewn (this can be done either on a lathe or using a file). Lubricate the edge of the axle with grease.
- It is also recommended to lubricate the two springs located in the guides with grease.
- The lever axis, after returning it to its place, is pinned again.
The wheel installation operation is performed in the reverse order to that used during removal. Then sit in the car and press the brake pedal several times until you feel the pressure become tight.
Over the course of approximately 500 km after replacing the pads, when braking, it will seem that the pedal seems to be “wobbly” and does not respond well to your pressure - this is explained by the fact that the linings and discs have not yet ground into each other, you should not be alarmed by this. But you need to brake with due care.
Source: https://olade.ru/zamena-perednix-tormoznyx-kolodok-na-nive
How to remove a brake disc on a Matiz
Daewoo Matiz. REPLACING THE BRAKE DISC
The brake disc should be replaced with a new one when, during the operation of the vehicle, its thickness becomes less than 10 mm (see “Checking the technical condition of the brake system,” page 45), and also if the end runout of the disc exceeds 0.05 mm.
To replace the brake disc, remove the front wheel hub with the steering knuckle assembly and press the hub out of the steering knuckle (see “Replacing the front wheel hub bearings,” p. 130).
To keep the wheel hub from turning when unscrewing the brake disc mounting bolts, screw the nut onto two diametrically opposed wheel mounting studs. . and, inserting a mounting spade between the hub collar and the nut, use a 14mm head to unscrew the four bolts securing the brake disc to the hub. Remove the brake disc.
Install the brake disc in reverse order.
Daewoo Matiz. REPLACING THE WHEEL CYLINDER OF THE REAR WHEEL BRAKE MECHANISM
We replace the wheel cylinder if its pistons lose mobility, wear or damage to the cylinder cuffs (fluid leaks from under the boot).
The operation is shown using the example of the brake mechanism of the right rear wheel. The operations for replacing the wheel cylinder of the brake mechanism of the left rear wheel are performed in a similar way. Use a rubber bulb or a medical syringe to remove the brake fluid from the hydraulic brake reservoir.
We clean the bolt securing the wheel cylinder to the brake shield from dirt. We treat it with a penetrating liquid such as WD-40. Remove the brake drum and brake pad spacer (see “Replacing the brake pads of the rear wheels,” p. 147). Without removing the brake pads, remove them from the wheel cylinder.
. disconnect the brake pipe from the wheel cylinder.
. and close the hole in the tube with a protective cap to prevent brake fluid from leaking out.
. and remove the wheel cylinder.
We install the wheel cylinder of the rear wheel brake mechanism in the reverse order and bleed the hydraulic brake system (see “Bleeding the hydraulic brakes, replacing brake fluid,” p. 47).
- keys “10”, “12” and “17”
- screwdriver
Before starting work
Remove the corresponding wheel.
If there are burrs, deep scratches and other defects on the working surface of the disc that increase pad wear and reduce braking efficiency, replace the disc. In specialized workshops, such a disk can be machined and ground on both sides to the same depth, but after processing, the thickness of the disk must be no less than the minimum permissible.
The minimum permissible thickness of the brake disc is A = 7.8 mm. If the disk thickness is less, it must be replaced. The axial runout of the brake disc surface should not exceed 0.15 mm. Please keep in mind that measurements of the disk must be carried out in specialized workshops. Measuring the disk, for example with a caliper, will not give real results.
Replace both brake discs at the same time.
The procedure for replacing front brake discs on a Daewoo Matiz car is somewhat different from other brands. To remove the disk, you will need to completely disassemble the hub mechanism, support bearing, steering knuckle, and ball joint.
ATTENTION! A completely simple way to reduce fuel consumption has been found! Don't believe me? An auto mechanic with 15 years of experience also didn’t believe it until he tried it. And now he saves 35,000 rubles a year on gasoline! Read more". Also, service center technicians recommend replacing the support bearing together with the brake disc due to equal service life
Replace with new ones also in case of sudden breakdown. When installing the support bearing, there is again a high probability of geometry violation, mismatch of the seat with the chamfer
Also, service center technicians recommend replacing the support bearing together with the brake disc due to the equal service life. Replace with new ones also in case of sudden breakdown. When installing the support bearing, there is again a high probability of geometry violation and mismatch between the seat and the chamfer.
Replacing brake pads VAZ 21214 injector
The pads need to be replaced if the thickness of the pad linings has decreased to 1.5 mm.
Using pliers, remove the cotter pin of the lower axis of the clamping lever.
Using a drift we touch the axis of the clamping lever
Holding the lever, use pliers to remove the axle.
Remove the clamping lever.
We remove the two clamping lever springs from the pad guide so as not to lose them
Using a screwdriver, lift up the brake caliper
...and place it on the steering knuckle.
Remove the brake pads from the guide.
Before installing new brake pads, it is necessary to move the pistons as far inside the cylinders as possible.
Using sliding pliers (or a gas wrench), press the pistons into the cylinders.
- You can recess the pistons into the cylinders in another way.
- To do this, insert the outer block into the guide and, having installed the caliper in place, use a mounting blade to press the pistons into the cylinders
- Then we assemble the assembly in reverse order.
- To make it easier to install the axis of the clamping lever, we sharpen its tip on a sharpener so...
- ...to make a cone.
- Before installation, lubricate the axis of the clamping lever with graphite grease
- Pressing the lever, insert the axle
- After installing the brake pads, you must press the brake pedal several times so that the cylinder pistons move the pads to the brake disc.
We change the front and rear brake pads of Niva Chevrolet
The brake system of any car should always be in good working order. This is the most important and mandatory, because the driver’s life directly depends on the braking system. To ensure that the brakes are always in order, it is necessary to monitor their performance and check the brake pads. Checking the condition of the brake pads should be carried out once a year, if the car is not used daily, and once every 2 years, if the car is used on average 3-4 times a week.
How to replace brake pads on a VAZ 21213 yourself
The braking system is very important for driving safety. Therefore, it is necessary to monitor its serviceability. One of the main elements of the brake system are brake pads (BC), which, due to friction, slow down the rotation of the wheel. Naturally, over time they wear out and require replacement. You can perform the operation of replacing the TC on a Niva yourself in a garage.
All elements of the car wear out to varying degrees during operation, depending on the load experienced. The wear of brake pads is influenced by many factors, so the frequency of replacement for each Niva will be different.
SUVs are used in difficult off-road conditions, so they are replaced after 15-20 kilometers. The reason for rapid wear is the nature of the road surface on which the vehicle has to drive: sand, water and dirt.
The wear and tear of the roadway depends not only on the quality of the road surface, but also on other factors:
- climatic conditions of the area where the SUV is operated;
- driver's driving style;
- quality of consumables.
The manufacturer recommends replacement after an average of 30-50 thousand. But given that wear varies, experts strongly recommend checking the brake system every 10 thousand kilometers.
When checking, you need to pay attention to the presence of creaks, other extraneous sounds, and smooth braking. When replacing, in parallel, you should check the integrity of the anthers on the guides, brake hoses, rubber covers, and the degree of wear of the brake discs. This is necessary for timely identification and elimination of faults.
The front axle bears the main load, so the front axles wear out faster than the rear ones. On average, for every rear pad replacement there are two front pad replacements. Any driver can understand that there is a problem with the brake pads if he pays attention to the characteristic symptoms:
- increased braking distance;
- knocking noise when braking hard;
- ineffective brake operation;
- creaking when braking;
- metal shavings on brake discs or pads.
If at least one of the signs appears, it is necessary to check the brake system and replace worn parts if the following signs of wear are found:
- cracks and delaminations of the TC are visible;
- defects in the form of chips and scratches were found on the surface of the block or lining;
- a protruding rim has formed along the edge of the disk;
- the thickness of the linings on the pads is less than the required technical specifications;
- uneven wear of the TC.
The pads must be changed in pairs: two front, two rear. When replacing the pads on only one wheel, the driver will not be able to brake effectively; the car may pull to the side when braking, which threatens to create an emergency situation on the road. The thickness of the overlay is measured using a caliper. The minimum thickness allowed is 1.5 mm.
To carry out the replacement you will need the following tools:
- jack;
- wheel wrench;
- a set of keys;
- pliers;
- gas wrench or sliding pliers;
- flat blade screwdriver;
- hammer;
- mounting blade;
- support post;
- calipers.
Naturally you need to buy new brake pads. It is advisable to have WD-40 penetrating fluid to relieve stuck fasteners.
Changing the pads of the front wheel pair
To make it convenient to work, we place the SUV on a flat, horizontal plane. We place wheel chocks under the rear wheels and set the handbrake. Before dismantling work, we treat the threaded connections with WD-40. We perform the replacement according to the following algorithm:
- We tear off the wheel mounting bolts with a spray bottle. Let's jack up the side of the car on which we will carry out the replacement. We install the car on a support stand for safety.
- We unscrew all the bolts and remove the wheel.
- Using pliers, pull out the cotter pin of the pressure lever (PR) of the lower axle.
- Use a tool of suitable diameter and a hammer to knock down the axle.
- Then, holding the PR with pliers, remove the axle.
- Remove the pressure lever.
- From the TC guide we take out two springs that held the PR.
- Using a screwdriver, pry up and remove the caliper.
- It is convenient to place the removed caliper on the steering knuckle.
- Next, we easily remove the TC from the guide.
- Before installing new parts, you need to press the pistons into the cylinders, which pop out under the pressure of the brake fluid. This can be done with sliding pliers.
- There is an alternative way: we insert the external TC into the guide, return the caliper and use the installation to recess the pistons into the cylinders.
- Before inserting the axle, it is advisable to sharpen its end using sandpaper so that the edge takes a cone-shaped shape.
- Before installation, the axle should be lubricated with graphite grease or rubbed with graphite so that it fits in and out of the hole easily.
- Press the lever and insert the axle.
- After installation, press the brake pedal several times so that the pistons come out of the cylinders and press the pads against the brake disc.
Changing the rear wheel pair pads
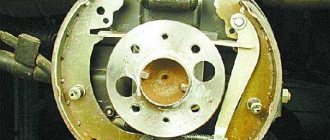
You can assess the condition of the brake drum without dismantling the brake drum by pulling the plug out of the shield and looking into the inspection window. To replace the rear fuel tanks, we drive the vehicle onto a lift or inspection ditch. Further work consists of a sequence of steps:
- Loosen the wheel nuts, place supports under the front wheels and jack up the car. We substitute a safety support, lower the car onto it and remove the hand brake.
- At this stage, you can check the rear hub bearings and whether the wheel is rubbing or not. It depends on the settings of the handbrake. Rotation should be free and without delay.
- Unscrew the fasteners and remove the rear wheel.
- We turn out two bolts with a hex head to “12”. To fix the wheel, turn on the handbrake.
- We screw the removed bolts into two threaded holes located opposite each other.
The caliper jams on a Chevrolet Niva
The brake pipe fittings are screwed into the holes on the right side of the cylinder: The elasticity of the ring is selected in such a way that it does not move along the cylinder mirror from the force of the tension springs of the pads, but only from the force of the pistons.
Features of the Niva Chevrolet brakes. The car is equipped with two independent braking systems: working and parking (Fig....
Otherwise, replace the valve. This operation can be performed as follows: The elasticity of the ring is selected in such a way that it does not move along the cylinder mirror from the force of the tension springs of the pads, but only from the force of the pistons.
Maintenance of the mechanism From time to time, any brake system may malfunction. No car is protected from malfunction, especially if it is not always used correctly.
A very common maintenance procedure that you will encounter is bleeding.
With the help of the latter, you can get rid of air bubbles in the brake fluid, which interfere with normal braking, or even lead to system failure.
Check the condition of the pads through the hole in the brake caliper body. If the thickness of the friction linings is about 1.5 mm, replace the pads.
To check the degree of wear of the brake pads of the rear brake mechanism, remove the rubber plug from the hole in the brake shield and 5.
Replace the pads in the following cases: Check the pressure regulator with an assistant from below the car mounted on a lift or inspection ditch.
Have an assistant press the brake pedal. When you press the pedal with a force of 70-80 kgf, the piston should move out of the body, twisting the torsion arm.
To adjust, lift the rear axle of the car. Loosen locknut 1 of adjusting bolt 2.
When turning the adjusting bolt with wrench 1, achieve light contact of the bolt with piston lever 2. Turn the adjusting bolt one more turn and tighten the locknut. With proper adjustment of the rear brake pressure regulator drive, the rear wheels should lock during hard braking somewhat later than the front wheels.
Place the ruler next to the pedal with its end on the floor, oriented in the middle of the pedal pad. Mark on a ruler or remember the position of the pedal. The vehicle is equipped with a vacuum booster located between the pedal pusher and the brake master cylinder. It is attached with two studs to the pedal bracket. The amplifier is non-separable; if it fails, it is replaced.
If the amplifier is working properly, after starting the engine the pedal should move forward.
Remember that failure to operate or insufficient efficiency of the vacuum booster can also be caused by a leak in the hose that takes the vacuum from the receiver.
The brake master cylinder is attached to the vacuum booster housing with two studs. At the top of the Chevrolet Niva master brake cylinder there is a reservoir from which brake fluid enters the cylinder.
The tank has markings for the maximum and minimum liquid levels, and a warning device with a float is mounted in the lid, which closes the contacts when the liquid level drops. The brake pipe fittings are screwed into the holes on the right side of the cylinder: The front wheel brakes are disc brakes with a three-piston floating caliper.
The pads are located between the cylinder block and the caliper: The caliper can move in the pad guide, being pressed against it by two spring-loaded levers. The pad guide is rigidly attached with two bolts to the steering knuckle.
When unscrewing, the bolts are secured by the edges of the protective casing; they are bent back at the edge of the bolts after tightening. Brake discs are cast iron.
The automatic clearance adjustment device is located in the wheel cylinder and consists of two elastic steel split rings, one for each piston, installed on the pistons with an axial clearance of 1.65 mm.
The elasticity of the ring is selected in such a way that it does not move along the cylinder mirror from the force of the tension springs of the pads, but only from the force of the pistons. As the pads wear, the pistons move the rings along the cylinders during braking, maintaining a constant design gap between the pads and the drum. In this case, it is necessary to replace the cylinder and brake fluid.
The nominal inner diameter of the drum is mm. It is allowed to groove the working surface of the drums when worn.
The largest permissible diameter during wear or after grooving is mm. The pressure regulator serves to reduce the braking force on the rear axle, which prevents the car from skidding when braking.
Replacing the front brake pads of a VAZ 2121 Niva 2131
The removal and subsequent replacement of the front brake pads on a VAZ 2121 and Niva 2131 is carried out in case of wear, when the thickness of the friction linings has become less than the maximum permissible, when mechanical defects have appeared on the surface - chips, cracks, etc.
It is recommended to replace the pads on both sides at once, regardless of the condition of the other pair, in order to maintain the quality of operation of both wheels and not violate the basic characteristics. We hang the side to be repaired with a jack and remove the wheel.
Prepare a standard set of tools, and then perform the following sequence of actions:
After removing the wheel, we clean the brake mechanism from dirt using a wire brush or blow it with compressed air.
Now we need to pull out the cotter pin of the lower axis of the clamping arm. To do this, using pliers, you first need to remove the locking plate that secures it from spontaneous removal, then remove it from its place using a hammer and a stop of suitable diameter.
We grab the cotter pin with pliers and at the same time, holding the lever from falling, remove the cotter pin and remove the lever from its seat.
Remove the two lever pressure springs from the pad guide.
Then we pry up and lift the brake caliper.
Place the caliper on the steering knuckle with the pads facing up. Then we remove them from their seats.
Now that the pads have been removed, we replace them, and then proceed to installation. But first you need to recess the brake pistons into the cylinders; for this you can use sliding pliers, or install the caliper with one outer old pad back in its place and insert a small mounting blade between the disc and the pad and recess the piston.
- Also, before installation, it is recommended to grind down the end of the clamping lever axle to make it easier to install into place and lubricate it with graphite lubricant.
- We carry out all subsequent assembly in reverse order.
- At this point, the repair work to replace the front brake pads on the VAZ 2121 Niva 2131 has been completed.
Source: https://Remladavaz.ru/zamena-perednix-tormoznyx-kolodok-vaz-2121-niva-2131
Replacing pads on the rear axle
To replace the rear pads, you will need to carry out the same preparatory work, after which the first thing you need to do is loosen the handbrake. Subsequence:
We remove the spring near the lever from which two cables go.
Using two “13” keys, you need to unscrew the bracket nuts, after which the cables weaken and do not affect the pads.
You can start directly replacing the pads
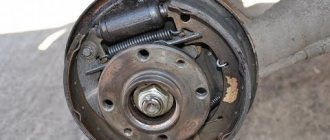
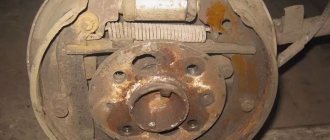
You need to remove the drum from the axle shaft using a “12” key by unscrewing two bolts. The drum often sticks, so you need to tap it with a hammer around the entire perimeter.
The working cylinder must be pushed inward on both sides using a flat screwdriver.
- You need to pry the tension springs by pulling them out.
- The block must be moved to the side opposite to the other block by the lower part, after which the two blocks are removed from the shield.
After removing the pads, the brake flap and drum must be cleaned and degreased and checked for the presence or absence of cracks.
Changing brake pads on a VAZ Niva 21214
The domestic SUV is considered one of the best in its price segment. Almost any Niva owner can assemble and disassemble it independently. This is due to the fact that with active off-road loads, many components need to be regularly changed or updated. One of these problem areas was brake pads.
How to Identify Brake Problems
No one will argue that a working brake system is a guarantee of safety. With serviceable brakes, you can compensate for the breakdown of any component in motion. Therefore, regular monitoring of these nodes is a mandatory procedure. Replacing brake pads on Niva 21214 occurs in the following cases:
- increasing the braking distance when you press the pedal;
- car drifting away from a straight line when braking;
- extraneous sounds when the brakes are applied;
- overheating, defects in the brake system elements;
- long travel of the handbrake lever and/or pedal;
- change in force when pressing the pedal;
- independent operation of the brakes;
- the hand brake does not apply on slopes;
- wear of brake pads less than 1.5 mm.
Replacing components is not a problem even for beginners in repairing their own car. The main thing is to strictly follow the instructions and check the new system after assembly to eliminate possible problems while driving.
Replacing front pads
It is logical that for replacement it is better to select original parts or those that have received official approval from the manufacturer. For the further process, you should hang the wheel and secure the car properly. Replacement procedure: Remove the wheel.
- Remove the cotter pin of the lower axle clamping element.
- Partially knock out the axle and then remove it with pliers while holding the lever.
- Remove the lever.
- Remove both springs so they don't get lost in the process.
- Remove the brake caliper using a screwdriver.
- Remove the pads from the guide.
Before installing new parts, press the pistons into the cylinders as much as possible. This is done with an installation spatula, pliers or an adjustable wrench. Afterwards the assembly is assembled in the reverse order. To simply install the clamping lever axis, it is recommended to slightly sharpen it into the shape of a nail and lubricate it with graphite lubricant.
Replacing rear pads
It is important to understand that when replacing these parts, the entire set, all four elements, are replaced. If you install only one new unit, then when braking the car may pull away from the straight line. After hanging and removing the wheels, proceed according to the following scheme:
- Loosen the handbrake cable.
- Tap the bolts securing the brake drum to the axle shaft.
- Unscrew the bolts using a hex tool socket.
- The last two fasteners are unscrewed with a 12mm head.
- The drum itself is removed by screwing two bolts into the threaded holes. They will rest against the flange. If the drum does not give in completely, then it is tapped at the end through a wooden beam. The blows must be made evenly while rotating the part.
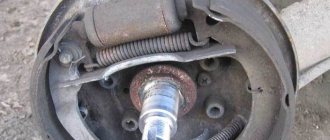
- Remove the pads themselves. One way is to remove the support posts, move the lower element and remove the lower stop. After removing the upper stops from the slots, remove the lower tension spring, pull out the pads from behind the axle shaft (this must be done carefully so as not to damage the cylinder boots).
- Remove the manual shoe drive lever from the rear hand brake.
- Remove the pads with the upper spring and spacer bar.
- Stretch and remove the upper spring.
- Unscrew the axle of the manual brake pad drive lever and remove it.
Source: https://expertniva.ru/tormoznaya-sistema/smena-tormoznyh-kolodok-na-vaz-niva-21214.html