Signs of Brake Pad Wear
We list the signs and symptoms that, if detected, require work to replace the pads:
- If the braking distance of the car has increased.
- If the wheels brake unevenly (the driver feels this).
- If, when you press the brake pedal sharply, a knocking and beating noise appears (your foot on the pedal feels like the pedal is vibrating).
- If you hear a squeaking sound when you press the brake.
If such signs are detected, it is advisable to quickly eliminate these problems. Damage to the pads and brake disc can be checked by visual inspection:
- if the brake pad lining has become too thin (thickness has decreased);
- if there are cracks, chips, or deep scratches on the linings or pads;
- if the thickness of the brake disc has decreased significantly.
- if the thickness of the pad, although normal in thickness, is worn unevenly;
- if a rim appears around the perimeter of the brake disc (the thickness of the disc has decreased, but the rim at the edges remains).
If the rubber rings on the pistons are worn out, then operating pressure will not be created. To do this, you need to replace the brake master cylinder repair kit. This is not difficult to do; you can do it yourself.
Causes of brake pad wear
In this case, the reasons are understood as various factors that influence in one way or another the surfaces of the brake pads, brake discs and drums.
We list the main reasons due to which the greatest wear of pads occurs:
- roads, quality of road surface;
- driving style (calm, moderate driving or jerking and drifting);
- climatic conditions (frost and heat);
- Poor quality pad lining material.
Many people don’t know how long it takes to change brake pads. The service life of brake pads on cars with manual transmissions ranges from 30 to 50 thousand km. The service life of brake pads on cars with an automatic transmission ranges from 25 to 30 thousand km. And you need to check the condition of the brake system at least every 10 thousand kilometers. Basically, until squeaks, rattles, and beating of pads appear, the brakes are not checked.
For special vehicles or cars that are often driven through sand, mud, and water, naturally, it is necessary to carry out diagnostics and replacement more often.
Did you know that a faulty car steering rack can be identified by 5 signs?
Which pads need to be changed more often?
Since the main load falls on the front wheels, when braking, the front brake pads are loaded more, so they wear out faster than the rear ones. The front pads have to be changed 2-3 times more often than the rear ones.
When replacing brake pads, they must be changed in pairs, that is, do not change only one at the front or one at the rear. Install the kit immediately. Timely replacement of pads will increase the service life of the brake disc, and the disc itself will serve for a long time. When replacing brake discs, the cost of repairs to replace pads with discs is much more expensive.
During repair work to replace brake system parts, you should also check the guide boots and rubber boots for integrity. It is especially important to check the brake system pipes and hoses.
If you decide to take the city driving test in your own car, then do not forget to prepare: drive along the exam routes several times, adjust the mirrors, seat, brakes, etc.
Selecting brake pads for Lada “Grant”
The front pads for the Lada “Granta” consist of two parts: a plate and a friction lining applied to it. The rigidity, wear resistance and coefficient of friction of the pads, which depend on the quality of the friction material, are the most important parameters that determine their quality. Original pads recommended by the manufacturer are more reliable, durable and efficient. They are produced without the addition of asbestos, which poses an environmental hazard. Their only drawback is the price. Non-original pads are installed for the sake of economy, when they try to find something of acceptable quality for a reasonable price. Sometimes this is successful, sometimes such savings result in losses. For example, a low-quality lining that comes off during braking can cause the car to suddenly pull to the side and, as a result, an accident.
How to change front and rear brake pads
Replacing the front and replacing the rear brake pads are different, because the front has disc brakes and the rear has drum brakes.
General replacement procedure (disc and drum):
- Open the hood and unscrew the brake fluid reservoir cap.
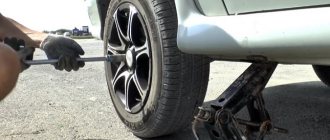
- Jack up either front side and remove the wheel.
- Clean the brake disc from dirt.
This is what brake disc pads look like on a Skoda Octavia car
- Unscrew the bolts of the guide caliper and brake drum to gain access to the pads.
- Use a screwdriver to remove the pads.
- We install new pads in pairs.
- Then you need to bleed the entire brake system.
This was the general procedure for replacing brake system parts. Now let's look at how to properly change brake pads on the front and rear wheels.
How to change the front pads on the Lada “Grant”
To change the pads, just park the car on a level surface. Replacement is carried out sequentially - first on one side, then on the other. To replace the front pads on the “Grant”, you must perform the following steps:
- check the brake fluid level in the reservoir and, if it is close to the maximum, take a little with a bulb or syringe;
- jack up the wheel;
- unscrew the wheel bolts and remove the wheel;
- bend the corner of the washer that prevents spontaneous unscrewing of the guide pin fastening bolt; holding the hexagon with a wrench, unscrew the bolt holding the guide pin;
- turn the bracket covering the pads upward (along the axis of the guide pin);
- pull out the pads of their guides;
Important: if you press the brake pedal while the brake caliper is unscrewed, the brake piston may completely come out of the cylinder.
- clean the pad seats from rust and dirt;
- push the piston to the maximum depth using a flat screwdriver or press firmly with your hands (lower the bracket into place and press the piston, resting the screwdriver against the brake disc) or a clamp (resting its paws against the piston and the bottom of the cylinder);
Tip: it is better to use the method with a clamp, since using a screwdriver can damage the brake disc.
- install new pads;
- return the brake caliper to its place;
- tighten the fastening bolt;
- bend the lock washer;
- press the brake pedal several times;
- install the wheel and remove the car from the jack.
Now you know how to change the front pads on the Lada “Grant” and you can do it yourself.
Sources
- https://www.autosecret.net/lada-granta-vaz2190/tormoznaja-sistema-lada-granta/1145-zamena-tormoznyh-kolodok-lada-granta
- https://spike.su/index.php/Replacing-brake-pads-Lada-Granta.html
- https://ladaservice.info/lada-granta/hodovaya-chast/zamena-perednih-tormoznyh-kolodok-na-lada-granta/
Do-it-yourself replacement of front brake pads:
- Select the recommended brake pads for your specific vehicle make and model.
- Then prepare a set of automotive tools, place the car on a level place, place wheel chocks (shoes) under the wheels and jack up the wheel.
- Unscrew the brake reservoir cap to relieve pressure in the system.
- Unscrew the guide caliper bolts. If there are still fixing brackets, then remove them with a screwdriver. If there is a brake pad wear sensor, disconnect it.
- Use a thick, strong flat-head screwdriver to separate the pads. To do this, insert a screwdriver between the pads to press the brake piston and remove the worn pads.
- Clean the places for installing new pads and install them.
- Carefully lubricate the caliper guides and at the same time do not allow oil to get on the surface of the pads.
- What was unscrewed during disassembly, we screw it back.
- Install the wheel and remove it from the jack.
- Bleed the brake system.
Replacing the front pads of Lada Granta
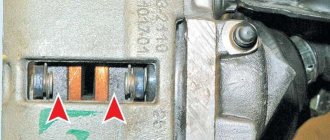
The time period for replacing the front pads is not regulated by the manufacturer. However, it is necessary to check the thickness of the pads regularly. To do this, just remove the wheel and look at the inspection window in the caliper. If the thickness of the Lada Granta pad is less than 2-1.5 mm, all 4 pads must be replaced.
Before starting work, open the hood and look into the brake fluid reservoir. If the fluid level in the brake hydraulic reservoir is at the MAX mark, then before installing new pads, use a syringe or a rubber bulb to pump out some of the liquid from the reservoir so that when the piston is recessed into the working cylinder of the brake mechanism, liquid does not flow out from under the reservoir cap. Having removed the front wheel, we securely fix the Lada Granta on a reliable stand.
Using pliers, we bend the edges of the locking plate of the bolt securing the cylinder to the lower guide pin. Use a 13mm spanner to unscrew the bolt, holding the guide pin with a 17mm spanner.
Remove the bolt with the locking plate.
Raise the bracket and remove the brake pads from their guide.
Attention! Once the caliper has been rotated relative to the shoe guide, do not press the brake pedal as the piston may come out completely from the cylinder. We clean the pad seats in the caliper and the pad guide from dirt and corrosion.
Before installing new pads, it is necessary to move the piston as much as possible inside the cylinder. This operation can be performed in different ways
We clean the pad seats in the caliper and the pad guide from dirt and corrosion. Before installing new pads, it is necessary to move the piston as much as possible inside the cylinder. This operation can be performed in different ways.
Using sliding pliers, we recess the piston into the cylinder.
Either we insert a screwdriver with a wide blade or a mounting spade through the caliper window and, resting it on the brake disc, move the bracket, recessing the piston into the cylinder. This procedure can be carried out even before disassembling the brake mechanism. If you do not recess the piston, you will not be able to insert new, thicker pads.
After replacing the pads, press the brake pedal several times to set the gaps between the pads and discs. We check the fluid level in the tank and, if necessary, bring it up to normal.
During operation, the surface of the ventilated disc of the Lada Granta brake mechanism becomes uneven, as a result of which the contact area of the new, not yet worn-in pads with the disc decreases
Therefore, during the first 100 kilometers after replacing the pads, until the new pads have broken in, be careful and take into account the increased braking distance
Do-it-yourself replacement of rear brake pads:
- Place the car on a level place, put the “shoes” on it and jack it up.
- Remove the wheel.
- Remove from the handbrake.
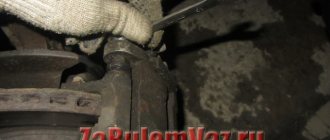
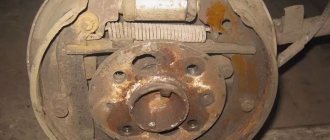
- Remove the bolts that secure the brake drum.
- Remove the brake drum. To do this, sometimes you have to knock on it quietly, because it happens that the pads are skewed and the drum cannot be removed.
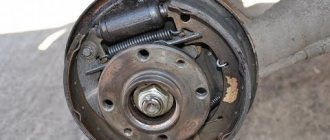
- Take a photo or remember how the springs should be installed. If the springs are installed incorrectly, the pads will not be able to separate all the way.
- Release the handbrake cable.
- Disconnect all springs and links using a flathead screwdriver.
- Remove the rear brake pads and install new ones. The order of assembly is inversely proportional to disassembly.
- Put the wheel on, do not immediately remove it from the jack. This is needed for verification.
- Put the handbrake on and try to turn the rear hanging wheel. If the handbrake does not hold, then you need to adjust the parking brake cable. If everything is done correctly, with the handbrake set all the way, the rear wheel will not spin.
- We remove the car from the jack.
Replacement of the rear brake wheel cylinder of the Lada Granta VAZ 2190
To replace the rear brake wheel cylinder on a Lada Granta VAZ 2190, you will need: a 10mm wrench, a special 10mm wrench for loosening the brake pipe nuts. If during operation there are brake fluid leaks on the brake drum and the inside of the rear wheel or the pistons in the brake cylinder are jammed, replace the rear wheel brake cylinder. 1. Put the Lada Granta VAZ 2190 into first gear and install wheel chocks (“shoes”) under the front wheels. 2. Remove the rear brake pads from the corresponding side (see “Replacing the brake pads of the rear wheel brake mechanism”).
Replacing the rear brake cylinder on a VAZ 2113, VAZ 2114, VAZ 2115
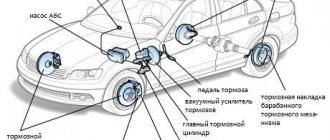
Welcome! Brake cylinder - there are usually 5 of them in a car, two are on the rear wheels, two more on the front (Front and rear brake cylinders differ significantly from each other) and one more is located in the engine compartment of the car, usually the one under the hood is called the main brake cylinder, and those that are scattered across the wheels are called working cylinders, all cylinders work together and simultaneously during braking, and if one fails (the front right wheel, for example), then the wheel will stop braking, but that’s half the problem, since the car will still stop, it’s just that not four wheels will do this, but only three, but if the main brake cylinder becomes unusable while driving, then this is already very dangerous and in the best case, either the wheels will all lock (the brake pedal is still in the floor will go away and you won’t be able to get it out of there until you change the cylinder) and the car will stop abruptly, or there will be no brakes at all and the engine will have to stop the car.
How to replace the rear brake cylinder on a VAZ 2113-VAZ 2115?
Note! If you decide to save a little money and repair the brake cylinder, then we do not recommend that you do this, firstly, you will need special tools for this, and secondly, a new one does not cost that much money and it is not a fact that you have a repaired brake cylinder It won't jam after a while, so it's best to buy a new one and replace it with the old one!
Removal: 1) First, you will need to remove the brake drum from the car and also the wheel at the same time, then the pads must be removed and you can proceed to replacing the cylinder itself, if you do not know how to do this or you know how but simply do not remember the principle of removal and installation, then in this case, study the article entitled: “Replacing rear brake pads on a car” in which we described everything in detail.
2) Now, with the same brush that you were supposed to use to clean the drum from dirt, clean the back of the brake drum shield, namely in the place where the brake cylinder mounting bolts are located and where the brake pipe is located, if you have WD-type fluid. 40 then apply it to the back of the shield.
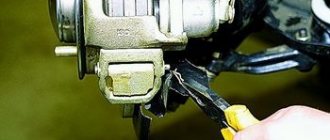
3) Then unscrew the nut that secures the brake pipe with a wrench, after unscrewing, disconnect the pipe and be prepared for brake fluid to flow out of it, so that a lot of fluid does not leak out, be sure to close the pipe with something (For example, you can remove the cap from the bleeder fitting, as shown in the small photo, the location of this cap is also shown so you know, with a blue arrow).
4) Finally, holding the brake cylinder with your hand, unscrew the two bolts that secure it and then remove it completely from the car and replace it with a new brake wheel cylinder.
Installation: Installation is carried out in the reverse order of removal, but you will only need to bleed the brakes after installation; for information on how to do this, read the article entitled: “Bleeding the brake system on a car.”
Additional video: Below we have attached a video in which a person explains in detail how you can remove the slave cylinder from a car and in which places you need to apply WD-40 to make it easier to remove.
The rear brake cylinder is responsible for effectively braking your car. Therefore, you need to check its operation from time to time. Your safety on the road depends on it. It is located under the rear wheel drum. To gain access to it, you need to remove the wheel and pull out the drum.
Selecting a brake cylinder.
Today there are a huge number of manufacturers of spare parts for cars. And it’s easy to get confused when choosing quality spare parts. In order to make a choice, you can read reviews on the Internet. We also read and came to certain conclusions. The most reliable brake cylinder is considered to be the ATE cylinder. The cylinder is also not inferior to it. You can also look at Kraft products.
How to determine a faulty brake cylinder.
The first sign of a problem in the brake system will be a brake fluid leak. You can also evaluate the condition of the cylinders when replacing the rear pads. Usually the rubber bands in the brake cylinders break and the pistons become sour. Of course, they can be repaired, but it is much easier to replace them with new ones, since they are not expensive. In stores you can find cylinders for around 400 rubles.
Replacing the rear brake cylinder.
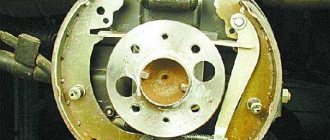
- The first step is to remove the brake drum.
- Raise the handbrake all the way.
- Remove the cap from the bleeder fitting and use a size 8 wrench to completely unscrew it.
- Lubricate the fitting with grease.
- Loosen the brake pipe fitting.
- We finally unscrew the fitting.
- Unscrew the 2 bolts securing the working cylinder.
- Place the fitting cap on the tube to prevent brake fluid from leaking out.
- Remove the brake cylinder from the shield.
- Before installation, we clean everything from rust and dirt and degrease the working surfaces.
- Reinstall the brake cylinder in reverse order.
- Reinstall the brake drum.
- We bleed the brake system and check everything for leaks.
Self-replacement of the main brake cylinder on a VAZ 2114
Before we talk about replacing the device, you should first understand its essence. What is this master brake cylinder?
This is a very important element of the car's braking system. Its main task is to convert the force applied to the brake pedal into pressure within the braking system.
Most often, a malfunction of the gas turbine engine can be determined by several signs:
You should make sure that the master cylinder is the culprit for the malfunction of the brake system. This is easy to do; you don’t even have to go to a service center and spend money on it.
- Press the brake pedal with the power unit off.
- Start the engine without taking your foot off the gas pedal.
- During normal operation, the gas turbine engine fails under the influence of vacuum.
- If the pedal does not fail, you will need to conduct more thorough diagnostics and restore the device to functionality.
Most likely, you will need to restore the tightness of the return regulator connection. It is located on the intake manifold amplifier housing.
Repair kit or new GTZ?
Many car owners face a question when the brake master cylinder fails: how exactly to repair the brake master cylinder. After all, there are two main options:
- Purchase a new GTZ;
- Use repair kit.
First, let's take a look at the price tags.
Purchasing a repair kit and using it to restore the functionality of the brake cylinder entails uneven wear of old and new elements, breakage of rings and a number of other problems. In this regard, we advise you to eliminate the breakdown by completely replacing the gas turbine engine, and not by using a repair kit.
If the GTZ fails, the engine will begin to operate unstably and incorrectly, engine dynamics will decrease, and fluids will begin to leak.
Be sure to check to see if the brake booster is the culprit. To do this, clamp the vacuum hose with the engine running. If signs of GTZ failure have disappeared, the problem must be looked for in the amplifier.
To carry out dismantling work that entails replacing the master brake cylinder, it is necessary to prepare a certain set of tools and materials. It includes:
- Brake fluid;
- Tool for unscrewing fittings;
- Pliers;
- Dry rags;
- Metal brush for cleaning contacts;
- Key for 17, 13 and 10 millimeters;
- Spring tensioner;
- New brake cylinder.
Before starting work, prepare yourself a site where you can place all the elements to be removed. Write down or photograph, or otherwise record where this or that unit was removed from. This will greatly simplify the reassembly procedure.
After all the preparatory activities, you can start working.
- Be sure to remove the negative terminal from the battery of your VAZ 2114. Without this, almost no repair or maintenance work on the car can begin.
- Raise the hood and lock it securely.
- Use a syringe to remove any remaining brake fluid from the container.
- Unscrew the brake fluid supply pipes using an open-end wrench. Unscrew it carefully so that the brake fluid does not get on other units in the engine compartment.
- In some cases, the thread becomes stuck, making it very difficult to remove. In such a situation, we recommend treating the threads with brake fluid and letting it sit for a while. Then the hoses are removed using a 10 mm wrench.
- If these measures do not help, you will need a special wrench with a clamping bolt and a cap slot. It is attached to a nut, clamped with a bolt and rotates the part.
- After dismantling the brake fluid pipes, be sure to mark them with a marker or corrector so that you know which pipe is connected where during reassembly.
- Now you need to remove the brake master cylinder. To do this, first remove the two main nuts that hold the GTZ to the amplifier.
- That's it, the damaged element can be removed from its seat.
- Clean the installation sites so that there are no problems with the new cylinder in the very first months of operation.
- Follow the reverse assembly sequence so as not to confuse the location of certain elements.
- Do not clamp the brake fluid hoses too tightly, otherwise there is a risk of stripping the threads. Restoring connections is a hassle.
- It is recommended to replace the brake fluid used before repair, and then be sure to bleed the brakes.
- To level up, you will need help, so make an agreement with a friend in advance. One will gently press the brake from inside the car, and the other will wait for brake fluid to start coming out of the holes. At this very moment it will be necessary to return the front tubes to their places.
Be sure to simultaneously check the correct operation of the vacuum booster. If it is faulty, it will need to be replaced.
Expert advice
Experience is useful. Therefore, listen to some very practical advice regarding replacing the brake cylinder and interfering with the brake system in general.
- Before reassembling the unit, be sure to treat all dismantled elements with isopropyl alcohol. Blow out the openings of the units and wipe them thoroughly with a dry cloth. This will significantly increase their service life and avoid a number of problems in the early stages of operation.
- Try to prevent rubber, plastic elements, seals, and pipes from coming into contact with gasoline, kerosene and other chemically powerful substances. Their contact can lead to damage and loss of integrity of the elements.
- Before changing the GTZ, put the device body in order. It is necessary to remove all traces of oxidation, dirt, and plaque.
- Make sure the device is sealed. Carry out periodic checks of the sealing rings even if the gas turbine engine does not show any signs of malfunction.
- When assembling the unit, treat all elements with brake emulsion.
- Under the screws securing the GTZ there are sealing gaskets that will need to be replaced during the repair process of the device.
- After replacing the master cylinder, do not forget to bleed the brakes. This is necessary in order to remove air trapped in the system. The presence of air locks can lead to accidents, since the brake pedal simply will not work at some point.
- When removing the block with wires (when replacing the vacuum booster), be sure to close all open holes so that dust, dirt, and brake fluid do not get there.
- When carrying out dismantling work to remove the main brake cylinder, it is recommended to first remove the main brake reservoir, and only then unscrew the mounting screws. This will make it much easier to remove the unit and all other elements of the system.
- Most often, the turbocharger fails due to leaks in the brake fluid supply system. Lift the hood and look at the joint of the device. The presence of traces of leakage indicates that the gas turbine seal is worn out and needs to be replaced.
Always remember that any intervention in the brake system requires mandatory bleeding of the brakes after completion of the work. Ignoring this step can have serious consequences.
Installation of a new gas turbine engine
As you can see, it is more than possible to carry out work on replacing the gas turbine engine yourself. This will save an impressive amount of money, since such services at professional service stations will cost at least 1,000 rubles. Moreover, this is in ideal situations and the presence of good friends at the service station.