07/15/2021 23 292 VAZ 2109
Author: Ivan Baranov
For any vehicle to function properly, it is necessary to regularly monitor its technical condition. Sometimes you need to remove the gearbox, for example, when overhauling the gearbox itself, replacing the oil seals in it, or if it interferes with getting to any parts when repairing the car. The article describes how to remove the box on a VAZ 2109, and also attaches a video in which you can see all stages of the process.
[Hide]
How to remove the box on a VAZ 2109
Unscrew the mounting bolts and remove the crankcase protection.
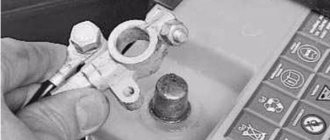
Unscrew the bolt and disconnect the ground wire from the clutch housing.
Loosen the nuts on the end of the clutch cable.
Remove the cable end from the clutch lever.
Disconnect the block with the wire from the starter traction relay terminal.
Unscrew the fastening nut and disconnect the wire from the contact bolt of the starter traction relay.
Unscrew the three nuts (the third on the other side of the starter) that secure it and remove the starter.
Loosen the clamp and disconnect the gear shift rod from the joint tip.
Unscrew the fastening nut and disconnect the cable from the speedometer drive.
Disconnect the block with the wire from the reverse light switch.
Loosen the nut securing the brace to the suspension arm.
We unscrew the nut securing the brace to the bracket or the three bolts securing the bracket to the body and move the left and right braces apart.
Remove the cotter pin from the nut securing the steering link ball joint to the steering arm.
Unscrew the nut securing the steering rod ball joint.
Using a puller, press the steering rod ball joint pin out of the strut swing arm.
We unscrew the two bolts and disconnect the ball joint of the suspension arm from the steering knuckle.
Use a pry bar to press the shank of one of the internal CV joints of the front wheel drive out of the gearbox and move it to the side.
Instead, we insert a technological plug, for example, an old internal CV joint. After this, disconnect the second CV joint.
Unscrew the three mounting bolts and remove the clutch housing shield.
Loosen the three bolts and nuts securing the clutch housing to the cylinder block.
We place suitable wooden support blocks on the wing flanges in the area of the front strut supports and install a beam on them to hang the engine. The beam must rest only on the wing flanges!
We attach the engine to the beam with a long bolt with a hook. You can also use strong rope or wire for this. (For ease of photographing, the hood has been removed).
We unscrew the two nuts securing the rear support of the power unit to the body.
Unscrew the nut and remove the bolt of the left power unit support.
We unscrew the three nuts securing the left power unit support to the gearbox and remove the support.
We finally unscrew the three bolts and nut (on the other side of the gearbox).
When removing the gearbox, first move it away from the engine in a horizontal plane to remove the input shaft from the clutch.
Do not damage the clutch diaphragm spring blades when removing.
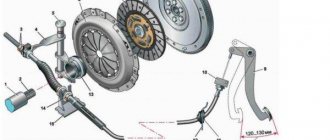
Disassembling the left drive
Before removing the box on the VAZ-2109, it is imperative to disassemble the left part of the suspension. The fact is that the left drive will interfere when the box is moved. Therefore, you need to free up space for maneuvers:
- Using the “17” wrench, unscrew the two bolts that secure the ball joint race to the hub steering knuckle.
- Using pliers, you need to pull the cotter pin out of the hole in the steering tip, and then unscrew the nut with a key “19”.
- Having installed the puller on the tip, you need to remove the finger from the fist hole.
- Move the brake hose to the side.
- After this, you need to completely unscrew the nut on the outer CV joint.
- Pull the entire stand toward you until the drive falls to the ground.
You don’t have to do the sixth point; you just need to remove the internal grenade from the gearbox. But the right grenade is removed only after the box is moved to the side. It is not difficult to remove the VAZ-2109 box with your own hands, just follow the sequence of all actions.
Installing a gearbox on a VAZ 2109
Before installing the VAZ 2109 gearbox, it is recommended to lubricate the input shaft splines and the outer surface of the clutch release bearing guide sleeve with a thin layer of grease.
We center the clutch driven disc using a special mandrel.
We install the gearbox in the reverse order of removal.
When connecting the front wheel drives to the gearbox, we change the retaining rings on the splined ends of the inner CV joints. Otherwise, there is a risk of the drives disconnecting from the gearbox while driving.
The final tightening of the nut securing the brace to the lever is carried out with the suspension loaded and the car standing on the ground.
Final disassembly
Then you need to perform the following manipulations:
- Remove the starter, first disconnecting two wires from it.
- Using a 13mm wrench, unscrew the negative wire attached to the gearbox.
- Loosen the clutch cable and remove it.
- Unscrew the speedometer drive cable.
- Place a support under the gearbox; you can use a regular jack.
- Disconnect the lever from the rocker.
- Completely remove the cushions that secure the transmission to the car body.
- If you need to remove the VAZ-2109 engine with gearbox, you will need to hang it.
That's all, now the gearbox is held in place by just three bolts and one nut on the engine housing.
Installation
The gearbox is installed in place after all problems and malfunctions associated with it have been fully eliminated.
Before the reassembly process you should:
- make sure that all elements affected by the dismantling process are in good condition;
- check the alignment of the clutch;
- Renew the lubricant on the splines of the release and input shaft bearing flanges.
When installing a gearbox on a car, the following scheme is used:
- the power unit is lowered on a jack or stretcher with a slope of 15 degrees;
- the box itself is lifted and inserted until it stops (do not try to tighten the engine and gearbox with bolts until it sits tightly in its designated place);
- tighten all four elements securing the gearbox to the engine;
- install “pillows” (supports) under it;
- attach the clutch cable and adjust its tension (its pedal is normally located a centimeter above the brake);
- return the previously removed starter together with the rear speed sensor to its place;
- install the flywheel protective housing;
- screw the speedometer cable and ground wire;
- connect the shift gear mechanism - its lever is aligned according to the marks made during dismantling;
- assemble the drive, install ball joints, couplers;
- put the car on the wheels and tighten the bolts on them;
- tighten the drive nuts;
- add fresh oil.
What to pay attention to
So, following the instructions, we disassemble the gearbox of your VAZ 2109. Along the way, pay attention to the following points:
- Bearings. When they wear out, a noise from the box occurs. Plus, worn bearings negatively affect the condition of other gearbox elements;
- Synchronizers and sealing washers. If their condition leaves much to be desired, then the gears shifted poorly precisely because of them. Replace them;
- Clutch system, cotters, coupling hub clamps. All this must be replaced separately if there are signs of wear or defects;
- Blocking rings, synchronizers. If there are chips or nicks, don’t even think about alternative solutions, replace them immediately;
- Bearing tracks. Over time they wear out. If signs of wear are found, perform a complete replacement. In this state, they were only a short time away from breaking;
- Gap between gears and locking rings. Normally it is no less than 0.6 mm. In case of deviations, there is only one solution - replacing the rings;
- Retaining rings. If elasticity is lost, these elements must be changed, since they will no longer be able to perform their functions.
When assembling the gearbox, do not forget to lubricate the new gaskets with a layer of lithol. And when pressing the oil seals, do it with the working edge inward. The metal clip should be located on the outside.
During the process of reassembling the gearbox, all rubbing components should be treated with oil, and do not forget about the sealant for connecting the clutch housings and gearbox. Doing everything yourself is quite possible.
Didn't find the information you are looking for? on our forum.
Video “Removing the gearbox”
This video shows the step-by-step process of removing the transmission.
Most owners of 2108-21099 are aware of the problem with engaging and sometimes knocking out 2nd gear. And I was no exception))) Since the cost of work at the service station did not particularly suit me, I decided to go through the checkpoint myself. As it turned out later, there is nothing complicated about this. Without problems with the Murzilka, you can safely climb into the gearbox!)) Having studied a lot of articles on the Internet, having studied all the intricacies, I got to work at the moment while the car was being painted (naturally, only the bare body was painted), and everything else was in the garage and needed a little renovation. I took the box to the car wash. They washed it thoroughly for me there. The next day I disassembled the box, laid out each piece on pieces of paper and signed the next removal number)))) Oh, how tedious it was. The first problem arose with the nuts on the shafts, which only my father could unscrew. The second problem arose with the bolts securing the metal plate that holds the bearings of the primary and secondary shafts, under a Phillips screwdriver. Well, no matter how much they didn’t want to unscrew, I already broke 2 of my favorite large screwdrivers until I bought an impact screwdriver)))) The impact screwdriver became a new favorite, the screwdriver is SUPER))) Having unscrewed the plate, I found a collapsed plastic separator of the secondary shaft bearing (((
And naturally, the ball bearings were replaced with bearings with a metal cage, and the roller bearings were simply new
With grief, we pick out the retaining rings of the bearings with round pliers and remove the crankcase... I discovered a broken spring in the gear shift mechanism, which reduces the play of the lever and helps to disengage the gear.
I ran through all the auto stores and the search was unsuccessful ((((And of course, everyone offered to buy the complete mechanism for 1,700 rubles, diligently insisting that I had no choice, that I would still have to buy it. I even went to our production specifically for the spring GOC, in an attempt to find something similar, but alas... But to spite all the store sellers, I naturally found help on GOOGLE (I always turn to it) and found an interesting idea to install a spring from the radiator cap of a VAZ Classic. The old cap with 6ki father))) And of course she fit like her own.
Detection of breakdowns and disassembly of the gearbox
The following malfunctions occur most often in the operation of the Nine transmission.
- The VAZ 2109 gearbox lever is loose.
- Knocks out first gear, second gear falls out.
- The gears don't engage at all.
- The transmission howls and noise is heard in the gearbox.
- Reverse gear does not engage on VAZ 2109.
Often, some part of the mechanism wears out. It is difficult to determine the cause of a particular breakdown without disassembling the box. If oil leaks in large quantities are clearly visible, we can say with confidence that the gearbox seal will need to be replaced. To identify other weak links in the operation of the gearbox, the gearbox is disassembled step by step. First drain the oil through the technological hole.
First, remove the 5th gear cover and tear off the nuts of the primary (with the drive gear) and secondary (with the driven gear) shafts with a 32mm head. Next, dismantle the 5th gear driven gear assembly with the sliding clutch and fork. Then we undermine the 5th speed drive gear. Now we remove the support bar on the shafts using an impact screwdriver, unfasten the bushing on the washer and remove the bar that secures the gear shift. We remove the rings that lock the bearings of the primary and secondary shafts. To remove the upper casing, it remains to unscrew the remaining 14 nuts by 13.
Access to the shaft mechanisms is open. Remove the axle and reverse gear. After unscrewing 3 bolts with a 10mm wrench, we took out the entire reverse gear mechanism. Next, one by one we remove the rods with the forks of the 1st, 2nd, 3rd, 4th gears. Next, pull out both shafts. All that remains is to remove the main gear (gear with differential).
We take it out and look at the axis of the satellite gears (gears). They should spin tightly. If they walk, then the axle is worn out. The reason is lack of oil. Inside the box there is a fork located on a long gear selection shaft. Unscrew the bolt by 10 and pull out the shaft.
Let's start disassembling the shafts.
| Stages | Actions |
| Let's start with the primary one. | It contains the drive gears of the 1st, 2nd, 3rd, 4th, and rear speeds - everything is solid. If you need to change something, we clamp it in a vice and beat it with a chisel. |
| Dismantling the secondary shaft. | We clamp it in a vice, through a rag, so as not to damage the teeth. We proceed to disassembly, remove one by one the washers, gears, synchronizer rings, needle bearings of all gears, as well as retaining rings and half rings. |
We check all the elements of the box for “licking” of edges, abrasion, wear of mechanisms, damage to parts. Due to the “licked” teeth on the clutch, gears are knocked out, wear of the forks leads to the appearance of play on the gearbox lever (the lever dangles). Parts are damaged as a result of dry friction, which is formed when oil leaks through the seals. In this case, it is necessary to replace the VAZ 2109 gearbox seals.
Dry friction can also cause noise and howling in the box.