Snapshot
Through the caliper window we estimate the thickness of the brake pads.
Through the caliper window we estimate the thickness of the brake pads.
Through the caliper window we estimate the thickness of the brake pads.
We replace the brake pads of both front wheels if the thickness of the friction lining has reached the maximum permissible value - 1.5 mm. Rotating the brake disc, inspect its working surfaces on both sides. There should be no cracks or deep grooves on the working surfaces of the disc.
What pads to put on Priora
The front pads have a catalog number: 21100-3501080-00. The approximate cost of original pads is about 350 rubles.
Which pads are best to buy for Priora ? Because front pads are used not only on Priora, but also on other Russian cars (VAZ 2110, Lada Granta, etc.), so you can safely rely on the reviews of these owners. As practice shows, the brake pads on the Priora are good from Ferodo.
Snapshot1
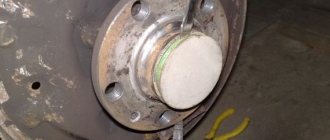
Using a caliper or micrometer, we measure the thickness of the disk, which should not be less than 17.8 mm.
Otherwise, both disks must be replaced. Using a caliper or micrometer, we measure the thickness of the disk, which should not be less than 17.8 mm. Otherwise, both disks must be replaced.
Using a caliper or micrometer, we measure the thickness of the disk, which should not be less than 17.8 mm. Otherwise, both disks must be replaced.
Replacement of rear pads
Replacing rear brake pads is slightly different from replacing front ones, but the reasons are almost the same. Let's move straight to what tools are needed to install new rear pads:
- wrench 7;
- flat-head screwdriver;
- two mounting blades;
- pliers;
- hammer;
- goatee
Replacing front pads on a car
Before replacing the rear elements, as before, the car must be secured, then put in first gear and “brakes” installed under the front wheels.
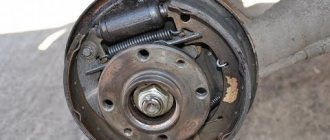
Removing old rear car pads:
- when the brake lever is completely lowered, you can remove the wheel and clean the brake mechanism;
- Drain the brake fluid if necessary;
- if necessary, remove the brake drum;
- when you get to the tension drum spring, you will need to remove its upper surface using a bit;
- do the same with the lower part of the spring, as well as with the front;
- then we remove the front brake pad on the Priora so that it does not interfere, and the expansion bar;
- Now carefully remove the guide in the rear wheel-shaped parts, disconnecting the parking brake cable and the drive lever;
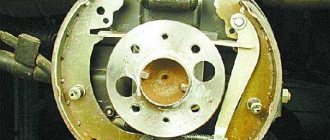
- remove the cotter pin and the support washer from the pin of the drive lever;
- remove the drive lever and, by pressing on its finger, remove it from the block.
We install the purchased brake pads by performing the steps in reverse order, only in this case it will be necessary for their upper ends to fit into the grooves of the piston.
Using mounting blades, we bring the brake pads together, thereby moving the pistons to the center of the cylinder. Just as we removed it, we put the brake drum back in place, and at the very end of the operation, when the car is already on the ground, we press the pedal a couple of times, allowing the pads to fall into place.
Snapshot2
Brake mechanism of the left front wheel: 1 - screw securing the cylinder body to the caliper;
2 — brake hose; 3 — wheel cylinder; 4 — hydraulic brake bleeder fitting; 5 — caliper; 6 — brake pads; 7 - guide pin; 8 — guide pin cover; 9 — pad guide; 10 — brake disc; 11 — brake mechanism shield; 12 — ring gear for ABS sensor; 13 — locking plate; 14 - bolt securing the cylinder to the guide pin. Brake mechanism of the left front wheel: 1 - screw securing the cylinder body to the caliper; 2 — brake hose; 3 — wheel cylinder; 4 — hydraulic brake bleeder fitting; 5 — caliper; 6 — brake pads; 7 - guide pin; 8 — guide pin cover; 9 — pad guide; 10 — brake disc; 11 — brake mechanism shield; 12 — ring gear for ABS sensor; 13 — locking plate; 14 - bolt securing the cylinder to the guide pin.
Brake mechanism of the left front wheel: 1 - screw securing the cylinder body to the caliper; 2 — brake hose; 3 — wheel cylinder; 4 — hydraulic brake bleeder fitting; 5 — caliper; 6 — brake pads; 7 - guide pin; 8 — guide pin cover; 9 — pad guide; 10 — brake disc; 11 — brake mechanism shield; 12 — ring gear for ABS sensor; 13 — locking plate; 14 - bolt securing the cylinder to the guide pin.
Attention! The brake pads of the front wheels must be replaced as a set - all four pads. Replacing the pads of only one brake mechanism can lead to the car pulling to the side when braking.
If the fluid level in the brake hydraulic reservoir is at the MAX mark, then before installing new pads, use a syringe or a rubber bulb to pump out some of the liquid from the reservoir so that when the piston is recessed into the wheel cylinder of the brake mechanism, liquid does not flow out from under the reservoir cap.
After removing the front wheel, we securely fix the car on a factory-made support stand.
Replacing the front brake pads of a Lada Priora - step-by-step instructions
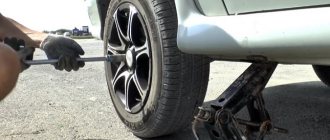
1. Place the machine on a level surface. Place wheel chocks or some blocks or bricks under the rear wheels.
2. While the car is standing on four wheels, remove the bolts of the wheel on which the brake pads will be replaced. If the bolts do not budge, treat them with WD-40 penetrating liquid.
3. Jack up the car, install a safety block under the body and remove the wheel.
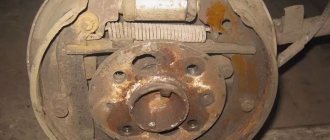
4. Next, using a metal brush and a rag, clean the brake mechanism parts.
5. Check the brake fluid level; if the brake fluid level in the reservoir is about 0, you need to use a syringe with a hose to pump out some of the fluid; if this is not done, the fluid may run high or simply will not allow the pads to move apart.
6. Now take a screwdriver and place it between the caliper and the outer pad, then carefully press the piston into the brake cylinder.
7. While resting on the block, pull the caliper as far as it will go.
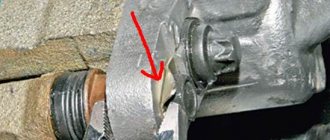
8. Using a screwdriver, you need to bend the corner of the lock washer of the lower bolt. Sometimes there is no way to do this, in which case the corner will have to be knocked down using a chisel.
9. Using a wrench set to “13”, unscrew the lower bolt securing the bracket body, and to prevent it from turning, fix the guide pin with a wrench set to “17”.
10. Next, lift the bracket body up and take out the pads.
11. Using a metal brush, we thoroughly clean the brakes, calipers and discs from dirt and rust, in other words, we prepare everything for installing new brake pads.
Direct replacement of brake pads on Lada Priora
1. Take new brake pads and install them in place. During installation, ensure that the compression springs are parallel to the top edge of the pads.
2. Turn the bracket body down, then tighten the lower fastening bolt, holding the guide pin with a wrench.
3. Roll back the lock washer antenna.
4. We put on and fasten the wheel, lower the car to the ground.
5. Press the brake pedal several times to return the piston to working condition.
6. Add fuel oil if necessary, as you know the level should be between the “MIN” and “MAX” marks.
Snapshot7
We remove the brake pads from their guide.
We remove the brake pads from their guide.
We remove the brake pads from their guide.
Attention! Once the caliper has been rotated relative to the shoe guide, do not press the brake pedal as the piston may come out completely from the cylinder.
We clean the pad seats in the caliper and the pad guide from dirt and corrosion.
Before installing new pads, it is necessary to move the piston as much as possible inside the cylinder. This operation can be performed in different ways.
Adviсe
To ensure a smooth replacement, it is important to:
- check the functionality of the entire braking system;
- If the protective covers are cracked or otherwise damaged, replacement is required. It is better to use Uniol-1 lubricant or any high-temperature lubricant;
- Do not operate the car immediately after replacement. It takes time for the pads to get used to the discs;
- To make the grinding process complete faster, drive out onto a flat road and perform several stages of movement. Accelerate first and then slow down.
To change the pads, you do not need to take the car to a pit or overpass. To work, you only need a jack, with which you can easily remove the wheel. After studying the detailed instructions, you can easily replace parts yourself and save on it.
Snapshot9
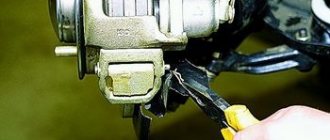
We insert a screwdriver with a wide blade or a mounting spade through the caliper window and, resting it on the brake disc, move the bracket, recessing the piston into the cylinder.
We insert a screwdriver with a wide blade or a mounting spade through the caliper window and, resting it on the brake disc, move the bracket, recessing the piston into the cylinder.
We insert a screwdriver with a wide blade or a mounting spade through the caliper window and, resting it on the brake disc, move the bracket, recessing the piston into the cylinder.
After replacing the pads, press the brake pedal several times to set the gaps between the pads and discs. We check the fluid level in the tank and, if necessary, bring it up to normal.
During operation, the surface of the brake disc becomes uneven, as a result of which the contact area of the new, not yet worn-in pads with the disc decreases. Therefore, during the first 100 km after replacing the pads, until the new pads have broken in, be careful, as the car’s braking distance may increase. In this case, the pads may become hotter than usual, up to the appearance of slight smoke and odor, especially in hot weather.
Lada Priora: checking and replacing the brake pads of the front wheels
Features of replacement on a car with ABS (ABS)
When installing pads on a Lada Kalina with an anti-lock braking system (ABS) installed, it is important to take into account several nuances.
- Before starting the replacement, you will need to tighten the ABS sensor so as not to damage it when removing the old pads. The sensor is mounted on one screw, which can only be unscrewed using a deep E8 star-head.
- When removing the brake drum from the mount, you should be careful, since there is a built-in ABS sensor disc underneath it. Damage to the disc may cause the braking system to malfunction.
Some useful tips:
- Whenever you replace pads or brake discs on a Priora, take the time to inspect the entire brake system, check the protective rubber covers of the guide pin, and the movement of the caliper relative to the brake pad guide. If the movement is tight, it is necessary to apply special grease to the guide pins.
- Replace protective covers if cracks or damage are found on their surface. It is recommended to use special lubricant - UNIOL-1, but if you don’t have one at hand, you can replace it with high-temperature lubricant.
- After replacing the brake pads, it is not recommended to actively use new parts or check the effectiveness of the brakes. The fact is that grinding in new pads to brake discs is not a matter of minutes; it takes time for everything to get in properly; it is impossible to say more precisely, because it all depends on the intensity of braking, the quality of the pads and the frequency of operation of the car. At first, you need to take into account the fact that the brakes do not work effectively enough, so constantly brake with a “reserve”.
- To speed up the process of grinding brake pads to discs, select a flat section of the road, preferably with a minimum number of road users, and perform several cycles: acceleration - smooth braking. Be careful and do not lose your vigilance, because it is very easy for new brake pads to overheat or “burn” (when the top layer of the linings becomes “mirror-like” and braking efficiency is reduced by 10-15%).
Product catalog where you can buy brake pads for Lada Priora
Back