Replacing pads for Lada 2105 (VAZ 2105)
When operating a VAZ 2107 car, sooner or later there is a need to replace various consumables, which include brake pads.
In today's article we will talk about how to replace them on a VAZ 2107 car. It is worth noting right away that for sevens it is quite simple and even a beginner can do it. When should you change your front brake pads?
Typically, front brake pads last about 20-30 thousand kilometers. But here it is worth noting that this is a very approximate value, and it is different for each driver, moreover, it depends both on the driving style, the places where he drives (city, town, on the highway), and on the pads themselves. One of the more accurate methods for determining that the pads need to be replaced is to look at the thickness of the friction linings; it should be more than 1.5-2 mm. If the thickness has reached this level, you should not wait for the characteristic grinding sound of metal on metal, as you risk ruining the brake disc, which will cost more and it will be more difficult to complete this work than changing the front brake pads on a VAZ 2107.
So, what do we need to replace the front brake pads on a VAZ 2107:
- wheel chocks or a pair of bricks
Let's move on to the process of replacing the front brake pads
Before you start changing the brake pads, you should open the hood and look at the brake fluid level in the barrel. If it is close to the maximum, then you need to pump it out a little with a syringe, since when we press the liquid into the caliper cylinders, it may exceed the maximum mark. Yes, and the new pads will be in a more recessed position since the friction linings there are new, but on the old ones they are already worn out.
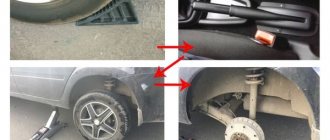
Now that we have checked the level, we should place the car on a flat surface and secure it with the parking brake. Place wheel chocks under the rear wheels if there are none, most likely just place bricks. Now you should remove the bolts from one of the wheels, depending on where you decided to change first. We jack up this side and remove the wheel; I don’t think any details are needed on how to do this.
- now that we have everything prepared, and the wheel has been removed and does not interfere with us, we should remove the fixing splines using pliers.
— next we remove the guide pins using a drift, it is worth doing this carefully so that the springs do not fly away.
— if you have pliers, you can use them or a large screwdriver to push the pistons into the caliper cylinders and remove the worn pads. Install new pads in place of the old ones, and reassemble this wheel in reverse order.
— after which you should move to the second wheel and perform the entire cycle from the beginning.
Before leaving, you should check the brake fluid level, it may have exceeded the maximum, and also start the car and press the brake pedal. At first the pedal will fail, but after 3-4 presses it should recover and become as before. If this does not happen, under no circumstances should you drive off; you need to check the tightness of the brake system; a hose is probably damaged somewhere.
Well, that’s all, the process of replacing brake pads does not take much time at all, even for novice car enthusiasts.
The front brake pads on a VAZ 2105 should be changed if the thickness of the working surfaces of the friction linings has become less than the permissible standard, namely 1.5 mm. The pads should also be replaced if various mechanical damage, cracks, deep scratches, or loose connections between the pad and the base are found on their surface. Replacement should be done on both sides so as not to disrupt the uniform operation of the front brake circuit.
To perform dismantling work, prepare two sets of new pads and a standard set of tools. Perform the following sequence of actions:
- Secure the vehicle stationary by engaging first gear or applying the parking brake.
- After loosening the wheel bolts and jacking up the body, remove the wheel.
- Using a wire brush, clean the surface of the front brake mechanism from dirt.
- Next, open the hood and check the brake fluid level in the reservoir. If the level corresponds to the “MAX” mark, then it must be taken out using a rubber bulb so that when the brake pistons are subsequently compressed when removing the pads, it does not overflow.
Lada 2105 ⓂⓊⓈⓉⒶⓃⒼ Classic Style › Logbook › Replacing front brake pads
Good day to all!
Last week I decided to replace the front brake pads with FERODO
NOTE: Replace pads only as a set (on both sides of the vehicle). The work is carried out on a car with the front wheels hanging (on a lift or a car raised on a jack and installed on supports). After I took off the wheel, I cleaned everything from dirt and dust, then WD-oh popped the joints of the pins with the cylinders
to make it easier to knock out the fingers, since I read on the Internet that they stick, but they came out without problems for me, I didn’t even have to strain =) In order to remove the fingers, I removed two cotter pins of the fingers
Then I knocked out the fingers, but not completely, and when I knocked them out, I removed two pad pressure springs
I loosened the pads with an adjustable wrench and helped out a lot =)
HELPFUL ADVICE As the pistons are pressed into the cylinders, the level of brake fluid in the master cylinder reservoir rises. If the fluid level in the reservoir is at or close to the “MAX” mark, pump out some of the fluid from the reservoir to prevent overflow. And then I took out the old pads
WARNING Do not press the brake pedal with the brake pads removed to avoid pushing out the pistons from the working cylinders. Then I installed new brake pads in the reverse order of removal.
After doing one side, I pressed the brake pedal 5-6 times to set the pistons to the working position =) NOTE After replacing the pads, check the brake fluid level in the master cylinder reservoir and, if necessary, bring it to normal. HELPFUL ADVICE Before you do everything, don’t go straight out onto a busy street, first drive somewhere where there are no cars or people, so that the pads get in a little for even contact with the brake disc =) Well, that’s all, now all that’s left is to wait for the pads to rub in and see on their braking efficiency =) Half of the photos were taken from the Internet, since I forgot to take pictures of these processes =) Thank you all for your attention and good luck on the roads!
How to choose spare parts
How long the pads will last depends on the driver’s driving style (aggressive driving) and the conditions under which the car has to be driven. The pads wear out faster if the car moves around the city in jerks: either picking up speed in fairly short sections, or using sharp braking.
The procedure for replacing brake pads is carried out on both wheels of the same axle at once. Wherein:
- Be sure to analyze the condition of the parts and mechanisms of the brake system.
- To assess brake disc wear, use a caliper and measure its thickness.
- Check the entire assembly for damage and find out if the geometry of the structure is broken.
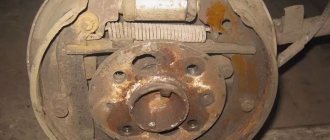
What rear brake pads can be installed on a VAZ 2105?
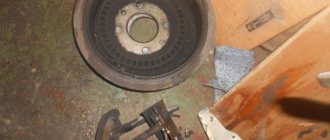
The VAZ 2105 is equipped with drum brakes on the rear axle. It must be remembered that their price is relatively low. The replacement process is simple and does not cause any serious difficulties. But just like with front pads, it's important to be careful when purchasing rear brake pads. Non-original products can be downright dangerous.
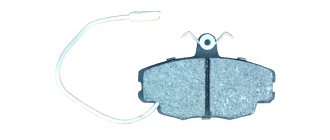
Original
Replacement with the original takes minimal time. Despite the fact that production of the entire VAZ 2105 family has long been discontinued, purchasing pads from the manufacturer itself will not be difficult. This would be a better choice. The likelihood of buying a fake will be minimal.
| Name of product, brand | vendor code | Cost, rubles |
| LADA VAZ | 21010-3502090-86 | From 700 rubles |
Analogs
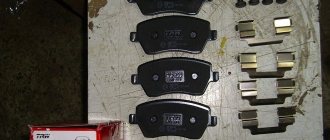
You can easily purchase an analogue of the original. You need to focus on well-known brands. Because they closely monitor the quality of their products. The likelihood of buying a defective item is extremely low. You need to familiarize yourself with the signs of fakes. Most often, Chinese manufacturers imitate products from well-known companies. For example, Bosch and Ferodo, TRW. The presence of a company logo, high-quality packaging and a special hologram allows you to avoid major problems.
| Name | vendor code | Cost, rubles |
| S.B. | BS40503 | From 700 rubles |
| Allied Nippon | ABS1702 | From 1 thousand rubles |
| TRW | SFK89 | From 500 rubles |
Replacing front pads
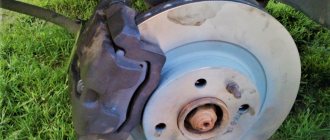
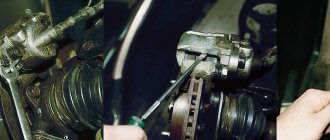
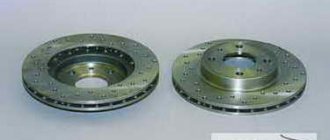
As already mentioned, the front brakes of the VAZ 2107 are disc. Replacing them is much easier. After hanging it on a jack and removing the wheel, we gain access to the caliper. Using a large screwdriver or pry bar, we open the pads, thereby pressing the brake pistons into the cylinders.
Unscrew and remove the guides of the front pads, and then remove the pads themselves. We install new ones after the brake pistons are fully unclenched. Insert the guides and secure them with cotter pins. This is where the replacement ends. It should be noted that disc pads wear unevenly, so usually replace one that is more worn.
Attention! If during work it is discovered that the brake drum or disc has a damaged, uneven working surface, something must be done with them - grind or change. Otherwise, the new pads will wear out too quickly and all your efforts will be ineffective.
Front Brake Component Replacement Process
In order to replace a set of old brake pads on a VAZ-2107, it is important to do the following:
- Raise the car using a jack.
- Remove the wheel.
- Spray the guide pins with WD-40 spray.
- Using pliers, remove the cotter pins from your fingers.
- Use a thin screwdriver or small hammer to knock them out and remove the springs that press the pads.
- Using a large screwdriver (pry bar), remove the worn ones.
- Replace the brake disc if its thickness is less than 8-9 mm or if it is deformed.
- Using old pads and a pry bar, press the pistons on the brake cylinders as far as they will go.
- Install new front shaft pads on the VAZ-2107.
- Insert the pins back and secure with cotter pins.
- Install springs.
- In order for the pistons to come out of the cylinders, it is necessary to press the pedal of the main brake system to the floor a couple of times.
- Put on the wheel and secure it.
- Place the car on its wheels using a jack.
Using the same scheme, replace the front brake pad of the VAZ-2107 on another wheel.
Having done this, be sure to check the amount of special liquid. If the level is low, top up. Experts advise checking the presence of a special fluid that is used for the brake system and its level before sinking the pistons. Being in this state, they affect the fluid level. To prevent it from spilling out and spoiling the coating, as well as body parts, it is worth taking a little from the barrel using a small syringe or syringe.
Brake pad problems
The parts of the braking system in question have to be changed not only when they wear out, but also when malfunctions occur that are associated with the use of low-quality consumables or too active driving. The following characteristic signs indicate problems with the pads:
- creaking, grinding and other extraneous sounds when braking;
- car skidding when pressing the brake pedal;
- to operate the pedal you have to exert more or less force than usual;
- beating of the pedal when braking;
- after releasing the pedal, it does not return to its original position;
- the presence of black dust on the rims.
Extraneous sounds
Modern brake pads are equipped with special indicators that indicate wear of these car parts. The indicator is a metal strip that is attached below the friction lining. When most of the material is worn out, but the pad is still able to decelerate, a characteristic grinding or whistling sound appears when the brake pedal is applied. If the pads are not equipped with such indicators, the presence of extraneous sounds indicates obvious wear of the elements in the brake mechanism and the need to replace them.
Skid
If the car skids to one side when braking, then the likely cause is wear on one of the pads. The car can skid until it turns around, even on a dry surface. In addition to the pads, skidding can occur due to scuffing or deformation of the brake discs.
Video: why the car pulls to the side when braking
Some time ago I was faced with a situation where the car began to pull to the side when braking. It didn't take long to find the reason for this behavior. After a quick inspection of the car's underside, it was discovered that one of the rear brake wheel cylinders was leaking. This caused brake fluid to get on the working surface of the pad and drum, as a result of which the mechanism was unable to perform its function. The problem was resolved by replacing the cylinder and bleeding the brakes. If you encounter a similar situation, I recommend replacing the entire cylinder rather than installing a repair kit, since the quality of rubber products today leaves much to be desired.
Increase or decrease pedal effort
If the pedal has to be pressed unusually hard or lightly, the problem may be caused by worn or dirty pads. If everything is in order with them, then you should check the integrity of the entire brake system for fluid leaks.
Vibration
If there is vibration when you press the brake pedal, then a possible reason is that dirt has gotten between the brake disc and the pads, or a crack or chips have appeared on the latter. As a result, parts are subject to premature wear. However, you should be aware that a similar phenomenon is also possible due to problems with the hub or hydraulic cylinders of the brake system.
The pedal goes down
Sometimes it happens that the brake pedal does not move back after being pressed. This indicates that the pads are “stuck” to the disc. This phenomenon can be observed at sub-zero temperatures when moisture gets on the pads. In addition, air may enter the braking system, which requires inspection and subsequent repair or bleeding of the brakes.
Plaque on discs
Plaque on wheel rims is black dust, which indicates wear on the pads. If the dust contains metal particles, then not only the pads are erased, but also the brake disc itself. If such a situation arises, you should not delay inspecting the brake mechanism, as well as replacing failed parts.
One day I noticed that the front wheel rims were covered with black dust, and it was not road dust. It is no longer known what brake pads were installed at that time, but after replacing them with factory ones from AvtoVAZ, the situation remained unchanged. Therefore, I came to the conclusion that the appearance of black dust is a normal phenomenon, indicating natural wear of the pads.
Signs of faulty brake pads
In order to fully replace a set of (rear and front) brake pads on a VAZ-2107, you need to know the signs of a malfunction:
- on the metal plates that protect the block from friction, cracks and chipped places are visible;
- the front pad is about 2 mm thick, and the rear pad is 1.5 mm thick;
- the plates are smeared with oil.
It is important to remember that removing the wheel will help determine the degree of pad wear. In order to see the condition of the rear ones, the owner needs to remove the brake kit drum. The process always requires more time and effort.
Experts emphasize the existence of other ways to determine possible problems with pads:
- when braking, the car pulls to the side;
- You hear a certain sound (creaking) when you press the brake pedal.
Such problems indicate that the pads are wearing out. In this case, they should be replaced.
How to replace front brake pads on a classic VAZ-2101-2107
The car brakes poorly, you can hear a whistle, and when braking, metal scrapes against metal. This means there is a reason to inspect the brake pads. Replacing the front brake pads on classics is necessary when the lining becomes less than 1.5 mm thick.
It is best to change the pads at once, on both front wheels, so that the brakes get used to it and the car does not skid to the left or right when braking.
Over time, pads inevitably have to be changed on any car. Moreover, if they were operated in urban or forced mode. The front brakes experience the greatest load when braking. Thus, they are the ones who take on the entire mass of the car, multiplied by its speed.
Preparation
The work is best done on a flat, paved area - most typical garages will be a bit cramped. Find a suitable support in advance - hanging a car on a standard jack is dangerous, especially considering the state of the jacking sockets on cars, the youngest of which is almost ten years old. Also for work you will need:
- narrow nose pliers;
- a thin drift (at worst - a piece of 4 mm electrode or a thick nail);
- metal brush;
- powerful flat screwdriver;
- rubber bulb or large syringe.
First, you need to pump out the old brake fluid from the reservoir - when the working pistons are recessed, it can overflow, and replacing it with fresh one would be quite reasonable. It is worth placing stops under the wheels and, having removed the tightened bolts, hang the car, place a support under the threshold and release it down.
What is needed to replace brake pads
To change the brake pads of a VAZ 2107, you will need the following tools and accessories:
- jack;
- wheel wrench;
- set of wrenches;
- hammer;
- bit or thin screwdriver;
- metal brush;
- rag (rags);
- a powerful flat-head screwdriver or pry bar;
- pliers;
- screwdriver;
- WD-40;
- new pads.
Important: VAZ 2107 pads must be changed only as a set: both left and right at the same time.
The front brakes of the “seven” are disc type, the rear brakes are drum. Accordingly, the design of the pads and the procedure for replacing them are different.
Replacing a brake disc with your own hands on a VAZ-2107
Hi all! I decided to tell you about my experience of replacing brake discs on an old VAZ-2107; in principle, this is not as difficult a matter as it might seem at first glance. Last year, during a routine inspection of the brake pads, I noticed uncharacteristic arc-shaped wear on them closer to the center of the disc, which should not be there, and it was on all pads on both sides. I decided to change the pads to new ones, ride off the winter and check again: as it turned out in the spring, similar wear appeared on the new ones, plus when braking at high speeds, a beating in the pedal began to be felt.
Completion
Having installed the wheels, the fastening bolts are pulled by hand or “with a jerk” - spinning the wheel so that it reaches the bolt with its inertia. The final tightening is carried out when the car is released on the wheels, while the normal tightening torque is no more than 120 Newton meters; greater force will not improve the reliability of the fastening, but will only wear out the threads in the hubs more intensively.
When the working pistons are retracted, liquid will again appear in the reservoir of the main brake cylinder. Pump it out again and fill it with fresh water until about 0, then move the pistons to the working position by pressing the brake pedal until its movement returns to normal. Refill the brake fluid to the upper mark, and the car is ready for further use.
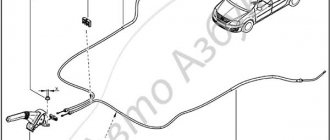
Adjusting and replacing rear brakes on a VAZ 2101
Adjustment of the rear brakes is carried out with the rear of the car suspended and raised on a jack (or overpass or pit) with the wheels removed. To check the operation of the brake system, you will need an assistant and a set of tools: a 17-size spanner, a 13-size open-end wrench, pliers and a special measuring stick with graduations from 0 to 0.15 mm.
The recommended gap between the drum disk and the brake lining should be in the range of 0.10 - 0.15 mm, and it is important to ensure that the rotation is smooth. Sequencing:
- Apply the brake pedal until the pads are fully pressed and use a screwdriver to turn the two adjusting eccentrics until they touch the pads.
- Then release the brake and unscrew the adjusting nuts alternately until the size of the gap between the drum mirror and the working surface of the pads is within 0.10 - 0.15 mm.
- After this, pump the brakes with sharp pressures several times and measure the gap again with a feeler gauge. If the eccentrics become loose, they are turned again to the required value.
After installing the wheel after adjustment, you need to make sure that it rotates freely. If the brake linings are worn out, they must be replaced, which is done with the drum removed. To remove the drum, bolts are used, inserting them into the technological holes and turning until the drum itself moves away from the axle shaft.
The difficulty is that during long-term operation the aluminum alloy is “welded” to the steel surface of the axle shaft flange and sufficient force will be required to remove it.
Installing new rear pads:
- Lever 3 of the shoe drive and cable fastener 10 are disconnected.
- Springs 5 and 9 are removed.
- The cup of the support column 1 is turned out and removed along with the springs.
- Next, remove the block 2 itself, pulling it out of the grooves of the piston 4 and removing the support rail 6, after which new blocks are installed, assembling the mechanism in the reverse order.