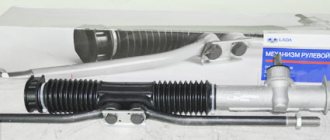
Step-by-step replacement of the VAZ-2109 door lock cylinder
The problem with the VAZ-2109 is that over time the door becomes loose and the operation of the locks is disrupted. In most cases, adjustment and adjustment of the lock is necessary. The situation is more complicated when the lock simply jams. This often happens on the driver's side. In this case, it is worth replacing the lock, but do not knock it out with a wheel wrench. As a temporary measure, the door lock cylinder on a VAZ-2109 car can be replaced.
Repair of interior door locks
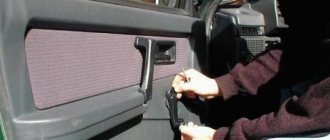
Losing keys or jamming a lock is an unpleasant situation for any car enthusiast. Do not break the door or locking mechanism. Carefully open the door so as not to damage the rods and the body of the locking mechanism. After this, proceed to the rest of the work. Instructions for removing and replacing the Euro handle cylinder are as follows:
- Remove the door trim. This job won't take much effort, but be careful not to damage the material.
- Disconnecting the rods is one of the most difficult parts of the job. Pick up the bottom one with pliers and remove it from the handle. Then it is easy to insert it back. To remove the top one, press the screwdriver against the handle, thread the unnecessary wire through the rod and pull sharply. Without a screwdriver, the rod will bend.
- Using a 8 key, unscrew the handle.
- Before further work, remember the position of the lock. Pull out the pin from the side and remove the rod.
- Remove the spring and pull out the cylinder.
- Lubricate the groove where the cylinder was located with WD-40.
- The new cylinder is supplied with the key. Do not remove it until the lock is installed. Sometimes a new part needs to be carefully finished with a file. This happens if it is made in China or is simply of poor quality.
- If the pin does not fit into the hole freely, then you need to lightly file the place for it.
Assembly occurs in reverse order. Don't forget to connect the rods and check the lock's functionality before you lock the car for the first time. This work will take you no more than an hour. The trim is always installed last, after adjusting the locking mechanism.
Features of door adjustment
The adjustment work involves changing the height of the rods.
The rods are attached using plastic tips that have a ball joint inside. Correct adjustment of the door lock is carried out by pulling out the groove. Next, you will need to twist slightly counterclockwise or clockwise. The lock is adjustable by selecting the ideal length. So please be patient. After the repair, you will have to adjust the sash slamming mechanism. By the time you move on to setting it up, you can already return the trim back to the door, since the work will be carried out with the latch on the body. Move the clamp up or down until you achieve the perfect result. The door should latch easily, without noise or effort. This adjustment can be made without replacing the lock cylinder if you are not satisfied with the need to apply force when closing.
Replacing and adjusting the trunk lock
The work is carried out in the following order:
- The casing is removed.
- Replace the support mechanism. If the lock's supporting tooth breaks. Replace not only the cylinder, but also the new body. In general, this work is no different from what needs to be done to repair a door lock.
- Adjustment is carried out using the lower clamp. Unscrew the nuts and remove the washers. Assembling and disassembling the lock will help you adjust the lock. In this case, you need to act using the selection method. The desired result is the moment when the door closes effortlessly and does not vibrate when slamming and driving the car.
More extensive work is required if the retainer bushing is broken. If you are changing the lock assembly, then before its fasteners are fully tightened, you need to adjust the latch. Only after the lock closes perfectly can you tighten the fastening nuts to the maximum.
Installation of alarms on VAZ-2114
The control module is located under the dashboard on the left, and its connector attached to the body contains six wires:
DBMS module of the “ninth” family
When installing an alarm, the “blue” and “brown” cords are broken to obtain the following diagram:
How to connect the alarm to the central locking system
The wiring of the 6-pin connector mounted on the main Starline A91 module is given below. Carefully study the principle of operation of the circuit: the limit switch here is in the “closed” position.
Before connecting the alarm to the ACU, make sure that a standard 5-wire actuator is installed in the driver's door, and not a toggle switch. It’s unlikely that anyone will be able to install the actuator with their own hands by running two cords to the engine in 5 minutes. In general, it is sometimes better to refuse to connect the signaling system to the central locking system.
Let us take the liberty of revealing VAZ’s proprietary secret:
- If you see a "white" control wire connected to terminal "7", it is responsible for unlocking (as opposed to the "brown" one);
- If terminals “5” and “7” are not used, a “brown” cord will be connected to terminal “8”, and it is then responsible for unlocking.
The locking contacts are terminals 5-6. The two outer terminals are responsible for unlocking. This is true not only for model 2114, but also for BUBD units of the “ninth” family in general.
The instructions for the alarms usually do not say that you will need to buy additional parts before installation. These include:
- Diodes 1N4001 (2-3 pcs.) – designed for current up to one Ampere;
- 1N5401 (1 pc.) – three-amp diode;
- To install any car alarm that does not have separate outputs for turn signals, you need to purchase two power diodes (4-5 Amperes).
The latter, as you might guess, does not apply to the Starline A91 system. And this is great luck.
1N5401 diode wiring
When installing any Starline system, you usually spend less than 100 rubles on parts.
Replacing the lock cylinder of a vase
The door opening mechanism on the VAZ 2106 is quite durable from the outside, but some owners still manage to break them off, or particularly aggressive passengers. Replacing the handle is not so easy, because you have to remove the casing. So, to perform this repair you will need a tool such as:
- crosshead screwdriver
- Head for 8
- Extension
- Driver or ratchet (most convenient)
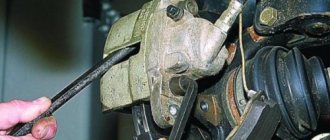
The procedure for removing the outer door handle on a VAZ 2106
First, perform the following procedure: Removing the trim from the front door.
Next we need a head with an extension. The handle is secured from the inside with two nuts. First, unscrew its left side:
The second nut is in a more difficult to reach place, so you will have to gain access to it first. To do this, you need to unscrew the three bolts securing the door lock, as shown in the photo below:
Now from the inside we move the lock mechanism a little to the side so that we can put the head on the second nut securing the door handle:
After which, on the reverse (outer) side, the handle will be released, but will still be held on by the rod, which is attached to the lock cylinder.
To disconnect the door handle, you need to pull with medium force for up to three times until the rod comes off the hook of the cylinder:
That's all done, now the handle is disconnected from the VAZ 2106 door and is ready for replacement.
Installing the new one is done in reverse order. The price of a new such part is 170 rubles on average in all auto parts stores.
How to replace a lock cylinder
Very often it is the lock cylinder that fails, so we will look below in more detail about how to replace it. To do this, you will need a thin wire or needle and a flat-head screwdriver.
First of all, we remove the spring, which throws the key in the lock when opening. Just pry it off with a screwdriver and remove it, first remembering its position so that you can put it back in the same way:
Now we take a thin wire and with its end we squeeze out the cylinder fixation rod, as shown in the photo below:
After which the upper ring is removed and the larva is removed from the reverse side:
The cylinders are replaced in pairs, on both the left and right doors, and also at the same time as the trunk lock, so that you have just one key for everything! Otherwise, you will have to carry several keys with you, which is not very convenient. The price of the set is 300 rubles maximum, so your wallet won’t be too empty.
We carry out the installation in reverse order; everything is not as complicated as it might seem at first glance.
Good day to all! From the very beginning I received the car with non-working locks. Initially, the driver's door was locked only from the inside, and the passenger door was not locked at all. The neighbor's children took advantage of this and the car repeatedly greeted me with its doors open. This annoying drawback was eliminated by me quite recently. Moreover, on the way to the salon there are a couple of goodies.
We repair “Nine” locks ourselves
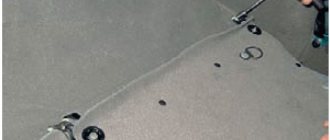
Let's say the key in the VAZ-2109 lock does not turn or, conversely, turns and does not unlock the door. Repairing car locks involves one of the following actions: replacing the cylinder (cylinder), replacing or repairing the internal lock. In official manuals, by the way, it is recommended not to repair the internal lock mechanism, but to replace it. Be that as it may, you first need to get to it, for which you remove the door trim. Each of the actions required for dismantling is further illustrated in the photo. The entire sequence must be considered in order.
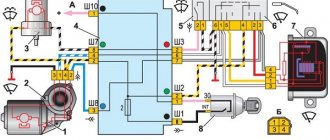
"Nine" and the door lock device
Theoretically, the lock mechanism can be divided into 3 parts: a handle with a cylinder and a button, the main mechanism, and the inner door handle. All nodes and connections between them are shown in the diagram.
The node labeled “2” looks like this.
4 rods fit to it, that is, to this node. Two of them are connected to the external handle, and in order to dismantle it, the rods are disconnected.
If there is no electrical wiring inside the door, you do not need to disconnect the battery before performing repairs.
In other cases, that is, when power windows or locks are installed, the battery must be disconnected. To do this, as many people know, it is enough to remove the “negative” terminal. This means that before repairing locks, the hood is opened first, not the doors. Anyone who violates such a requirement will, at best, have to change burnt fuses.
Replacing the door lock cylinder
To gain access to the locking mechanism, you need to remove the trim. On the “Nine” it is quite simple to remove it - the casing is held in place by plastic pistons. These pistons are located around the perimeter; they are simply pressed out and, if necessary, replaced with new ones.
First, as is easy to understand, you need to dismantle three elements: the side handle, the window lifter handle, the socket of the inner handle of the lock. The “dog” must be pulled up, but it is better to remove the seal that protects the glass during the dismantling of the casing.
Used kit
The kit is small and is pictured in full below:
Used kit
The kit also includes instructions in English:
Instructions - description of the control unit
Connection diagrams
Theory
Before starting the installation, I want to warn you about the characteristics of my particular VAZ 2114 car (2006 model year, “Lux” equipment, the wiring under the dashboard is numbered as “VAZ 2115-...”), since I myself, from personal experience, have seen “four” and “tags” of the same year of manufacture, the same configuration, but with completely different wiring (I assume that this was due to different supplies of wiring to the conveyor).
After looking at the information on the Internet, I came to the conclusion that the overwhelming number of people install the control unit according to the incorrect diagram “D”, from the instructions, which will not fit the Samar family (VAZ 2108/09/99/13/14/15) , since the opening and closing of doors (or rather, the supply of a signal to the BUDU (Door Lock Control Unit)) in Samara is controlled by a “minus”, and according to the “D” scheme, control occurs by supplying a “plus” to the BUDU. As I found out, this scheme only works when the standard BUDU is removed and the BU works every other time and only one button on the control key works. In my case, when connecting circuit “D” (I tried to connect it together with the BUBD), I burned several fuses and started looking for another connection method.
The scheme we need and works is scheme “C”
Scheme C
According to this scheme, our control unit will send a “minus” signal to the BUDU and everything will work normally, without removing the BUDU itself.
Installation
To begin with, I determined which wires in the control unit block I needed and which I did not. I didn’t need: - green wire - window closer; — blue wire — trunk opening; — pink wire — siren (there was a siren, but I just didn’t want to install it); Also, orange and orange-black wires are not needed, since according to scheme “C” they are not needed.
We still have: - red - “plus” 12v to the battery; — black — “minus” 12v (I connected the minus to the body, since the control unit does not necessarily require minus power from the battery); — yellow and yellow-black — connect to the negative (I connected them to the main negative and all 3 wires to the body); - 2 brown ones - they supply a plus to the alarm button (some people connect them to the dimensions); — white — it sends a minus for closing; - white-black - it sends a minus to the opening.
For clarity
Used block with signatures
The control unit was installed on self-tapping screws, on the lower plastic part of the panel (to the left of the steering wheel height adjustment lever, next to the hood opening handle), but you can install it as you wish.
Plus, I stuffed it into the cambric and passed it through the rubber of the headlight range control, making a small hole with an awl (I couldn’t find a more convenient place, without drilling, in the whole car):
Positive wire
Under the hood I connected the plus directly to the standard terminal, tightening the bolt to “10”:
Positive terminal
I started connecting the emergency lights. I read on the Internet that you need to disassemble the hazard warning button, solder something, short circuit something, and in general it turns out that this round button interferes with normal steering and everywhere they show how to redo it. In general, I did not find a complete pinout of the button, using a general electrical diagram and the scientific “poke method” I found out that:
— blue-black wire — left turn; - blue wire - right turn
Hazard warning button block
I again stuffed the two brown wires into the casing and brought them to the emergency flasher button block, pulled out the blue-black and blue wires from the block, using a small awl and “someone’s mother,” and soldered the brown wires directly to the “mother” terminals, like this how I didn’t want to cut off the factory terminals (you don’t need a lot of tin, because if there is a lot of it, the terminals won’t fit back into the block):
Emergency signal block with soldered brown wires BU
Removing the BUDU turned out to be not an easy task; it is located above the hood release handle, almost under the dashboard, in general in not the most convenient place.
I have installed BUBD 21093-6512010-03 NPO Itelma.
BUBD 21093-6512010-03 NPO Itelma
This BUBD was installed on all Samara II (VAZ 2113/14/15), I’m not sure about the Samar I (VAZ 2108/09/99), check whether the BUBD is the same on your car, because the pinout may be different. The wires we need in the BUBD block are: - brown - closing the doors; — blue — opening doors By analogy with the emergency gang, I soldered the wires to the terminals according to the diagram: — brown from the BUBD with white from the control unit; — blue from BUBD with white and black from BU
BUBD block with soldered wires from the control unit
Now the most interesting part is the driver's door.
We remove the door trim, remove the black “anthers” from the inside.
There are several options:
Option 1) You have a certain “microswitch” in the driver’s door, which, when you open the driver’s door with the key, sends a signal to the ECU and it opens the other doors (another name for such a switch is central locking, since without such a switch you would have to close each door separately). The driver's door motor is missing. There is also a block with two wires in the driver’s door: one is red, the other is yellow (the same blocks are 100% in the other 3 doors of the car) they supply power to the electric motor, which opens/closes the door lock.
Option 2) Everything is the same as in point 1, but the block with the red and yellow wires is missing (a very common situation, especially if the equipment is not “Lux”). In this case, you need to pull these wires from the ACU to the driver's door (the diagram of the door lock system will be below).
Option 3) You have/have had a non-standard alarm installed and now you have more wires in the driver's door than in the entire car. Here I can’t tell you anything, since I myself have not installed a non-standard alarm system in Samara, try to figure it out using a diagram of the door lock system.
Here is an unmodified, factory “Diagram of the door lock system” for VAZ 2114/15 cars (may coincide with VAZ 2109/99):
Door lock system diagram
We have the first scenario, which means we must first remove the “microswitch”.
Microswitch
How to remove it is detailed here. Personally, I removed it with a Phillips “screwdriver attachment.”
Next, we need to buy a so-called “actuator” (an electric motor (also known as a gearmotor, also known as a door activator) with a contact group, that is, it will perform not only the role of an electric motor, but also the role of a microswitch at once). I didn’t “reinvent the wheel” and install some strange actuators with strange alarms, which are not sold in all auto parts, for which you need to drill holes in the door, I just bought a standard actuator under the number: 21093-6512110-01, he already has All the wires and necessary connectors are present, there is no need to solder or drill anything:
Actuator 21093-6512110-01
You can also install a regular 2-pin electric motor, with two wires 21093-6512210-01, which is installed in the passenger doors:
Electric motor 21093-6512210-01
But in this case, you will only be able to open the doors with the BU key; only the driver's door can be opened through the driver's lock (3 passenger doors will not open), because it does not have a built-in microswitch, like in the 21093-6512110-01 actuator, which gives a return signal on the BUBD (in fact, because of the built-in microswitch it is called an actuator, this is its main difference from a conventional electric motor).
You also need to buy a rod for the driver's door lock, I couldn't find one for sale, so I bought several repair kits for the door lock rods and several bushings for the door rods, in the end I got an almost original rod (I copied the length and bend from the rod for the front passenger's door lock), even with ability to adjust the length of the pull:
Homemade door lock rod
You also need to buy long screws to fix the actuator in the door. This is roughly what it looks like when assembled:
Door with actuator
Well, everything works, but in this state the car will close all doors only with the BU key, the actuator will strongly resist, if you open the driver's door with a regular key, it will open the door, but will immediately close it, because the CU will give the command to close the doors . This way the door can be opened a couple of times without any problems, in case of emergency.
And here we could finish the article... But then I thought about it and decided that I want to keep both the functionality of the control unit and, just in case, keep the standard functionality of the central lock (so that all doors can be opened with a key).
Without soldering, I added the 3-pin block so that I could interrupt the constant negative (black wire):
Rework
Now in one position of the switch, only the control unit works, in another position of the switch, only the central lock works, while nothing is bridged and everything works. I placed the switch together with the window lift buttons into the “stuff pocket” of the door.
I placed and connected a light bulb, which, attention, blinks. This LED is connected to a separate small red connector on the control unit; it blinks when the control unit is in the “closed” state.
Bulb
Bottom line
In this simple way, we installed the Chinese central locking control unit without cutting a single factory wire or drilling a single extra hole in the body.
PS - in 3 months of operation nothing burned, melted or exploded. The control unit does not discharge the battery, since it is not an alarm and it does not have a constant connection with the key fob; the only source of consumption is the light bulb. The BU key is triggered when it is relatively close to the car; the CU's antenna is not large and picks up the signal in different places at a distance of 5 to 20 meters.
Price: - BU: 900 rubles - Actuator: 390 rubles - Door rod repair kit: 108 rubles (2 sets) - Door rod bushing: 40 rubles (2 pcs.)
Features of replacing the door lock cylinder on a VAZ 2114 car
The larva has a cylindrical shape, which is activated when the key is turned in the well. If the mechanism jams and makes it difficult to open/close, then one day the driver simply will not be able to get behind the wheel of his car. Therefore, if the device does not operate correctly, it is recommended to replace the door lock cylinder with a VAZ 2114.
Reasons for replacing the VAZ 2114 lock cylinder
The mechanism is silent, but if an extraneous sound appears when opening the door element, the device will have to be dismantled or rebuilt. Replacing the front door lock cylinder on a VAZ 2114 is required for a number of reasons:
- a sharp drop in temperature;
- failure of the locking ring;
- loss of the fixing column;
- destruction of the plastic rod cap;
- wear of internal pins and teeth.
In winter, the locking devices freeze, causing the key to turn with difficulty or not move. If a person makes an effort, then there is a risk of breaking the opening element in the core of the lock.
When individual parts wear out, they will cling to each other, blocking the rotation function. The main factor indicating a repair is turning the key.
Recommendations
Reassembling and lubricating individual parts will not work if the fragments are heavily worn. It is better to remove the cylinder from the core and install a new one. Recommendations for replacing the VAZ 2114 door lock:
- Partial repairs or lubrication will only temporarily restore life to the closing mechanism. If problems arise, it is better to replace the entire cylinder.
- After installation, it is necessary to periodically lubricate the mechanism. Experienced motorists use silicone substances for this.
- The repair procedure is carried out in a well-lit room at a comfortable temperature.
- To change the element, you will need a set of screwdrivers, pliers and lubricant.
- Sometimes the springs have to be replaced along with the cylinder. They are purchased separately.
The cylinder fragment is sold as a set. The price depends on the manufacturer. If you buy a cheap Chinese version, it will cost about 150 rubles. It is better to give preference to VAZ spare parts. The cost of such a kit is 400-500 rubles.
Withdrawal procedure
Depending on the reason, a complete or partial replacement is performed. It is not recommended for the average person to engage in reassembly, since there are too many nuances in this process, but almost anyone can replace the mechanism. Step-by-step instruction:
- Three screws are unscrewed. They are located on the inside of the handle. To do this, use a Phillips screwdriver to remove the cover.
- The front trigger glass position switch is removed along with the wiring harness block. To do this, the wires are first disconnected.
- The plug on the armrest handle is removed, the element is picked up with a thin corner of a screwdriver.
- Unscrew the 2 screws on the handle that hold the inner panel.
- The plastic clips are pressed out to remove the lining.
- 6 pistons are removed to remove the door card.
- The external fastenings are removed, the nuts are unscrewed with an 8mm wrench.
The last action is to gain access to cravings.
How to remove cravings
To remove this piece, you will need an impact screwdriver and a size 8 wrench. The piece is attached to the internal locking mechanism and the lock switch. Algorithm of actions:
- The internal lock of the outer handle rod is completely disconnected.
- The handle is removed along with the rods.
- The pin is removed from the end of the rods.
- The plastic tip is removed from the core of the cylinder device.
- The return spring is removed. The old larva is being removed.
Usually the rods are fixed with plastic hinges, so they can be disconnected with a flat-head screwdriver.
Installing a new part
The removal and assembly algorithm is the same, although the instructions for installing the cylinder mechanism have its own nuances. Before inserting a new cylinder into the core, the part is lubricated with a silicone substance and only then inserted into the handle. Further algorithm of actions:
- The return spring is inserted next to the cylinder.
- The functionality of the key is checked. It should turn easily in all positions.
- A pin is installed on the tip of the rotary rod. Connection is being made.
- The inner and outer panels are screwed on, the handles are fixed, and the plug is returned to its place.
- The main three screws are tightened from the inside.
You won’t have to change the lock cylinder for a long time if you carefully use the opening mechanism.
How the central lock works
The central locking algorithm consists of sending an impulse to the VAZ 2114 central locking control unit, which analyzes the received signal and generates commands that control the door locks. They are either opened or locked.
General scheme of central locking
Elements that activate the central locking are connected to pin 30. If contact 87 closes, then the activator outputs will be affected by ground. When a certain relay 30 is activated, the contact will connect to the positive. Thus, the activator will receive power and the rod will begin to move. The control unit rod closes different pairs of signals depending on what action needs to be performed: closing or opening the doors.
Since the central locking activators are connected in parallel, all doors will either open or lock at the same time. Central locking can be pneumatic or electric. The first type of device includes a control panel, compressor and tubes. In an electric one, the main element is a motor, thanks to which the mechanisms are activated.