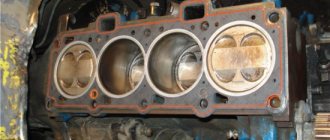
Replacing the exhaust manifold and gasket on a VAZ 2114
The exhaust manifold is a unit that is responsible for ride quality, without which comfort is impossible. This is silence and the absence of exhaust smell under the hood, which can be drawn into the cabin through the hole in the cabin filter. Fixing a leak in the exhaust manifold of a VAZ 2114 is a necessary repair. Fortunately, it is not urgent; you can prepare in advance and choose a convenient moment.
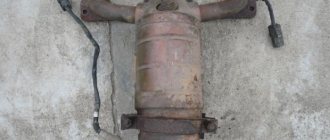
Exhaust manifold for VAZ 2114
Causes of malfunctions
The key factor that causes 90% of exhaust manifold malfunctions on VAZ 2114 cars is high temperature and poor quality materials from which the parts are made. During operation, the steel repeatedly heats up and cools down, which leads to the appearance of cracks in the body. This is a common occurrence for VAZ cars older than 7-8 years.
Auto repair shops offer crack welding services using argon welding. However, for a number of reasons, this activity is useless for cars older than 7 years.
1) Just removing and installing the exhaust manifold will cost about 2.5 thousand rubles. Taking into account the work of the welder and other actions, the cost of repairs can be 4-5 thousand rubles. If you do the work yourself, buying a new part will cost less.
2) Welding, even argon welding, disrupts the structure of “tired” metal. A boiled part rarely lasts longer than a year, after which new holes appear. The older the car, the faster the problem returns, and the collector has to be removed again.
If the car is older than 8 years and there are problems with cracks in the manifold, it is better to remove the part and replace it with a new one.
Types of elements
Today two types of exhaust manifolds are produced:
- whole;
- tubular.
Solid parts have shorter channels, which are then combined into one chamber. Material: heat-resistant cast iron. The part has low gas removal efficiency. This is because the shorter manifold passages act as a barrier to gas pulses from the cylinder block.
Most parts are produced for mass use, and their quality often suffers. Such collectors do not have a vacuum zone. If they get too hot and then cool, the cast iron can crack. Then you will need to remove the VAZ 2114 exhaust manifold and replace it.
For sports and extreme use, a large number of exhaust manifolds are produced with various shapes and methods of connecting pipes. They are made of stainless steel. Car enthusiasts call these parts spiders. There are short spiders and long ones.
For example, on a 4-cylinder engine, the pipe system is represented by the formula 4-2-1. So, each cylinder has its own pipe. Then these pipes are connected into two, and then into one. This system is used in tuning. It allows you to increase the car's power and torque. The short 4-1 system is used in sports.
Signs of trouble
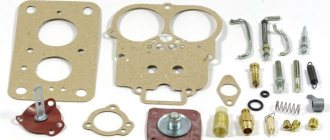
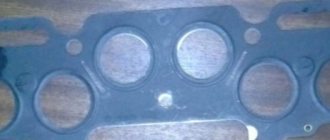
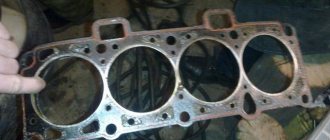
Exhaust manifold gasket
One of the main signs of a leak in the system is a “sporty” growling sound when the engine speed increases. This may be a symptom of various exhaust system problems. To check, it is better to take an assistant and go to a garage with a pit or to an overpass. Most often, you can determine by eye whether the problem lies in the muffler, resonator or exhaust.
Gasket wear may become apparent during planting. Open the hood and start the car - white or grayish smoke rising from the manifold during warm-up indicates a leak for this reason. VAZ car owners usually encounter this problem once every 3-4 years. When using low-quality spare parts and before. The solution may be to manufacture a custom-made steel gasket. It can last as long as the entire collector.
Prices and options
The Premier 2110 Lux is equipped with heated front seats and excellent velor upholstery. An armrest is mounted between the seats. Based on reviews from car owners, you can understand that the rear seat is a bit short and the backrest angle is small. But the developers claim that this will change soon. The interior of the car, especially if it is trimmed with leather, looks much better than other modifications.
In conclusion, I would like to say that the Premier turned out to be much better than the usual 2110. However, it is still far from being a representative car or a limousine. This is clear, because even the manufacturers themselves position this model as a car with improved passenger seating.
| See all advertisements in the archive |
Tools and necessary parts
To remove the exhaust manifold on a VAZ 2114 in order to replace the gasket or entire part, you will need the following tool:
- open-end and ring wrenches for 8, 10, 13, 17;
- wrench with heads 17, 19;
- screwdrivers, pliers.
It is also a good idea to have tools such as a Dremel, nut saw or nut pick on hand. As a rule, the fasteners on the exhaust system parts stick tightly.
A few days before your planned repair, begin treating accessible nuts with WD-40 or another penetrating lubricant. Repeat the operation 2-3 times. This will make the task of removing the manifold a little easier .
The question often arises: is it worth using a sealant after removing and replacing the gasket? Experts believe that if you apply sealant to the gasket, it should only be high-quality silicone. A bad sealant can bring a lot of trouble to a VAZ 2114 engine: when it burns out, it turns into “pellets” that are pulled into the crankcase. And this is unnecessary contamination of the piston system.
Spider 4-2-1 VAZ 2113, 2114, 2115 8cl Stinger
By installing a tuning exhaust, an increase in car power is achieved.
Characteristics:
- Diameter 51mm
- Diameter of primary pipes 38 mm
- Diameter of secondary pipes 43 mm
Applicability:
- VAZ 2113
- VAZ 2114
- VAZ 2115
How to buy
It's easy to place an order on our website. Simply add the selected items to your cart, then go to the Cart page, check that the items you ordered are correct, and click the “Checkout” or “Quick Order” button.
Quick order
The “Quick Order” function allows the buyer not to go through the entire ordering procedure on their own. You fill out the form, and after a short time the store manager will call you back. He will clarify all the conditions of the order, answer questions regarding the quality of the product and its features. It will also tell you about payment and delivery options.
Based on the results of the call, the user either, having received clarifications, places an order independently, completing it with the necessary items, or agrees to the order in the form in which it is now. Receives confirmation by email or mobile phone and waits for delivery.
Placing an order in standard mode
If you are confident in your choice, you can place your order yourself by filling out the entire form step by step.
Filling out the address
Select the name of your region and locality from the list. If you did not find your locality in the list, select “Other location” and enter the name of your locality in the “City” column. Enter the correct index.
Delivery
Depending on where you live, you will be offered delivery options. Choose any convenient method.
Payment
Choose the optimal payment method.
Buyer
Enter your information: full name, delivery address, phone number. In the “Comments to the order” field, enter information that may be useful to the courier, for example: entrances in the house are counted from right to left.
Placing an order
Check that the information you have entered is correct: order items, location selection, customer information. Click the "Place an order" button.
Our service remembers user data, order information, and next time it will ask you to repeat the previous order data. If the conditions do not suit you, choose other options.
Payment
You can choose one of three payment options:
Cash payment
Cash payment is available for pickup from our retail store in Tolyatti. Come, we will be glad to see you in our store.
Cash on delivery by Russian Post
Sending orders by cash on delivery is possible after prepayment of delivery. This is due to the fact that cases of non-repurchase of parcels sent fully cash on delivery have become more frequent. In connection with this, we suffer losses by paying for Russian postal services for delivery in both directions.
The prepayment amount is calculated individually; the order amount must be at least 1,500 rubles.
Dear customers, goods can be sent to distant regions only with prepayment.
Cashless payments
When placing an order in the cart, you can select the non-cash payment option. We accept Visa and Master Card.
After placing your order, expect a call from our manager to agree on payment and delivery terms.
The manager will send you payment details by email or phone via SMS after you agree on the price and delivery method over the phone.
Payment by invoice for legal entities
Information for organizations and individual entrepreneurs:
- On the website, information on prices is presented for individuals.
- The price of goods for legal entities will increase by 10-15%. We work without VAT.
The minimum order amount by bank transfer is 3,000 rubles.
Delivery
Our online store offers several delivery options:
- post office;
- transport companies;
- courier;
- pickup from the store;
Express delivery*
Courier delivery is possible only within the city of Tolyatti.
Delivery price: 200-400 rubles (depending on the area).
Payment for goods is made in cash upon delivery of the order.
Pickup from the store
You can pick up the product from a retail store in the city of Togliatti. It is advisable to pre-order on the website or call by phone to check product availability.
Postal delivery
You can order delivery through Russian Post. Immediately upon arrival of the goods, a parcel notification will be sent to your address. You will also be able to track the passage of your parcel using the track number, which will be sent to your phone by Russian Post upon acceptance of the item for delivery. Very large and heavy parcels are sent only by transport companies.
Delivery by transport companies
Delivery by a transport company is the most convenient and fastest delivery method. Delivery is possible if there is a representative office of one of the transport companies in your city - https://nrg-tk.ru
– TC “Business Lines” – https://dellin.ru
– TC “SDEK” – https://edostavka.ru
– TC “ZhelDorExpedition” – https://jde.ru
– TC “PEK” – https://pecom.ru
– TC “GTD” – https://gtdel.com (formerly KIT)
about the product
You can ask any question you are interested in about the product or the work of the store.
Our qualified specialists will definitely help you.
Exhaust manifold removal procedure
Before removing the exhaust manifold yourself, think 7 times. Having this work done by a service center is not cheap, but the inaccessibility and difficulty of unscrewing some nuts can be a serious problem.
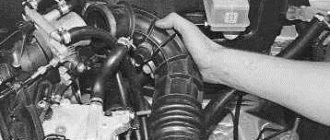
Unscrew the bolt securing the intake pipe
It is important to drain the coolant before removal, as antifreeze may enter the cylinders during the process. The sequence of actions for cars with an injector is as follows:
- Disconnect the battery, release the throttle cable from the throttle valve.
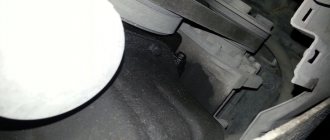
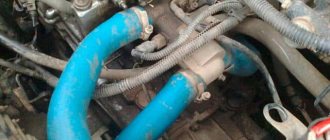
- Disconnect the fuel line pipes.
- Disconnect the wires from the TPS and idle speed control.
- Release the crankcase ventilation, vacuum, and brake booster hoses.
- Remove the receiver, remove the injector block wires and remove the injector fuel rail.
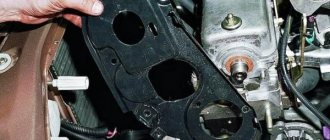
- Remove the bracket and thermal shield.
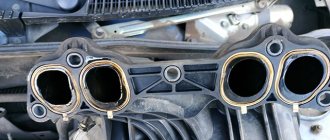
- After this, you can disconnect the exhaust pipe, exhaust and intake manifolds from the manifold.
Dismantling
There is only one difficulty in this process - the inaccessibility of some fasteners. It is best to carry out this “operation” in a viewing hole or on a lift. Of course, this is not necessary, but it is much more convenient.
Work order:
- First you need to remove the negative terminal from the battery or turn off the mains switch.
- Next, it is recommended to drain all the antifreeze into a container prepared in advance.
- Next, you need to disconnect the fuel pipes. If the coolant is not drained, at this stage it will go into the cylinders.
- Now you have to find the throttle position and idle speed sensors, and then remove the wires from them.
- We first remove the crankcase ventilation from the hoses, then the brake booster.
- Remove the intake manifold (receiver) together with the throttle assembly.
- Then remove the fuel rail (without disassembling) and the wires from the injector.
- There's not much left. Now you need to remove the heat reflecting screen. The exhaust pipe of the muffler is unscrewed from the manifold.
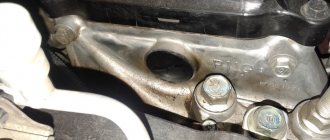
- We remove the exhaust manifold Kalina 8 valves from the BC head studs, to do this we unscrew the fastenings shown below in the figure
Replacing the exhaust manifold gasket on a VAZ-2114 with your own hands
Replacing the exhaust manifold gasket on a VAZ-2114 is a very complex procedure and requires certain knowledge and experience. So, not all experienced car enthusiasts are able to do this correctly. In addition to the fact that exhaust gases exit through the exhaust manifold, it is also responsible for the normal operation of the engine, since a lambda probe is installed on it.
Video about replacing the exhaust manifold gasket on a VAZ-2114
The video will tell you how to properly replace the exhaust manifold gasket, and also tell you about some of the subtleties and nuances of this process.
Required tool for replacement
Before you begin the process itself, you need to decide on the necessary tools. So, what will you need: a ratchet and sockets for 17, 19; screwdrivers with flat and Phillips tips; a set of keys and the gasket itself.
Now that everything is prepared, you can start working directly. In order for the manifold to be removed without any problems and rusted bolts not to create trouble, everything must be lubricated with WD-40 before performing the operation. It is advisable to do this several times. Before performing the operation, you need to think again, weigh everything and calculate your strength.
Step-by-step instructions (algorithm with photo)
If, nevertheless, the car enthusiast makes up his mind, then we will consider step-by-step instructions for replacing the gasket:
- Remove the negative terminal from the battery.
Remove the terminal from the battery
Remove the fuel pipes shown in the photo
We disable the TPS
Disable the IAC sensor