9.4. Gearbox replacement
We work on an inspection ditch or a lift.
Disconnect the negative cable from the battery. We disconnect the cardan drive from the gearbox (see Replacing the cardan drive) and remove it from the car. Remove the exhaust pipe of the muffler (see Replacement of exhaust system parts). Disconnect the terminals from the reverse light switch (see Replacing the reverse light switch). In the cabin, carefully remove the decorative cover from the ring.
Using a screwdriver, we disconnect the rings holding the mat.
Moving and lifting the mat, we unscrew the four screws securing the cover.
We take out the cover with the foam rubber seal from under the mat and lift them up.
By pressing down on the gear shift knob, use a thin screwdriver to remove the locking sleeve from the groove of the lever rod.
. and remove the handle.
By striking the mounting blade inserted between the engine and the engine compartment partition, we bend the eye washer of the upper clutch housing mounting bolt.
Use a 19mm wrench to unscrew the bolt.
It is more convenient to use a special curved wrench with a head for this purpose.
Using a wrench or a 13mm socket with a cardan joint, unscrew the two upper bolts securing the starter to the clutch housing.
Using a 13mm socket with an extension, unscrew the lower starter mounting bolt.
Using a 10mm wrench, unscrew the four bolts securing the clutch housing cover.
Using your hand or sliding pliers, unscrew the nut securing the flexible speedometer drive shaft to the drive housing.
We install a stop under the lower part of the box housing.
Using a 19mm socket with a universal joint on the wrench extension, unscrew the remaining three bolts securing the clutch housing.
Using a 13mm wrench, unscrew the two nuts securing the cross member.
We remove the gearbox by sliding it back.
To replace the gearbox, disconnect the clutch housing (see Repairing the gearbox). We install the gearbox in the reverse order of removal. Before installation, apply a thin layer of CV joint-4 lubricant to the splined end of the input shaft.
How to remove a gearbox (gearbox)
How to properly remove the gearbox? For any repair of the VAZ 2106 gearbox, you will need to completely dismantle it from the car. This procedure is certainly not the simplest, but if you have a garage and a pit, then every car owner can do it.
I personally removed the transmission on all my cars probably more than 10 times, since I often had to disassemble “classic” models. And unfortunately, it was not possible to record a detailed photo report on the work done. The last time this happened, I was able to take a few pictures to at least roughly show how this work was done.
Device location and characteristics
The gearshift lever of the VAZ 2107 is located directly in the car's interior. It is used to be able to change gears while moving. The gear lever fails only in rare cases, and the reason for this is negligence towards the product. If the product fails, it must be replaced. But before replacing, it is necessary to remove the product in question. We’ll find out in more detail how to remove it, as well as replace it on the “seven”.
On the “seven” the gear shift knob has a common problem - rattling and chattering. If you fix such a malfunction using improvised means, then replacing the device will not be necessary. Before you begin replacing the device, you will need to find out the exact causes of the malfunction. After all, sometimes not only the part in question can “fail,” but also the gearbox or clutch.
Step-by-step instruction
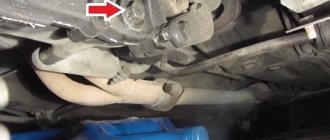
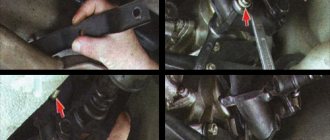
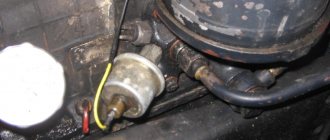
So, when all the preparatory steps have been made, you can proceed directly to the removal itself. To do this, unscrew the brake fluid supply pipe to the gearbox, as shown in the photo below:
Then remove the fixing plate and release the hose:
When the cardan is disconnected, unscrew all the bolts securing the gearbox to the engine, including the small bolts of the tin protection. Then you can unscrew the hanging bar, which actually holds the gearbox.
Be careful not to let anything fall on your head. Use insurance while performing this work. You can place a special stop under the box to secure it.
Installing/removing the VAZ 2106 gearbox
To repair or replace the gearbox, it must be removed. Today we will tell you how to remove or install the gearbox on a VAZ 2106 yourself.
Installation and removal of the VAZ 2106 gearbox
1. Work must be carried out on an inspection ditch or lift.
2. Disconnect the negative cable from the battery.
3. Disconnect the cardan drive from the gearbox and remove it from the car.
4. Remove the exhaust pipe from the mufflers.
5. Disconnect the terminals from the reverse light switch.
6. In the salon, carefully remove the decorative cover from the ring.
7. Use a screwdriver to pry off the rings holding the mat.
8. Moving and lifting the mat, unscrew the four screws securing the cover.
9. Take out the cover with the foam rubber seal from under the mat and lift them up.
10. Pressing down on the gear shift knob, use a thin screwdriver to remove the locking sleeve from the groove of the lever rod...
11. ...and remove the handle.
12. By striking the mounting blade inserted between the engine and the engine compartment partition, we bend the eye washer of the upper clutch housing mounting bolt.
13. Using a 19mm wrench, unscrew the bolt.
14. It is more convenient to use a special curved wrench with a head for this purpose.
15. Using a wrench or a 13mm socket with a cardan joint, unscrew the two upper bolts securing the starter to the clutch housing.
16. Using a 13mm socket with an extension, unscrew the lower starter mounting bolt.
17. Using a 10mm wrench, unscrew the four bolts securing the clutch housing cover.
18. Using your hand or sliding pliers, unscrew the nut securing the flexible speedometer drive shaft to the drive housing.
19. Install a stop under the lower part of the gearbox housing. Using a 19mm socket with a universal joint on the wrench extension, unscrew the remaining three bolts securing the clutch housing.
20. Using a 13mm wrench, unscrew the two nuts securing the cross member.
21. Remove the gearbox by sliding it back.
22. To replace the gearbox, disconnect the clutch housing. We install the gearbox in the reverse order of removal. Before installation, apply a thin layer of CV joint-4 lubricant to the splined end of the input shaft.
Let us remind you that the previous article was about removing and installing the instrument panel on a VAZ 2106 with your own hands.
Removal and installation of the Gearbox (Gearbox) VAZ 2101, 2104, 2105, 2106, 2107
We carry out the work on a car lift.
Lower the parking brake lever to the down position. Remove the gear shift rod.
Align the two screws securing the parking brake lever boot and remove the boot from the lever.
Remove the front carpet.
Remove the floor tunnel cover.
Disconnect the battery.
Remove the warm air wire hose from the air filter housing.
Remove the two upper starter mounting bolts.
Unscrew the nuts securing the exhaust pipe to the exhaust manifold and remove the locking plates. (If you have difficulty removing the nuts, complete the operation from underneath the vehicle.)
Unscrew the lower starter mounting bolt and...
...move the starter forward.
Drain the oil from the gearbox housing. Close the drain plug.
Disconnect the parts securing the main muffler to the body.
Disconnect the additional mufflers from the exhaust pipe without disconnecting them from the main one.
Remove the exhaust pipe from the car downwards.
Remove the driveline safety bracket.
Unscrew the three nuts from the bolts securing the flexible coupling to the gearbox flange.
Remove the bolts from the flange and coupling one by one by turning the driveshaft.
Using a screwdriver, pry the coupling away from the flange and lower it down.
Disconnect the wires from the reverse light switch (located on the right rear of the transmission).
Unscrew the nut and disconnect the cable from the speedometer drive gearbox (located in the left rear part of the gearbox).
Remove the slave cylinder from the clutch housing without disconnecting the hose from the cylinder.
Unscrew the four bolts securing the clutch housing cover and remove the spring washers.
Place a support under the crossbar.
Unscrew the two nuts (the second one is not shown) securing the cross member to the body and remove the washers.
Remove the stop and smoothly lower the gearbox down.
Place a stop under the front of the engine to secure it in position.
Using extensions and universal joints, remove the left and right upper bolts securing the clutch housing to the engine. Remove the spring washers and eyelets.
Unscrew the left and right lower bolts securing the clutch housing to the engine. Remove the spring washers.
(An assistant must support the rear of the transmission.)
Remove the gearbox by first moving it backwards until the input shaft leaves the clutch, and then downwards.
Install the gearbox on the vehicle in the reverse order of removal. Fill in the required amount of oil.
Before installing the gearbox, apply a thin layer of LSC-15 or Litol-24 lubricant to the splined part of the input shaft and engage 1st or 3rd gear
Source
How to replace the gearbox on a VAZ?
The gearbox is the most important element of any car. It is she who converts the torque to obtain the most efficient engine operation and the desired travel speed under various road conditions. In this article we will learn how to replace the gearbox on a VAZ 2106. We will also look at in what cases it is replaced and how it is removed.
How to remove the gearbox on a VAZ 2106?
To begin, place the car on the inspection hole, engage neutral gear and install wheel chocks under the wheels. Don't forget to take care of lighting, you will need it. To do this, it is recommended to use a portable lighting lamp. Also prepare a standard set of tools.
Before removing the gearbox, it is necessary to dismantle everything that interferes with its removal. To do this, disconnect the negative terminal of the battery and pull out the switch for turning on the reverse lights on the gearbox.
Don't forget to drain the gearbox oil. This has nothing to do with the work, but will significantly lighten the weight of the box. And this will be useful to you when removing it.
Next in line is the gear shift lever. It is located inside the car. To remove it, you need to remove the decorative trim, unscrew the four screws securing the special metal plate, pull out the protective cover and loosen the special fastening clips. After this, the lever is removed from there and removed along with the plate. Next, unscrew the speedometer drive cable and hang it so that it is not in the way.
After this, drain the brake fluid from the clutch drive. To do this, unscrew the tube from the fitting and place an empty bottle. Unscrew the clutch fork and disengage it from the gearbox. Next, go down into the pit again and unscrew the exhaust pipe. The fact is that it will interfere with dismantling and then the likelihood of damage during work will increase. That is why it is recommended to simply dismantle it.
Lastly, the driveshaft is removed from the gearbox side. Raise one of the rear wheels and place the body on a rigid support, such as a tree stump or a double stack of bricks. Using a screwdriver, bend the locking tabs located on the front propeller shaft seal. Using the same screwdriver, push this oil seal back. Next, using a wrench or socket wrench, unscrew the nuts securing the cross member and remove it. Surely parts of the exhaust system will interfere with you. If you cannot remove the cross member, then remove all interfering elements. After this, remove it from the spline joint, which is secured using an elastic coupling.
Now you will need the help of a partner. First of all, unscrew the fastening of the gearbox cross member, then your partner should hold it from falling, while you, at this time, unscrew the bolts securing the gearbox to the engine. Once all the bolts are removed, move the box back and remove its input shaft from the connection with the crankshaft bearing.
Lada 2106 “06 in January” › Logbook › (No. 64) Installing a 5 speed manual transmission. on VAZ 2106 (“Torn package”)
And here’s a new reason to write and talk about what happened!)
Yes, 5-mortar
I wanted it for a long time... from the very beginning of owning the VAZ-2106. I won’t say that I drive on the highway often, I go once a month. Either go to your parents (250 km from the city), or just relax somewhere with friends... So at such moments you think:
“Eh! How is the 5th missing?)))
But I didn’t want to look for it purposefully and didn’t want to deal with this issue. I thought, whatever chance comes along, I’ll take it...
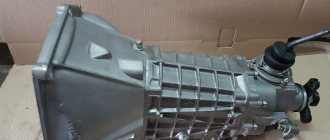
And here is a lucky chance, and the 5-speed manual transmission from the VAZ-2107 is “in my hands”))
And by the way, the holiday weekend is just around the corner) Let's take on the car swap))
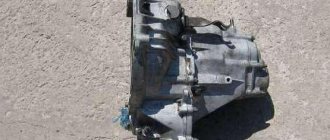
Having already become a tradition, the dirty units that came my way...:
... They undergo chemical and water procedures:
And the unit appears in all its glory)
And a small digression...
I initially knew a little about the biography of this manual transmission. And she did not provide a 100% guarantee that I would ride it without worries and hassle. THAT'S WHY
…)
It was decided to go through it “bone by bone”, since such a batch had already begun...)) In the end, everything is done for oneself.
But there were also reasons:
— H.Z. what kind of oil is inside, and how much is it... and in what position of the gear - Slightly increased transverse play of the input shaft - Replace oil seals and gaskets (Desire to get rid of drips in the future)
And having stocked up with “Murzilkas” and manuals...
... I started the autopsy!
“The key is “10”, “13”... blot with a cloth... etc.))))
In general, the process went:
and THERE WAS A SURPRISE WAITING FOR ME))
The box turned out to be the latest modification from our AvtoVAZ... called “Torn Package”
.
PS I won't go into details. If anyone is interested, read it - CLICK HERE!
In short, due to changes (splines instead of keys, new washers, etc.) - the manual turned out to be 20% unusable) But fortunately there is Internet in the garage!)
Thanks to the semerkainfo.ru forum, that’s where I found the information on the “new” box
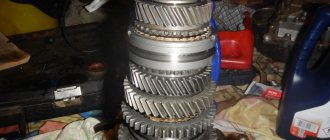
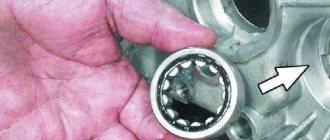
Well, in general, the process went further - now we got to the input shaft and the bearing that needs to be replaced:
Prepared, previously purchased new:
And he sat him down:
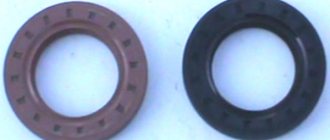
Also one of the important conditions was to replace the seals:
Well, how can you not wash the parts when everything is disassembled and accessible!
I was happy to wash off and clean the old malso “ala” nigrol)))
Well, when everything was washed, the bearing was replaced, the seals were changed - I started assembling!
How to install a new gearbox?
As soon as the old one is removed. Clean the junction between the engine and the gearbox. Be sure to check the clutch. If it needs replacing, it is better to do it now to avoid these difficulties in the future.
With the help of a partner, install the new transmission and drive it into the engine. It is worth noting that one of the most difficult procedures is inserting the transmission input shaft into the rear crankshaft bearing, so you will need a lot of physical strength and a little patience. After the box is attached, tighten the nuts securing the gearbox to the engine.
Replacing the gearshift lever on a VAZ 2101-VAZ 2107
Welcome! Gearbox lever - it is one of the important elements when choosing the speed of a car. At the moment, there are many types of levers being sold as such, and in this regard, people change them to the one that is most convenient for them, because there are people who like long levers, and there are also people who like only short ones. But not everyone knows how to change this lever on a car, and therefore, especially for such people, instructions for replacing the lever in pictures were prepared.
Note! To replace the lever you only need a screwdriver!
Summary:
When do you need to change the gearshift lever? Many people replace the lever for various reasons, some because of its deformation, and some simply remove it to shorten it because, as a rule, “Classics” have long levers that not everyone really likes in terms of comfort, but the exception is the VAZ car 2105” on which a shorter lever came from the factory.
Gearbox VAZ 2106: general information
The gearbox in a car is designed to change the value of torque transmitted to the wheels of the car from the crankshaft of the power unit (in our case through the driveshaft). This is necessary to ensure optimal load on the power unit when the machine moves in various modes. VAZ 2106 cars, depending on the modification and year of manufacture, were equipped with four- and five-speed manual gearboxes. The gear shift in such devices is carried out manually by the driver using a specially designed lever.
Device
The first “sixes” rolled off the assembly line with a four-speed gearbox. They had four forward speeds and one reverse. Since 1987, the VAZ 2106 began to be equipped with five-speed gearboxes, with an added fifth forward speed. It made it possible to almost completely “unload” the car’s engine during long high-speed trips. The five-speed gearbox was designed on the basis of a four-speed one. Both of these boxes are interchangeable, and their designs are largely similar.
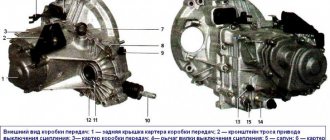
The six-speed four-speed gearbox consists of:
- crankcase with covers;
- primary, intermediate and secondary shafts;
- stage switching devices.
The gearbox input shaft is mounted on two bearing supports. One of them (front) is mounted in a socket at the end of the crankshaft. The rear bearing is located in the wall of the gearbox housing. Both bearings have a ball design.
The rotation of the secondary shaft is ensured by three bearings. The front one has a needle design. It is pressed into a bore on the first shaft. The middle and rear bearing supports are installed in a special housing in the crankcase and the mounting hole in the rear cover, respectively. They have a ball design.
The gears of the first three stages are located on the secondary shaft. All of them are engaged with gears on the intermediate shaft. The front part of the shaft is equipped with special splines used for fastening the synchronizer clutch for the third and fourth speeds. The reverse gears and speedometer drive are also installed here. The intermediate shaft is also mounted on two bearings: front (ball) and rear (roller).
Stage synchronizers have the same design, consisting of a hub, coupling, springs and locking rings. The gears are switched by means of a mechanical drive, which consists of rods with forks that engage with movable (sliding) clutches.
The shift lever has a two-part design. Its upper and lower parts are connected using a collapsible damping device. This is necessary in order to simplify the dismantling of the box.
The five-speed gearbox is similar, with the exception of some changes in the rear cover and the design of the intermediate shaft.