Replacing front brake pads on VAZ-2110, 2111, 2112
The brake system is responsible for stopping or reducing the speed of the car; it is a rather complex mechanism, the most important part of which is the brake pads.
The pads are responsible for the quality of braking, and, therefore, for the safety of the car. That is why it is so important to change them on time, because otherwise, an accident cannot be avoided. This article will tell you what the pads are and how to change them.
Brake pads and their types
The brake pad, or as it is also called, the wheel chock, is an element of the brake system that interacts with the sphere of the brake disc, by pressing which the process of reducing speed occurs.
Pads have come a long way in development. They were first used at the end of the 19th century, for manually driven carriages.
Over time, mechanical engineering developed, and the braking system also evolved. Today, there is a wide range of wheel chocks, each with its own pros and cons, and technical features, which we will discuss further.
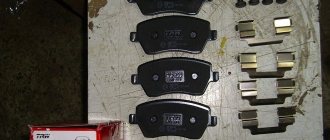
The block consists of a durable metal base, resistant to mechanical and other damage, to which a special lining is attached. There are several types of pads:
- resins
- synthetics
- rubber
- ceramics
- Other materials.
It is the composition of the lining that determines its quality; manufacturing companies try to keep the secret of the composition in the strictest confidence, but in any case, the lining must have the following properties:
- good wear resistance
- the lining must not deform the brake disc
- the ability to withstand high temperatures, which is especially important during emergency braking, when parts become red-hot and the temperature inside the system reaches prohibitive levels.
The main task of the stops is to make the braking system more reliable and the braking distance shorter.
To achieve this task, manufacturers create unique technologies, offering the buyer new types of products.
So at the moment the following brands of pads are the most popular:
- Original Equipment Manufacturer OEM. A company operating in this market segment has been offering high-quality friction stops for many years. The products have a one-year warranty, the cost starts from 1,800 rubles, the price varies depending on the type of pads.
- One of the largest manufacturers producing stops is the Wagner company. Most motorists prefer this particular brand, because the Wagner brand itself already speaks of the excellent quality of the products. The price of Wagner products varies from 1,750 to 3,500 rubles. depending on the type of pad.
- Raybestos Raybestos is considered a favorite brand of auto mechanics who prefer practicality, reliability, and durability. The product comes with a 1 year warranty. The advantage of the product of this brand is also its reasonable price, which starts from 1,500 and ends at 3,820 rubles.
- The undisputed leader in the market is the company GENERAL MOTORS, known as a reliable manufacturer of all components for cars. The products here are, of course, excellent, but the price makes you think twice; it starts at 3,500 rubles. and ends with a price of 17,500 rubles.
How to remove front pads yourself
Due to the frequent interaction of the stops with the disc, the linings are deformed, which leads to failure of the pads. The service life of the pads is approximately 30-50 thousand km, or with a friction lining thickness of 1.5 mm. You can determine that the pads need urgent replacement by the following signs:
- Sharp sound when braking.
- Slow or, conversely, too fast braking process.
- The brake pedal goes down.
If you are convinced of the presence of at least one of the listed symptoms, you need to immediately change the stops. In order to make the replacement, you need to prepare the following tool:
- jack
- knob for 19
- hammer
- pliers
- screwdriver (no more than 70 mm.)
- a little patience and free time.
- First of all, we dismantle the old pads. To remove the stops, we take the car to a perfectly flat area, put stands under the wheels to prevent the possibility of rolling, and put the car on the parking brake.
- Now you need to lift (using a jack) the side from which dismantling is being done. Since the topic of our article is replacing the front pads, we raise the front of the car.
- Loosen the wheel fastenings and remove it. Using pliers, we pull out the cotter pin from the upper rod, and then with a screwdriver we begin to knock the rod itself out.
- Having completed this work, we will begin to remove the clamp, which holds the caliper in a static position. Only by getting rid of the retainer will it be possible to remove the caliper, which is done by rotating the part around the circumference of the second fastening. To keep the part out of the way, it can be moved to the side.
- Now the deformed pads are not difficult to pull out, which is what we do.
Installing new pads
In order to install the stops, it is necessary to place the piston in the area of the brake cylinder.
Here it is important to balance your strength and not overdo it, because this work is hard, requiring not only effort, but also caution, since the part is made of aluminum, which, as is known, is not very strong.
The second step is to install the pads in the caliper. The caliper itself is installed in its place and secured with a bolt. Installation of parts is carried out in the reverse order of dismantling.
The job is done, all that remains is to put on the wheel.
For an experienced motorist, replacing pads is not a complicated procedure that takes a little more than fifteen minutes. It is necessary because the pads primarily affect the safety of the car, because they are directly connected to the braking system.
Therefore, you should not neglect this type of repair work; it is better to spend some time in the garage and a certain amount of money on buying new parts than to suffer more serious losses in an accident, which is what worn pads lead to.
Replacing brake pads on a VAZ 2110
On a VAZ 2110, replacing pads is an extremely simple process for servicing your own car. This skill will be useful to almost any driver, because this element of the brake system is most susceptible to wear. The safety of the motorist on the road directly depends on its condition. This is also a great way not to overpay for simple work at a service station, as well as a useful repair practice for a beginner.
Brake pads VAZ 2110
Agree, no one wants to “kiss” the traffic ahead at a traffic light. In the event, God forbid, of an emergency, no reaction or driving skill will save you if the degree of wear on the VAZ-2110 pads leaves much to be desired. Therefore, you should not rely on chance and take the initiative into your own hands.
It’s nice to understand that such an important procedure can be easily and simply performed by any VAZ-2110 driver on his own. Believe me, there is nothing easier than inspecting and replacing the pads. You will need a minimum of effort and time. No one can solve your problems better than you yourself. Have a little patience and be sure that by the end of the article you will already be able to consider yourself an expert on the issue of replacing brake pads on a VAZ 2110-2112
When it's time to replace
On VAZ 2112 vehicles, the front wheel pads must be replaced at least after 50 thousand kilometers. In each individual case, the timing is individual and depends on the driving style, technical condition of the caliper and driving mode. Therefore, it is likely that problems with braking may appear after 30 thousand kilometers.
Checking the pads of the VAZ 2110
It is worth understanding that a clear deterioration in braking performance is a sure signal to revise the brake system of the VAZ-2110 and the brake pads in particular. The maximum permissible thickness of the friction lining is 1.5 mm, but it’s really not worth bringing the product to this state. Uneven wear of the front pads indicates a problem with the caliper on Lada 2110, 2111 and 2112 models.
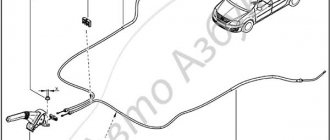
The degree of wear of the rear pads can be assessed by the depth of travel of the handbrake and the number of “clicks”. Ideally there should be no more than three or four. Wear of the rear pads leads to the fact that the stroke of the lever and, accordingly, the traction increases. If you neglect timely replacement, the car may begin to roll downhill even with the handbrake on.
Replacement of front pads VAZ 2112 (2110)
Replacement for cars of the VAZ-2110 family is not very complicated and can be performed in the following sequence:
Some important tips before replacing
VAZ 2110 front pads and their replacement
You need to use brake pads that are recommended by the manufacturer. If you plan to use the brake pads in the future, you should mark them when removing them. It is absolutely unacceptable to reinstall the pads from the inside to the outside and from the outside to the inside, as well as from the left wheel to the right.
Note. Brake pads on one axle must be replaced at the same time, even if only one of the pads is worn out.
The steering wheel should be turned towards the disassembled wheel until it stops to achieve maximum convenience when replacing brake pads.
Replacing brake pads
High-quality and fully functional brake pads are the key to safety on any trip in your own car. But how can you determine whether it’s time to change these parts? To do this, just listen to our recommendations. You just need to replace the pads
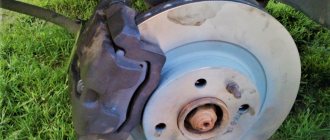
- You found metal shavings mixed with dust on the brake discs. This means that the friction pads are completely worn out and the pad is rubbing against the metal of the disc;
- the gasket has peeled off from the brake pad;
- traces of lubricating fluid are found on the surface of the part;
- the braking distance of the car increases;
- the car pulls to the side during braking, regardless of the driver’s actions;
- The pads have microcracks, scratches and other mechanical damage.
| Brake system repair | Price, rub |
| Brake drum - removal/installation | 300 rub. |
| ABS sensor - removal/installation | 300-600 rub. |
| Brake disc (rear) - removal/installation | 800-1000 rub. |
| Brake disc (front) - removal/installation | 800-1000 rub. |
| Brake pads (rear drum) - removal/installation | 800 rub. |
| Brake pads (rear disc) - removal/installation | 500 rub. |
| Brake pads (front) - removal/installation | 500 rub. |
| Caliper guide - removal/installation | 800 rub. |
| Parking brake cable - removal/installation | 1000-3000 rub. |
| Brake pipe (main) - removal/installation | 500-1000 rub. |
| Brake pipes - removal/installation | 2000-5000 rub. |
| Brake cylinder (main) - removal/installation | 1000-3000 rub. |
| Brake cylinder (working) - removal/installation | 800-1000 rub. |
| Brake hose - removal/installation | 500 rub. |
| Overhaul, overhaul of calipers (replacement of cylinders, boots, seals) without materials | 1500 rub. |
The price is subject to change due to unforeseen labor costs of the work order.
In addition, discs and pads must be replaced if the thickness of these parts has reached a critical limit. Typically, the optimal dimensions are indicated in the car's operating manual.
You can determine the presence of faults and the need to replace Citroen brake pads yourself, but this is best done by a qualified mechanic from our car service center. To do this, you just need to come to us at any time convenient for you or call a specialist at the address you specified.
Features of replacing brake pads
Our company’s employees must follow the following rules for replacing brake discs and pads and repairing the entire system:
Compliance with these rules allows us to ensure the highest quality of repairs and your complete safety on the road!
- The parts must be installed in pairs, on each wheel of the front or rear axle of the car;
- new spare parts must strictly comply with the requirements of the car manufacturer. Unsuitable pads can have a significant impact on driving safety;
- extreme care must be taken when installing parts, since the friction linings are very fragile and can be damaged during falls or impacts;
- Oil should not come into contact with brake system parts.
Brake pads, instructions for self-replacement
It's no secret that a car's brakes require the closest attention from the driver, since not only his safety, but also the safety of others depends on their good condition. Apart from checking the brake fluid level, the next most common operation is replacing the brake pads.
Brake pads are made from a friction mixture (mostly asbestos based), which makes them very short-lived.
Being a very important, but still consumable element of the brake system, the pads need constant monitoring and systematic replacement as they wear out.
On cars, different brake systems are most often used for the front and rear wheels. The front wheels have disc brakes, while the rear wheels have a drum system. Let's look at the procedure for replacing brake pads, using the example of domestic cars of the VAZ 2107, 2109, 2110, 2112, 2114, 2115 family. Since the brake design of the listed cars is no different, the instructions for replacing the pads are suitable for all these cars without exception. The only difference between the VAZ 2107 (classic) and other cars will be the size of the brake drums and pads, otherwise the design is no different from 2109 and 2110-2115.
Replacing front brake pads
We replace the front pads with the car suspended and the wheels removed. First you need to straighten the locking plates holding the head of the guide pin bolt. Using a 13mm wrench, unscrew the top bolt, just loosen the bottom one slightly. If the guide pin rotates, it must be held with a key of 17.
We bend the caliper with the brake cylinder to the side and easily remove the old brake pads from the guides. Having installed new brake pads in their place, we try to put the caliper in place, after first pressing in the cylinder piston. If this is not done, then it simply will not fit into place, because the thickness of new pads is usually significantly different from worn out old ones.
If the cylinder is in good condition, then this can easily be done using the handle of a hammer, or any other available device, by pressing on the piston. If it does not budge, you can try to loosen the brake bleeder (a small drilled bolt located on the caliper), which, however, is not always easy to do. Usually, the standard fitting comes with a 6-piece head, and it “sticks” tightly. Attempts to unscrew it lead to the fact that the edges quickly become confused, and then dancing with a tambourine cannot be avoided.
When replacing pads, we recommend replacing all the fittings with others with a larger head size; fortunately, stores always have them in stock.
Excessive force when pressing the piston can lead to cylinder breakage. The author at one time tried to drown the piston using a clamp, since he did not want to give in. As a result, the case cracked, and I had to run to the store for a new one.
When do you need to change the pads?
To know when to change your brake pads, you need to be able to recognize the following symptoms:
- noticeable decrease in braking efficiency;
- obvious grinding noise when pressing the brake pedal;
- increasing pedal free play;
- locking the brakes when you press the pedal;
- various jerks, vibrations and unnecessary sounds that are heard during braking;
- cracks and chips on disks.
To accurately determine wear, it is recommended to remove the wheels in the garage and examine the rims.
Installing new pads on the rear wheels
After thoroughly cleaning the various holes under the drum from dirt, it is necessary to drive the brake cylinder pistons inside. This is done to a minimum, after which the parking brake linkage is connected to the new block. This video guide will help you do everything without errors.
After connecting the rod, the block must be pinned. It is better to work with small pliers and a screwdriver. A convenient tool in this case will play a big role.
Next, we connect the guide spring to the brake shoe, and attach the parking brake rod to the cable. First, we connect the upper spring to the new block with one end, then the other with the second block. For ease of operation, it is better to rest the block on the heel of the brake cylinder and, by pulling its lower edge, tension the spring so that it can be inserted into the slot of the bar. Finally, you need to carefully tighten the guide bolts and put the wheels in place.
Replacing brake pads on a VAZ 2110 with your own hands (video)
It is quite easy to determine a malfunction of the brake system by the first signs - a beating in the steering wheel and a metallic squeak coming from the front wheels. Such phenomena indicate that it is time to change the brake pads.
Brake kit
It is recommended to replace the rear brake pads on a VAZ 2110 simultaneously with changing the front ones. The fact is that the main part of the load during braking is taken on by the front elements. This is approximately 70 percent of the load. The rear ones serve more as a balance, so they wear out much less intensively than the front ones.
Let's take a closer look at how the rear and front pads are replaced on a VAZ 10.
Front
Before starting work on replacing the front brake pads on a VAZ 2110, be sure to arm yourself with a set of tools, which includes:
- Hammer with short handle;
- A small sharp chisel;
- Two wrenches - socket and socket 13;
- Open-end wrench 17;
- Pliers;
- Small crowbar;
- Jack;
- Balloon wrench;
- New pads.
When everything is ready to go, you can begin the replacement process.
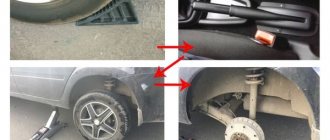
- Park the car in such a way that it cannot roll away. It is best to put some kind of stoppers under the wheels. It is advisable to use special devices rather than simple bricks.
- Loosen the bolts on the front wheels and lift the car to one side using a jack.
- Completely remove the wheel mounting bolts, remove it and place it under a raised part of the machine. This is a simple safety measure in case the jack accidentally comes off.
- Now we determine the location of the front brake pads on the VAZ 2110. The calipers are located in front of the brake disc, so to easily replace the left pad, turn the steering wheel all the way to the left, and vice versa.
- To make it easier for you to access the part, arm yourself with a thin chisel and a hammer. These tools will unlock the top bolt.
- Unscrew it with a 13 socket wrench, holding it on the other side of the caliper with a 17 socket wrench.
- There is no need to remove the pad yet, since the caliper is now in its extreme position. That is, the new part will not fit into place.
- Do not completely unscrew the bolt; use a crowbar and insert it between the body and the pad, pressing the caliper all the way.
- Once this is done, unscrew the top bolt all the way. This will move part of the caliper to the side, thereby providing access to the pad itself.
- Remove the old pads and put new ones in their place.
- During assembly, simply follow the reverse order of dismantling. Just remember the importance of bolt countering. The washer must be bent onto the edge of the fastener. At this point the replacement can be considered complete.
Rear
For clarity, we recommend watching a video about replacing the rear brake pads on a VAZ 2110. This will make it easier to complete the task and have a visual representation of each stage of repairing the brake system.
It will be good if you once installed disc elements . The beauty of them is that the process of replacing the rear pads will be similar to the front ones.
The situation is completely different for those who use factory drum braking systems. The work will have to be done delicately, but completely achievable on your own.
To get started, arm yourself with a set of tools, which includes:
- Balloon wrench;
- Jack;
- Pliers;
- Screwdriver;
- Hammer;
- Sharp chisel;
- Open-end, socket and ring wrench sizes 12, 13 and 17 - 3 sizes of each type of wrench.
Now we proceed directly to replacing the rear brake pads.
- Place chocks under the front wheels and remove the rear wheel.
- Unscrew the guides using a 12mm wrench.
- Guides are required for fixing to the axle shafts of the drums.
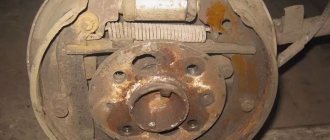
- It may be quite difficult to remove the drum from its place. This is where you will need a hammer and a wooden stand. Tap the inside of the drum. It is strongly not recommended to hit the drum directly with a metal hammer, as the mechanism may be damaged.
- If the drum cannot be removed even after hammering, treat the contact areas with the hub with WD40 or other penetrating lubricants.
- Then, arm yourself with pliers and remove the springs from the bottom and top of the pads.
- Remove the guide spring located in front.
- This will allow you to completely remove the block.
- When the bar is removed, you can begin to remove the spring from the rear pad.
- Well, now remove both parts of the block. When removing the back one, remember the hook. It comes from the handbrake cable.
- After removing the old block, put a new one in its place. Assembly is carried out in reverse order.
- But there is one caveat - the bushing must be removed from the drive arm, which will greatly facilitate the reassembly process. The upper part of the pads is inserted into the grooves located on the cylinder rod.
- Be prepared for the fact that certain difficulties may arise when installing a new element. The reason is the large output that remains as a result of the operation of old brake elements.
- Take two pry bars and squeeze the two blocks together to bring them as close as possible. At this point the replacement can be considered completed.
- At the last stage, mandatory bleeding of the brake system is carried out. Without it, not a single intervention in the design of car brakes can be done.
When do you need to replace the pads and how to determine the degree of their wear?
Changing the rear brake pads on a Lada Granta with your own hands
The service life of the pads on VAZ-2110 cars and its derivative modifications is, on average, 15–20 thousand kilometers for the front ones, and 40–50 thousand for the rear ones. However, their wear directly depends on a number of factors. Thus, during city driving, the degree of wear is higher, as well as when operating on dusty roads, when there is a high risk of mechanical particles getting on the working surfaces.
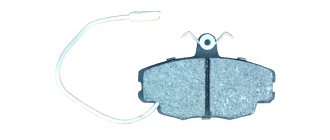
The main sign of a malfunction is the appearance of a characteristic whistle during braking. This is due to the fact that the pad design contains signal indicator strips, and when the working surface of the pad wears down to a critical minimum, the strips are exposed and create this sound.
Along with this, problems can be expressed in the form of a metallic grinding sound in the event of destruction of the friction layer and exposure of the metal structure of the pad. In this case, during the braking stage, vibrations and knocks may appear, as well as a characteristic creaking sound in the area of the front wheel (or the rear wheel if the rear pads become unusable). In other words, the pads whistle, rattle or knock, indicating a malfunction.
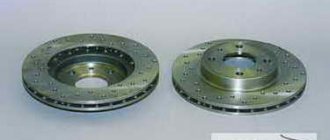
Difference in thickness of old and new pads