Hello, my dear reader!
The standard radiator grille on Vesta has too large holes. It is imperative to install additional protection against insects and pebbles that can damage the radiator. I decided to install a metal mesh behind the bars. By the way, I couldn’t find a grid for a long time, I bought a metal one with a cell of 0.5 by 0.5 cm, such grids are sold in rolls. I took a piece of half a meter by a meter. So, for installation you need to remove the bumper. Torxes of all calibers in your hands and go!
The bumper came off easily. Next I decided to check the condition of the radiator, otherwise the insects had already woken up here too!
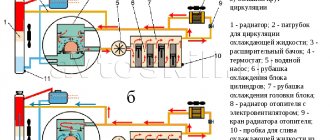
Like previous AvtoVAZ cars, the Lada Vesta has two engine radiator grilles (upper and lower) in the front bumper. They serve as decorative elements and also protect the radiator from dirt and damage. Let's look at the features of the fastenings of these plastic grilles, as well as how to replace them.
In the Vesta repair and operation manual they write that to remove the radiator grille you need to remove the front bumper. However, from the experience of owning previous Lada models, it is known that there is an easier way without removing the bumper:
_x000D_
- _x000D_
- Remove the six screws of the upper bumper mounting (No. 1); _x000D_
- Bend the upper part of the bumper along with the grill towards you; _x000D_
- Unscrew the radiator grille mounting screws using a short screwdriver, inserting your hand into the resulting hole. Be careful not to break the plastic; _x000D_
- Remove the radiator grille by pulling it towards you. _x000D_
_x000D_
remove the Lada Vesta radiator grill remove the Lada Vesta radiator grill remove the Lada Vesta radiator grill
Installation of the grille is carried out in reverse order. It is worth noting that not everyone can perform such a replacement. Difficulties may arise for owners with large hands.
It is unlikely that you will be able to gain access (from below or from above) to the fastenings of the lower radiator grille. In this case, you will first have to remove the bumper assembly, and then dismantle the lower radiator grille. Mounting diagram:
Lada Vesta car owners often encounter...
...with the problem of damage to the radiator of the cooling system. The reason is not the quality of the radiator, but the imperfect design of the upper and lower grilles. Often, at speed, stones, gravel, and crushed stones fly into the engine compartment, thereby damaging the elements of the cooling system.
There are three ways to deal with manufacturing defects:
- install a branded, non-standard Lada Vesta radiator mesh;
- install a homemade structure;
- install universal protection.
The owner of a Lada Vesta chooses the most optimal option for himself, based on his budget and availability of free time. If you are not physically able to install the protection yourself, contact a service station specialist for help.
Review of product prices for LADA Vesta
Price is an important criterion when choosing parts for tuning; it often affects the quality of the product and its durability. Let's consider the most optimal products in terms of price-quality ratio.
- YAROPLAST winter grilles consist of two elements. One of them is for the lower grille, the other for the upper protection.
Cost – 600 rub. and 900 rubles, respectively. This is a high-quality product that allows you to completely block the oncoming flow of air masses for the radiator. If the air temperature drops below 3-4 °C below zero, it is better to remove the upper part of the structure so that the cooling fan does not turn on too often.
- Icarus-VENERA.
Ready-made or homemade protection?
Branded
The mesh is sold in car dealerships, online and at car markets. Installation is carried out from the front side of the grille. The design is represented by four lattices:
- top;
- bottom;
- for the left air intake;
- for the right air intake.
The main material is aluminum, which has high strength and ventilation. The edging is made of ABS polymer.
| Name | Price in rubles |
| Top (chrome) | From 3300 |
| Black color | From 3100 |
| Bottom (chrome) | From 2400 |
| Black | 2200 |
| Set | From 5500 – 5800 |
| *prices are as of May 2021 | |
Homemade
The mesh is made from available materials. Installation is carried out from the back of the bumper with fixation using plastic clips and self-tapping screws. Aluminum is used as the main material, the shape of the structure is rectangular.
Radiator grille "Next"
Consists of two parts. Installed instead of standard ones. The upper grille without a badge will give the car a “predatory” look. Equipped with a protective black aluminum mesh to protect the radiator from contamination and the engine from overheating. Material: high-quality ABS plastic. Color: black varnish.
- up - 4650 rub.
- bottom - 2250 rub.
How to install a protection grid
- We place the car over the inspection channel, open the hood, remove the engine sump protection and license plate.
- We gradually unscrew the fasteners of the upper, middle, and lower contours.
- We remove the headlight units from the seat.
- Then we move on to the wheel arches and unscrew the bolts.
- After the front bumper is completely freed from the fasteners, dismantle it.
- Let's start making the protection. We apply a metal mesh on the back side and draw the outline with chalk. We cut out the trim to the shape we need, not forgetting the holes for the screws.
- We unscrew the bolts, remove the standard mount, apply the mesh, and screw it on.
- On the left and right in the central part we fix the cover with plastic clamps, since the design does not provide holes for self-tapping screws.
Installation is complete, let's start installing the front bumper in its original place.
Product description:
Buying a stylish and laconic “Venera” radiator grill is a great way to transform your Lada Vesta car. The main difference is the lack of space for the Lada nameplate.
Attention!
- to the color of the car - field “Vesta Color”
- to any other color - “Additional color” field
Both options at the same time should not be selected!
The grille is made of impact-resistant, unstructured ABS plastic using thermo-vacuum molding. Products obtained using this technology have a number of advantages over similar products made from other materials:
- high hardness, wear resistance and durability;
- non-toxic, increased impact resistance and elasticity;
- good adhesion to primers and paints and varnishes;
- resistance to solutions of acids and inorganic salts;
- resistance to fuels, lubricants and alkalis;
- exceptional resistance to atmospheric conditions;
- wide range of operating temperatures (long-term operating temperature, from -40 to +80°C).
Conclusion
The process of installing a mesh on the radiator grill of a Lada Vesta is not complicated; the task is doable even without experience in servicing equipment. It is necessary to strictly follow the regulations and avoid mistakes.
As for the modification of the protection and the method of its manufacture, this is a “personal matter.” The car owner takes into account the cost of the accessory, budget, and availability of free time.
Obviously, purchasing a ready-made kit with subsequent installation will significantly simplify the process. But not all drivers agree with the high cost of the kit.
A homemade protective mesh costs several times less, but does not always meet the established quality. The choice is up to the vehicle owner.
Modification of the lower radiator grille
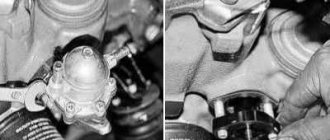
- Remove the front bumper.
- Remove the grille from the bumper (Torx T20 mounting screws).
- Place the mesh on the grill and cut out a piece measuring 85x15 cm.
- Secure the metal mesh with clamps.
- Installation of the grille and bumper is carried out in the reverse order.
Before and after modification:
The process of installing the protective mesh in the lower bumper grille in the video:
Advice
. In order not to remove the bumper several times, it is recommended to combine the installation of the mesh in the lower and upper radiator grilles.
Let us remind you that you can also protect Vesta’s radiator by replacing the standard radiator grille with a tuning one or using overhead nets.
Winter radiator protection
The plugs are made of plastic or soft material (fabric, tarpaulin). There is no need to do this. This may be justified if you live in the far north, where there are very severe frosts. If this is the middle zone, then closing the radiator for the winter is simply nonsense. You have a modern car with a normal cooling system. If it's working, then you don't need these things.
It is known that the car gets hot with them, and can cause the engine to overheat. If you work in a taxi or as a sales manager, buy a special blanket. It will prevent the engine from cooling quickly and will save some fuel.
Types of tuning: which one to choose
Nowadays, the greatest demand is for designs that do not have icons and are installed in the same place where the standard part is located. To make the accessory, durable ABS plastic is most often used, which is resistant to changes in air temperature, road reagents and mechanical stress. If severe pressure or impact occurs, the part is damaged, but it is resistant to minor obstacles.
Here are the main options for tuning the Lada Vesta grille:
- winter version of the grille from YARPLAST;
- protection without badges, manufactured by Icarus or VENERA;
- linings produced by FERRUM-GROUP;
- Radiator grille for Lada Vesta - chrome tuning;
- external mesh produced by Strelka.
Customer Reviews
| Positive | Negative |
| Kolya: “An inexpensive way to make your car aggressive and stand out from other Ladas.” | Evgeniy: “It seems to me that with the grille the car will look worse than when it was just purchased in the factory configuration.” |
| Igor: “I ordered it online - it fit perfectly in both size and design, I was very pleased, and paid less than when buying in a store.” | Oleg: “I installed the grille, followed the instructions, and after three days the right side fell off. There are only unnecessary problems with her.” |
| Timur: “I like that the radiator is protected. I often have to drive on crushed stone, I don’t want small stones to cause damage.” | Valera: “I can’t say that for Vesta the grille is a tuning, there is absolutely nothing bright and beautiful about it.” |
| Murat: “It looks beautiful on a modern car and attracts attention. I installed it very quickly myself, I didn’t have to go to the service center.” | Arthur: “I took an inexpensive chrome-plated structure - the coating peeled off in literally six months, I just spent the money.” |
| Evgeniy: “It washes perfectly, protects the car well and adds originality. At the same time, the price is quite reasonable.” | Alexey: “I can’t say that it’s as easy to install as they say on YouTube. I spent a lot of time and watched a lot of videos before it worked out.” |
Conclusion
To create an original and individual car, you can upgrade the radiator grille on the Lada. We recommend that you purchase parts only from trusted suppliers. Experts do not advise purchasing the cheapest goods, since they are not of good quality; it is better to choose an average cost and a trusted manufacturer.
| Video - Installing the Grille on Lada Vesta Lux |
| Video - Tuning the Lada Vesta radiator grill!!! for all trim levels |
Heat marathon or how to close the radiator grill of a Lada Vesta: a review of handmade solutions
The single resolution of experiments and reasoning is to insulate. Combining the operation with the morning warm-up ceremony is not the best idea: you can’t put the cardboard in a second, there are no cracks. Generally speaking, a sheet of cardboard in front of the grill is impractical advice:
- Installation involves removing the bumper.
- Thick paper gets wet quickly and hardly dries out.
- It is necessary to ensure a gap between the heat exchanger and the insulation.
With an eye to accuracy
Horizontal fins, wide spacing between them, recessed radiator honeycombs – this is not an exemplary platform. Select a material of a nondescript color, cut it into pieces and insert it between the edges - simple and inconspicuous. It is not at all necessary to hide the modification - the tone in the color of the car adds presentability.
Technically, there are no difficulties. Minimum amount of funds:
- An ordinary isolon or travel mat of a suitable color.
- 15-20 plastic clamps of a certain tone.
- Stationery knife.
- A long, straight piece of wood.
Preliminary strip sizes have already been taken and estimated (window numbering from top to bottom):
- 1 – 5x82.
- 2 – 4x33 (2 pieces).
- 3 – 4x98.
- 4 – 5.5x80.
- 5 – 5x84.
Attention! When choosing a material, focus on its maximum size: at least 98 cm.
The trapezoidal shape is not typical for all windows. The nameplate extends slightly onto the first and third platforms, and in the fourth opening under the license plate a narrowing is applied over a very long segment. It is not necessary to cut out a stencil for problem areas - careful adjustments on the spot will do. For fastening, 4-5 ties are used per strip.
Limiting air cooling to 100% is acceptable at ambient temperatures less than -25°C. During the thaw, it is recommended to open one of the windows, since in traffic jams the cooling fan may turn on. It is optimal to remove the second strip of two parts: the appearance will not be affected.
Fast and practical
A hastily cut sheet of foiled polypropylene is certainly a quick solution, but not an aesthetically competent one. Another thing is to close the openings in the Vesta radiator grill with Flex tubes. The dimensions are known, cut, cut lengthwise and insert. The exterior is a C grade, but it’s simple, fast and cheap. Pre-painting can increase the beauty index.