Soundproofing Vesta with your own hands is a long process, but its quality can be higher. The factory sound insulation of the Lada Vesta differs from that installed on previous VAZ models - in previous models, drivers did everything with their own hands to get rid of all kinds of crickets and noise. During a quiet drive around the city, noise insulation suppresses extraneous sounds, creating comfort for the Vesta driver. And only when driving outside the city, where the surface coverage is full of surprises and driving speed increases, it becomes obvious that in this part of the Lada Vesta there is still work to be done. The need for sound insulation is recognized by many car owners who often travel in their cars. You can do this work yourself if you know the basic rules - read the article and find out how to make noise in the hood, floor, doors, arches, trunk and panel!
Sound insulation assessment of Vesta
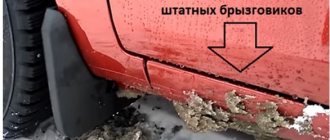
The running engine of the Lada Vesta creates quite a few loud sounds that disturb the driver. Standard noise insulation is not enough to completely cope with them. And yet, experts, having conducted a series of tests, comparing Vesta with other similar sedans, gave an average rating, noting that the acoustic and vibration comfort of Vesta is even higher than that of Volkswagen Polo and Renault Logan. Owners notice that the soundproofing and soundproofing qualities of the car have shortcomings. The reasons for the problems are associated with two features of the car: the absence of rear fender liners, poor door and glass seals. Sound insulation improvements are made taking these factors into account.
Door pillar linings
- Dismantling must be done with the threshold linings previously removed (see above).
- Remove the door seal of the front and rear doors in the area where it meets the threshold trim.
- Remove the cap from the head of bolt No. 4, unscrew the bolt (flat screwdriver, replaceable head 14).
- Take the lower part of the upper cladding No. 1 and pull with a force that overcomes the forces of the plastic holders.
- Remove the top trim by threading the strap through the hole in the trim.
- Remove the bottom trim by removing four screws No. 2 (replaceable Torx T20 head, knob).
Objective measurements of the sound insulation properties of the Lada Vesta showed:
— At a speed of 60 km/h in a car not equipped with rear fender liners, the noise level in the cabin is 64.3 dB versus 63.5 dB for a car with wheel liners.
— At a speed of 90 km/h the indicators increase to 67.1 dB, 65.5 dB.
— At a speed of 110 km/h – 68.9 dB versus 67.5 dB.
Based on the results, we note that installing rear fender liners improves the quality of noise and vibration comfort for passengers/driver.
In addition to the fender liners, owners also modify the roof, trunk, floor, doors, hood, and front panel. The result is a quiet car in which you can travel long distances.
About sound insulation of Lada Vesta SW
According to AVTOVAZ representatives, the new LADA has sharply increased its level of sound comfort. For several years, foreign cars have had one noticeable advantage - acoustic comfort. Today the interior of the Lada Vesta SW is quieter than that of its competitors. Is it so?
The interior of the Lada Vesta SW Cross was disassembled and found out:
- There are vibration-absorbing materials, but only partially. For example, they are on the left rear arch, but not on the right.
- There is sound insulation in the form of felt in the cabin and trunk.
- Microfiber is used in the doors.
- The technological openings in the doors are closed.
- The entire floor surface is soundproofed in the form of felt. But in the front part it has a moisture-proof coating on top, but not in the back.
Features of standard sound insulation of Lada Vesta SW on video:
Let us remind you that the easiest and fastest way to improve sound insulation is to cover the fender liners and wheel arches. Also read how to get rid of squeaks in Vesta’s interior.
Keywords: sound insulation of Lada Vesta | Lada Vesta engine
+3
Share on social networks:
Found an error? Select it and press Ctrl+Enter..
General procedure
There is a single procedure for improving insulation with your own hands. The standard algorithm includes a number of steps:
First you need to remove the factory trim - gaining access to the metal. Next, the metal is thoroughly degreased. Soundproofing materials are cut to size. Vibration absorber/sound absorber are installed alternately. Then the anti-creak is installed. The trim is assembled in the car. At some stages, vibration-proofing materials are heated with a construction hairdryer and rolled with a roller so that there are no irregularities or bubbles left.
How to remove cladding and interior trim on a Lada Vesta
During modifications, installation of additional equipment or car repairs, it becomes necessary to disassemble the interior. To avoid breaking anything, it is recommended to first study the instructions for removing plastic interior trim. Let's look at the features of such dismantling on Lada Vesta.
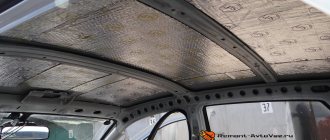
Roof sound insulation
To soundproof this part of the car, it is necessary to carry out work on the roof metal. First you will need to unscrew all the ceiling handles, remove the lampshades and stands. This will allow you to easily remove the soft covering and gain access to the metal part of the roof. Next, you will need to lay a vibration and noise absorber on the surface. It is better to use sufficiently dense materials that can cope with the sound wave created under the skin. After installing the insulation, you can install the sheathing/parts in reverse order.
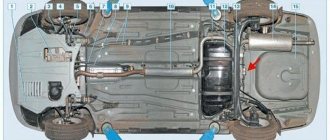
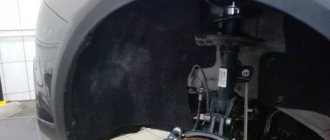
Soundproofing arches
To soundproof the arches on the Lada Vesta, you will need to remove all the wheels and lockers. This part of the car gets seriously dirty, so before degreasing it is necessary to thoroughly clean the arch surface. Further work occurs according to the standard algorithm.
It is better to choose a vibration absorber based on bitumen. The process of gluing the outside of wheel arches is labor-intensive. To make the task somewhat easier, you can cut the materials into small pieces, placing them on the surface one after another. The joints formed during the process are coated with rubber-bitumen mastic. An additional layer of noise insulation is then glued to the locker.
Soundproofing the floor of Lada Vesta
The work begins with removing all seats, carpets, and upholstery from the interior. As soon as the metal layer becomes accessible, further actions are carried out. To soundproof the floor, use 3 layers of materials:
High quality vibration absorber. It is recommended to purchase premium material for the best insulation. Sound absorber with a thickness of at least 8 mm. NoiseBlock soundproofer. This design will protect the car from external noise over a wide range. As a result, the interior becomes significantly quieter.
SOUND INSULATION OF LADA VESTA CROSS - VIDEO REPORT
Each Mos-Olympus master has at least 5 years of experience, which is a guarantee of careful analysis of the salon. Rest assured that not a single part will be damaged or broken during operation. The technician changes up to 20 pairs of gloves while working on your car.
The interior of the Lada Vesta is thoroughly washed and degreased after disassembly. Then the master takes photographs of the disassembled interior, photographing each element separately, the roof, doors, interior floor, hood, rear fenders, trunk lid. After this, the process of installing the first layer of sound insulation begins.
Before installation, all vibrating material is heated in a special oven to a temperature of about 57-60 C. During installation, everything is rolled with rollers without fail!
The interior is thoroughly washed and degreased after disassembly. Then the master takes photographs of the disassembled interior, photographing each element separately, the roof, doors, interior floor, hood, rear fenders, trunk lid. After this, the process of installing sound insulation begins.
Soundproofing the interior begins with complete degreasing of the metal surface.
Then the craftsmen install the first layer - vibration-insulating material Dark Premium D3 - an ultra-light material for car sound insulation, made from the mastic composition D-formula, created using the latest patented technology of multi-stage low-temperature mixing of DarkAir and HotAl aluminum foil using InFliz technology.
The vibrating material is preheated and hot mounted. During installation, the entire area of the material is rolled with rollers for maximum adhesion to the metal of the body.
We use a premium new product in the line of vibration materials from ComfortMat. Improved adhesion, reduced weight, increased efficiency. Thickness 3mm.
Then we proceed to installing the noise-absorbing layer in the interior of the Lada Vesta Cross.
We install highly effective noise-absorbing material from secondary foamed PU, made using Regeneration 2.0 technology on a special acoustic grade of foam rubber.
The material is elastic, resistant to ultraviolet radiation, changes in humidity and temperature. Thickness 4mm.
Soundproofing a Vesta Cross roof begins with complete degreasing of the metal surface.
Then we proceed to the installation of ultra-light material from ComfortMat - G2 . We mount the vibrator and roll it with rollers.
on the roof as a second layer . One of the best sound-absorbing materials, made from special high-density acoustic felt using Kniton thermal bonding technology.
Material thickness 10 mm . Excellent at suppressing both external and internal noise in the car. The material is self-adhesive. Used to soundproof the roof of a car, reduce noise from rain and improve the acoustic properties of the car. 86% sound absorption
The sound insulation of Vesta doors includes 3 layers of ShVI, plus anti-creaking of all door skins, it is this order of installation of vibration-noise materials that allows you to achieve the maximum sound insulation effect, reduce vibrations traveling through the body, and improve the sound of the car's standard acoustics. And carefully, using special tools, so as not to damage or scratch the body and door trim, we proceed to disassembly.
We degrease the metal surface of the door and proceed to the installation of the ShVI. The first layer is to install an effective vibration-damping material. Material thickness 2 mm.
As a second layer, we install another vibration layer in the door, this time on the outer side of the card, in order to remove vibrations traveling through the body as much as possible.
The third layer - Volna material - is an effective sound insulator from ComfortMat, dampens up to 80% of sounds.
The material is intended for professional acoustic preparation of the door volume. Eliminates negative and acoustic phenomena, such as: reflections, standing waves, ECHO effect (waves superimposed on one another).
Significantly improves the sound of the car's standard acoustics! Material thickness 15 mm.
We treat each door trim with anti-squeak to eliminate as much as possible the appearance of unpleasant “crickets” in the car interior.
Sound insulation of the Vesta Cross trunk includes a combination of vibration and noise-absorbing materials to achieve maximum effect.
The first layer in the trunk niche is mounted with vibration-damping material made from a new-level mastic composition G-formula and HotAl aluminum foil using InFliz technology, thanks to which it was possible to achieve a significant increase in all indicators, especially the mechanical properties and adhesion. Thickness 3mm.
To soundproof the arches of the Lada Vesta, we use vibration-insulating material Comfort Mat Premium DARK . The entire vibration is preheated and rolled with rollers during installation.
Then we proceed to the installation of noise absorbers. The trunk wings contain Volna material, an effective sound insulator that dampens up to 86% of sounds. Thickness 15mm .
We glue the trunk niche and arches with highly effective sound insulation from Comfortmat with a moisture-resistant adhesive layer. Thickness 4 mm.
Noise insulation of the hood will also not be left without attention. We install the vibration layer on the metal and roll it with rollers.
Sound insulation of the trunk lid consists of vibration and sound-absorbing material. Vibration-damping material made from a new-level mastic composition G-formula and HotAl aluminum foil using InFliz technology. Thanks to this, it was possible to achieve a significant increase in all indicators, especially KMP and Adhesion. Material thickness 2mm.
We mount Volna on the fifth door trim, thickness 15 mm.
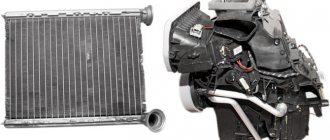
Soundproofing the hood of Lada Vesta
There are several features associated with hood sound insulation. There is an engine located here, which makes a lot of noise and also requires special thermal insulation qualities. Light vibration-proofing materials show the greatest effect during work.
The work itself is carried out only on metal surfaces under the hood. They are thoroughly cleaned of oil and dirt, and then, following the standard algorithm, sound insulation is installed. The work requires skills and patience, so it is ordered from craftsmen to complete it.
Sound insulation panel
The front panel is insulated to rid the car interior of squeaks and rattles coming from under it. The work is carried out differently, depending on which part the extraneous sounds are heard from. During modification, an anti-creak and vibration absorber are used.
To disassemble the front panel, you need to unscrew the screws and carefully pull it out of the latches located on the side. You need to remove it carefully, not forgetting to disconnect the cable. Next, the panel can be glued with Madeleine or another anti-creaking agent.
Threshold covers
Removing the front sill trim
:
- Unscrew screw No. 3 (Torx T20).
- Remove seal No. 2 of the doorway in the area where it interfaces with the threshold trim.
- Remove the threshold trim by pulling it with a force that overcomes the forces of the plastic holders.
Removing the rear sill trim
:
- Removing the trim is done by removing the trim of the side arch (see below) and the rear seat cushion.
- Unscrew screws No. 5 (Torx T20).
- Remove seal No. 2 of the doorway in the area where it interfaces with the threshold trim.
- Remove the threshold trim by pulling it with a force that overcomes the forces of the plastic holders.
Average price for noise protection
The cost consists of the price of materials/work of the craftsman. When you contact a car repair shop, where they will completely insulate the noise of the car, you will spend on average up to 40 thousand rubles. Independent work will require almost half the investment. True, the work will take about five days or more. Some stores sell ready-made sets of materials and tools for work, the purchase of which will completely reduce expenses to 10 thousand rubles. True, in this case it will not be possible to choose better manufacturers, but this option may be suitable for unassuming car enthusiasts.