Front brake pad wear sensor VAZ 21083, 21093, 21099
On VAZ 21083, 21093, 21099 vehicles, front brake pad wear sensors (alarms) were installed in the maximum configuration.
When they were triggered, the driver received a signal that it was time to replace the brake pads in the form of a lit warning lamp in the instrument panel (on-board control system display unit). Here is a diagram for connecting the front brake pad wear sensors with a description of the elements and operating procedure.
Connection diagram for front brake pad wear sensors for VAZ 21083, 21093, 21099 cars
Description of the scheme
— The wear sensor is a metal rod with a wire inserted into the front brake pad. The wire is connected to the electrical circuit for turning on the warning lamp. When the pad lining wears out, the rod touches the brake disc and closes the electrical circuit (minus) of the warning lamp in the display unit on the front panel of the car. It lights up, signaling to the driver that it is time to change the brake pads.
— Plus (voltage) is supplied to the warning lamp in the display unit on the front panel of the car from the “B+” terminal of the generator through the mounting block. After turning the key in the ignition. Until the circuit is closed it does not light up.
Front brake pad wear warning lamp in the on-board control system display unit
— The electrical circuit is protected by fuse F16 (15A) in the fuse and relay mounting block.
Notes and additions
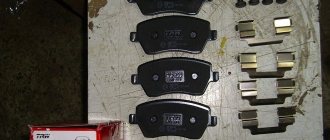
Brake pads for VAZ 21083, 21093, 21099 vehicles use a front brake pad wear sensor (alarm) 2110-3501093(02).
How to get to the right fuse
Almost the entire electrical circuit of the VAZ 2114 is protected by knife-type fusible elements. The most powerful consumers such as headlights, electric fuel pump, etc. are already mounted via a relay. Most fuses can be found in the so-called. fuse box VAZ 2114. However, this diagram has exceptions:
No special tools are required to dismantle VAZ 2114 fuses. Therefore, first of all, look at the VAZ 2114 fuse box, which is located under the hood of the car opposite the driver next to the left pillar. In order to open the fuse box, protected by a plastic cover, you need to lightly push a couple of cover latches towards you, lift it and remove it. After this, you will immediately be able to see the modules responsible for the electrical safety of various vehicle systems.
We determine the wear of brake pads and discs on a VAZ 2114
We remind you that brake discs and pads have a certain service life, and they need to be changed in a timely manner in order to avoid disastrous consequences. No manufacturer of brake discs or pads can give an exact mileage that will ensure safe driving. It all depends on the components, your riding style, braking force distribution, etc. Therefore, it is necessary to check the discs and pads from time to time and determine the wear of these brake units.
How to correctly determine the wear of brake discs and brake pads?
Pay attention to the table; it shows the dimensions of the permissible sizes of brake system units. If your indicators are close to the table, then draw appropriate conclusions and get ready to replace parts
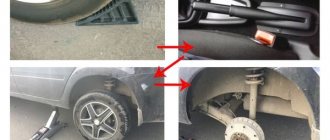
1) First of all, put the car on a jack and remove the front wheel.
2) Clean the disk from dust and dirt, if any.
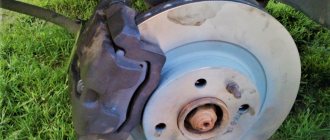
3) Take a caliper and measure the thickness of the disc, draw the appropriate conclusions (the discs need to be replaced in pairs) (The permissible wear of the brake discs must be at least 10.8 mm)
4) Visually check the condition of the pads through the inspection hole. If they are thin, then again we use a caliper. (If the thickness of the pads is less than 1.5 mm, then replace them in pairs)
5) Take a screwdriver and check the ease of movement of the pads. If the pads are difficult to move, they may be pinching the disc. (If the wear is uneven, you will need to replace the caliper or cylinder as a set)
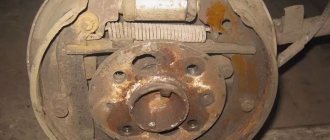
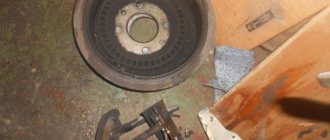
6) To check the rear brake units, in addition to the wheel itself, remove the drum.
7) Then measure the thickness of the pads.
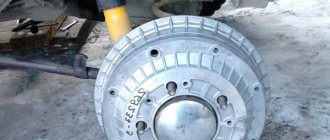
 We measure the diameter of the working surface of the drum. (The maximum permissible diameter of the working surface inside the drum should not exceed 201.5mm.)
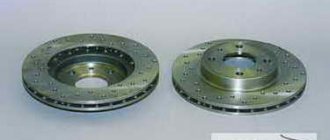
If the brake discs are worn more than the permissible 10.8 mm, then they need to be replaced.
When and in what cases should you change brake pads?
1) Pad thickness less than 1.5 mm
2) The pad linings have an oily surface
3) The pads are poorly connected to the base
4) There was a creaking noise when braking
5) There was a beating when braking on the brake pedal
When and in what cases should you change brake discs?
1) The thickness of the disc is less than the acceptable parameters 2) There are scratches and chips 3) The disc is oval or crooked, hitting the brake pedal
Uneven pad wear, what to do?
If you are faced with such a problem, then the first thing you need to look for is the greater wear of the pads: the guides could be jammed, the piston.
WE CHANGE BRAKE DISCS (TD) AND PADS WITH YOUR OWN HANDS
Replacing brake discs on a VAZ 2114 is a fairly simple process that, if you have the necessary equipment and 2-3 hours of free time, you can easily do it yourself.
To replace the disks yourself, you will need the following tools:
- Jack;
- Screwdriver;
- Keys at 17, 8 and 13;
- Balloon key.
- Rubber hammer.
Rubber hammer in action
We replace discs in the following sequence:
- We place the fourteenth on a flat surface, preferably asphalt. We install wheel chocks under the wheels;
- If the car wheels have not been removed for a long time, it makes sense to treat all threaded connections with WD-40 and wait 10-15 minutes - this will greatly facilitate the removal process;
- We tear off the nuts securing the wheel from a dead point using a wheel wrench. Since this can cause the car to sway violently, this should be done before lifting the car on a jack;
- After the fastenings are loosened, install the jack in the place of the special stop and raise the car;
- We twist all the fixing nuts with a wheel wrench and remove the wheel;
- We remove the block; to do this, you need to unscrew the caliper that secures it. This is done with a 17 key. You must first remove the brake hose fasteners (with a 13 key) and drain the leaking fluid into a prepared container;
- Remove the brake cylinder. It is secured with two bolts that can be unscrewed with a 13mm wrench;
- Now we have free access to the disk. It is secured with two guide pins (pins), which we need to unscrew with an 8 key;
- After removing the clamps, use a rubber hammer to tap the back side of the disc so that it comes off the hub. To do this, you can use a regular hammer and a block of wood as a backing, but everything must be done extremely carefully;
- Once the dismantling is complete, the disk is installed. Installation of a new part is carried out according to the same algorithm as the removal of a VAZ brake disc, only in the reverse order. Before installation, the connection point with the hub must be lubricated with a special high-temperature lubricant; the so-called “copper” lubricant is well suited.
Often, along with replacing the discs, it is also necessary to replace the front brake pads on the VAZ 2114.
This is done as follows:
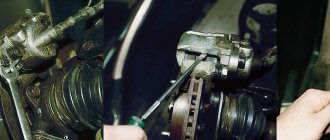
- After removing the wheel and cleaning the parts from dirt, remove the brake fluid supply hose from the bracket;
- Using a 17mm wrench, unscrew the upper caliper mounting bolt. To unscrew this bolt, you need to bend the counter curtain, which prevents the bolt from turning when driving; this can be done with a regular flat-head screwdriver;
- Similarly, loosen (no need to unscrew completely) the lower caliper mounting bolt;
- Move the bracket covering the brake pads up (it will be held on by the loosened bolt);
- We remove the worn out pads and install new ones in their place;
- We screw the caliper back, attach the fluid supply hose back to the bracket and install the wheel.
Is it possible to replace a faulty sensor?
You can replace the faulty part yourself, but you need to follow some recommendations. First, the car is raised with a jack and the wheel is unscrewed. The external sensor is located near the hub, mounted on a spring or clamp. The sensor is pulled out of its place, the contacts are cleaned of dust. Instead, another sensor is installed and the wheel is secured. After lowering the car “from a height”, it is worth checking the functionality of the element. The lamp lights up when the pads are very worn. A replacement sensor is selected that is similar to the old one, that is, the one recommended by the manufacturer. The work is carried out in accordance with the car repair instructions. Correct selection of parts makes driving safer.
DETERMINATION OF WEAR
Hard use causes not only premature, but also uneven wear of the rubbing parts in any brake system. Uneven wear of the brake discs can be determined when driving by the vibration and noise when pressing the brake pedal. Accordingly, in this case, the pads do not wear out equally.
Car owners often have a question about how to determine brake pad wear by external signs without disassembling the car. Signs of malfunction:
- braking efficiency deteriorates;
- the light signal lights up (if there are pad wear sensors in the car);
- the free play of the pedal increases, sometimes the pedal completely fails;
- as a most extreme option, a metallic sound occurs when you press the pedal. This already indicates that the pads have worn down to iron.
You need to have a good understanding of the dangers of a brake system malfunction. If there is any suspicion of a defect, the condition of the parts must be checked.
. To check the condition of the disc brake parts on the front suspension you need to:
- loosen the front wheel, lift the car with a jack, then remove the wheel;
- Remove the pads and carefully inspect the parts.
How to determine pad wear? Without removal, the condition of the pads may not be visible, since even fairly thick linings on them sometimes have uneven wear. The thickness of the friction linings should not be less than 1.5 mm. The pads must be replaced as a whole set, since different thicknesses of the friction layer will negatively affect braking efficiency. Replacement should also be carried out:
- if oil gets on parts;
- when chips and cracks are detected;
- when the friction layer of the pad peels off.
Let's try to determine the wear of the brake discs. The thickness of the working surface of these parts should not be less than the value provided by the manufacturer of this car brand. It is believed that the thickness of the disc cannot be less than 11 mm.
To correctly determine wear, you should pay attention to the general condition of the parts. Discs to be replaced:
- with a working surface thickness less than the permissible value;
- with uneven wear of the working plane;
- curved, oval discs.
These brake discs must be replaced
Types of systems and operating principles
Sensors that warn of critical wear are divided into two types:
Mechanical.
Electronic.
The mechanical type is the simplest and at the same time effective sensor that monitors friction lining wear. Its design includes a plate mounted on the base of the block. The ends of the plate protrude beyond the limits of this pad and at the moment when the material wears away, the end begins to come into contact with the disk. This causes strange grinding sounds to appear. Unfortunately, today mechanical sensors are practically not installed on modern cars. The design, although simple, has its drawbacks. The first drawback is the high chance of losing the plate. The second “minus” is false positives, which in practice occur quite often. Sometimes, even recently installed pads begin to make squeaks, and the sensor begins to make a characteristic squeak. Also, a mechanical part cannot be placed on drum mechanisms due to the design features.
Electronic sensors are considered technologically advanced because they interact with the lamp on the instrument panel. The car owner does not need to listen to extraneous sounds. All information is sent to the sensor. It, in turn, is divided into external and integrated types.
The external type has a recess. It is placed on the block, namely on its metal part. The advantage of this type is that when replacing pads there is no need to change the sensor; it can simply be moved to a new part. Integrated devices are placed inside the pad, and it is impossible to remove it from there. When replacing the pads, the sensor also changes. This is quite easy to do.
How to remove and replace front pads
The process of replacing front brake pads is usually carried out 5-7 times more often than rear ones. The main reason for this is the operating conditions. Abrasive gets between the pad and the brake disc. The rear wheel drum isolates the linings from microparticles.
The process of removing the front pads and installing them on the VAZ 2114 and 2115 is as follows.
- The wheel bolts are unscrewed, and the car is first placed on a jack;
- Use a spanner to unscrew the bolt securing the caliper bracket;
Loosen and unscrew the caliper mounting nuts - Next, the lower caliper mounting bolt is loosened, while a special key is bent;
- The brake hose should be removed from the bracket;
Protect the hose from damage by removing it - The metal bracket must be pulled up and towards you;
Release the caliper - Used pads are removed and new ones are installed in their place;
Remove worn out pads - Reassembling the mechanism is carried out in the reverse order.
The process of replacing the front pads is easier than the rear ones, but you should do everything as carefully as possible.
Reasons for replacing pads
- Their thickness is below acceptable.
- The presence of cracks, chips of various origins, and tubercles on them.
- Visible wear of the disk, there is its deformation, misalignment (when replacing disks, the linings are also changed at the same time).
This process, as you know, consists of two operations: the front pads are replaced separately and the rear pads are replaced separately. There are some differences here. Of course, the driver can do the work himself, but some skill in mechanical car repairs and a trivial set of automotive tools will be required.
DISCS
Brake discs do not wear out as quickly and therefore need to be replaced less frequently. Although it should be noted that if the car is equipped with drum brakes, then the pads in such a vehicle are changed much less frequently than in disc brakes. Especially when it comes to the rear suspension. Wear of the rear drum-type brake pads occurs somewhere on average within 50-100 thousand km.
Typically, discs are changed half as often as pads. But here, too, a lot depends on various factors; sometimes replacement is required earlier than planned.
When to change?
Brake pads must be replaced after reaching a certain number of kilometers, but these numbers are not always standards, it all depends on driving style. Brake pads wear out much more often when driving around the city; when driving on the highway, the pads will last much longer.
Also, the front pads will have to be replaced much more often than the rear ones. This is explained by the fact that the front brakes take on most of the load.
On average, rear brake pads can travel almost 80 thousand kilometers without replacement.
The front pads must be inspected every 10-15 thousand km, and if the brake pad lining is worn down to 1.5 mm, it must be replaced without fail.
Advantages: the most widespread network in Russia, delivers to any corner of the country, including remote ones. Flaws:
- high cost of delivery of heavy or large parcels, as well as the weight of one parcel should not exceed 20 kg;
- long delivery times and queues in large cities for receipt.
To send your order by Russian Post:
- Place an order in our online store by phone or on the website (registration is not necessary);
- After we receive it, our manager will contact you by phone to clarify the cost, delivery time and your wishes. Next, we will pack your order carefully and then send it to you;
- You will receive the tracking number of the shipment via SMS from us and from the Russian Post; the message will indicate the full cost of the purchase, including delivery to your locality (that is, the cost of your order plus the cost of delivery by cash on delivery). You can control the status of the order coming to you using our tracking service, as well as independently, on the Russian Post website using the track number;
- To the Post Office, you will only have to pay the cost, including delivery.
Delivery time may vary depending on how far your locality is from Togliatti and usually ranges from 5 to 14 days.
The cost of delivery is calculated based on the volume, weight of the selected product and the distance to the recipient's settlement.
Required for sending:
- indicate full name recipient;
- Your mailing address;
- Your phone number (contact);
- Post office code.
Russian Post commission for cash on delivery service:
- purchase price up to 1,000 rubles. – 70 rubles + 5% of the amount;
- purchase price from 1,000 to 5,000 rubles. – 80 rubles + 4% of the amount;
- purchase price from 5,000 to 20,000 rubles. – 180 rubles + 2% of the amount;
- purchase price from 20,000 to 500,000 rubles. – 280 rubles + 1.5% of the amount.
Russian Post - Delivery of goods up to 20 kg throughout Russia.
https://www.pochta.ru The algorithm for removing old parts is as follows:
- Forward gear is engaged;
- The handbrake is turned off;
- The exhaust pipe is removed from special rubber cushions;
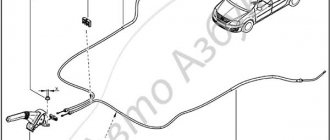
- The handbrake tension nut is unscrewed;
- The rear wheel bolts are unscrewed;
Remove the wheel, do not forget about the stops
Unscrew the drum mounting bolts
Disc with cover removed
The springs and spacer bar are removed. When assembling the pads you will need to align
The fasteners themselves are removed from the old pads and put on new ones.
Installation of new overlays is carried out as follows:
- After installing new parts in place of the old ones, they are necessarily compressed (closed) together;
- We press on the brake cylinder - this will allow them to be installed in place;
- The brake drum is put on;
- The wheel is installed in place and free rotation is checked.
If possible, please read the installation manual in advance.
How to change the rear ones with your own hands: video
Replacing brake pads on VAZ 2114 and 2115 is performed identically for both wheels.