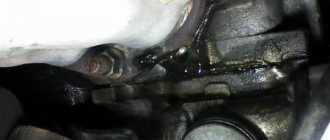
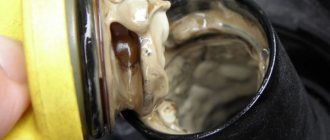
The consequences of a crack in the cylinder block and methods for detecting it depend on its location. Among the main symptoms are the appearance of an emulsion in the coolant reservoir or sump, increased pressure in the cooling system and, as a result, engine overheating. We will talk about the causes and consequences of cracks in the cylinder head/cylinder head walls, which method is better for detecting microcracks and whether this can be done without disassembling the engine. We will separately consider repairing cracks in the cylinder block, in which antifreeze leaks along the outer part of the cylinder block.
Crack in the cylinder block
The appearance of cracks in the cylinder block (BC) and cylinder head (cylinder head) is a fairly common problem. Cracks can appear as a result of natural wear and tear, after a unit jams, an accident, etc. Fortunately, modern technologies make it possible to restore a damaged element, and sometimes the driver can even remove a crack in the BC on his own.
Before describing how to troubleshoot a problem, let's look at how to find this problem. There are several ways to detect a cracked cylinder block:
- using ultrasound,
- using magnetically sensitive equipment,
- hydrocontrol method,
- pneumatic crimping method.
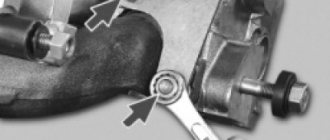
Car repair shops most often search for cracks using water or air. Air is supplied to the damaged element, then the part is lowered into a bath of water and it becomes clear from the bubbles where the problem lies. If you pump water into the element, it will seep out at the crack.
Once the location of the split has been found, repairs can begin. One of the most popular methods is welding
(both electric and “cold”). Almost all cracks can be welded, except for cracks in the area of the valve seat, cylinder walls and the contact areas of the block and BC head.
To avoid having to make repeated repairs, it is important to follow all recommendations. To repair a cast iron block, you need to drill out the ends of the crack and then sand the entire length of the crack at a 90-degree angle. For welding, the cylinder block is heated to 650°C, then a continuous seam is applied using a cast-iron-copper filler rod and flux, and at the end a special heat cabinet is used to gradually cool the part.
If you are using electric welding
, then there is no need to warm up the block. At the end of the work, the seam must be degreased with acetone and then coated with epoxy paste (at room temperature it hardens in 24 hours, at 100°C in about 2 hours). The last stage is sanding the seam.
In addition to welding, there are a couple of popular methods for repairing BC
: epoxy paste, fiberglass patch, SEAL-LOCK technology. If you use epoxy paste and fiberglass, then the metal must first be thoroughly degreased. Then you can alternate layers of paste and fiberglass, the last should be epoxy.
SEAL-LOCK is convenient because repairs do not require a welding machine and there is no need to dismantle the internal combustion engine. The meaning of the technology is that the crack is filled with a special layer of soft metal. The procedure here is as follows:
1) First, you need to drill the edges of the crack, then holes are made across the split at a certain pitch, and tie-ties are inserted into them, connecting the edges of the crack.
2) A hole is drilled between the staples. Next comes cutting the conical thread with a special tap. The resulting hole must be processed to remove the oxide film. Then a cone-shaped plug is screwed into it, the material of which is in active contact with the metal of the BC.
3) The part of the plug that rises above the plane needs to be filed down a little, then screwed in with a special tool. Under great force, the soft plug will break where the cut is made. The protruding parts are polished.
4) Next, the next hole is drilled, and so that there is partial overlap with the previous hole with a plug. And thus the entire crack is filled with plugs. At the end, the seam is ground and pressed.
It must be said that the seam obtained using the method described above is better than a welded one in a number of respects. It is not afraid of temperature changes, it does not receive significant stress and does not collapse even at high temperatures.
Four reliable ways to repair a cracked cylinder head
Electric or gas welding.
- To begin with, holes are drilled along the edges of the crack, then the crack itself is slightly deepened and widened. This is done to improve the adhesion of the weld to the metal of the block head.
- You also first need to warm up the block head itself to a temperature (600 - 700C).
- Next, using a copper-cast iron filler material and flux, a neat seam is applied to the defect site. Note that the welding seam should rise above the surface of the head by about 1 - 1.5 millimeters.
- After completing the welding work, the block head should cool slowly in the oven. In some cases, welding is carried out without preheating, but then it is better to use direct current electric welding.
Another option is to install a patch in place of the crack. To carry out such repairs, it is better to use electric welding with copper electrodes wrapped in tin. After performing such work, the welding seam must be cleaned and coated with epoxy paste.
Using epoxy resin.
- The crack and the surface in the immediate vicinity of it are thoroughly cleaned, preferably to a shine.
- Next, again, holes are drilled along the edges of the crack (diameter 3 - 5 mm). They are threaded and aluminum or copper plugs are screwed in (flush).
- After this, the crack itself must be processed to a depth of ¾ of the wall thickness and at an angle of 70 - 90 degrees.
- Notches must be applied to the surface of the crack; this is done to give it a certain roughness.
- After this, all that remains is to thoroughly degrease the entire surface and apply a layer of epoxy paste. The paste (resin) itself must be applied with a spatula in about three layers.
The thickness of each applied layer is 2 mm. Hardening of the applied layers occurs within 24 hours. If the surface of the head is subjected to intense drying or heating, the resin will harden within three to four hours. Finally, the applied layer of epoxy resin must be sanded with a grinder or a regular file.
Epoxy resin (paste) and fiberglass.
- The preparatory work for this method is similar to the previous paragraph.
- And the principle of applying the paste is also similar, but in this case, after applying each layer of resin, a patch of fiberglass is installed, which must be rolled with a roller.
- It is worth considering that from the edge of the patch to the extreme point of the crack there must be at least 20
millimeters. In total, you can apply from two to eight such layers. The final layer must be covered with resin and cleaned with a grinder or a standard flat file.
Use of pins.
- Holes with a diameter of 4–5 millimeters are drilled at the edges of the crack.
- Next, more holes are drilled throughout the entire crack, the step between them should be within 7 - 8 millimeters.
- All holes are threaded.
- Next, copper rods are screwed into the prepared holes, the tops of which are necessarily trimmed, but not completely, but so that the tips remain on top at a height of 1.5 - 2 mm.
- The next step is to drill new holes along the crack so that they necessarily overlap the existing holes.
As a result, you should have a continuous strip of rods. The last step is to hammer the copper tops of the rods, this way you create a continuous copper seam. For greater reliability, the finished seam is coated with epoxy resin.
After completing all the work, the head must be pressure tested. Please note that all work must be performed by professionals or people who know how to handle materials and tools, and also understand the complexity and seriousness of such repair work.
A microcrack in the engine block is no longer a problem
The engine is the iron heart of every vehicle. If any of its components fails, there is a high probability of complete failure of the entire unit.
Especially when we are talking about such severe damage, such as deformation of the cylinder head or block. If you do not eliminate them in a timely manner, you will have to do a major overhaul of the engine.
Note that cracks in these components are among the most complex faults. They usually occur after a traffic accident with a high level of wear of parts or manufacturing defects.
Causes and symptoms of malfunction
Below are the “symptoms” that indicate the presence of a crack in the head or block.
Important! These same signs can indicate other malfunctions! Therefore, one should not make hasty conclusions.
- The engine overheats, antifreeze or other coolant leaks. To make sure that the problem is not a crack, check how well the cylinder head bolts are tightened, as well as the tightness of the system.
- The temperature control system is not working correctly. Due to overheating, the cylinder head is deformed.
- Failure of the expansion tank plug, which causes the formation of air masses.
- During the summer period of the year, the temperature sensor needle jumps sharply in different directions.
Symptoms also include “tripping,” which is especially noticeable when moving downhill.
Important! To verify the presence of cracks, you need to unscrew the spark plug. Afterwards, in the literal sense of the word, taste the liquid from the candle. If it turns out to be sweet, it means that coolant is entering the oil through a crack. In this case, try adding oil to the system and starting the car (without closing the expansion tank cap). If it boils immediately, it means that a microcrack is absolutely present in the cylinder head.
Note that cracks often occur near the bushing (guide or intake valve). In this case, you will have to completely replace the head.
Another sign is the loss of gases. To find out that this is the reason, we recommend putting a rubber glove on the expansion tank. If it inflates over time, there is a problem.
Diagnostics and methods of repairing damage
Such an unpleasant concept as “crack” probably has a negative meaning in any case, be it figurative or direct, cracks are always bad. The appearance of cracks in the cylinder head (cylinder head) does not bode well for the owner, at best an expensive repair, at worst a major overhaul or complete replacement of the engine.
Causes of cracks in the cylinder head
Most often, cracks in the cylinder head appear as a result of mechanical damage, overheating or due to freezing of the coolant in the cooling system.
Signs of cracks in the cylinder head:
- Gradual decrease in the level of coolant (coolant) in the system;
- Bubbles in the expansion tank of the cooling system;
- Oil in antifreeze or vice versa;
- The appearance of an air lock;
- Constant problems with coolant temperature (sometimes too high, sometimes vice versa).
How to find a crack in the cylinder head?
Despite the above signs, finding the crack itself can be quite difficult, and sometimes even impossible. Even an experienced “motor mechanic” can spend a very long time looking for the place where a crack has formed. The thing is that cracks appear in different places on different engines.
We list the main places where cracks appear in the cylinder head.
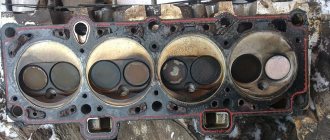
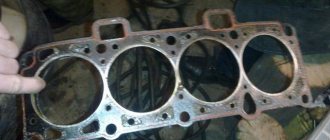
- Between the valves. As a rule, a crack is immediately visible; it passes under the seats of two adjacent valves.
- Between valve and spark plug. The situation is similar, and the crack itself is immediately visible, you don’t have to look for it.
- On diesel engines, a crack can easily form at the location of the valve and go towards the prechamber. Again, finding this crack won't take much time or effort. However, if a crack in the cylinder head forms under the prechamber, it is unlikely to be visible.
- Under the valve guide. This place is also one of the unpleasant ones from the point of view of detection. First, the channel is quite dark, second, the crack is covered with a guide bushing. In such a situation, a special approach and diagnosis are required.
Water test
This method is similar to the previous one. The whole difference between them is that you don’t need to lower the head with water, but quite the opposite - you need to pour it into the head:
- Check all the holes for leaks.
- Then pour the channel into the water.
- Next, using a pump, pump air into the channel.
- Leave the part to be treated for several hours. If you notice that the water has gone, it means there is a problem with the head and it needs to be changed or, at best, repaired (which will be cheaper, but... will not guarantee the longevity of this component).
Determination methods
To finally verify the formation of microcracks, there are several ways to determine defects.
- Magnets are installed on the device body or cylinder head. Metal shavings are poured on top. It begins to move towards the places where the magnets are installed, getting into the cracks.
- Apply special liquid paint to the cylinder head surface thoroughly washed with acetone or kerosene and wait 10 minutes. After this, use a clean rag to wipe off the remaining paint. Defects after this method are detected immediately.
- Liquid can be used to check integrity. To do this, you need to seal all the holes and pour water into the channel. Using a pump, we pump air into the channel at a pressure of 0.7 MPa. Leave the block in this state for several hours. The leaking water will indicate that there are defects in the block head.
In the same way, integrity is checked by immersing the block in a container of water. In this case, the bubbles will show the location of the cracks.
Locations of defects that are not worth attempting to eliminate.
- on valve seats;
- on the cylinder mirrors;
- on the plane of contact between the block and the head.
Pressure diagnostics
This technique is performed in several ways: immersion in water or without it. Read below on how to perform these operations.
Immersion in water:
- Initially, close all channels of the spare part that may be adversely affected by water.
- After this, place the part in a container filled with water over 40 degrees Celsius.
- Then use compressed air (there is a crack in the places where bubbles appear).
The procedure without “immersion” is performed as follows:
- As in the previous case, make sure that all GBU channels are closed.
- Pour the soap solution onto the lid.
- Supply air masses into the circuit of the “sick” part. If there is a defect, soap masses form at this place.
Electric welding
First, you need to drill out the “sore” areas with a tool so that they stop increasing in volume. Afterwards they need to be sanded.
So, at the beginning of work, we heat the block to 650 degrees Celsius, after which, using a special rod, we make a seam. To prevent its oxidation, you need to use borax.
As a result, after finishing the work, there should be an even layer on the surface (the protrusion of which is no more than two mm.). The next stage is the heating cabinet (cooling in it).
DIY repair
- Drill out the cracks with a drill so that they do not go further and begin to grow during work. Sand.
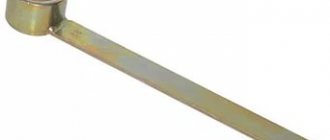
- We heat the block to 600-650 degrees. For embedding, we use a filler rod made of a cast-iron-copper alloy, 5 mm in diameter, and flux. Protect the seam from oxidation using borax.
- There should be an even layer on the surface of the engine block with a protrusion of no more than 2 mm. After this, cool the block in a heating cabinet.
Arc welding
In this case, heating the block is not required. Electronic wire is used as a filler material. Argon is used as a welding medium. Do not allow overheating above 60 degrees.
Heat the head to a temperature of 200 degrees. We use an acetylene torch for this. Sealing is carried out using direct current. The diameter of the electrode is selected depending on the width and thickness of the wall.
Application of epoxy paste
Cut the crack by grinding and drill the ends of the cracks with a drill with a diameter of no more than 85 mm. Place copper plugs into the holes. We make a notch along the outlines of the cracks to create an artificial roughness.
We degrease the surface using acetone and heat it with an infrared lamp to a temperature of 80 degrees. Apply epoxy paste to the fracture in the following sequence:
- 1 layer 1 mm,
- the second 2-3 mm,
- third 3-4 mm.
Welding the patch
To perform this operation, you need to select a piece of metal that matches the size of the crack. Next you need to weld the selected material. The next stage is grinding and coating the treated area with a special paste.
Well, now you know what a cracked cylinder head is, as well as how to deal with this problem. In any case, it is better to prevent a breakdown than to fight it.
Crack in the cylinder block
Deformations of key engine elements, such as the cylinder block and cylinder head, are serious malfunctions that, if not corrected in a timely manner, can lead to the need for major engine repairs. The formation of cracks in the engine block and cylinder head is one of the most difficult breakdowns in a car. Cracks can occur due to impact (for example, during an accident), due to high wear or manufacturing defects. In this article, we will look at how to determine that the engine cylinder block or cylinder head is cracked, and what can be done about it.
We repair damage ourselves
The only way to properly seal a crack is by welding.
No adhesive composition can properly seal a crack in the heads.
When heated to operating temperatures, the head will expand and the crack will become larger, that is, a composition is needed to seal the crack, which would have the same linear temperature expansion as the head material, and also be resistant to other loads. All this can only be achieved by welding.
Part preparation
Before welding, the crack must be cut; to do this, the metal is drilled out along the entire length of the crack using a milling machine. The groove should be quite deep, 6-8 mm in depth and approximately the same in width; it is advisable to make it wedge-shaped in shape. This will help to better weld the metal.
To cut a crack between the saddles, you first need to remove the saddles, and only then cut the crack. After cutting the cracks, the head must be heated to a temperature of 200-250°C, but not higher, so that the head does not lead.
Heating allows you to reduce the stress in the metal that occurs during welding. For heating, it is best to use an acetylene torch or oven, but you cannot use a blowtorch, because it can easily overheat the cylinder head.
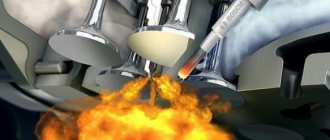
Welding work
Gas welding using filler material can be used to weld the cylinder head, but argon arc welding (TIG) gives better results. A ground is connected to the head, and the arc burns in an argon environment between the tungsten electrode and the head, where the aluminum filler wire is inserted.
After welding, the seam must be cleaned, pressed again, and if all is well, then the surface adjacent to the block must be milled so that it is perfectly flat.
https://kakavto.com/?p=1496
Symptoms of a crack in the cylinder block and cylinder head
There are several signs that, if detected, should sound the alarm and send the engine for diagnostics. They may indicate both the formation of cracks in the engine and other malfunctions. Most often, cracks in the cylinder block and cylinder head are indicated by:
- Regular engine overheating. If, due to a crack, the system is no longer sealed, this will lead to coolant leakage and constant overheating of the engine. This problem can also occur due to burnout or other defects in the cylinder block gasket;
- Problems with the operation of the temperature control device (thermocouple). This is fraught with severe overheating of the engine and its deformation;
- The expansion tank does not hold pressure and air pockets form;
- Incorrect temperature sensor readings. If the temperature sensor needle changes chaotically, either up or down, this may indicate sharp changes in the temperature of the engine itself during operation;
- Engine vibrations. One of the most obvious signs of cracks in the cylinder block. If the engine vibrates or shakes excessively, especially when driving uphill, this may indicate the presence of microcracks in the engine block.
Typical crack locations
Automakers allow cracks to form in the head, and this will not be considered a malfunction, since the crack will be shallow and it will not connect two containers. In VW diesel engines, a head with a crack between the valves is allowed to be used.
But finding all the cracks is a problematic task even for an experienced mechanic. It would seem that cracks should form in the same places on the same engines. But this does not make the search any easier. There are places that can be detected with one glance at the head:
- - between the valves - the crack is immediately visible, passes under the seats of two adjacent valves.
- - between the spark plug and the valve - the same situation, again, everything is in sight and you don’t need to look anywhere
- — in a diesel engine, a crack can go from the valve towards the prechamber , such a crack is easy to notice, but how can you see it if it forms under the prechamber and does not come out?
- — under the valve guide is another sweet spot where the crack is not visible, firstly, it’s already dark in the channel, and secondly, the crack is covered by the guide bushing.
This requires a different approach, not just a visual one. And what is the use of detecting a crack between the valves if gases do not escape through it? Let’s not rely on chance, especially since the diagnostic method was invented a long time ago and has proven itself to be the best.
How to detect cracks in the cylinder block
Not always, when we talk about a crack in the cylinder block, it means a serious defect noticeable to the eye. Quite often these are microcracks, which can be determined by one of the following methods:
- Pneumatic crimping;
- Use of ultrasound scanning;
- Application of specialized magnetically sensitive equipment;
- Hydrocontrol.
Each of these methods allows you to determine whether there are microcracks in the cylinder block, and where exactly they are located. Most often, service centers, in the absence of specialized equipment for diagnosing a cylinder block, use the method of searching for cracks using water or air.
The essence of this method is simple - water is pumped into the cylinder block, and if it leaks out, it means there is a crack in that place. When using air, air is pumped inside, and the part itself is immersed under water, thereby, by the presence of bubbles on the surface of the water, it will be possible to understand whether there is a crack.
Finding a Crack
Diagnosing such a malfunction is very simple, all the signs are “on the surface,” but finding the crack itself is extremely difficult, and sometimes even impossible. Sometimes even experienced mechanics can tinker with an engine for many hours before finding where a crack appears.
Next, we will try to list the places where cracks most often appear in the cylinder head.
- In the gaps between the valves. Such a crack is visible to the naked eye; it clearly passes between the seats of adjacent valves.
- Between the spark plug and the valve. A similar situation - the crack is clearly visible and there is no need to look for it.
- From the valve location to the prechamber (on diesel engines). This crack is also visible.
- Crack under the prechamber. It is very difficult, and sometimes even impossible, to notice such a defect.
- Directly below the valve guides. An unpleasant defect is rare and invisible. Firstly, such a crack is covered by the valve guide, and secondly, it is always dark in the channel and it is very difficult to illuminate there.
We are done with the diagnostics, and then we propose to understand the methods for eliminating such a serious defect as a crack in the cylinder head.
https://autoremka.ru/vaz/samostoyatelnaya-diagnostika-i-ustranenie-treshhin-v-gbts-dvigatelya.html
How to repair a crack in a cylinder block
Depending on the extent of the damage, various methods can be used to repair the cylinder block. It is worth noting that in some cases it is more advisable to replace the unit rather than repair it.
Welding method
The most common method of repairing a crack in a cylinder block. At the same time, welding a cylinder block is quite a complex job, since it requires strict adherence to technological regulations. If you make mistakes when welding, the seam will come apart while the engine is running and the problem will return.
When welding, the ends of the crack on the cylinder block are initially drilled out. This must be done to avoid the possibility of crack propagation. Drilling and further grinding are carried out at an angle of 90 degrees.
Next, the welding process itself begins. To do this, the cylinder block must be heated to 650 degrees Celsius, after which a continuous seam is applied using a cast-iron-copper rod and flux. Next, the part is gradually cooled in a heating cabinet.
Important: Do not suddenly cool the part, otherwise it will lead to rupture of the seam.
It is worth noting that you can weld the cylinder block without heating it. To do this, you should use electric welding and copper electrodes in a tin wrapper. At the end of the work, the applied seam must be degreased using acetone or special compounds. Next, you need to apply a layer of epoxy paste on top of the seam with a spatula. Next, the part needs to be “dried” by leaving it at room temperature for 24 hours so that the epoxy is completely dry. The final stage is grinding the treated seam.
By applying epoxy and fiberglass method
A simple method that allows you to eliminate minor cracks on the surface of the cylinder block. The method involves creating an additional layer made of epoxy paste and fiberglass on the surface of the crack.
To seal a crack using this method, you first need to thoroughly degrease the surface so that the applied compounds “take root” better. Next, several layers of epoxy paste and several layers of fiberglass are applied alternately. The last layer should be epoxy.