Advantages of disc brake
Despite the fact that the domestic manufacturer does not install such mechanisms on its products, they are becoming increasingly common among car enthusiasts. The whole secret lies in the advantages of this choice, in particular:
- significant reduction in braking distance;
- quick brake response to pedal pressure;
- basic care;
- uniform operation of the system;
- no need to constantly tighten the handbrake cable;
- They are not afraid of cold weather, because they simply do not freeze.
In addition, such brakes have an attractive appearance. Next, we’ll talk about how to correctly install the mechanism on the Lada Priora.
Lada Priora Hatchback useful tuning › Logbook › ZDT “Tornado” on Priora with ABS, installation.
Hello everyone, readers of my blog.
The path to the HA was long, it all started from here Restoration of the Tornado HA, part one: Electrolysis Restoration of the Tornado HA, part two: assembling calipers The only thing left to do was buy discs for abs and new pads.
Finally it happened. Ready-made set of HTD "Vector" wheels for abs
- 2500 rubles per pair.
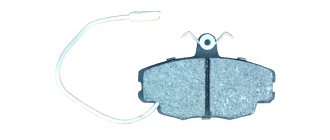
Pads Ferodo FDB1319
- 1500 RUR set
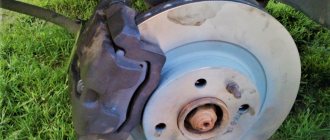
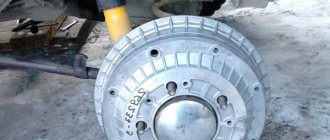
First of all, we remove the stock drums. After 75,000 runs, it’s a complete mess, all the parts are recycled. Output more than 2mm.
We remove the brake shield and the entire hub; the bolts were a bit difficult to unscrew.
Since my HA kit was bought for 99 and was not calculated according to abs, there was a problem with installing the sensor. There was already a hole in the casing; most likely they are stamped as universal ones. It remains to drill 2 holes for the bolts. We drill along the bracket
At 99 I tried a lot of negative camber spacers on the rear axle. From 1 to 2.5 degrees. 1 degree is the optimal solution for civilian cars. We buy 1 degree spacers from Avtoprodukt - 350 RUR set
The spacer comes with long bolts. We install them. Don't forget, the narrow part of the spacer is at the top. Assembling the knot
We screw the whole thing together and put on the disk.
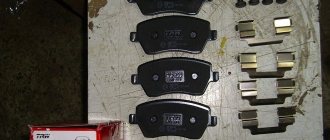
The pads and caliper are as follows
The ABS sensor turned out to be a little long and was catching on the disc. The generator bushing served as a spacer.
Pump the brake fluid, tighten the handbrake a little and you're done.
For the first 100-200 km, no sudden braking while the pads and discs are grinding in. And therefore it’s already possible to drive. About the difference with drums. Yes, it exists and it is huge. I speak from experience using the ZDT at 99. Of course, if your style is 40 km/h in the right lane, then the drums cope with a bang. It’s very difficult to overheat the HDT, but that’s not what makes me happy, it’s the fact that you don’t have to tighten the handbrake every 2 thousand km, there’s automatic tensioning. Thank you for spending time on my blog.
Source
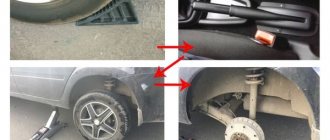
Progress
First you need to dismantle the old mechanism. After you remove the wheels, you will be faced with the hubs, which need to be removed from the rear beam. If you have a Priora with ABS, you will need to additionally remove the sensor from the supporting panel. You will also need to remove the screw from the cable bracket.
At the same time, you should already have on hand all the necessary materials to replace the brakes and clean parts that will not be dismantled. Clean components and sensors. Further work includes the following steps:
- Installing the adapter plate.
- Securing the sensor washer. This is necessary for vehicles equipped with an ABS system.
- Installation of the ABS bracket, as well as a special sensor designed for its operation.
- Installing the caliper bracket.
- Mounting the disc on the rear beam.
- Lubricating the handbrake spring, threading the cable into the bracket, fixing the bracket.
- Disconnecting the handbrake cable and adjusting the cylinder.
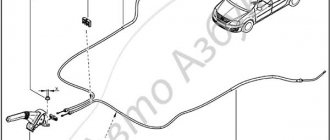
- Brake line assembly.
The work is quite complex as it needs to be done with extreme caution. Otherwise, you may be left without brakes or face the need for an emergency replacement.
When checking the degree of wear on the brake pads of the rear wheel of a Lada Priora, we evaluate the condition of the front pad, which wears out faster than the rear one.
LADA > Priora
Selecting rear brake discs for Priora
One of the main advantages of installing brake discs yourself is significant savings in money, about 10,000 rubles.
Important: when carrying out installation, it is better to purchase devices with a certificate and install them in specialized service stations, which also provide certificates stating that the brake system is adjusted and meets all standards. However, this will not provide any guarantee that you will not be picked on during maintenance.
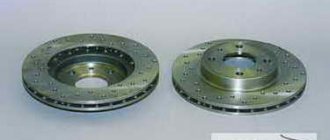
If you still decide to install the brake system yourself, then you need to decide which brake discs are best to install. Of course, you can go to the auto parts market or look for suitable ones on the Internet. It is also possible to adapt front disc brakes from the same Priora or any other car of the VAZ family. If you're a speed enthusiast, you might be interested in ventilated brake discs, which provide much better cooling and help prevent overheating.
Spare part from a reliable brand
The most common and high-quality solution in Russia are Italian Brembo brake discs, which are widely used throughout Europe and are certified by the German Federal Bureau of the Automotive Industry. Brembo has a wide range of discs, among which you can find those that suit you, including price. In addition, Brembo has official technical support in Russia.
Brake discs from this company can be installed in conjunction with any other pair, since they do not require in-depth adjustment. If you have extra money, you can also buy Brembo MAX front brake discs, which are produced specifically for cars of the VAZ family, including Priora.
Thanks to the presence of a special wear indicator, brake discs will be replaced in a timely manner. There is a notch on the disc that completely disappears when the disc wears out, allowing you to determine its reliability at any time.
DSC_9000ll
After replacing the pads on both wheels, the parking brake must be adjusted.
Rotate the adjusting nut clockwise to tighten the cables. The full stroke of the Lada Priora parking brake drive lever should be from 2 to 4 teeth (clicks) of the lever ratchet device. When the lever is lowered, the suspended rear wheels should rotate freely. Use a locknut to secure the adjusting nut.
About disc brakes in general
Almost all foreign cars (except budget ones) have long had disc rear brakes. And the point here is not only in the efficiency of disc brakes in relation to drum brakes. The main issue is to ensure uniform application of braking forces on all wheels simultaneously. Lagging or advancing in the operation of any of the four brake mechanisms can lead to loss of controllability.
What are the main advantages of disc brakes over drum brakes:
Maintenance Recommendations
After the installation of the HCD is completed, grinding and heating of the working coating may occur, which is caused by the grinding in of new spare parts. Do not try to brake hard until you have driven 350-550 km so that the new parts can get the necessary break-in.
In combination with rear brake discs, it is advisable to install Brembo MAX front discs on the Priora. This will allow you to achieve the highest quality of uniform braking. In addition, front disc brakes will give an organic and aesthetic look to your car.
Source expertvaz.ru
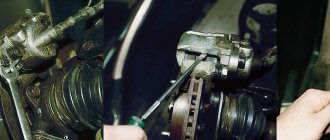
| 1 | To service the rear disc brakes, the machine is placed on a jack and the rear wheels are removed. The caliper fingers are unscrewed, then the bracket is attached to the steering knuckle (to simply replace the pads, the bracket attachment does not need to be removed). Next, you need to check the working thickness of the brake disc. If it is no less than 17 mm, everything is fine. |
| 2 | The retaining plates of the brake pads are cleaned, and a special lubricant is applied to the pads themselves. |
| 3 | Lubricant is introduced into the brake caliper through special holes in it. |
| 4 | New pads are installed. |
| 5 | Reassemble the entire system in reverse order. |
Replacing the brake drum on Lada cars
The brake drum is the main element of the Priora rear brake mechanism. In this article we will talk about it, about its replacement, diagnostics and repair.
The brake drum is the main element in the rear brake system, which is designed to stop the car. The wear on the drums and pads of the rear brakes is not as great as that of the front brakes, and accordingly, replacement of brake elements occurs much less frequently.
What is the danger of installing a non-standard braking mechanism?
It is important to know that after installing a disc brake system, you will get the desired effect, but at the same time you will encounter some problems.
- When changing the standard equipment, be prepared for the fact that your car will not pass inspection at a service station, because... any interference in changing the configuration is illegal, despite all the advantages.
- It may be difficult to attach the handbrake system. A possible solution to this problem would be to install a hydraulic brake, which performs braking functions when driving at high speeds. But this type of brake also has disadvantages; it weakens if it is used when the car is parked. The most desperate car owners completely dismantle the handbrake, and maintenance is carried out without any problems.
- If an unpleasant situation happens and you get into a traffic accident, perhaps if a spare part is found that does not correspond to the configuration of this vehicle, the decision will not be in your favor, regardless of whether you are at fault or not.
After installation, the rear disc brakes on the Priora need to be adjusted by equally distributing the brake forces. This important process cannot be ignored, otherwise the rear brakes will work more quickly than the front ones. The consequences can be unpredictable, for example: overheating of the brake system, sudden drifts that can lead to undesirable consequences, or worn out tires.
Some craftsmen grind off brake pads by almost 50% with their own hands, reducing friction during braking.
So, let's consider the important factor of the need to set up a clear determination of the braking force of the car using the rear axle.
Looking at the car from below, you can see a regulator located to the left of the beam, which ensures stable brake fluid pressure. It is important to know that disc brake systems, unlike drum brakes, require much less fluid pressure to brake. If this moment is ignored and the adjustment is set to the previous position, the result is that the rear wheels of the car will constantly lock, and this happens earlier than the front wheels lock. This happens because the part of the car located at the rear is several times lighter, so the braking system responds faster.
The principle of operation of the adjustment mechanism is very primitive: by pressing the valve, the force of pressure on the rear circuit increases, which means that if it is slightly relaxed, it correspondingly becomes less. The main function of this mechanism is to provide the necessary braking to the rear wheels of the car.
In this particular case, our goal is to slightly reduce the effort.
Loosening the lever attached to the beam will allow you to move it from one side to the other without much effort. If the lever is moved away from the regulator, the pressure in the rear axle will decrease to avoid over-braking of the rear wheels of the car. You may also have to do some work to adjust the flexible plate located on the lever.