Self-installation of outside air temperature sensor
Many VAZ car models do not have an air temperature sensor, so to increase comfort, many car enthusiasts install it themselves. This does not require any special skills, but first you should determine whether the dashboard is able to identify the readings of the new device. This is not difficult to do, and, for example, on Grant it is done as follows:
- when the daily mileage button is pressed, the ignition is turned on;
- this causes the self-diagnosis process to start, when all indicators begin to flash;
- at this time, the daily mileage calculation button must be pressed again, which will cause the version number to appear on the display - connecting a temperature sensor is supported by versions 090 and higher.
If the version supports the ability to connect a temperature sensor, you can go to the auto store to purchase it and begin the installation process. Initially, you should correctly determine the location of the outside air sensor - it should not be influenced by temperature flows from the engine. The optimal place is considered to be the space close to the radiator - it can be seen when the hood is open, there is a pin welded to the frame. It is convenient to “throw” the mass from the device onto it.
After securing the device itself, you will need to run a “plus” wire into the interior. To do this, you can use the clutch cable plug or another convenient place. After this, you will need to remove the instrument panel; you need to find the 25th contact, intended specifically for the temperature “controller” of the ambient air. The “outboard” temperature readings appear automatically in the menu. If this does not happen, the positive terminal is removed from the battery for 10 minutes. After power is restored, the temperature will appear. The installation process can be seen in the video:
Lada Granta AT ICE-MAN › Logbook › Installing an external air temperature sensor
Another weekend was spent usefully: an external air temperature sensor was installed. Having read about the possibility of equipping the car with a temperature sensor, I went to look at the version of the dashboard on the car. To do this, with the ignition off, press the mileage switch button and turn the key to position 1. As soon as the arrows start moving and all the indicators light up (dashboard test mode), release and press the same mileage switch button again. We see the dashboard software version! 090
is exactly what you need!
Next, a temperature sensor was purchased complete with a connector: in the store it was called “VAZ-2115 Outside air temperature sensor” and cost 200 rubles. I bought some corrugated plastic at a hardware store, and used the wires supplied from the speakers, which I installed in the rear doors. To install, you will need to remove the battery as the wiring will have to be laid underneath it. I unsoldered the sensor connector and tucked the wires into the corrugation.
Installed without removing the bumper, your hands can easily fit into the lower slots, you can install the sensor itself and lay the corrugation with the wire.
It is best to bring the wires into the cabin through the rubber plug of the hydraulic headlight range adjustment.
We go into the salon and tighten the wires. We disassemble the dashboard to get to the connector: 1) first unfasten the cover of the safety block (it is held on by latches, do not forget to disconnect the connector - the trunk release button) 2) then unfasten the cover on the instrument panel (it is held on by three screws, one on the left and two on the top, right edge also on the latch) 3) unscrew the four screws securing the dashboard. Before removing the connector, unfasten the rocker-lock (black) on it, then it will easily fall out of the mating connector. To disassemble the connector itself and get to the contacts, you need to bite through the clamp and slide down the black locking plate.
That's it, let's move on to the connection: we took the case from one of the bolts under the dashboard, the second wire was pre-soldered to a pre-prepared “pin” from the FDD power connector (removable from any computer power supply, even a very old one). We insert contact number 25 into the connector between the pink and white-black ones. Before installation, I rang the resistance of the sensor with a multimeter: at a temperature of +11 it showed 5.7 kOhm. The polarity of the connection does not matter. Reassemble the dashboard in reverse order, turn the ignition key 1 notch. Using the button on the right switch, we scroll through the BC readings, and we see the item with temperature that appears!
Time spent 2 hours and 200 rubles of money :), I completed another small and simple modification on my own.
PS: Thanks to everyone who has subscribed, you are already 200! I would like to believe that all these publications are not in vain and they help us in exchanging experience in finalizing our grants!
UPD: Do not screw the second wire onto the bolt without tinning or crimping the terminal, as winter operation has shown, it oxidizes (probably due to temperature changes and condensation) and the readings begin to distort (I almost changed the sensor, I thought there was a glitch in it). Only perfect contact with the body!
Source: www.drive2.ru
Where is the coolant temperature sensor located?
If installing an ambient air temperature sensor is not a priority, as is regularly checking its functionality, monitoring the coolant temperature is extremely important. To do this, the car is equipped with a special device that helps the driver constantly monitor the situation and prevent the engine from overheating.
A working sensor will allow you to turn off the vehicle’s engine in time, if there are prerequisites for overheating - this will prevent the onset of serious consequences associated with this. The location of the device itself may differ on different car models, but it will always “stand” on the path of fluid from the engine to the radiator:
- radiator housing;
- cylinder head;
- the upper hose of the radiator itself.
It helps not only to avoid overheating. For example, at negative temperatures outside, this device will allow the driver to judge how warm the engine is. Naturally, you should not start driving on a supercooled engine, since this not only leads to a sharp increase in fuel consumption, but also seriously increases the percentage of engine wear. Information from the coolant temperature sensor will help you choose the “correct” engine warm-up mode, “telling” the driver whether to increase the idle speed.
What temperature sensors are installed on the Lada Granta, where are they located, price
In total, over ten digital and mechanical sensors are installed in the Lada Granta. The following deserve special attention and control from the driver:
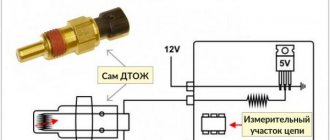
- Coolant temperature sensor (hereinafter referred to as DTOZH);
- Environmental DT (hereinafter referred to as DTOS).
The functionality of the devices and the accuracy of data display depend on the condition of the technical equipment and the safety of driving a car.
DTOZH is designed to monitor the temperature of antifreeze in the cooling system circuit of the power unit. After receiving data about the “degree” of the engine, the ECU increases or decreases the speed of the power unit in order to adjust the temperature.
The quality composition of the fuel mixture depends on the accuracy of the DTOZ readings. The service life of the sensor is unlimited, with the exception of mechanical damage or manufacturing defects.
The standard installation location is the thermostat cover. The base part is screwed into the thermostat housing. Two power supply cables extend from the top.
A melting element is installed inside the DTOZh base. As soon as the antifreeze temperature reaches 90, the contacts close and the on-board computer signals an error.
Types of sensors that monitor coolant temperature
All sensors installed on modern cars are divided into magnetic and bimetallic. You can independently determine the specific type installed on your personal car by the speed of its reaction after starting the engine. The magnetic one has an instant response, and after starting the motor it immediately shows the current temperature. The bimetallic version does not differ in such “efficiency”, showing the correct temperature after a short pause.
The operating principle of a bimetallic (tape) sensor is quite simple. The existing control unit changes the current depending on the current temperature of the circulating fluid, which leads to heating of the coil on the metal strip. It is able to change its length according to the temperature, and rotate the arrow attached to it, showing the current temperature of the liquid.
If the coolant temperature sensor is faulty
If the installed sensor is faulty, the risk is that the cooling fan simply will not turn on. It goes without saying that this cannot go unnoticed by the entire cooling system, causing a rapid increase in engine temperature and overheating. The most unpleasant thing about this is that the driver currently driving the vehicle is unable to promptly notice the problem that has arisen, which can lead to serious engine repairs.
In order to be sure that the coolant temperature sensor is working properly, it must be checked periodically. You can easily do this yourself using a multimeter and a digital thermometer. The removed sensor must be lowered into a vessel with liquid heated to 100 degrees, and the resistance must be measured - it should be 177 Ohms. When the liquid temperature drops to 50 degrees, the resistance value will be 973 Ohms, and at 20 degrees it will be 3520 Ohms. If the indicators do not correspond, then the sensor needs to be replaced.
Grant engine temperature sensor. We install it ourselves
Every owner of a Lada Granta car has encountered its main drawback - the absence of an engine temperature sensor on the panel. The task of the AvtoVAZ management was to make Grant accessible, the engineers did it “excellently”, saving even on this device. The emphasis was on cheapness, so we tried.
Soon, however, everything was corrected - on models of a higher price and advanced configuration of the Lada Granta liftback 21911, 21912, 21917, an engine temperature sensor has already appeared and helps monitor the condition of the internal combustion engine.
Advice
However, what should owners of earlier models do? The overheating indicator lamp installed on cars is not informative enough.
In winter, it is impossible to determine whether the engine is warm enough to start driving, and in summer, the overheating warning light may come on too late.
The thermostat is the weak point of Lada Granta cars, and it would be much more effective to determine its malfunction at a very early stage by assessing the behavior of the TD sensor needle, but...
It was these problems that prompted some motorists to look for answers to the question: “How to install an engine temperature sensor on a Grant?” You can, of course, contact dealers. For a fee, specialists will equip everything you need. But there's no need to rush. It is not at all difficult to equip your car with this device yourself. To make sure of this, let's look at the whole process step by step.
How to equip your Grant with an engine temperature sensor
First, you should purchase an installation kit for the coolant temperature sensor (engine). If you don’t want to go to a car store far, or don’t want to, you can easily order the necessary kit in an online store with home delivery. It includes:
- temperature indicator,
- plastic case for it,
- the sensor itself;
- fastening clamps.
Once you have the kit in your hands, it's time to head to the car. To see the place where the Grant engine temperature sensor will be attached, the negative terminal is removed from the car battery, and behind it the air filter is disconnected and removed.
This will open an overview of the pipe that leads from the thermostat. Coolant circulates through it during operation.
It is necessary to carefully cut the pipe and insert the temperature sensor inside along with the adapter (buy at a car store), then securely tighten it with clamps.
The wires are dealt with as follows: the first is the ground wire, it is attached to the engine (body), the second is pulled directly into the cabin.
An indicator with an arrow for the temperature sensor can be installed on the dashboard near the windshield next to the instrument panel. Visually this is very convenient, because...
It is located close to eye level, and a quick glance will be enough to control the temperature level.
But what should you do if you may need to fix the navigator in approximately this place? The second option for mounting the sensor indicator is even more aesthetically pleasing.
note
Many motorists install the device in a cup holder next to the gearbox, but the panel itself will need to be slightly modified.
Of course, in this case you will have to look for a place for a glass of coffee, but this will be a huge plus: the sensor indicator in your cabin looks very harmonious. Now you can fully control the engine temperature and monitor how the thermostat behaves.
Diagnostics and indication
There is an easier way to solve the problem of the missing coolant temperature indicator. You just need to buy a bluetooth adapter elem 327.
Connect it to a special connector and download to your smartphone a program that interfaces with the adapter, for example hobdrive, torque or opendiag.
In addition to temperature, other sensor parameters can be displayed on the display, such as air suction temperature, volume and many other functions.
You can place your smartphone on a special delivery or just on the panel. Here's what it looks like in practice.
Source: https://grantaliftback.ru/articles/datchik-temperatury-dvigatelja-granta-ustanavlivaem-svoimi-rukami.html
What is the purpose of the inlet air temperature sensor?
Another temperature sensor that any vehicle is equipped with is the intake air temperature sensor. At first glance, its role is quite insignificant, and most motorists may not even be aware of its existence. In fact, the uninterrupted operation of the car engine largely depends on the performance of this unit. Most modern temperature sensors are designed based on a semiconductor thermistor, so there are practically no problems during operation.
If difficulties arise, as a rule, they are as follows. During long-term operation, there is a discrepancy between the temperature readings on the sensor body and its electrical resistance. This leads to a smaller error in calculating the actual temperature of the incoming air. As a result, the computer, which calculates the parameters of the fuel mixture, sharply reduces the air supply and at the same time increases the “portion” of fuel. The resulting mixture entering the cylinders is “incomplete,” which makes its combustion process difficult. This results in unstable engine operation; in addition, an overly enriched mixture easily causes spark plugs to flood, which makes starting the engine impossible.
There are no recommendations regarding the frequency of checking this sensor, and each car owner decides this for himself. To independently check the functionality of this important incoming air temperature sensor, you will need an ohmmeter and a table with normal resistance values, which is included in the instructions for the car itself. The test begins with the engine cold and continues with the engine running until the cooling fan starts. If there is reason to believe that the sensor is faulty, it makes sense to replace it with a new one. The cost of the device is low, and all replacement work is completed in a matter of minutes and does not require special skills or experience.
Temperature sensors are elements of electrical circuits that change their resistance depending on temperature.
Classification: According to the principle of operation: Thermal switches - they work on the principle of a key - when the temperature changes, an abrupt change in resistance occurs: 1. when a certain temperature is reached, the resistance drops from one to almost zero - thermal switches that operate to close. 2. when a certain temperature is reached, the resistance increases from zero to one - thermal switches operate to open. Thermistors - change their resistance gradually depending on temperature. – thermistors with negative temperature coefficient of resistance (thermistors or NTC (Negative Temperature Coefficient)). As the temperature increases, their resistance decreases. – thermistors with a positive temperature coefficient of resistance (posistors or PTC (Positive Temperature Coefficient) – posistors). As the temperature increases, their resistance increases.
By function: 1. Sensors for turning on the fan. 2. Sensors for the temperature arrow. 3. Sensors for the injection system.
Thermal switches Thermal switches are installed on a large circulation circle, usually on the cooling radiator or next to it. Thermal switches are divided into two types: – emergency indication activation – cooling fan activation
Temperature sensors are important parts of the engine management system, helping to save fuel and reduce harmful emissions. Together with other sensors, temperature sensors provide the electronic engine control unit (ECU) with the data needed to control fuel injection.
There are several main types of sensors: 1. Coolant temperature sensors. Their function is to measure the coolant temperature. These sensors are installed in a small coolant circulation circle and transmit data directly to the ECU. The range of measured temperatures ranges from -40 degrees to + 130 degrees. 2. Incoming air temperature sensors. Installed on the intake tract. These sensors measure the temperature of the air entering the engine, this data, in combination with data coming from the air flow sensor, allows the ECU to more accurately calculate the mass of air entering the engine. The range of measured temperatures ranges from -40 degrees to + 120 degrees. 3. Outside temperature sensors. The function of these sensors is similar to that of incoming air temperature sensors. The difference lies in the installation location. They are not installed in the intake tract.
General information
As noted above, various sensors are installed on cars for a reason. They are necessary for the efficient operation of the system as a whole. As for the outside air temperature controller, it is mostly informational in nature and shows the temperature outside. But this does not apply to all systems. Sometimes the coolant temperature sensor is connected to the engine electronic systems. This is necessary to start the engine in the cold season and is a very convenient addition to the “autostart” function.
Unfortunately, not all cars have a temperature sensor built in at the factory. Many VAZ models do not provide this. But it doesn’t matter, let’s look at how to install it and what is remarkable about this process.
Where is the ambient temperature sensor located?
On different brands of cars, the controller has a different location. This is due in most cases to the design differences of the machines. For example, on a BMW you can install a temperature sensor directly behind the bumper, but not on a VAZ.
However, understanding where the ambient temperature sensor is located is quite simple. You need to find its number in the electrical diagram, and that's all. In most cases, it is installed near the radiator, usually in front or behind it. But it happens that it is mounted on the side. The main requirement is the absence of temperature effects from the engine. The motor gets hot and affects the controller. He, in turn, will give incorrect testimony.
"Lada Granta": sensor installation
This car is equipped with a controller only in the maximum configuration. In other cases, there is preparation, that is, there are all the necessary connectors and wires for connection. This is done so that the driver has the opportunity to carry out the installation himself.
However, before installation, it is advisable to check whether the dashboard will display controller readings. To do this, press the daily mileage button and turn on the ignition. This is how we run self-diagnosis, as a result all indicators are displayed. During diagnostics, press the daily mileage button again, which should bring up version 090 or higher on the display. This will indicate the possibility of installing a sensor
Lada Granta displays temperature data on the instrument panel
As you know, AVTOVAZ removed the internal combustion engine temperature scale from the panel on the new Grants and Kalinas and left only the overheating light, but if it lights up, then this is already the beginning of the end. Therefore, in luxury trim levels, the coolant temperature display was added to the on-board computer readings, and for all others, only a collective farm is assumed in the form of installing additional screens in place of button covers or external On-board computers.
To fix this problem, you can update the dashboard firmware of Lada Granta and Kalina 2 cars.
First, we find out what version of the firmware is embedded in the instrument panel.
- With the ignition off, press the daily mileage reset button on the panel and, without releasing it, turn on the ignition, the service mode of the panel is activated, in which all the indicators light up and the arrows begin to move
- release the button and press again. Numbers will appear on the display, this is the software version
Now let's decipher them
The first numbers (2190 or 2192) indicate the car model (Granta or Kalina 2). This is followed by the numbers 00, 20 or 40, which stand for “standard”, “norm” or “lux”, respectively.
Now, using the table below, you can see if it is possible to flash your panel so that it displays the temperature.
FIRMWARE VERSIONS OF INSTRUMENT PANELS LADA GRANT AND KALINA 2
| Equipment | Firmware version | DTNV | DTOZH | What is needed for firmware | Note |
| Granta Standard | 015 | No | No | Changing the display and working with a soldering iron | Old board |
| 029-040 | No | No | Changing the display and working with a soldering iron | Updated board | |
| Granta Norma | 053, 060, 076, 087 | No | No | Work with a soldering iron or use modified firmware 2190-20_092_for_076 | |
| 090, 091 | Yes | No | Suitable 092 and 009 or 012 from Kalina | ||
| 092-095 | Yes | Yes | |||
| Granta Lux | 032, 038, 042 | Yes | No | Firmware 046 is suitable | |
| 046 | Yes | Yes | Shows the transmission number | ||
| 047 | Yes | Yes | |||
| Kalina Norma | 007 | Yes | No | Suitable firmware 009 or 012 | |
| 014 | Yes | Yes | Added on/off gear shift sound | ||
| Kalina Lux | 009 | Yes | Yes | Firmware 012 is suitable | |
| 012 | Yes | Yes | Shows the transmission number | ||
| 014 | Yes | Yes |
Here is an example of firmware for the Grants Norma panel. Initially, the panel is sewn with firmware 090
We take out the panel, remove the back cover, and connect the programmer to a special connector on the panel board.
We upload the new firmware and go try it in the car. As you can see, the version has been updated and now firmware 092 is installed
Direct installation
As noted above, the VAZ ambient temperature sensor is not difficult to install. Especially if all connectors are provided by the manufacturer. The next step is purchasing a sensor. There is nothing complicated, we go to the car store and buy the thing we need. The most optimal location for the sensor is near the radiator. The mass can be thrown over the welded pin. The wires need to be pulled into the interior. How this will be done is up to you. The most convenient and shortest way is through the clutch plug. Of course, you can’t do without disassembling the instrument panel. We dismantle it and look for the 25th contact. It is precisely intended for the ambient temperature controller. Readings on the on-board computer usually appear automatically. If this does not happen, reset the battery terminal for 10-15 minutes. After this everything should work. The VAZ ambient temperature sensor costs a penny. Its installation does not take much time.
How to install an ambient temperature sensor on a Priora
The standard configuration includes this controller. But there are times when for one reason or another it is absent. For example, you bought a used car, but there is no sensor or there is one, but it doesn’t work.
However, this is not a big problem. True, for installation or replacement you will need to remove the bumper, since it is not always possible to get under it. It is located directly behind the front bumper and mounted on the front of the body. If there is an air conditioner, then there will be two such sensors. First of all, you need to check the functionality of the old one. The best option is to take a household thermometer and compare the readings. Deviations may be caused by excessive voltage on the contacts.
If the sensor is missing, then install it in the appropriate socket. There should be a wiring harness, so all that remains is to connect and enjoy the result. If the old sensor is acting up, then take it out, turn on the ignition and check the voltage on the connecting block (wire harness). It should be in the 3.5 V range. If there is no voltage, then the problem is somewhere in the circuit. We call and eliminate.
How to independently replace temperature sensors on a Lada Granta car
- Set of automotive tools, key set to “19”;
- Rags;
- Additional lighting as needed;
- New measuring device.
- We install the technical equipment within the perimeter of the repair area;
- We turn off the engine, open the hood;
- We provide priority safety measures: block the rear row of wheels with wheel chocks, squeeze the parking brake;
- Remove two terminals from the DTOZH
- Use the key to “19” to unscrew the DTOZH;
- We insert a new sensor in place of the faulty one and put on two terminals.
We start the engine and check the operation of the equipment. We replenish the missing amount of antifreeze (optional).
- Automotive tool set;
- Rags;
- Additional lighting as needed;
- New DTOS.
- We install the machine on a level platform, provide priority safety measures, secure the rear row of wheels with wheel chocks;
- We hang the front part of the car with jacks. We use a hydraulic lift if available;
- Unscrew the six screws along the lower perimeter of the front bumper;
- We remove the wheels, unscrew three screws on each side in the wheel arches;
- We also unscrew the five fasteners in the center of the front bumper;
- Remove the bumper;
- Carefully disconnect the contacts, limit switches from the dimensions, lighting, turn signals;
- Lower the front bumper to the floor;
- To the left of the center of the cooling system radiator, a DTOS is installed on a torsion beam;
- Carefully disconnect the power terminals;
- We snap off the sensor at the base;
- We are removing the fastening. Replace with a new one as needed;
- We install a new measuring device;
- We put on terminals and limit switches;
- We assemble the front bumper, screw the fasteners, put on the lighting system terminals;
- We start the engine, although you can limit yourself to activating the ignition to test the DTOS functionality. DIY replacement completed.
vote
Article rating
About installing the controller on Kalina
Let's figure out how to install an ambient temperature sensor on this car. "Kalina", unfortunately, often does not even have the necessary wires, so you will have to pull them into the cabin yourself.
To install, you need to remove the bumper and install the sensor, preferably in front of the radiator. There are only two wires - ground and signal. We hook the mass to the nearest bolt, for example from a horn. We tape the signal wire to the harness with tape, although it is more preferable to use plastic clamps. The most convenient way to bring it into the cabin is through a plug installed near the battery. We remove the tidy and connect the sensor. Usually it shows the temperature right away, you don’t even have to remove the terminals. Now you know where the ambient temperature sensor is located on VAZ cars.
External temperature sensor on Kalina
This device is used, as a rule, to optimize the operation of climate control and, together with a temperature sensor in the cabin, help maintain an optimal microclimate inside the car, thanks to which the trip becomes comfortable.
The outside temperature sensor is located behind the bumper radiator grille, which will need to be removed if there is a need to replace the device.
What are the signs of a bad sensor?
First of all, this is a discrepancy between the temperature on the control panel and the actual data. That is, if it’s frosty outside the window, and the device claims that it’s +15 there, this is a good reason to pay attention to it.
It is not uncommon for an error to occur that causes the detector to show -40 degrees Celsius, regardless of the weather.
In any case, if the discrepancy with the actual temperature is more than seven degrees, it is necessary to check the serviceability of the analyzer.
You should not lose sight of the entire system in which the device operates - these signs may also indicate that the wiring connecting the detector to the computer is damaged, or the contacts have oxidized.
For what reason can the Kalina ambient temperature sensor break down?
Due to its rather open location, this device can be damaged by a variety of factors:
- mechanical reasons - a stone hitting the detector body can easily damage it;
- low ambient temperatures;
- the third reason, already mentioned above, can lead to the device breaking down - malfunctioning wiring or oxidation of contacts.