Simplified operation of the VAZ 2114 cooling system
The coolant enters the water jacket of the engine block through the pipes. In the water jacket, the coolant circulates in a small circle until the engine (and therefore the coolant) reaches a temperature of 95 degrees Celsius.
At this moment, the thermostat opens and coolant is delivered through the pipes to the radiator. The radiator removes excess heat from the coolant. Excess hot coolant returns to the expansion tank.
The entire cooling system is under high pressure of 1.2-1.8 atmospheres, due to the operation of the pump and the increase in coolant volume due to heating.
From the above text we conclude: malfunctions of the cooling system are not easy to detect with small leaks, since the coolant evaporates almost immediately, having a high temperature, and work to find the location of the leak sometimes requires the intervention of a professional.
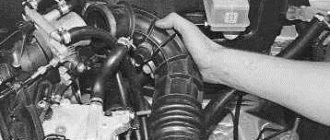
Step 1. The pipe burst
Since the pipes are the “blood vessels” of the car, failure of any of them will result in loss of coolant.
This malfunction is clearly visible on a warm engine while driving. A large amount of steam appears from under the hood. The burst pipe is clearly visible.
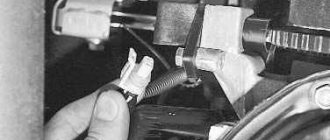
But there are times when the coolant leak is small. Then, first of all, attention should be paid to the articulation of the pipes with the vehicle components.
When using coolant in the form of antifreeze or antifreeze, a characteristic oily coating remains in the leak areas.
Step 2. Radiator problem
A radiator malfunction is extremely difficult to detect. At the site of a coolant leak, a large amount of scale sometimes forms, making it difficult to see the location of the damage.
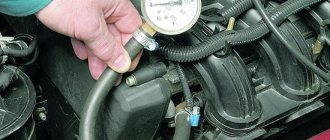
Pay attention to the tightness of the filler plug. If everything is OK with the tightness, then to check you will need a compressor with a pressure gauge or a pump.
Disconnect the upper pipe and connect the compressor. The pipe must be plugged. We create excess pressure and see where the leak appears. We dismantle the radiator. We take it to a specialized service center, where they will check it again under pressure, find a leak (there may be more than one) and weld it with a special compound.
Step 3. Gases in the expansion tank
This malfunction occurs due to the entry of exhaust gases (a specific smell is clearly felt in the car interior) into the cooling system under enormous pressure of 90-96 kPa.
The reason is a faulty gasket between the valve head and the cylinder block. It is caused by coolant leaking from under the expansion tank cap.
The check is quite simple. We start the engine on a cold car, remove the cap from the expansion tank and sharply press the accelerator (in common parlance, the gas pedal).
If the coolant rises sharply, the gasket must be replaced. Stop operating the vehicle immediately until the problem is resolved.
Sometimes the expansion tank cap, due to spring wear, may not withstand coolant pressure.
Step 4. Gray emulsion instead of oil
If you notice that your car has started to “trouble”, a large amount of steam comes out of the exhaust pipe, which smells like coolant. The amount of coolant is constantly decreasing and when checking the oil dipstick, it is clear that the oil has turned into a gray emulsion.
All this indicates a malfunction of the cooling jacket of the engine cylinder block. I categorically do not recommend operating the car in this condition! In addition to the problem with the cooling system, the lubrication of all moving parts of the engine is impaired, which can easily lead to its breakdown.
Step 5. Antifreeze in the cabin
In addition to cooling the engine, the coolant is used to heat the vehicle interior. If the interior radiator or the pipes leading to it malfunction, a large amount of coolant leaks onto the floor.
The malfunction is very unpleasant, as it entails disassembling almost the entire front part of the car's interior.
How to make a replacement
If the engine protection is damaged during a collision with an obstacle, it should be replaced.
It is done in the following order:
- Raise the car on a lift or place it on a pit (to provide convenient access to the lower part of the engine compartment).
- Unscrew all fasteners of the old protection and remove it.
- Clean the area between the guard and the crankcase if there are traces of dirt on it (if necessary, you can also replace the oil filter).
- Place the new protection in place and secure it with fasteners.
Thus, the entire process will only take a few minutes.
Speaking about replacing the crankcase protection, one cannot fail to mention such an issue that worries many drivers as installing additional protection. It is designed to provide essential protection against damage when driving over very rough terrain and to ensure that even in very severe collisions with obstacles the crankcase will not be deformed.
At the same time, if you decide to install additional protection, you should definitely remember the following:
- if you live in a metropolis or just a city with a very good road surface, rarely travel long distances and never travel out of town on dirt roads, then installing an additional casing does not make any sense - it will simply “hang like a dead weight”, bringing no benefit ;
- if the additional protection has a height of less than 3 cm (that is, its bottom is 3 cm or less from the crankcase), then it is better not to purchase it, since in a very strong collision it can bend and damage the crankcase;
- if the car is lowered and the roads in the city are not of the best quality, then installing additional protection is highly desirable (perhaps this is the only situation when the presence of another casing under the crankcase is necessary when driving in urban conditions).
At the end of the conversation, it is worth recalling once again that the crankcase protection is not just a metal pan, but an element that protects the engine from failure due to oil leakage. That is why its condition should be checked periodically, and if it is severely damaged, it should be replaced immediately.
Several important nuances when choosing cooling system components
The most important thing is to use special antifreeze or antifreeze liquids, which have a higher boiling point.
Choose pipes from well-known manufacturers, do not skimp on this. Especially when making replacements inside the car.
Replace the expansion tank cap only with the original one. Do not reduce the number of coils of the spring, they are designed for a certain pressure. It is important!
When replacing the radiator and thermostat, pay special attention to the volume and response temperature. This is critical for proper engine operation. Excessive or too low temperatures will lead to either overheating of the engine, or it will not heat up to operating temperature at all.
How to find out that antifreeze has got into the cylinder block
To begin with, it is worth clarifying that in this case, antifreeze is not only a brand of coolant, but also a common name for any antifreeze. And it doesn’t matter at all what exactly ends up in the block. In other words, the signs that there is antifreeze or antifreeze in the cylinder block will be very similar:
These are the main signs that indicate that the liquid in the car’s engine cooling system is entering the cylinders. Before you take any action, you need to find out exactly the cause of this problem.
Signs
The first sign by which you can recognize a gasket leak is an oil leak at the junction of the pan with the internal combustion engine. But since this element is the lowest point of the engine, it is not always possible to recognize a breakdown in time. Moreover, the scale of the problem can be different - from slight “fogging” to black oil puddles. The first option is not so scary for the car owner. Some drivers have been driving with this for years. However, if after a short parking period oil streaks form on the asphalt, it is worth inspecting the condition of the pan.
Also, a pan gasket that has lost its tightness affects the oil level. It will gradually decrease. How intensively the oil will leak depends on the scale of the tragedy. Driving with a dry engine is extremely dangerous. Once every thousand kilometers, experts advise checking the level on the dipstick. It should be above the average mark.
If it is at a minimum, the engine will experience oil starvation. Inserts, rings and other elements work “dry” - ellipse of the cylinders and other problems are formed.
What to do if antifreeze gets into the cylinders
So, after determining why there was antifreeze in the engine cylinder, the question arises of how to eliminate this malfunction. The simplest solution, as you might have guessed, is to eliminate the first cause of such a leak.
We are talking about replacing the gasket, since it will be enough just to replace the gasket under the cylinder head to restore tightness. Its cost is relatively low, especially when it comes to domestic cars.
The most difficult action in this case will be removing, and borrowing and replacing the head itself. However, there is nothing overly complicated about this: you just need to have the appropriate keys and follow the sequence of unscrewing and tightening the nuts. Moreover, the cylinder head is tightened using a torque wrench in compliance with all standards for a specific car model.
In most cases, it is difficult to do without the help of a specialist. But this procedure will not help if the head has become deformed (as they say, it has “begun”) due to overheating or incorrectly tightened nuts. If so, then only replacing the head will save you from getting antifreeze into the cylinder. Well, if antifreeze gets inside because cracks have appeared in the block, then repair or replacement of the block itself will be required.
How to clean
To begin work, you will need to prepare the necessary tools, namely:
The crankcase ventilation of a VAZ 2114 is cleaned as follows:
- Loosen the fastening clamps of both pipes and then remove them.
- Inspect the pipes for cracks or chips - if the latter are present, replace the pipes with new ones of the same diameter.
- If the pipes are in good condition, clean them outside and inside with a damp cloth.
- Disconnect the throttle cable from the sector.
- Remove the pair of mounting bolts securing the throttle body to the receiver.
- Remove the bracket along with the cable.
- Unscrew the two bolts securing the cylinder head, and then remove the washers and rubber bushings located on them.
- Remove the cylinder head cover itself.
- Find the oil separator on the cylinder head cover and unscrew the mounting bolts that hold it.
- Remove the housing cover, and then remove the oil separator itself.
- Thoroughly rinse the filter mesh (oil separator) in gasoline (it is recommended to use highly purified gasoline for this) or kerosene.
- Clean the cylinder head cover from oil and adhering dirt (this is best done using a rag soaked in kerosene).
- Install the oil separator filter back into the cylinder head cover.
- Reassemble in exactly the same order, but in reverse order.
To avoid possible injuries, all work on dismantling the cylinder head cover and cleaning the ventilation system should be carried out only with the engine completely cooled.
It should be noted that when performing operations to clean the ventilation system, it is worth paying attention to the condition of the rubber bushings that fasten the cylinder head, as well as the gasket. If they are worn out or covered with cracks, they should be replaced immediately, without waiting for serious damage.
At the end of today's conversation, it is worth mentioning a situation where cleaning the crankcase ventilation system does not actually help improve engine performance. This happens when the engine is very worn out, and the secondary vapors entering it to burn out actually “choke” all its work.
There can be two ways out of this situation - either carry out a major overhaul of the power unit or remove the ventilation system to the external environment (in this case, unburned gases will not enter the engine, but into the atmosphere). True, at the same time, the environmental friendliness of the car will noticeably decrease, and it will no longer meet the high Euro standards. For this reason, such a decision should be postponed until the last resort.
Source
Antifreeze getting into the cylinders: consequences
If coolant is detected in the cylinders, the engine cannot be operated further. Antifreeze itself, like any other antifreeze, although it is a rather aggressive and toxic substance, does not harm the engine. However, it contains ethylene glycol, which, when mixed with oil, forms insoluble solids. Based on their physical properties, they can well be considered abrasives. Naturally, such additives will not add service life to the engine.
We must not forget that when antifreeze enters the cylinders, engine cooling deteriorates greatly and it begins to overheat. Overheating can cause the engine head, as well as the cylinder block itself, to become deformed.
What is protection
Structurally, engine protection 2114 is a metal casing that protects the engine crankcase (essentially a container with oil) from damage when hitting protruding solid objects (for example, large stones).
The absence of this protection, as well as its being in an unsatisfactory condition, can lead not only to oil leakage (which is the most favorable option), but also to complete destruction of the engine due to its sudden wear.
For this reason, you should always check the condition of the engine protection after hitting obstacles when you return home, and if oil leaks appear on the ground after the collision, then immediately after the accident. If it turns out that the protection is severely deformed, you should stop driving and call a tow truck.
The protective casing is located at the lowest point of the engine compartment (which is why all manipulations with it should be done from the pit for greater convenience), directly under the engine. Externally, as mentioned, it is a steel casing that covers the bottom of the crankcase, and therefore it will not be difficult to find it.
What conclusions can be drawn?
So, antifreeze ingress is a fairly common problem and relatively easy to diagnose. A leak can be indicated, firstly, by a constant decrease in the liquid level in the expansion tank, and secondly, by thick white smoke with a characteristic odor from the exhaust pipe. In addition, the color of the oil on the dipstick and on the filler cap changes. Well, if the spark plugs are also wet and smell of antifreeze, then this is a sure sign of antifreeze in the cylinders.
The difficulty and cost of solving the problem depends on the reason why the coolant got into the oil. In any case, you cannot delay diagnostics and repair, since even untimely replacement of an affordable gasket can lead to subsequent serious expenses for engine repairs.
How often should cleaning be performed?
If the ventilation system is clogged and its filter is unable to clean the mixture passing through it, then not only unburned gases, but also oil particles and other pollutants will enter the engine. All this will ultimately have a negative impact on both the operation of the engine and its remaining service life.
The frequency with which the crankcase ventilation of the VAZ 2114 should be cleaned directly depends on the condition of the engine. So, if the car just recently came off the assembly line, and its engine has not clocked up 50,000 km, you shouldn’t even think about cleaning it, since the piston rings are still new, and there is practically no leakage of gases through them.
Scheme of the functioning of the cooling system.
Cars of the Samara-2 family (VAZ 2113, 2114, 2115) are equipped with a closed-type cooling system with forced circulation of coolant. The system maintains excess antifreeze pressure, which creates an increased boiling point and allows the liquid to heat up to 110-115°C.
1 – expansion tank plug; 2 – extended
Antifreeze, located in the cooling jacket of the cylinder head and block, removes the heat generated during fuel combustion in the engine. Fluid circulation is ensured by a centrifugal-type water pump (pump), which is driven by a timing belt. The cooling mode is set by a thermostat: at temperatures below 85°C, antifreeze flows in a small circle, providing quick warm-up of the engine, and when the value reaches 85 degrees, the thermostat opens a large circle, and hot antifreeze enters the radiator. When the car moves, the antifreeze in the radiator is cooled by blowing with a flow of oncoming air and then returns through the pipes to the engine block.
The antifreeze temperature is monitored by a sensor in the thermostat housing, information from which goes to the instrument panel indicator and to the car's ECU. When the antifreeze heats up to a certain temperature (95°, 98°, 105° - depending on the settings of the control unit), the electric motor of the fan located on the inside of the radiator automatically turns on. Also, on front-wheel drive VAZs, antifreeze from the engine transfers heat to the heater radiator to heat the interior.
An expansion tank with an antifreeze level sensor is used to fill the system with liquid. The total capacity of the VAZ 2114 system depends on the modification and averages 7.8 liters.
VAZ 2115 | Removing and installing the pallet
Removing and installing the pallet
When installing, use a new pan gasket or suitable sealant (where applicable).
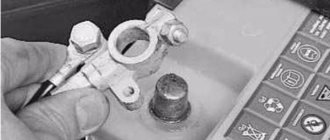
1. Disconnect the ground cable from the battery.
If the car radio in your car is coded, make sure you know the code before disconnecting the battery.
2. Drain the engine oil, then install and tighten the drain plug to the torque specified in the Specifications (use a new washer). 3. Jack up the front of the vehicle and place it on axle stands. Where available, remove the lower engine shield. 4. Unscrew the reinforcing rod (where available) between the front suspension domes. 5. On F8Q engines, unscrew the mounting bolts and remove the upper plastic cover of the drive belt/right engine mount. On F9Q engines, unscrew the mounting nuts and remove the engine soundproof cover. 6. Use a winch to support the weight of the engine/transmission. 7. Remove the bolts securing the muffler/converter downpipe to the exhaust manifold. Separate the downpipe and support it. 8. Unscrew the flywheel bracket/cover. Please note that one of the bolts secures the rear support bracket to the transmission, and to remove the bolts securing the bracket to the engine you will need a socket wrench. 9. Unscrew the holders securing the power steering hydraulic tube to the right side of the subframe. 10. Remove the nut securing the right engine mount upper bracket to the travel stop/rubber engine mount assembly on the body. 11. Raise the engine enough to allow the pan to be removed. 12. Remove the bolts securing the pan to the cylinder block, but leave two diagonally opposite. 13. Separate the pan from the base of the cylinder block. Do not use a screwdriver as it may damage the contact surfaces. 14. Remove the two remaining bolts and lower the pan. Remove the gasket where present. 15. Clean the cylinder block and pan of any remaining gasket or sealant.
1. Check the cleanliness of the mating surfaces of the pan and cylinder block. 2. Where available, position a new gasket on the sump and, if there is no gasket, apply a 1mm wide sealant - Renault recommends Rhodorseal 5661 - to the mating surface of the sump (on the outside of the sump groove). 3. If a gasket is not used, it is important to position the pan so that it no longer has to be moved once the sealant contacts the cylinder block. Long bolts or pins can be used as guides. 4. To prevent oil from dripping from the oil pump and cylinder block, wipe these areas before installing the pan. 5. Press the pan against the cylinder block, then insert the bolts and gradually tighten them to the force given in the Specifications. 6. Lower the engine, then install and tighten the right engine mount nut. 7. Install the power steering hydraulic tube holders. 8. Install the flywheel/drive disc reinforcing bracket-cover and tighten the fastening bolts. 9. Install the muffler/converter downpipe and tighten the bolts. 10. Remove the winch and install the upper plastic drive belt/right engine mount cover or soundproof cover, where available. 11. Where applicable, install the reinforcing rod between the front suspension domes and tighten the bolts. 12. Connect the battery, then lower the vehicle to the ground. 13. Fill the engine with fresh oil.
Signs of a malfunction of the cooling system.
Most often, failure of the cooling system is associated with loss of tightness, which leads to coolant leakage. The symptoms of this problem are easy to spot:
Causes of antifreeze leaks.
A coolant leak occurs when one or more components of the cooling system fail:
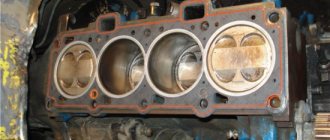
Cylinder block.
The liquid coolant circulates in the engine block through a system of special channels - the cooling jacket. If a malfunction occurs, antifreeze may leak for the following reasons:
If, after a long period of parking on a cold engine, coolant leaks are noticeable at the junction of the head and block, then most likely the cylinder head bolts are not tightened properly. To eliminate a leak, check the tightness of the bolts and, if necessary, tighten them to the required torque.
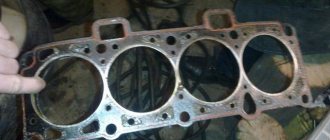
If the cylinder head gasket is damaged, the antifreeze goes inside the engine: either into the combustion chamber or into the crankcase.
Coolant entering the combustion chamber causes unstable engine operation (up to the impossibility of starting) and thick milky-white smoke from the muffler. Antifreeze that gets into the combustion chamber washes away all the carbon deposits until they shine, which can be determined by turning out the spark plugs and shining a flashlight into the spark plug wells. It is also possible that exhaust gases under pressure enter the cooling jacket and form vapor locks in it. In this case, in a well-warmed-up car at high speeds, there is a sharp increase in the amount of antifreeze in the expansion tank, until the expansion cap is knocked out.
If the coolant goes into the engine crankcase, it mixes with the oil. This fact can be diagnosed by the presence of a white emulsion coating on the oil filler cap and on the oil dipstick. A sharp darkening of fresh antifreeze is another symptom that the cooling system is in contact with oil. It is necessary to replace a broken or burnt cylinder head gasket.
The worst option is the appearance of microcracks: the symptoms are similar to the previous case, but it is problematic to eliminate this problem with your own hands. First of all, the crack may not be visible on the removed part, but it will certainly manifest itself when the bolts are tightened and on a warm engine. To eliminate microcracks, the head or block is polished using specialized equipment. In the worst case scenario, you will need to purchase a new cylinder head.
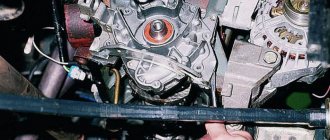
Water pump.
The pump on the VAZ 2114 (catalog number 2109-1307010) is installed in the lower part of the engine block under the timing belt tension roller. If you detect coolant leaks on the protection in the area of the right front wheel, you should remove the plastic timing belt cover and check the pump. If coolant leaks are found on the pump housing or at the point where it connects to the engine block, it is necessary to remove the timing belt and replace the part. Also grounds for replacement are play in the pump pulley or jamming when the shaft rotates.
Replacing the sump (crankcase) gasket on a VAZ-2114
Most car enthusiasts have heard about the existence of such a part in a car as an oil pan. But if you ask a beginner what it is needed for, what functions it performs and what it consists of, it will be quite difficult to get an intelligible answer. At the same time, everyone knows that the crankcase must be protected from mechanical shocks (there is even special protection for this).
Purpose of the oil pan and design features
The oil pan is shaped like a small bath of unusual dimensions. Depending on the make and model (and, accordingly, engine design), it may have a different configuration. Everything is done in order to prevent possible contact with the elements of the transmission located underneath or, for example, the front axle gearbox.
Some cars have a so-called “dry” sump. It has one interesting feature. The oil is not in the pan (as is usually the case), but in a special tank.
On most cars (including domestic cars), the task of the pan is to collect and store oil that circulates through the engine system. It is in the oil pan that all unnecessary debris settles, which can appear during the friction of various metal parts.
In addition, oil is collected in a special container, which at a certain point in time is not involved in the lubrication process. Subsequently, the composition is captured using an oil intake and sent to the main engine components. At the same time, the installation of such an oil “sucker” is well thought out. It captures oil not from the very bottom (where there is a lot of dirt and sediment), but a little higher. Moreover, in some models special magnets are installed at the bottom of the tray. Their task is to hold metal “chips” and prevent them from returning back to the engine.
On the inside of the crankcase there are special anti-drip bulkheads. Their task is to prevent oil from splashing during movement. In addition, the hole for draining oil from the engine is also located in the oil pan. Everyone (even beginners) knows how to check the oil level in the crankcase - this is done using a special oil dipstick.
The oil pan is a removable mechanism. It is fixed to the main unit using several bolts. In this case, a special gasket made of rubber or cork material is installed between the pan and the crankcase. Its task is to eliminate oil leaks at the junction of two elements. If the gasket is damaged, it should be replaced as soon as possible. If the malfunction is not noticed in time, the lion's share of the oil may leave the engine. The consequences for the most expensive component of a car can be very tragic.
Changing the oil pan gasket on a VAZ-2114
So, when the first symptoms of an engine oil leak appear, the first thing to do is inspect the engine. Damage to the gasket can be seen immediately by the appearance of a characteristic leak at the junction of the crankcase and the pan. The reasons may be different - natural aging of the material, poor quality of the gasket and its wear. In addition, problems with the gasket may appear after installing an initially defective product or insufficient (or, conversely, too strong) tightening of the bolts.
As for the gasket replacement process, it will take you no more than 20-30 minutes.
The algorithm of actions should be as follows:
- Carry out the work in a viewing hole in the garage or use a lift. If this is not possible, then you can jack up the front of the car and install wooden trim.
- Place special shoes to securely secure the car, apply the handbrake and engage first gear.
- If your car has a metal crankcase protection, unscrew the mounting bolts and move the structure to the side (it will not be needed yet).
- Start the engine and bring it to operating temperature. This is necessary in order to warm up the oil a little and reduce its thickness.
- Unscrew the pan drain plug, place a container under it and drain the engine oil. Be careful when unscrewing and try not to get yourself covered in oil.
- Now remove the oil pan itself. On the VAZ-2114 (as well as on a number of other domestic car models) it is secured with six bolts. Unscrew them completely and set them aside.
- Remove the pallet. If they are stuck and do not budge, use a screwdriver with a wide and sharp “sting” or a regular knife. You will still be changing the gasket, so don’t be too stingy with it.
- Remove the old gasket. It happens that it adheres too tightly to the surface. In this case, a screwdriver or knife will help you (as in the previous case).
Connecting pipes and clamps.
To connect all elements of the cooling system, rubber or silicone pipes are used, which are secured with metal clamps. Insufficient tightening of clamps, cracking and wear of pipes lead to antifreeze leaks. Some tips on how to avoid this:
The cooling system of domestic cars requires constant monitoring and regular maintenance. If a minor malfunction of the cooling system is not corrected in time, it can ultimately lead to expensive engine repairs, so do not be lazy to periodically look under the hood.
Source
Replacement
Having discovered the first signs of a leak in the pan, you should immediately replace the gasket. But the problem can also be caused by a breakdown of the “bathtub” itself. In this case, we carefully inspect the surface of the pan for mechanical damage - cracks, etc. If any, the crankcase should be replaced or repaired (depending on the extent of the damage).
To replace a part such as the engine pan gasket, we need to drive the car into a viewing hole or hang its front part with a jack (at least on one side). Since the element is located at the bottom, it is important to provide high-quality lighting using a portable lamp. An important point is that if the replacement is made in cold weather, the oil should first be warmed up. Let the engine idle for a few minutes.
Depending on the design features, it is necessary to remove the metal crankcase protection.
It is installed non-standard - usually the car comes from the factory with plastic engine mudguards.
Since the crankcase is a kind of reservoir for oil, when dismantling it, you need to drain all the lubricating fluid. To do this, unscrew the drain and filler plug (the last one - so that a vacuum does not form in the system, so that the oil quickly drains out). You should first place a container next to the tray. Typically, passenger cars use up to 4-5 liters of oil. In the absence of an inspection hole, it will be difficult for us to place a bucket here - we need a flat container. To do this, take an old canister and cut off the “sidewall” from it. We unscrew the plug and wait until all the liquid drains out.
The next step is to thoroughly wash the outer part of the pan. Usually a lot of dust accumulates on its surface (since it is the lowest part of the car). And if the gasket is broken, then there will also be oil streaks on the pan. It is extremely difficult to remove them. You need to use a spray degreaser.
Using a 10mm wrench, unscrew the crankcase mounting bolts. Also, do not forget about the bolts that are located above the beam and near the resonator manifold. Next, carefully remove the pan, prying the joints with a negative screwdriver.