Removing the engine
You will need: keys “10”, “13”, “17”, “19”, extension with cardan joint, socket heads “13”, “17”, “19”, “22” , “24”, wrench, screwdrivers (two), mandrel for centering the driven clutch disc, pliers, hoist or other lifting device, slings (strong rope).
1. Disconnect the wires from the “+” and “–” terminals and remove the battery.
3. Drain the coolant from the engine cooling system (see “Replacing the coolant”).
4. Remove the air filter with the intake pipe hose (see “Removing and installing the air filter” in the “Power system” subsection).
5. Unscrew the mounting bolts and remove the engine crankcase protection.
8. Turn the throttle drive sector all the way and disconnect the throttle drive rod from it.
9. Remove the two bolts securing the throttle linkage bracket. Move the bracket to the side without disconnecting the rods from it, so that it does not interfere with engine removal.
10. Unscrew the fastening nut and remove the tip of the engine “mass” wire from the stud on the clutch housing.
11. Unscrew the two fastening nuts and remove the tips of the “mass” wires from the studs securing the rear cover of the cylinder head.
12. Disconnect the block with wires from the coolant temperature sensor by squeezing the plastic clip.
13. Loosen the clamps and disconnect the radiator inlet pipe, the throttle body inlet hose from the outlet pipe, and disconnect the radiator inlet hose from the thermostat.
14. Disconnect the heater radiator outlet hose and the cooling system filling hose from the water pump inlet pipe (see “Replacing the cylinder head gasket”).
15. Disconnect the wire from the coolant temperature gauge sensor (see “Replacing the cylinder head gasket”).
16. Disconnect block 1 with wires from knock sensor 2 or remove the sensor by unscrewing the nut that secures it and removing the sensor from the stud, leaving it on the wiring harness.
17. Disconnect the block with wires from the low-voltage terminal of the ignition module by pressing the plastic latch.
18. Disconnect the block with wires from terminal “D” of the generator. Sliding the rubber boot, unscrew the nut and disconnect the wires from the contact bolt (terminal “B+”) of the generator.
19. Disconnect the wire from the oil pressure warning light sensor.
20. Loosen the clamp and disconnect the brake booster hose from the receiver fitting.
21. Disconnect the wiring harness connector from the throttle position sensor...
22. ...and from the idle air regulator, squeezing the plastic latches.
23. Unscrew the fastening nuts, holding the hoses from twisting with a second wrench, and disconnect the fuel supply hoses 1 and drain 2 from the fuel pipes (the fuel supply hose is marked with paint).
25. Disconnect the heater outlet hose from the water pump inlet pipe.
26. Disconnect the injector wiring harness block by pressing the plastic latch.
27. Unfasten or cut the clamp securing the wiring harness to the water pump supply pipe.
28. From the bottom of the car, disconnect the wiring harness block from oil level sensor 1 in the engine crankcase (next to oil filter 2).
29. Disconnect the wiring harness connector from the crankshaft position sensor.
30. Disconnect the wiring harness connector from the vehicle speed sensor.
31. Disconnect the holder with wires from the front cover of the camshaft drive belt.
32. Remove the wiring harness from under the receiver and thermostat. Double-check that all wires and hoses are disconnected from the engine.
33. Loosen the adjusting nuts, disconnect the clutch cable from the clutch release fork and remove it from the bracket on the box.
34. Loosen the clamp and disconnect the gear shift rod from the joint tip.
35. Disconnect the wiring harness connector from the reverse light switch on the transmission.
36. Loosen the nuts securing the left and right braces to the suspension arms.
37. Remove the three bolts securing the brace bracket to the body and move the left and right braces to a position so that they do not interfere with the removal of the power unit.
38. Remove the cotter pin from the tie rod ball joint nut to the swing arm.
39. Unscrew the nut securing the steering rod ball joint.
40. Press the steering rod ball joint pin out of the strut swing arm using a special puller.
41. Remove the two bolts and disconnect the ball joint of the suspension arm from the steering knuckle.
42. Use a pry bar to press the shank of one of the front wheel drive inner joints out of the gearbox and move it to the side.
43. Insert a mandrel (for example, an old internal joint) instead of the hinge so that the side gear does not turn. After this, disconnect the second drive in the same way as the first.
44. Secure the engine to the eyelets and tighten the hoist cables.
45. Unscrew the two nuts securing the rear support of the power unit to the body.
46. Unscrew the nut, slightly lift the engine and remove the bolt of the right front power unit support.
47. Unscrew the nut and remove the bolt of the left front support of the power unit.
48. Lower the engine onto the supports, lift the car and remove the engine from under it.
Helpful advice. This section describes removing the engine downwards in accordance with the manufacturer's recommendations (as part of the power unit together with the gearbox). To do this, lifting mechanisms are needed to raise the front of the car higher. In garage conditions, it is easier to remove the engine upwards after first removing the gearbox.
Source
Removing the Engine (Part I)
You will need: keys “10”, “13”, “17”, “19”, extension with cardan joint, socket heads “13”, “17”, “19”, “22” , “24”, wrench, screwdrivers (two), mandrel for centering the driven clutch disc, pliers, hoist or other lifting device, slings (strong rope).
1. Disconnect the wires from the “+” and “–” terminals and remove the battery.
3. Drain the coolant from the engine cooling system (see “Replacing the coolant”).
4. Remove the air filter with the intake pipe hose (see “Removing and installing the air filter” in the “Power system” subsection).
5. Unscrew the mounting bolts and remove the engine crankcase protection.
6. Remove the exhaust pipe (see “Replacing the exhaust pipe” in the “Exhaust system” subsection).
8. Turn the throttle drive sector all the way and disconnect the throttle drive rod from it.
9. Remove the two bolts securing the throttle linkage bracket. Move the bracket to the side without disconnecting the rods from it, so that it does not interfere with engine removal.
10. Unscrew the fastening nut and remove the tip of the engine “mass” wire from the stud on the clutch housing.
Replacing piston rings VAZ 2109-21099
And to finally make sure, you should unscrew the spark plug in the cylinder with low compression, drip a little engine oil inside and check the compression again. It turns out that what gets on the piston rings will fill all the gaps and make them sealed. If, after lubrication with oil, compression returns to normal, then this is definitely a problem in the rings. If not, then most likely the valve seats are leaking or the valve itself is burnt out, but that’s a completely different story. In the case of rings, I really don’t recommend changing them if the compression shows 8-9 kg - this is nothing more than “still good”. Because having replaced the rings, very little time will pass when the past symptoms will return again, because the new rings will still rub against the cylinder walls and wear them out so much that the question of boring the engine will arise. So it’s better to delay this as far as possible. So, we have identified the cause, made sure that the problem is in the rings, now we proceed directly to the replacement.
It is most convenient to carry out the work on an inspection ditch or overpass and you should stock up on tools for crimping piston rings, since the pistons will be removed, and without the proper device, it will not be possible to install them back.
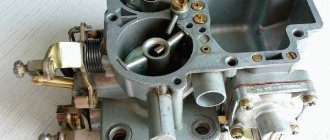
Carburetor engine
Injection engine
In this case, the carburetor throttle drive cable is removed, all hoses leading to the valve cover are disconnected, and the timing belt protective cover is removed. Then you can remove the valve cover and the following operating algorithm will be identical for both types of engines.
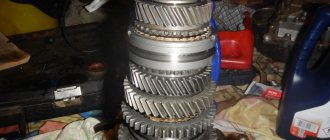
The next step is to rotate the crankshaft to match the marks on the gears and remove the timing belt. The crankshaft can, of course, be turned through the camshaft gear mounting bolt, but I advise turning it by the generator pulley mounting bolt, so as not to grind off the edges on the camshaft bolt. When the marks are set, use a 17 key to loosen the tension roller and remove the belt. To unscrew the camshaft gear, to the left of it you can see a pin on which we put a small tube through the holes in the gear so that it does not turn. And with the same key we unscrew the bolt and carefully remove the gear so that the key is not lost. Although it often fits well in place, it still happens when it falls out, so it is better to remove it and put it separately.
In the place where the tube was put to stop the gear, there is a bolt that needs to be unscrewed and the metal timing protection slightly bent so that the camshaft can be pulled out.
Using a 10mm socket or open-end wrench, unscrew the bolts securing the camshaft bearing caps, and then remove the camshaft itself. When removing the camshaft, try not to damage the oil seal, but the best thing to do is simply replace it with a new one.
Removing pistons and replacing rings
Now clamp the rings with a mandrel, and carefully tapping with a hammer through a wooden adapter, drive the piston back and reassemble in the reverse order. I strongly recommend that after installing each piston into the cylinder, make sure from below that the connecting rod bearing has not moved, otherwise there will be trouble! After assembly, the new rings must be run-in, that is, try not to load the engine for a while.
Actions requiring increased caution
Remove the muffler and camshaft pulley last. Further actions are taken taking into account the actual situation. If the star bolts are covered with a layer of dirt and oil, then there is no need to unscrew them. Remove everything together with the camshaft. It is better to unscrew them if the motor has been used recently.
The front crankshaft pulley will help you remove the engine correctly. To do this, it is recommended to use a folding key. It is installed through the top, not through the bottom. Before using it, it is recommended to switch to speed 4-5. After this, the VAZ engine is more easily subject to normalized physical impact. If the above recommendations do not help ease the movement of the key, you must use the services of an assistant.
One of the assistants gets into the car and presses the brake pedal. In this case, it is easier to remove the front crankshaft pulley. After this, the pipe and the generator bolts located on top are dismantled.
If the transmission bolts show signs of physical wear or significant contamination, it is better to replace them.
In this case, removing the engine will reduce the likelihood of failure in the future. After all, no one knows when the next time a car owner will look under the hood.
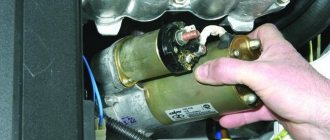
When removing the wires from the generator, it is necessary to gradually loosen the fastening of the device itself. The more accurately your hand moves, the less likely it is to get damaged. After this, the “crab” is removed with no less care. It is secured with two bolts, which we remove using a wrench. Before unscrewing the last bolt, the device is slowly moved to the side.
Boosting methods
In most cases, achieving the required indicators is achieved by increasing the volume of the car engine. To accomplish a task of this kind, there are several options:
The first involves increasing the diameter of the cylinder block to accommodate a larger piston diameter by boring. It is called “folk” because of its low cost, because in this case all that requires expenses is the purchase of a set of pistons and wheels, as well as payment for turning services.
The second is to replace the factory crankshaft with one that has a larger crank radius and therefore a larger piston stroke and larger volume. Its cost is much higher than the first method, since you will have to spend money on a crankshaft, a set of pistons suitable for the new crankshaft (since the height of the cylinder block has certain restrictions), and special rings for the pistons. In addition, it will be necessary to pay for work related to block boring.
For many, it may be surprising that the increased displacement of the “nine” engine is not always the most advantageous method of boosting. In some situations (it all depends on what the engine should ultimately be like), it is much easier and more efficient to modify the cylinder head (cylinder head) and then install a suitable camshaft. This type of boost will also make it possible to increase the power performance of the power unit.
Of course, to maximize all the capabilities and reserves of the camshaft, a fairly serious modification of the cylinder head will be required, which may even include repressing the seats and installing valves with a large diameter. For example, engines characterized by the presence of eight valves will fit similar parts from BMW, and sixteen-valve engines will fit components from Opel and Volkswagen. At the same time, one should not lose sight of the intake/exhaust channels intended for circulating the fuel-air mixture - they also require improvement. Their improvement involves increasing the cross-sectional diameter to maximum dimensions through internal polishing.
We recommend: Replacing clutch Lada 2114 (VAZ 2114)
The technical characteristics of the VAZ 2109 cylinder block, like other components, leave their mark on the overall performance of the engine. You can, of course, study in more detail the influence of the types and shapes of pistons, the weight of crankshafts and much more that is somehow reflected in the operation of the engine, but this article is not about that.
The following characteristics have a particular impact on the performance of the internal combustion engine: the ratio of the length of the connecting rod to the piston stroke and the dimensions of the crankshaft crank (diameter).
The importance of the above parameters is due to the fact that the engine is essentially a pump that pumps a certain amount of mixture through itself over a specific period of time. It is these characteristics that will be discussed further.
What signs indicate a timing belt replacement: 6 signs
Visually visible cracks and tears are not the only signs of possible failure. There are a number of other symptoms:
- Age. The service life of the part is determined by the mileage of the vehicle. But the age of the part also matters. If the car has been sitting idle for a long time and has not accumulated mileage, the belt still loses its original properties of strength and elasticity. On average, after 5 years, the part becomes covered with cracks, regardless of the number of kilometers traveled.
- Loss of power or uncertain starting of the internal combustion engine. A worn or weakly tensioned timing belt can jump over several teeth on the pulley. In this case, the function of the ignition system is disrupted - the fuel mixture ignites earlier or later than the specified time. At the same time, the driver feels that there are gaps in the traction, the internal combustion engine starts up uncertainly, and vibrations occur.
- Black smoke. If the timing belt is faulty, the mixture in the engine does not burn completely, which leads to destruction or melting of the catalyst. In this case, a portion of unused fuel penetrates into the exhaust system, resulting in the permissible temperature being exceeded. An obvious symptom of this situation is that the exhaust is accompanied by popping sounds, and the color of the smoke from the chimney is black.
- Extraneous sounds in the engine. If the timing belt is cracked or frayed, you can hear characteristic ticking, clicking and other sounds from under the unit casing. Typically, the frequency of sounds increases with increasing engine speed.
- Leaks in the drive. If oil or coolant is leaking, there is obviously a problem with the gas distribution mechanism. When the crankshaft oil seal wears out, some of the lubricant gets onto the belt. If the joints have lost their tightness, the belt is coated with antifreeze. As a result, the assembly deteriorates faster and jumps over the teeth of the pulleys.
- Starter idling. If, when idling, the combustible mixture is not picked up and ignited in the cylinders, then there is no compression. This indicates mechanical damage to the valves, which are bent when meeting the pistons. This is the worst consequence of a broken timing belt. You will have to change the engine or send it for an expensive restoration.
Step-by-step instructions for disassembling the internal combustion engine of a car + Video
Attention! Before removing the connecting rods and pistons, as well as the main bearings and liners, you must first mark them all to prevent errors when assembling the element.
That's all you need to do to disassemble the engine. The next step is to bore various elements to repair sizes and replace damaged and worn elements. It is recommended to pay special attention to the liners, which are most often subject to rotation, which is why the motor simply jams. After repair, the engine is assembled and installed on the car.
Oil change features
Filter and plug position
Changing the oil in a VAZ 2109 engine is not the most common process, but you can handle this task as needed. If you buy a used car from another person, you need to change the lubricant in the engine as quickly as possible. Repairing the steering rack on a VAZ 2109 with your own hands (video) The steering rack in front-wheel drive cars is fully responsible for the functionality of the entire steering mechanism. With all this, it is recommended to flush the engine with a special liquid, because it is not clear to you exactly what was filled in earlier.
Symptoms for replacement
In fact, there are quite a lot of reasons why injectors may not work well. And below are the most common symptoms:
Checking old injectors
Before replacing injectors, it is recommended to check them. This will allow you to determine whether it is working or not.
The test is carried out on a removed fuel rail, on a special stand.
Such a check can be done in almost any service.
You can also check not all injectors at once, but each one separately. To do this, you will need to apply current to the part and install a container with fuel on it. When current is applied, the valve will operate and gasoline will spray out through the nozzle. But such a check is inaccurate and will still need to be checked at a stand.
Removing the motor
Many car enthusiasts ask the question: how to remove the engine? The installed engine can be removed from the car at a car service by professional specialists or with your own hands in your garage. So, dismantling it yourself will take approximately 8-10 hours.
But, if the vehicle has a lot of electronics and the power unit is equipped with it, then it is not recommended to carry out the operation yourself, but rather turn to professionals. So, let's look at the process of removing the engine on the simplest versions of cars.
Removing and replacing injectors
Before dismantling the injectors on the VAZ-2114, you will need to relieve the pressure in the fuel rail. The process is performed by disconnecting the connectors with wires from the fuel pump and then starting the engine. The machine should run in this position until it stalls. The procedure must be repeated until the car can start.
Removal:
Important! If the nozzle will be washed, it is not recommended to place it in a dirty place.
Replacing the injector is quite simple. When the old spare part is removed, install a new one and secure it with a spring washer . After this, you can put the ramp in its place.
Video about removing and installing injectors
Replacement Tips
It is important to remember that you should be extremely careful when dismantling and installing injectors.
Service workers always advise adherence to the following points when replacing:
Video about proper injector cleaning
3.2.8 Removing and installing an engine without a gearbox
The engine without gearbox is removed upwards from the engine compartment using a lifting mechanism. It is also possible to remove the engine together with the gearbox, however, this is much more difficult, since this requires installing the car on a lift and using an additional lift to lower the engine together with the gearbox, having first disconnected and removed the units that prevent the lowering of the power unit.
Remove the negative cable from the battery. Warning
On vehicles with air conditioning, the air conditioning components can make it difficult to work on the engine, and it is not always possible to unscrew the bolts and move the system components to the side due to insufficient length of their hoses. In this case, the air conditioning system must be discharged by a Ford dealer or air conditioning specialist.
Remove the crankcase protection and mudguard.
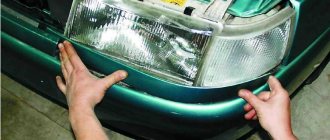
Remove the radiator grille.
Disconnect the hood opening cable from the hood closing mechanism and remove it from the clamps.
Remove the hood, first marking the position of the hinges to facilitate re-installation and disconnect the windshield washer tube.
Drain the coolant from the cooling system by placing a suitable container under the radiator drain plug and opening the drain plug located at the bottom of the radiator. To speed up the draining of the coolant, open the expansion tank cap. To drain the coolant from the cylinder block, unscrew the drain bolt located in the cylinder block.
To provide additional work space, remove the radiator.
Disconnect the coolant hoses from the water pump housing on the left side of the engine and the cylinder head.
Loosen the clamps and remove the pipes and hoses of the cooling system: – upper and lower radiator pipes; – expansion tank hoses; – hoses of the interior heating system from the cylinder head and the cooling system pump; – housing of the automatic carburetor starter.
Drain the engine oil and remove the filter.
Unscrew the four bolts securing the upper front cross member, the two bolts on both sides at the top and the two lower bolts securing the cross member support and remove it together with the radiator.
Remove the air filter.
Remove the breather hose from the cylinder head cover and unscrew the bolt securing the hose support hanger to the left front side of the cylinder head.
Remove the fuel supply hose from the fuel pump and plug it with a plug.
Disconnect the brake booster vacuum pipe from the intake manifold.
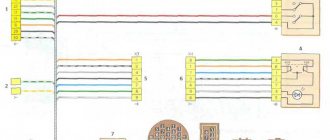
Disconnect the electrical wires and remove the connectors from the following units and sensors: – generator; – starter; – radiator fan; – speed and crankshaft position sensor; – temperature sensor; – engine control system temperature sensor; – oil pressure sensor; – ignition distributor; – ignition coils; – components of the fuel injection system and fuel injectors; – throttle position sensor; – fuel temperature sensor; – automatic air damper heater; – radiator temperature sensor.
Remove the high voltage distributor together with the wires from the ignition distributor.
Disconnect the accelerator cable.
Priora engine for VAZ 2110
Replacing a VAZ 21124 engine with a VAZ 21126
Let's rearrange the Lada Priora engine into a VAZ 2114. So, first of all, you need to dismantle the attachments, receiver, exhaust manifold, etc. Next, we install the motor on its standard mounts and attach it to the gearbox. In order not to have problems with laying a new fuel line and changing the fuel pump, we buy a standard ramp.
In addition to the ramp, you will have to purchase long nozzles. At this stage we do not attach the ramp to the engine. Before this, you need to install the receiver, this is a labor-intensive process; you will need to tighten all the cushions and lift the VAZ 2114 using a jack. We push the receiver through, insert the ramp with the injectors, insert them into the wells and screw the ramp. Only after this we begin to place the receiver in its place and secure it. Be careful not to damage the rubber seals of the receiver. Next, we put the attachments in place. Now let's move on to the electrical wiring. First, let's deal with the ignition. Since the car does not have four ignition coils, we leave the standard coil of the VAZ 2114 in its place, providing it with high-voltage wires from the Priora. The length of the injector control wiring may not be enough, so if necessary, we increase them by about 40 cm. The same applies to the phase sensor. As for the exhaust, the standard exhaust manifold with catalyst must be dismantled and replaced with a 4-2-1 “spider” system, which has a hole for the DC. We also insert the corrugation there, completely change the exhaust pipe and modify the standard can. Let's move on to the cooling system. It is worth noting that this system on the VAZ 2114 and Lada Priora is very different, so if possible it is recommended to install a radiator from the Lada Priora.
Causes
There are several most common reasons why a car owner has to remove the engine from his car.
| Cause | Peculiarities |
| Major renovation | In the event of a serious accident or as a result of wear of key engine elements, it will not be possible to restore its functionality without a removal procedure. Therefore, they resort to dismantling the engine |
| Replacement | It’s not uncommon for VAZ 2109 owners to think about replacing the standard factory engine with a more efficient, powerful power unit. This is a serious step, where dismantling is one of the initial stages |
| Finalization | If there is no opportunity or desire to change the engine, some simply modify the existing one. Tuning can be quite complex, involving the need to completely remove the engine from the engine compartment |
Regardless of the reasons, you need to remove the engine carefully, following a clear sequence of your actions. Decide in advance whether you will dismantle the engine together with the gearbox or without removing it.
Nozzle selection
For more information about choosing injectors, see the material: “Choosing which is best to install injectors on a VAZ-2114.”
The VAZ-2114 model can be equipped with different injectors from different manufacturers. Depending on this, durability and their cost also differ.
It is recommended to buy not domestic parts, but from other companies, for example, GM, BOSCH, SIEMENS.
Also, the choice of injectors also depends on the working volume and the number of valves . For 16-valve engines, the performance of such parts will be different than for the 8-valve version. If the parts are selected incorrectly, then most likely, gas mileage will be higher or the car will lose power.
If we talk about choice, then preference should be given to the BOSCH brand at number 0280158502 . This is the serial number that is suitable for an 8-valve engine with a volume of 1.5 liters.
Injectors fail not only because of their quality; their performance is largely affected by fuel that contains a lot of dirt or large fractions.
Cleaning injectors at service stations will not be cheap. Therefore, if you do not check and clean it yourself, then you should think about whether it might be easier to buy new parts and replace them.
Preparatory stage
Before starting work, it is strongly recommended that you familiarize yourself with the structure of the “heart” of the iron horse. This will help avoid many problems associated with incorrect connection of individual system elements, such as:
Beginners are advised to take photographs of the listed parts in assembled form. In order to successfully dismantle the VAZ engine, it is necessary to use the tools recommended by the manufacturer. A list of these can be found in the vehicle operating instructions. Regardless of the reason that prompted the need to carry out removal and diagnostics, you must adhere to the following scheme:
A carefully removed car ignition module will help you remove the engine correctly. Due to the fragile nature of the device, do not use excessive physical force. After this, the plug located on the block is dismantled. Only after all the liquid has been drained is the next element removed.
All plugs from the drive are disconnected in random order. The same thing happens with the throttle and hose cables. Before starting this stage, it is better to use a camera to record the initial position. The photo will be useful when the installation of the VAZ engine begins.
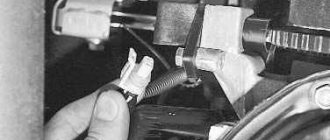
Literally, pinpoint precision is required when it comes to removing the hose leading to the gas line. To do this, you need a key set to “17”, which will not break the rather fragile system. Here, as in the case described above, it is necessary to carry out recording using a photo.
The influence of the R/S value on the VAZ 2109 engine
The ratio of connecting rod length to piston stroke is designated as R/S, and its conversion is taken with the utmost seriousness and responsibility. Many sources note that the norm for R/S is 1.75.
We recommend: Replacing the fuel pump mesh on Kalina
Indicators that differ from this value have different effects on the operation of the internal combustion engine:
R/S is above normal. Its undoubted “advantages” include the ability of the piston to remain in the top dead center (TDC) position longer. This ensures excellent combustion of the fuel mixture, namely: complete combustion of the fuel, increased pressure on the piston after TDC and increased temperature in the chamber where the fuel is burned. The result is good torque at high speeds and reduced friction in the piston-cylinder pair due to the long connecting rod, which is important for the piston stroke. At the same time, a motor assembled with an R/S number exceeding the norm, due to a decrease in air flow speed, cannot ensure proper filling of the cylinders when operating at low and medium crankshaft speeds. This is a significant “minus”, but, unfortunately, not the only one. Due to the high temperature of the combustion chamber and the prolonged presence of the piston at TDC, there is a high risk of detonation;
R/S is below normal. The advantages of this position are the excellent filling speed of the cylinders at low and medium crankshaft speeds, due to the fact that the piston moves faster from TDC, as a result of which vacuum occurs quickly. An increase in the speed of movement of the mixture consisting of fuel and air has a positive effect on its quality: it becomes more homogeneous, which makes it burn better. It is much easier to achieve such indicators, since the requirements for such modification are significantly different from engines with high R/S. A low R/S value means that the connecting rod has a large angle of inclination, and accordingly, the force on the piston will be applied in a horizontal plane. As a result, this can lead to rapid wear of the cylinder walls and rings, as well as deterioration of the lubrication process.
When configuring engines, AvtoVAZ gives preference to connecting rods with a length of 121 mm, which ensure optimal performance. In contrast, tuners using a crankshaft with a larger crank radius use longer connecting rods (129.132 mm). True, their cost is significantly higher than standard products.
How to repair a VAZ 2106 engine in your garage?
It is a well-known fact that the 2101 was the first VAZ model, followed by the station wagon, then the 2103 sedan and its modification, the 2106. It should be noted that it gained such popularity in Russia that there was no other foreign car. I even dreamed that the Toyota Corolla, which produced more than 30 million copies, could not defeat the “six”.
But no matter how popular this car is, it has drawbacks, which, unfortunately, should also be attributed to its engine. Now it’s easy to find the right part, so repairing the VAZ 2106 engine cannot be called problematic. As practice shows, the service life of such an engine is about 60,000 km, after which the “capital” follows. Fortunately, this procedure does not include all the parts and components of the car, but the process is still obvious.
Overhaul of the VAZ 2106 engine is important to reduce the price if installation and dismantling is carried out independently. Of course, you can go further, but not every car owner has several machines in his garage, in addition to his car, for boring cylinders or polishing crankshaft journals. Of course, for disassembly and rejection you will also need some tools, some of which can be called unique and specific.
For reasons of convenience, repair of a VAZ 2106 engine is divided into three stages, among which it is necessary to highlight dismantling, defects and replacement of parts with subsequent assembly. The first stage involves complete disassembly. It should be remembered that this should be done in a clean work area, because, for example, dust that may get into the cylinder block will soon stick to the greasy surfaces of the oil, and after assembly will negate all the work. ,All parts must be thoroughly cleaned with kerosene, since no self-respecting specialist will deal with a dirty cylinder block that is completely lubricated with fuel oil. In addition, if the "tail" remains in the engine, it will begin to be washed away with clean oil and can clog the entire lubrication system. Again all the work is in vain.
Repairing a VAZ 2106 engine also involves disadvantages. To do this you will need a few micrometers, a set of styluses and a caliper. The first is to measure the crankshaft journal and camshaft journal. The second is the cylinders and camshaft bearings. You also need to use probes to determine the condition of many parts (their list is quite long).
After determining the wear of parts, drilling the cylinders and grinding the crankshaft journals. Then the parts are installed. Particular attention should be paid to the build quality, as this directly affects the repair of the VAZ 2106 engine.
Then it is necessary to replace the consumable fluids. Particular attention should be paid to the oil filter, in which the oil must be installed before installation. After this, you must ensure correct assembly by turning the crankshaft by hand using a bent starter. The rotation should be tight. If you don't crank the crankshaft, you don't need to test your luck - it's better to take the engine apart again. It is clear that the procedure is not pleasant, but after reassembly everything will most likely work. Owners of other models should not despair, because, for example, a major overhaul of a VAZ 2109 engine is practically no different.
For flawless engine operation, you should regularly monitor the level and condition of the oil and change it on time. Replacement is usually carried out for the following reasons:
- exceeding the recommended mileage;
- change of season;
- changing the oil brand;
- harsh operating conditions.
All of the above factors collectively influence the frequency of fuel replacement. In summer, the lubricant should be more viscous than in winter. With prolonged use, the lubricant loses its properties, additives and chips that appear during friction of engine parts settle in it.
Sorry, there are no surveys available at this time.
How much oil to pour?
How many liters to pour depends on the car model. The volume of liquid poured into the VAZ 2109 engine is usually 3.5 liters. It is better to buy 4 liters; the remaining lubricant can be added during operation as needed. The amount of oil required is determined using a dipstick. The lubricant level should be between the maximum and minimum marks. If the level is below the minimum, then it is necessary to top up, the main thing is not to exceed the maximum, because this will have a bad effect on engine performance.
When changing oil, the question arises which one is better to fill. The highest quality, but also the most expensive, is synthetic: it has good characteristics and retains them during operation. Semi-synthetics are not as expensive, but their quality is worse. If you have limited finances and an inexpensive car model, you can use mineral.
It is important to note that you should not mix lubricants of different brands. When switching to another brand, before replacing, fill in a special flush and let the engine run for several minutes. It cleans the system well of old grease.
Changing the oil in engine 2109
Tools
It is easy to change the lubricant at home. To do this, you need to prepare the following materials and tools:
- a set of keys, including 17;
- container for waste liquid;
- a canister of new oil;
- funnel;
- new oil filter;
- a special wrench for removing the filter or a screwdriver;
- clean rags to remove stains.
Adjustment of valves
You need to start adjusting the valves from the fourth cylinder, the mark on the camshaft sprocket should be opposite the camshaft mark, so we will adjust the 8th and 6th valves, then turn the crankshaft 180 degrees, then we can adjust the 4th and 7th valves, turn the crankshaft another 180 degrees 1 and 3, to adjust 5 and 4, turn another 180 degrees.
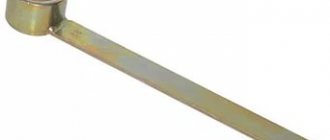
You can buy a feeler gauge designed for adjusting valves, this feeler gauge needs to be inserted between the camshaft and the rocker, loosen the nut by seventeen, and with a wrench of 13 you need to move the rocker so that it slightly clamps the feeler gauge. Now we slightly tighten the nut to seventeen, and with a wrench to 13 we loosen the rocker until the feeler gauge moves not hard but not easily, and now we tighten the nut to seventeen, if the feeler gauge tightens, the adjustment must be repeated. In my opinion, you don’t need to adjust the valves well right away, the point is that when you start the engine, it will run for a couple of minutes, the valves will clearly sit in their places, and you will have to adjust them again.
Changing engine oil in front-wheel drive VAZ engines
3.5 liters of motor oil are poured into the engines of VAZ 2108-15 cars; its level is checked using the oil dipstick. How much oil is in the engine must be checked every day before starting the internal combustion engine; the oil in the crankcase should be slightly below the top mark on the dipstick. The 2108-15 engine should be filled with semi-synthetic or synthetic; to replace it, use oil from well-known manufacturers, such as:
Changing oil 2108-15 is very simple; any driver can do it. For this operation, it is advisable to use a pit or a lift; the replacement should be done on a warm engine, in which case the oil will drain better.
We carry out the work as follows:
We change the oil filter, start the engine and check how it works. This completes the oil change job.
Compression test, troubleshooting
One of the main reasons for engine repair is decompression. Actually, the troubleshooting itself must be done every 30 thousand km, combining it with valve adjustment.
Signs of the need for early technical inspection of the engine are:
Compression test If you notice similar symptoms, you need to do the following:
IMPORTANT! The normal pressure in the VAZ 2114 engine is 1.0 MPa in the standard configuration and 1.4 MPa on an eight-valve engine.
After the procedure is repeated for all cylinders, it is necessary to analyze the records. So, in a working engine, compression should not fall below 1 MPa and should not have a spread between the cylinders of more than 0.2 MPa. Otherwise, you will have to repair the engine.
Without removing the gearbox
If there is no pit, overpass and friends, you will most likely have to figure out how to remove a VAZ 2114 engine without a box. You can perform this procedure yourself, and you will not need any special physical activity. Part of this procedure will not differ in any way from the general algorithm, so we will focus only on the differences.
To prepare a working base you will need bricks and a jack. It is necessary to smoothly lift the car and place brick by brick under the front wheels, having first secured the rear wheels so that the car does not roll.
The key differences between the methods begin when you completely free the motor head from the wires connected to it:
Remove the pulley and muffler. We remove the head itself with the camshaft - here it is important to pay attention to the bolts. If they are hexagonal, you will be able to remove the head together with the camshaft, if not (they come in the shape of an asterisk), then you will inevitably remove them separately. Now we unscrew the front pulley, first turning on the fifth speed and placing a brick on the brake. We unscrew the generator and go directly to the gearbox, on which there is a nut and three bolts. Unscrew the crab and put it aside. We fix the engine and lower it onto the prepared cushion.
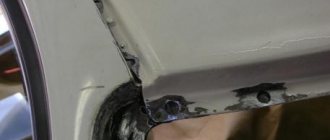
Homemade support for engine removal
Homemade support for engine removal
BE CAREFUL! Sometimes the engine does not want to fall off the box on its own, in order to fix this you will have to gently push it with a crowbar.
When you put it back together, don't forget to secure not only the engine, but also the box itself with rope. To carry out reassembly without removing the box, you will need an assistant.
Conclusion
How to remove the engine from a car? Removing a power unit from a car with your own hands can be simple and at the same time difficult, since it all depends on the type of power unit, as well as the presence of heavy electronics.
In the case of VAZ, GAZ, UAZ engines, they can be easily removed, but with foreign-made engines, everything is much more complicated. Therefore, most manufacturers recommend contacting specialists who can help remove the motor and repair it.
This guide is suitable for owners of all Classics. These are VAZ cars: 2101, 2102, 2103, 2104, 2105, 2106, 2107. The principles are common for removing the engine from other domestic models, as well as for foreign cars.
How to remove the engine of a VAZ 2107 at home? This question interests many car owners. This procedure is simple, but requires explanation. After all, there are subtleties and tricks, failure to comply with which can cause significant damage to your car. We present to your attention simple step-by-step instructions “in pictures” and with a video tutorial.
How to remove a VAZ 2114 engine: we analyze the process in detail
Many car enthusiasts, taking into account the price of a VAZ car and the possible cost of repairs in a car repair shop, are thinking about how to remove the VAZ 2114 engine with their own hands.
This article is intended specifically for thrifty and independent car owners, in which we will figure out how to remove the engine, install it back, what options for this procedure exist and how to check the compression after the repair. In addition, we will look at how to do this yourself without involving other people.
VAZ 2114 engine
Carrying out lapping
To make work more convenient and efficient, a rubber tube is installed between the drill and the valve. Its thickness should be the same as that of the valve stem. To prevent rotation, the tube is fixed using worm-drive clamps. The grinding procedure is quite simple. It is necessary to lubricate the valve plate and seat first with rough paste. After all minor surface irregularities have disappeared, this paste is washed off and a new one is applied for fine processing. The main thing in this matter is not to mix up the valves after grinding. At this point, the major overhaul of the VAZ 2106 engine can be considered almost complete. It is impossible to tell about it in a nutshell; reference books are needed to carry out all the work.
Source