With the arrival of cold weather, every motorist should take care of maintaining comfortable conditions while traveling. There are problems with heating VAZ cars. A possible culprit of discomfort is a faulty radiator of the heating system. The article examines fault diagnosis and options for replacing the VAZ 2110 heater radiator.
Symptoms of malfunction
Content
A vigilant vehicle owner, while driving or performing periodic inspections, will be interested in the unusual behavior of heating devices.
- Poor supply, uneven heat distribution inside the machine.
- The appearance of extraneous sounds when the heating is turned on.
- Fogging of glass covered with an oily film. Rubbing is useless.
- Visual presence of traces of fluid other than brake fluid, fuel, or lubricant.
- Unsatisfactory functioning of automatic heating control (AHC).
- Reduced coolant level. There are no visible areas of damage.
troubleshooting
If problems occur with the stove, first you need to determine what exactly caused the heater to fail to operate normally.
| Cause | Your actions |
| Low antifreeze level | If the antifreeze in the system becomes less than necessary, the coolant circulation in the engine-radiator circuit stops. Try topping it up as over time there is less of it in the tank. If this doesn't help, look further for reasons. |
| Airlock | It can form when adding antifreeze to the system. To clear the traffic jam, you need to slightly raise the front of your car and run the engine at idle speed for 10 minutes. If air was indeed present in the system, the plug will go away and all that remains is to add coolant |
| Switch | The fan rotates at a speed set by the step controller. If you can turn on the stove only at maximum fan speed, and the electric motor device does not work in other modes, then the most likely reason is the stove resistor. It should be replaced with a new one |
| At maximum speed the flow is weak | The reason may be the system of closing and opening the damper, that is, the tap. But most often, this problem results from contamination of the cabin filter. This can be determined by the musty smell of dampness. Replace the filter and the problem may go away |
| There is a leak | This is the most popular type of breakdown associated with the heating system on the VAZ 2110. Leaks can occur through the stove and faucet. The crane is a very vulnerable spot for dozens of all VAZ models. When they first started producing the ten, the crane was being installed. Then it was removed from the structure, and after some time it was modified and returned |
| Antifreeze puddle in the cabin | If you notice a puddle of coolant under the feet of the front passenger, and also smell an unpleasant odor, then you should check the radiator and tap. Plus, be sure to study the current condition of the pipes in the places where they are attached with clamps |
The pipes on the VAZ 2110 have a limited service life. After about 3 years, they will begin to tan, which will certainly lead to the need to replace them. It is better to prevent leakage by replacing the stove pipes a little earlier than scheduled.
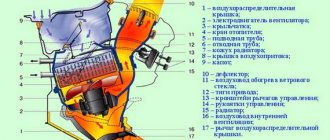
Location of the radiator of the VAZ 2110 stove
Heating equipment VAZ 2110 performs two main functions: cooking and heat distribution.
The preparation is carried out by a thermal unit, simply called a stove. It is located under the hood on the wiper side.
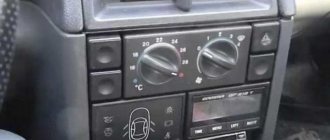
The radiator occupies a horizontal location under the panel. The controller maintains the flow rate and coolant temperature, guided by the position of the instrument panel controls and information from the ceiling sensor.
Location of the heater radiator
The left edge of the blue sector of one indicates a closed damper, the right edge of the red stripe corresponds to an open state. The second handle sets the fan operating modes.
Cabin air ducts distribute heat. The upper nozzles blow on the windshield, front door glass, and are located along the edge of the dashboard. The lower channels are directed under the feet of the driver and passengers.
Diagnostics of the heating system of VAZ 2110
If the function of the temperature regulator is malfunctioning, two most common reasons can be noted:
- incorrect operation of the control unit,
- damper malfunction.
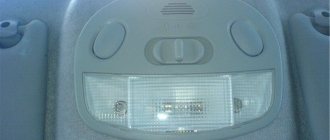
If the temperature controller malfunctions, the first thing you need to do is pay attention to the condition of the temperature sensor. The temperature analyzer is located next to the lampshade located on the ceiling.
You can check the functionality of the temperature analyzer as follows: you need to turn the temperature knob several times and tactilely analyze the temperature of the air flow.
If the air flow temperature changes only when the regulator is in the extreme position, the analyzer must be replaced. If, however, the temperature of the air flow changes according to the position of the regulator, the sensor is functioning properly and the cause of the breakdown is the incorrect operation of the control unit.
In order to check the function of the VAZ 2110 heater, it is necessary to move the damper located in the engine compartment. Next, it is necessary to visually diagnose the tightness of the radiator. If the check shows a violation of the heater seal, it is necessary to replace it with a new one. Replacing the heater involves dismantling and completely disassembling the VAZ 2110 stove. If you have a new heater, you can replace it yourself.
Fault diagnosis
Before starting repairs, the defective unit is identified.
The inability to regulate the temperature of the cabin air calls for checking the dampers, control unit, and temperature sensor.
- Turn on the heating.
- Evaluate the heat of the forced air flow with your hand.
- Set the maximum value. If heat is supplied only at maximum, the sensor requires replacement.
The next step is to prevent the damper covered by the central deflectors. The standard plastic curtain becomes deformed and freezes. It is logical to install an aluminum damper.
A flow of exceptionally cold air raises the suspicion that the stove is broken. Statistics show that in nine cases out of ten, the gearmotor installed under the facing frame is to blame; it’s time to replace it. The design of VAZ 2110 gearmotors has significant differences, depending on the year of manufacture. A battery connected directly to the gear motor will help you check this element.
The noisy operation of the heating unit is annoying. The most reasonable solution is maintenance of the entire unit:
- cleaning and lubrication of the electric motor;
- applying lubricant to rubbing parts;
- replacing worn washers, use fluoroplastic washers;
- tightening fasteners.
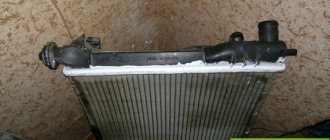
If the antifreeze periodically leaves without obvious drips, the clamps are tightened, the fittings are dry, the pipes are intact, the windows are covered with an oily film, the radiator of the VAZ 2110 stove needs to be replaced. Before starting repairs, it is worth studying the range of heaters.
What do you need for work?
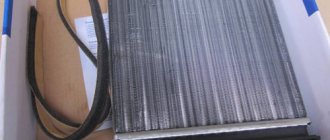
First of all, you will need a new heater radiator. The choice is presented in a fairly wide range, so decide for yourself here.
As for tools and materials, be sure to check the condition of the system pipes. It is possible that they are also damaged, so they will have to be replaced.
Buy a set of clamps. In general, you will need three of them, but it is better to take a reserve just in case. Moreover, this “just in case” happens to every second person who changes a stove radiator with their own hands.
Tools include a short Phillips screwdriver and tweezers . The latter will help you install the latches.
Which radiators are better
Cars of the VAZ 2110 model were equipped with radiators of two generations, distinguished by the year of manufacture: before and after 2003. New devices are produced by the Dimitrovograd Automotive Aggregate Plant (DAAZ). These are aluminum double-row tubular-plate radiators. Positive qualities are considered low weight, price, negative qualities are low thermal conductivity, efficiency, and corrosion resistance.
Copper systems:
- increased strength due to the copper body;
- durable;
- repairable;
- have high heat transfer and efficiency;
- heavy;
- require reliable fastening;
- have a high price.
For lovers of winter driving in severe frosts, the second option is more suitable.
Which radiator should I choose, aluminum or copper?
The VAZ 2110 after 2008 was equipped with aluminum radiators, which have a number of pros and cons. However, some car owners complain about cold interiors and foggy windows. Advantages of an aluminum radiator:
- They have a higher density compared to copper
- The width of the radiator channels is larger, which means more heat transfer
Minuses :
- If a leak occurs, it is not repairable
- Heats up quite quickly, but also cools down quickly
Initially, domestic cars were equipped with copper radiators. However, later, as we wrote above, they were replaced with aluminum ones.
Now it is quite difficult to find a high-quality copper radiator, since some manufacturers use impurities instead of pure copper.
Advantages of copper radiators VAZ 2110:
- Among the obvious advantages is its heat dissipation of 389.6 W/(m. deg), it is significantly higher than that of aluminum
- A copper radiator takes a long time to heat up, but also takes a long time to cool down.
- If it leaks, it can be repaired.
- The copper radiator can be soldered.
Minuses:
- This type of radiator has fewer fins and thin channels that can become clogged.
Replacing the heater radiator 2110
The replacement process is described by numerous sources devoted to the repair and maintenance of VAZ 2110 cars. Employees of branded service stations are required to adhere to the technological sequence for replacing the heater radiator provided by the manufacturer. Folk craftsmen made their own changes. The ideal case is to create a cheat sheet and follow it step by step, excluding the possibility of missing important points.
Replacing an old-style stove radiator on a VAZ 2110
Below is a version of this instruction:
- Disconnect the negative terminal of the battery.
- Drain the antifreeze using the drain hole of the engine block or through the expansion tank.
- Unscrew the screws, remove the trim, frill (the lining of the wind window frame is usually called frill).
- Remove the right noise protection.
- Release the clamps and tighten the tubes.
- Disconnect the wires of the electric fan drive, gear motor, and electro-pneumatic valve.
- Unscrew the screws, unfasten the brackets, disconnect the front part of the air intake housing and the heater casing.
- Remove the casing along with the fan and sealing washer.
- Unclip the fasteners and remove the electric motor and fan from the casing.
- Unscrew the fastening screws and detach the rear part of the casing.
- Take out the radiator.
- Reassemble the heating unit using the reverse sequence of steps.
Replacing the radiator of a VAZ 2110 stove, described in ten lines, can take a whole day. An attentive car enthusiast with the correct hand anatomy and patience will be able to perform the replacement.
How to remove the stove
Removing the stove on new VAZ-2110 models
First of all, drain the old antifreeze. To do this, the pressure in the system is released by opening the expansion cap. Next, we find the ignition control unit: the drain plug is hidden behind it; Unscrew it and wait for the liquid to be completely removed from the device.
The radiator is held on by 4 fasteners - a screw under the front glass, two bolts on the side of the intake manifold. There is also a nut next to the cabin air filter - it also needs to be removed. The driver has the opportunity to remove the radiator almost freely. But it will be so easy only for owners of restyled tens (VAZ-21103).
We also recommend reading our expert’s article, which talks about the features of tuning the VAZ-2110.
Removing the stove on old VAZ-2110 models
With the “old ladies” 1996-2001. everything is more complicated. The driver will have to remove the wipers, as well as the washer fluid supply line. Also superfluous will be a decorative trim under the forehead, a heater housing, a cabin air filter, a fan, and flexible heat supply hoses. AvtoVAZ engineers clearly did not want anyone to repair the stove themselves. Only by removing all the described parts will the car owner gain access to the interior heater radiator.
Fast way
The angry “vazovods” turned out to be no slouch and figured out how to remove the stove on a pre-restyling VAZ-2110. You will also have to work hard, but still less than with the standard algorithm.
Let us explain how to remove the stove on a VAZ-2110 in the simplest way:
- After draining the antifreeze and disconnecting all the pipes, we dismantle the expansion tank.
- The frill overlay will also get in the way, so we remove it.
- And now the highlight of the program: remove the brake pedal along with the vacuum booster.
- The repairman has a wonderful view of the radiator, and now nothing will prevent him from removing it after removing the fasteners.
We recommend: What to do if the VAZ-2114 injector cooling fan does not work
Use this “life hack” if you don’t want to spend several hours with repairs.
Radiator VAZ-2110: Tips for selection, repair and operation
Therefore, let’s try to figure out which unit is best to choose for the engine and for the stove so that it lasts long and reliably. Such a high-quality device will help in the operation of the cooling system in particular, and the entire car in general. Most often, repair of this device is required due to its leakage. This is affected by corrosion and, of course, the quality of the materials used in its manufacture.
Auto repair school Articles, tips and tricks on do-it-yourself car repair and maintenance
But, before that, it wouldn’t hurt to carry out one simple check: warm up the engine to operating temperature, check the upper and lower heater pipes with your hand in the engine compartment (they should be the same temperature), turn the “heat-cold” knob all the way to the right, turn it on heater fan. If, in the first 10-20 seconds, the air flow was hot or comfortably warm, and after that its temperature began to noticeably decrease to “room temperature,” then you can safely prepare to work on replacing the stove radiator.
Replacing a new VAZ 2110 heater radiator
Replacing a new model will be a little more difficult than replacing an old one. First, you will need to drain the antifreeze. It may not be completely drained. It is enough to drain the antifreeze from the cylinders. To do this, you need to unscrew the plug and place some kind of plug under the engine. But this can only be done if you do not need to completely replace the antifreeze. If it needs to be replaced completely, then all the liquid will need to be drained. Before you start draining the antifreeze, remove the expansion tank cap.
- To unscrew the tank, you need to loosen the clamps and remove the hoses. After this, the tank can be easily unfastened;
- When you first start working, look at the hood seal. If it interferes with your replacement, you can simply remove it;
- Next you will be able to notice sound and thermal insulation. It needs to be removed. To do this, find the insulation screws and unscrew them with a Phillips screwdriver. It is worth noting that the insulation bolts on the bottom have ten-size heads. There are 2 of these bolts in total. They will also need to be unscrewed;
- After this, you can see the insulation sheet. There will be clamps on it that need to be unscrewed;
- After removing the clamps, it is also necessary to remove the casing;
- There will be a special chip on the tank cap. It connects to the brake fluid level sensor. This chip must also be disconnected;
- When all of the above manipulations are done, you will have access to the vacuum amplifier (VA). You need to remove the hose from it and then move it to the side;
- Next you will need a 17mm socket and a ratchet. Using them, unscrew the brake cylinder. It will need to be moved forward, but without disconnecting the brake line pipes. To do this, all actions must be performed carefully;
- After this you need to go to the salon. In it, disconnect the contact connectors suitable for the brake light;
- You also need to unscrew the nuts on the brake pedal and VU. To do this, you should use a 13mm head;
- After this, work in the salon ends. You need to remove the amp and pedal. It is worth noting that you do not have to completely remove the glass to do this. This manipulation can be done without such dismantling;
- The main advantage of the new radiator is that it consists of 2 parts. Thanks to this, it is much easier to remove. Just unscrew the screws, of which there will be only three. And remove both parts one by one;
- When you have done everything written above, you will be able to see all the hoses that go to the radiator. These are water, outlet and steam hoses. And to dismantle you need to unscrew them all;
- And now we come to the radiator itself. All that remains is to remove it. It is secured with screws in 4 places. The first screw can be found near the edge of the glass. Two more screws are located near the manifold. And the last nut can be found near the filter. We unscrew them and remove the radiator.
Once the radiator is removed, it can be replaced with a new one. But this is not always necessary. Sometimes it is enough to simply repair the removed one and install it back. Installation and assembly are carried out in the same way, only in reverse order.
When assembly is complete, you will need to check the functionality of the tube. If the pipes are not hot, then there is a problem in the form of an air lock. You need to fix it and check the radiator again. The pipes must be hot.
How to remake the stove on a VAZ 2110
The central corrugation from the vacuum cleaner (the inside is smooth, with a diameter of 40 mm, and the other two are ordinary ribbed inside, also 40 mm in diameter) Important: The diameter of the corrugation should not be less than 40 mm, and if the corrugation is long, then it must be smooth inside, otherwise there will be a whistle. In frost below -20, a problem arose: it is impossible to make air flow in all directions simultaneously. And then either your feet freeze or the side windows freeze.
Did you buy a new heater core, but after installing it, you began to notice that the heater doesn’t heat up like before? The fact is that the heat transfer of the old (factory) stove radiator was better, and the new stove radiator (even if it was from a “trusted” company) most likely turned out to be a fake. Do you know how to determine which heater radiator is better right in the store, without installing it in the car?
On the Internet you can find various tests and reviews of radiators that will tell you which manufacturer you should pay attention to when purchasing. But as practice shows, all these tests are in vain, because when buying a stove radiator from a well-known company, you risk in 50% of cases that you will buy a fake, which naturally will not meet your expectations. Therefore, it is important to be able to correctly distinguish the original from the fake, especially when it is cold winter outside.
So, in order to distinguish an original stove radiator from a fake, you should pay attention to its cost. Usually the price of a good, high-quality heater radiator is within 750 rubles. If its cost is much lower, then you should think about it. Remember, the miser pays twice!
Ask the seller for a certificate and packaging (if the stove radiator is without it). Of course, it is impossible for an untrained buyer to distinguish original packaging from counterfeit packaging, but the lack of a certificate or radiator box is another reason to find a stove radiator elsewhere.
Now about how to choose a stove radiator according to the honeycomb. A good heater core should have honeycombs that are very close to each other. In other words, the smaller the distance between cells, the better. Also try to press a little on the honeycombs with your finger; if, after a little effort, the radiator honeycombs begin to sag - this is a bad sign.
About heater radiator fluid swirlers. Coolant turbulators or swirlers are plastic spirals that increase heat transfer from the radiator when the engine is running at low speeds. As Gennady Krivutsky, leading test engineer of the General Development Department of AvtoVAZ JSC, states: the absence of turbulators in the radiator reduces the efficiency of the heater by 27% at idle, by 17% when driving at a speed of 50.60 km/h, by 5% - at engine speed 5000 rpm. Thus, swirlers serve to increase the heat exchange of antifreeze with the radiator. If there are no swirlers, then the antifreeze “flies” through the radiator without having time to transfer heat, and as a result, the heater in the cabin blows cold air.
How to check if there are swirlers in the heater radiator? Just shake the radiator and hear something rattling inside – that means they are there. However, sometimes the “noodles” (as swirlers are called differently) will not rattle due to the peculiarities of its composition, in which case its presence will have to be determined visually. You are unlikely to be allowed to disassemble the radiator in a store, so we try to shine a flashlight inside the radiator; the swirl rings should be clearly visible.
The set of methods described will allow you to distinguish the original “hot” stove radiator from a fake, but you cannot be 100% sure of the quality of the product. There are known cases when the turbulators inside the radiator are spaced at intervals, or they are not the full length. If you come across such an “under-swirled” radiator, or there are no swirlers at all, do not rush to throw it away, because... There is an opportunity to modify the stove radiator with your own hands! To do this, it is enough to cut aluminum or copper strips 1-1.5 mm thick and 5-6 mm wide (select according to the diameter of the tubes), clamp one end into the drill chuck, fix the other and carefully curl it.