Payment for goods and downloading of the book in electronic form (PDF format) is made on the website.
To do this, you need to find the book you are interested in and click on the “Buy” button. The price of the book is indicated on the button.
For convenience, the price on the website for residents of Russia, Belarus and Kazakhstan is presented in rubles.
For residents of Ukraine in hryvnias, and for all other countries - dollars.
After clicking on the “BUY” button, a payment window will open where you can select a payment system with which you can pay for the selected book using any bank card (Visa, MasterCard, MIR, etc.)
When you click on the “Pay by bank card” button, the Portmone payment system will open, which is the easiest way to make a payment.
In addition, the website offers four payment systems for payment:
- Yandex (payment from any bank cards, Yandex Money account, QIWI Wallet, terminals, etc.);
- Portmone (payment from any bank cards, Portmone account);
- PayPal (payment from any bank cards, PayPal account);
- WebMoney (payment from any bank cards, payment from WebMoney wallets).
Payment via Yandex Cashier
After selecting payment via Yandex, the Yandex Cashier payment system will launch, where you need to select a convenient payment method (bank card, QIWI, Yandex Money account, etc.)
After specifying payment details and confirming payment, payment for the goods will occur.
If you have a bank card in a currency other than the ruble, then the money will be debited from the card at the rate of the Central Bank of Russia at the time of the purchase.
This payment method is optimal for residents of Russia, Kazakhstan and Belarus.
Official website of the Yandex Kassa payment system https://kassa.yandex.ru
Payment via Portmone
After selecting payment through Portmone, the payment system will launch, where you need to select the payment method: bank card or Portmone account.
The price in the Portmone payment system is converted into dollars at the exchange rate of the Central Bank of the country where you are located.
If you have a bank card in a currency other than the dollar, then the money will be debited from the card at the rate of the Central Bank of your country at the time of the purchase.
After specifying payment details and confirming payment, payment for the goods will occur.
Official website of the Portmone payment system https://www.portmone.com
Payment via PayPal
After selecting payment via PayPal, the PayPal payment system will launch, where you need to select the payment method: bank card or PayPal account.
If you already have a PayPal account, then you need to log into it and make a payment.
If you do not have a PayPal account and you want to pay using a bank card via PayPal, you need to click on the “Create an Account” button - shown with an arrow in the picture.
PayPal will then prompt you to select your country and provide your credit card information.
After specifying the information required to make the payment, you must click on the “Pay Now” button.
Official website of the PayPal payment system https://www.paypal.com
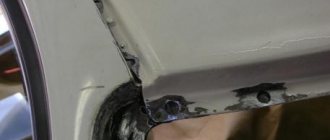
How to remove a headlight
The basic steps that are performed when replacing a headlight on any VAZ 2108-2115 car are the same. The first is to disconnect the battery. If you remove the headlights while the battery is connected, there is a high probability of a short circuit, damage to the on-board electrical network, or a car fire. After removing the battery, disconnect the wire connectors from the headlight connectors. Two wire blocks are connected to each headlamp. After this, remove the hydraulic corrector.
- To do this, unclip its latches, turn it counterclockwise and pull it out of the headlight housing.
- To remove the headlight unit for VAZ 2108-21099 cars, unscrew the 4 fastening nuts at the edges of the headlight. They are located on the engine compartment side, so to unscrew you will need a socket of the appropriate size (10 mm) and a ratchet.
- After unscrewing the nuts, remove the headlight from the body.
- To remove the headlight from VAZ 2110-2115 cars, remove the radiator grille by unscrewing 4 bolts, then remove the “eyelash” located below the headlight. It is secured with two latches (2110-2112) and one screw (2113-2115).
- After unscrewing the screw, pull the eyelash towards you. One of the headlight mounting bolts is located under the eyelash. Another 4 bolts are located at the top and bottom of the headlight. After unscrewing all the bolts, remove the headlight from the body.
Payment via WebMoney
After selecting payment via WebMoney, the payment system will launch, where you need to select the payment method: bank card or WebMoney wallet.
If you already have a WebMoney wallet, then you need to log into it and make a payment.
If you do not have a WebMoney wallet and you want to pay in another way, you need to select any of the methods that WebMoney offers and make the payment
After specifying payment details and confirming payment, payment for the goods will occur.
Official website of the WebMoney payment system https://www.webmoney.ru/
Downloading a book
After successfully completing the payment (by any method) and returning to the KrutilVertel store from the payment system website, you will be taken to the successful payment page:
On this page you need to indicate your e-mail, where access to download the book will be sent.
If you are already registered on our website, then simply follow the link to your personal account.
The book you purchased will be in your personal account, from where you can always download it.
Please note that after making the payment, you need to return back from the payment system website to the KrutilVertel website.
If for some reason you did not return back to the site and closed the payment system tab with a message about the successful completion of the payment, please let us know - we will send you a letter indicating access to download the book.
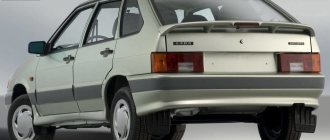
how to remove headlight glass on vaz 2115
how to remove the headlight glass on a VAZ 2115
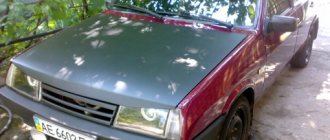
So let's start with the fact that little thing 4 arrived (who doesn't know, read the logbook more carefully! :-)) I decided that I would send our official service to the forest with my crooked and, most importantly, inaccurate specialists! You also have to pay them money for it Oh, yes, I forgot to tell you what kind of thing 4 These are the well-known CHINESE (more on this later in the text) ProSport monoblock headlights with angel eyes. You can scold, curse and say why are they needed, they shine like shit and so on, but they are too beautiful. The most beautiful, I would say! In general, a report on the installation of VAZ 2114 headlights (replacement). Lyrics: how I swore, how I swore at myself that I took these Chinese beautiful toys. From what is most bad about them (a flint in the ointment): 1) The rings are not reliable, or rather the wiring in the headlights. All wiring.
And the ignition blocks for these neon rings. 2) All wiring is very flimsy and not reliable. Repeating myself! 3) Flimsy plastic and thin bendable metal.
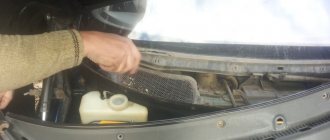
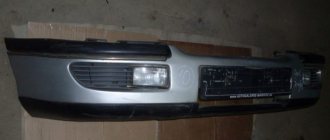
4) There is no space for the lamp in the lenses. The lamp can jump out of here and the light is crappy, as many write. Right off the bat (in terms of appearance), they shine, by the way, no worse than their relatives, but only on the condition that everything is set up and the lamps are positioned correctly in the lens! I don’t know why everyone here was scolding their light so much?! So, a guide for those who have to change their original headlights to tuning ones: For simplicity and convenience, I removed the plastic trim above the radiator. Climbing underneath the front bumper, we look for a screw under the cross that holds the lower eyelash of the headlight, it is located right under the turn signal, almost. This screw holds the eyelash together with the headlight, because
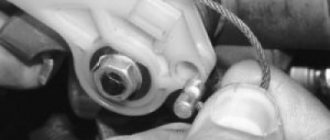
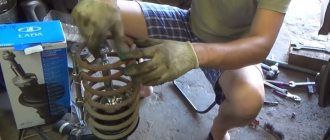
The eyelash is attached to the headlight with two clips. So we unscrew these bolts. DO NOT REMOVE THE TURNER SEPARATELY! In addition to the spring on the back of the headlight, it is also fixed with a latch from the bottom of the headlight. Here it is (the latch) in the photo. Next, unscrew the bolt from the side of the radiator, which fastens the headlight and the middle frame above the bumper (the one that smoothly goes on the sides into the lower eyelashes).
Don’t forget to disconnect all 2 plugs (to the headlight and to the turn signal) and the hydraulic corrector. The hydraulic corrector is easy to remove; just clamp the curved clip and turn the corrector plug down and remove it from the socket. Now, using a 10mm head, unscrew the 4 bolts at the back of the headlight.
Then you will see that the headlight has only 3 bolts, and the 4th (if you look at the right headlight, then at the top right; and if at the left, then at the top left.) holds that same middle frame above the bumper. We repeat the operations with another headlight. P.
S. With the right headlight it’s more difficult to get there because of the air intake, we just pull it deep into the hood, it’s just snapped there! In order not to scratch the paint anywhere and everything was neat, the two of us take out a little of the headlight from its seat, remove the fasteners of the middle frame from the joint with the headlight, and remove the middle frame. (I did one and in some places under the headlight I scratched the varnish on the bumper:() Now we pull out the headlights along with the lower eyelashes. STOP! REMOVED!))) Now you can carefully remove the eyelashes from the headlights, helping the clips. I tried to remove the clip from the right headlight first , and then the headlight (because, for some reason, the turn signal just came off so clumsily, breaking the latch with the headlight, the car shop service specialists installed white turn signals).
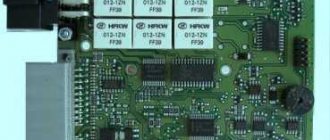
In short, I broke a clip near one eyelash (((If there was such a manual, I would have done everything more carefully.) only, for some reason, the turn signals were not made just for the turn signal plug, but for inserting the emitting turn signal bulb into the socket from the original turn signal I didn’t understand anything The kit also comes with an ignition unit for neon rings, at the end of which there are simply stripped wires, I immediately paralleled them with the dimensions, a la LEDs. And having carefully soldered everything, I thoroughly insulated it! It’s scary that everything is flimsy and this is current) On the main plug mother for the standard connector; a separate relay for the low/high beam (by the way, on these headlights, my dream is that the high beam lights up along with the low beam, apparently that’s what the relay is for); two plugs for the low beam and high beam, which are plugged into the lamps on the headlights (H7); a flat connector for connecting a size a la LEDs (I parallelized the angel eyes there); connection to + to the battery with a fuse (for relay operation). In general, then I put everything in place, connected everything, and carefully wrapped it with electrical tape. Attention! The third bolt (shared with the holders of the middle frame above the bumper), when tightened, can turn the aluminum holder of the new headlight, this is the kind of iron from CHINA.
Be careful. ) Don't forget to check everything before assembly! Don't forget to connect everything! Don't forget to check whether the low beam and high beam bulbs fit well in the grooves! Why did I take these headlights? Yes, this will do for now (for the summer), and then I just want to use them as a good idea for location and a beautiful case for inserting hella modules and real LEDs there! What do you think? P.S. As always, the work process was photographed on the phone. Don’t hit me))))) Article from: https://www.drive2.ru.
Did you like the article? Share with friends:
Problems when paying with bank cards
Sometimes difficulties may arise when paying with Visa/MasterCard bank cards. The most common of them:
- There is a restriction on the card for paying for online purchases
- A plastic card is not intended for making payments online.
- The plastic card is not activated for making payments online.
- There are not enough funds on the plastic card.
In order to solve these problems, you need to call or write to the technical support of the bank where you are served. Bank specialists will help you resolve them and make payments.
That's basically it. The entire process of paying for a book in PDF format on car repair on our website takes 1-2 minutes.
If you still have any questions, you can ask them using the feedback form, or write us an email at [email protected]
Installation and configuration of VAZ headlights
Installation is carried out in the reverse order of removal. To adjust the headlights after replacement, you need a vertical wall and a flat area in front of it. The size of the site should be sufficient to park the car at a distance of 5 meters from the wall. Before starting the setup, fill a full tank of gasoline and place an assistant in the driver’s seat, whose weight is approximately equal to yours, and set the hydraulic corrector to the driver and passenger position. This will allow you to more accurately adjust the headlights. Cover the left headlight with a piece of cardboard or a black flat rag. Turn on the low beam.
The upper border of the left side of the light spot should be equal in height to the distance from the ground to the middle of the headlight. The right border of the spot should be 6-7 cm higher. The lower part of the light spot should be located opposite the center of the headlight. If the light spot is shifted vertically, then move it using the vertical adjustment screw (it is located on the side of the radiator grille in the upper part of the headlamp). If the spot is shifted horizontally, level it using the horizontal adjustment screw (located at the bottom of the headlight on the wheel side). After you have adjusted the headlight unit, check the operation of the hydraulic corrector. To do this, switch it to different modes and check whether the height of the light spot changes.