You will need
- - Phillips screwdriver;
- — head at “10”;
- — key “Torx T-30”;
- — a capacity of at least 3.5 liters;
- — a spanner or socket set to “17”;
- - knife;
- — head at “13”;
- — head at “15”;
- — key to “17”;
- — head at “30”;
- - two jacks;
- - mounting blade;
- — spanner set to “13”;
- - slotted screwdriver;
- — head at “19”;
- — adjustable stop;
- — extensions for heads;
- — guide pin M12x1.25, 80 mm long (with a sawn slot for a screwdriver).
Instructions
Disconnect the wire terminal from the negative terminal of the battery. Then you need to remove the power unit mudguard (otherwise called “engine protection”), if you have one installed.
On each side of the engine protection, use a Phillips screwdriver to unscrew 2 screws securing the mudguards of the engine compartment to the mudguard. Then, using a “10” head, unscrew the 2 bolts of the rear protection fastening (one on each side). Now, holding the engine protection, unscrew the 5 front mounting nuts with a “10” head. Remove protection.
Remove the right mudguard from the engine compartment. To do this, use a Phillips screwdriver to unscrew the screw securing the shield to the fender liner. Using a Torx T-30 wrench, unscrew the 2 screws securing the shield to the body. Remove the mudguard.
Drain the oil from the gearbox. It is better to do this operation on a warm gearbox. Place a container with a volume of at least 3.5 liters under the drain hole and use a spanner wrench or a socket to “17” to unscrew the drain plug. After draining the oil, screw the plug back on.
Proceed to removing the air filter. Remove the wires leading from the engine management system to the mass air flow sensor. Then loosen the fastening clamp and remove the air supply hose to the throttle assembly from the mass air flow sensor branch pipe. Then disconnect the air intake hose from the fitting at the bottom of the air filter housing. If you have new rubber air filter supports, take a knife and cut off the old supports holding the filter in place. If there are no new supports, then carefully remove the supports from the mounting points (3 pieces).
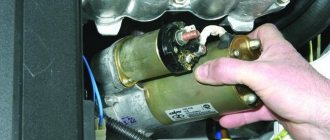
The next step is to remove the starter. Using a socket “13”, unscrew the nut securing the tip of the starter wire connected to the “positive” terminal of the battery and remove the tip of the wire from the contact bolt. Then, by hand, disconnect the control wire for the traction relay (or solenoid relay) and using the “15” socket, unscrew the two nuts securing the starter. Remove the starter.
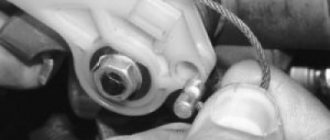
Disconnect the clutch release cable from the clutch release fork and the bracket on the gearbox. In the engine compartment, pull the clutch cable forward and remove the lead with the cable from the groove of the clutch release fork lever. Then, using a “17” wrench, unscrew the nut securing the front end of the cable sheath to the bracket on the gearbox several turns, holding the sheath by the hexagon with another wrench of the same size. Now remove the cable end from the bracket on the gearbox.
Locate the reverse light switch wiring harness on the transmission and disconnect the wires from it. Then disconnect the engine control wires from the speed sensor.
Using a “10” socket, unscrew the three bolts securing the lower cover of the clutch housing and remove it.
Proceed to removing the front wheel drives. Unscrew the front wheel bearing nut from the two front wheels using a 30mm socket. Raise the front of the car using two jacks and remove the front wheels using a standard wheel wrench or a 17mm socket.
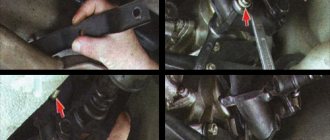
Using a 17mm spanner, unscrew the 2 bolts securing the steering knuckle. Move the steering knuckle with the stand to the side and remove the shank of the outer CV joint housing. Position the drive on the brace and use a pry bar to push the drive inner joint housing out of the transmission and remove it. Perform similar operations with the second drive.
Loosen the nut of the coupling bolt of the clamp securing the control rod to the shank of the gear selector rod hinge using a 13mm spanner. Use a slotted screwdriver to open the clamp and slide it along the rod. Now remove the control rod from the shift rod joint shank.
Using a socket at “17” and a socket at “19”, unscrew the two bolts securing the torque rod bracket and remove the bracket with the rod from the gearbox.
Install an adjustable stop under the engine oil pan. Take a 15" socket with an extension and loosen the nut of the upper tie rod of the support cushion. At the bottom of the car, using a “17” socket with an extension, unscrew the nut securing the left engine mount to the gearbox bracket and remove the washer. Now, using a “13” socket with an extension, unscrew the 2 bolts securing the support to the body and remove it.
Now, using the “13” socket, unscrew the nut securing the wiring harness bracket and remove the wiring harness bracket from the gearbox.
Take the head at “19” and unscrew the 4 bolts securing the clutch housing to the cylinder block. Move the gearbox away from the engine, removing the gearbox input shaft from the clutch driven disc hub, and remove the gearbox. Installing the gearbox is done in reverse order.
The gearbox (Gearbox) is one of the most important components of a car. The driving characteristics of the car depend on it. Owners of domestic cars (classics) have it a little easier than other car enthusiasts; they can repair and maintain the transmission of their cars themselves. And for those who do not have experience in such work, we have prepared a special article that will help them in this “difficult matter.”
The procedure for removing the gearbox
So, having installed the car on a pit or overpass, let's get started. The first thing we do is remove the driveshaft.
Secondly, we remove some elements of the exhaust system (muffler, “pants”, etc.).
You can, of course, only disconnect the “pants” from the resonator, but if the work is carried out without assistants, it will not be particularly convenient.
The next step is to remove the gearbox working cylinder (it is also convenient to remove it from the pit).
The cylinder can be easily unscrewed with a 13mm spanner; two bolts need to be unscrewed. The gap adjustment is not affected. The next step is the process of unscrewing the bolt securing the ground wire.
Having unscrewed the clutch slave cylinder and the ground wire, we move them to the side so that they do not interfere with us. There is no need to remove them completely, just secure them to the side. Then we remove the “chips” of the reversing light switch terminals.
All that remains is to disconnect the speedometer cable, which is attached to the gearbox.
Don’t forget about the clutch housing shield; it is fastened with four bolts (some have only two left).
After this, the lever itself is “pulled off” from the wings. To do this, pry off the nylon ring with some sharp object.
After removing the lever, rubber seals and nylon clamps will remain on the rocker; it is better to replace them with new ones, having previously purchased a repair kit for the rocker.
After completing the “upper” preparatory work, we go down into the pit again, we have to carry out the main part of the work - free the box from the main fastenings - these are four bolts that secure the gearbox bell to the engine (the first attachment point).
The lower bolts unscrew easily; we tear them off with a spanner. But the upper bolts are more “problematic”. To unscrew them, it is better to use a wrench with a head, or you will suffer with a regular cap, but it needs to be wound from the top.
Important! Before removing the gearbox, set the linkage to 5th gear. If the gearbox is 4-speed, then to the 3rd. Otherwise, it will be inconvenient to remove the gearbox.
Now we free the gearbox from the second mounting point, this is its rear support, the so-called “swallow”.
They are held on by 13mm nuts, which we pre-lubricate with WD-40, as they often turn sour and can be torn off.
After carrying out all these procedures, we carefully examine the “bell” of the box. We need this to make sure that we have disconnected all the wires and unscrewed the bolts and drives.
Advice! If there is engine protection, then it is advisable to lay a wooden block between it and the oil pan. This will help keep the motor in its original position, making it easier to attach the box to the motor in the future.
Now we proceed directly to removing the box. Having firmly grasped the gearbox housing with your hands and slightly lowered its rear part to remove the rocker, we move the box back, removing it from the splines.
Carrying out work to dismantle the gearbox may be necessary both to carry out repair work on drive gears and for. There is nothing complicated in performing such procedures, but they should be performed on a lift or in a pit, and best of all in the company of an assistant.
Lada 2109 › Logbook › Gearbox assembly + Clutch installation + gearbox installation
Good day! I decided to finish my renovation epic that I carried out in October. So, the last stage with the checkpoint. On October 26, I moved on to assembling the gearbox, namely, I began to assemble the secondary shaft, in the reverse order as I disassembled it, there were no problems, everything was quite simple. The only thing I put in 2nd gear was the clip from 5th gear, because... she was in better condition.
I went and received ordered new synchronizer clutch springs and 2 new shaft nuts and a thread locker, which fixed almost all the connections inside the gearbox.
I replaced the rod seal and the input shaft seal, coating the rod seal with sealant on the side. After that, I inserted the rod itself and installed the gear selection mechanism. I put the purchased case (glass).
I replaced the speedometer drive housing with a new one, the old one was leaking and was rather poorly secured and cracked.
I started to fasten it, but I realized that something was wrong and the gears were not engaged, I had to disassemble it, it turned out that I had not inserted the rod correctly, namely the part that selects the gears.
Well, okay, I assembled a new crankcase, secured the retaining rings on the bearings, secured the bar with 4 new screws, installed the fifth gear gears on the secondary and input shafts, but then a problem arose - the 5th gear synchronizer clutch engaged terribly, and the ball I got lost when assembling the coupling, and as a result, the next day, October 28, I had to buy a new one, the price was 850 rubles. At the same time, a new screw for securing the 5th gear fork was purchased, because... the old one has stretched out.
After installing the clutch, my friend and I secured the nuts on the shafts and coated the fifth gear cover with sealant and secured it with studs. This completes the assembly of the gearbox. Then a friend had to leave on urgent business, so the installation of the gearbox was delayed a little, so I went to install the remaining parts. Namely: Installing the clutch, the clutch mandrel helped here, a very convenient thing. There is also nothing complicated in installing the clutch - install the mandrel, install the disc
and secured the basket with 6 bolts
and pulled out the mandrel. After that I installed a new clutch cable.
I installed the locker under the right fender and sorted the nuts, bolts and fasteners for installing the gearbox, cushions and other parts.
After a friend arrived, we began installing the gearbox, installation of the gearbox was quite quick, around 10-15 minutes. And then the game of installing the pillows began. After installing the airbags, we removed the safety cables and jacks, installed the starter, secured the clutch cable, secured the lever, installed the drives in the gearbox, but it seemed to us that we had not completely hammered the internal CV joints, which disappointed us a little and we decided to install external CV joints by securing them in hubs.
But since there was already a lot of time (around 5 am), and I had to study tomorrow, it was decided to postpone the repair until the next day. The next day, in the evening, I hammered in the inner CV joints again, it turned out that we hammered them normally last time, and I continued further: I installed the protection, secured the wheels, lowered the front part of the car from the raised stops and put the car on the wheels. Then I tightened the wheel bolts and wheel nuts. I adjusted the clutch pedal, poured new oil into the gearbox, installed the battery, secured the minus to the gearbox, and connected the wires to the starter, secured the gearbox lever in the desired position.
Preparatory work
Handbrake + shoes for rear wheels = safety first
Before you begin dismantling the gearbox, ensure that the car is level and stable, and make sure that wheel chocks are installed under the rear wheels. lift as high as possible.
Removing the gearbox on a VAZ-2112: step-by-step procedure
- First of all, open the hood and turn off the power from the battery.
- Next, we unhook the clutch cable from the fork, removing it from the place of fixation on the gearbox itself.
Removing the clutch cablePull the cable out of the bracket
- Disconnect the connector from the speed sensor.
Speed sensor on the seat. - The next step is to drain the transmission oil from the crankcase; to do this, unscrew the drain plug and prepare a pre-prepared container with the total volume at least 5 liters
. Remember which one.The old oil is drained from the gearbox.
You will need a container of at least 5 liters
- Then we unscrew the bolt that secures it, and then two more bolts that serve to secure the gearbox itself to the car engine.
- We disconnect the connector located at the bottom of the gearbox, which serves to transmit information to the reverse sensor.
- We unscrew the two bolts that secure the jet thrust.
We remove the broken bolts to the side. - Next, we loosen the tightening torque of the clamp securing the fastening of the gear lever rod, then it must be moved back, relative to the gear selection hinge rod.
We remove the weakened lever according to the diagram. - Next is necessary (constant velocity joint - approx.).
At the same time, please note that a plug must be inserted in place of the left CV joint to prevent the drive from turning, and the right joint does not need to be removed completely, just move it to the side and simply hang it on a rope. Almost done. The CV joint is already on the drive. - In order to make further work on dismantling the gearbox easier, it is necessary.
Unscrew the fasteners and remove the ball joint from the fist - Next, unscrew the nut that secures the lower right side of the gearbox. Please note that on injection models, a special bracket is mounted under this nut, which must also be removed from its mounting location.
- If necessary, the nut (indicated by the red arrow - approx.) can be loosened.
- We unscrew the 3 nuts that hold the clutch cover to the gearbox housing.
Bolts are indicated by arrows. Under the number “1” is the crankcase, “2” is the gearbox housing. - Then remove the bolt securing the gearbox to the engine on the left side. At this stage, make sure that stops, a jack, or other supporting device are installed under the gearbox.
- We raise the engine a little; in this case, it is very convenient to use a second jack when working on the inspection hole.
- Next, unscrew the nut securing the engine mount on the left side. At the same time, inspect its condition and if replacement is required, read this article carefully.
- Next, we unscrew the two nuts of the “cushion” from the rear side, while first dismantling its front part, after which we move on to its rear support.
Removing the rear cushion - How to easily remove all engine mounts.
- When dismantling this support, unscrewing the nut and bolt, you should fix them with two keys in order to avoid turning.
- When all the bolts are unscrewed and the gearbox is firmly fixed to its fixing device or jack, insert a screwdriver with a thick tip directly between the clutch housing and the cylinder block.
- Move the box until it comes off the guide bushings, and be sure to use an assistant to hold it from accidentally tipping over.
Carry out the dismantling process until the input shaft comes out of the clutch. When there is nothing holding the box, we put it aside.
Now that this work is completed, you can continue with the next step depending on your goals.
Stages of work
It is impossible to remove the box without a hole or overpass. After the car is in the pit, disconnect the battery and apply the parking brake. Now you can start working, and it goes through the following stages:
- The lever needs to be pulled out.
- Remove the cover with the seal.
- Afterwards the cover and mat are removed.
- We remove the hose through which warm air enters, and then the exhaust pipe of the exhaust system.
- Move the starter forward.
- Drain all the oil into a previously prepared container.
- Disconnect the cardan coupling and muffler.
- Remove the clutch cylinder.
- We remove the cardan transmission, first getting rid of the fuses.
- Unscrew all the remaining bolts and remove the gearbox.
At this stage, we have completely removed the box, and now we can carry out repair procedures on it or completely replace it with a new one.
The process itself cannot be called simple, and a novice car enthusiast will definitely not be able to cope with it without a detailed training video. Therefore, turn to the Internet for help before you start any work. Watch videos from professionals who clearly show each stage of the work.
Video about removing and replacing the gearbox on a VAZ-2112
If while driving you notice an unusually high level of noise from the automatic transmission, shifting gears is difficult or spontaneous or unclear gear shifting is observed, if you notice oil leaks through the gaskets and seals, then your gearbox may refuse to work at any time. Don't wait for this. Fixing minor problems in a timely manner will help avoid major breakdowns and costly replacement of the unit.
Are we heading to the service center? If the car is new and the warranty period has not expired, then it is obvious that repairs are the responsibility of the car service center. Otherwise, you can try to make the repair yourself. Removing and installing the gearbox
, if you thoroughly understand the issue, it is not such a difficult undertaking.
How to remove a VAZ-2107 gearbox yourself
Before you begin dismantling the gearbox, you should prepare the tools and materials that may be required during the work, and also decide on the location for disassembly.
You can remove it (it’s even easier for one person - no one gets in the way), put a board across the hole, and drag the box onto this board. But it’s probably very difficult to stick one in, the problem is not even the weight of the gearbox, but putting the gearbox on the shaft so that the box “sits”
[x]
https://www.lada-forum.ru/index.php?showtopic=49447
What tools will you need?
To remove and replace the VAZ-2107 gearbox you will need:
- a set of open-end and ring wrenches, among which there must be keys for 10, 13, 19;
- a set of sockets of the same size as the keys, as well as cardan joints with an extension;
- pliers, screwdrivers, tweezers;
- funnel and container for oil;
- jack and wooden beams;
- rags.
Preparatory work
Work on removing the VAZ-2107 gearbox is carried out, as a rule, in an inspection hole, on an overpass or using a lift . The sequence of actions may be as follows:
- the car is raised with a jack on both sides, wooden beams are placed so that the rear part remains suspended;
After this you need:
- disconnect the oxygen sensor;
Removing the gearbox control lever and other work in the interior
Inside the car, you need to disassemble the gearbox control lever. To do this, lift the handle cover and secure the locking sleeve at the very bottom of the lever with a screwdriver. Then you need to remove the bushing from the lever, and remove the lever itself from the mechanism. Using tweezers, remove the rubber lever damper from the pulled out rod. Next you need:
- remove the three remaining bushings on the so-called rocker;
Removing the gearbox
Then you need to go under the car again, drain the used oil from the box into a previously prepared container, and then do the following:
- Unscrew the bolts that secure the clutch housing protective cover;
The gearbox weighs more than 50 kilograms, this should be taken into account when removing fasteners to avoid injury.
All classics have 4 bolt fasteners. Check, if the car is new and the gearbox has not yet been removed, then the upper bolts can be covered with factory shipping washers! The bolts are not visible in the murzilka, but look from the side of the spark plugs just above the bottom bolt, it is very clearly visible, the other one is above the starter.
byran
https://www.semerkainfo.ru/forum/viewtopic.php?f=12&t=1512&start=60&view=print
Features of automatic transmission dismantling and installation | General Tips
We carry out all work in places equipped with a lift or inspection pit. To avoid damage to the unit, you must use a transmission jack or other similar tool.
Removing the gearbox
Disconnect all pipes, rods, connectors, lines from the unit. Draining the oil is not necessary, but is recommended to make your job easier. Install automatic transmission
it will be easier to go back. When disconnecting the pipes, if the transmission fluid has not been drained, you need to install plugs;
Unscrew the bolts securing the hydrodynamic transformer (HDT) to remove it complete with the box. This operation can be quite painstaking, since the mounting schemes differ for different car brands. But the operation must be performed. Removing the automatic transmission body without a gas turbine engine can lead to damage to the splines of the input shaft and you will have to puzzle over how to install the gearbox
back;
Check again whether the unit is freed from all connections, connections, connections. And only after that you can remove the automatic transmission. During the process, you need to hold the gas turbine engine so that it does not jump off the shaft spline.
Removal and installation of automatic transmission Video
Gearbox installation
So, the box has been serviced, the problems have been fixed, everything has been cleaned and washed. Installing an automatic transmission
carried out in reverse order, following the sequence.
Lubricate the centering sleeve and check that all rings are in their proper places. Both on the box and on the engine block. Make sure that the gas turbine engine is assembled with the automatic transmission.
Check that there are two pins on the crankcase mounting flange. Gearbox Installation
in their absence is prohibited!
Thoroughly clean, rinse all internal cavities of the unit, make sure that no foreign objects or particles remain after repairs.
Center the clutch disc.
the gearbox installation is slowly taking place.
. We tighten all the fastening bolts, pipes, lines, attach the rods and connectors. It is important here not to confuse one with the other, to follow the markings. Don't forget about the torque converter.
Preparation for repair
Having decided to repair an automatic transmission yourself, the main thing is to approach the repair process competently. An important role in this is played by the knowledge that is required not only for removing, reassembling, and installing the box, but also for preparing for these operations. By the way, basic preparatory measures for automatic transmission repair include:
- Obtaining basic knowledge that everyone who reads the presented article to the end will have;
- Having a desire and some tools.
So, first, let's pay attention to the equipment necessary for repair. The minimum toolkit, namely what you simply cannot do without, includes:
- an expanded set of wrenches, hexagons, pullers, screwdrivers, a hammer, rags, oil drain containers and similar tools (required for removing, installing, and disassembling the automatic transmission);
- a wide area for repair work, an inspection pit, a trestle or lift and a special device for removing a heavy gearbox, for example: a trestle with a special puller, a similar lift, a transmission jack or a homemade puller made from a frame and a winch (without this, installation and removal of the automatic transmission will not be possible );
- parts necessary for replacement (we recommend purchasing them only after the automatic transmission has been disassembled and faulty mechanisms have been identified).
It would be a good idea to find a repair manual for the gearbox being repaired on the World Wide Web or in technical literature. This approach will not only simplify the repair process, but will also speed up its progress significantly. If you have never encountered an automatic transmission before, then it is not at all recommended to disassemble the mechanism without special manuals.
The box is in its original place. What's next?
We found out how to install a gearbox
, now for the finishing touches.
- We carry out adjustment work in accordance with the operating instructions.
- Fill the oil to the required level, start the engine, turn it off, add oil. We make the first drive for a few kilometers, let the car cool down and again check the transmission fluid level. Top up if necessary. Thus, we fill all the cavities and voids of the hydraulics.
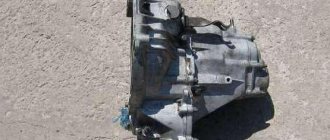
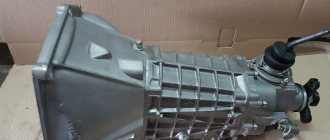
The VAZ 2114 and other models of the LADA SAMARA family range are equipped with a five-speed gearbox combined with a differential and final drive. In principle, the box from the VAZ 2114 is no different from the VAZ 2108. The only thing is that the VAZ 2108 does not have a dipstick, and acceleration on it will be faster.
You will need to remove it to replace the clutch, clutch bearings, and repair the gearbox.
How to put the gearbox in place
Install the gearbox in the reverse order.
Clutch disc alignment
If the clutch was removed during the dismantling of the box, then before installing the gearbox in its place, the clutch disc will need to be aligned. It is known that on the “seven” (as well as on the rest of the “classics”) the input shaft of the gearbox protrudes beyond the gearbox and is driven by the driven clutch disc using splines. Even further down, the input shaft is located in the crankshaft bearing. The point of centering is that the feredo should hit the center of the crankshaft bearing. If this does not happen, installing the input shaft of the box will be impossible: even if you hit the splines, the shaft will not fit into the bearing.
To center the disk, you will need any metal rod (optimally a piece of the old gearbox input shaft). The feredo is placed inside the basket, after which the basket is suspended from the engine housing. The rod is inserted into the hole and seated in the bearing. In this position, the basket is firmly fixed to the body.
How to remove the gearbox?
To remove the gearbox we will need:
- set of keys;
- screwdrivers;
- assistant;
- wd-40;
- board or other hanging equipment.
First of all, remove the terminals from the battery and take it out. Drain the oil from the gearbox () and remove the starter (). As you work, if you can’t unscrew any fastening or bolt, then don’t forget to use wd-40.
- We place the car on the overpass (pit) and remove the crankcase protection by unscrewing 3 fasteners.
- Next we need to remove the clutch cable from the clutch release fork. Then we pull it out of the bracket on the box.
- Next you need to remove the wire block from the speed sensor (). The block is secured by a spring, so to remove it, compress the spring.
- We unscrew bolt 1 securing the bracket to our gearbox. And bolt numbers 2 and 3 shown in the picture.
- We climb under the car and find the wiring block for the reverse sensor. Let's disconnect it.
- Then unscrew the 2 bolts securing the torque arm to the box.
- Loosen the gearbox shift rod clamp. We remove the rod from the gear selection rod hinge by moving it back.
- We remove the wheel drives. Tie the plug inserted in place of one of the drives with a rope or wire so that it does not fall out when removing the box. The right drive does not need to be completely removed. We disconnect it from the box and hang it in the body, first moving it to the side.
- So that the box can be removed without additional difficulties, unscrew the two bolts of the left ball joint from the steering knuckle.
- Unscrew the lower right mount of the gearbox to the engine (number 1 in the figure). The support bracket (numbered 2 in the figure) needs a stud.
- If necessary, just loosen the bracket fastening.
- We unscrew the 3 fastening bolts, remove the cover (number 1) of the clutch housing (number 2).
- Unscrew the bolt of the lower left gearbox mounting.
- We hang the engine using a board or other device.
- Unscrew the nut securing the left power unit support (from the bottom of the car).
- Unscrew the 2 nuts securing the rear support of the power unit to the body.
- Unscrew the 2 bolts securing the rear support of the power unit to the gearbox, holding the nuts from turning with a second wrench, and remove the support.
- By inserting a screwdriver between the clutch housing and the cylinder block, slide the gearbox off the guide bushings. Be sure to hold it while doing this.
- Move the gearbox as far back as possible, passing the rear cover of the box over the front suspension brace (the input shaft should disengage from the clutch). If the input shaft cannot be disengaged from the clutch, push the engine to the side. Lower the front end of the box and remove it from under the car.
For the purpose of complete understanding for the reader, the slides refer to points 3-19 in order except point 14, where you need to hang the engine.
How the gearbox works on a VAZ 2107
The five-speed gearbox (gearbox) is one of the main units of the VAZ 2107 car. Its design and assembly diagram are distinguished by a high level of complexity, which is why maintenance and repairs are usually trusted to professionals. However, for the general development and understanding of the physics of the processes occurring in your car, it does not hurt to study the structure of the box.
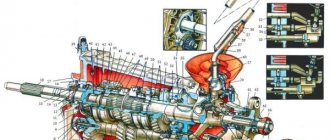
Let's start with the purpose of the gearbox: the five-speed gearbox of the VAZ 2107, according to its functional purpose, is designed to perform the function of converting the amount of torque received from the engine, with its subsequent transmission to the transmission. The gearbox used in the VAZ 2107 has only six speeds - five forward and one rear. The gear shift pattern is similar to the standard four-speed, to which a fifth speed has been added - to the left all the way and forward. Switching between them is carried out by moving the gearshift knob. The layout of the main structural elements is as follows:
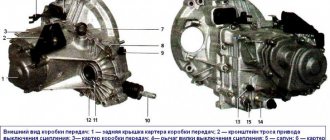
The VAZ 2107 box consists of body 3, closed on three sides with special covers. A shift knob 5 is installed in the upper part.
The main components and mechanisms of the gearbox are mounted in housing 3. Below is a diagram of the location of gearbox parts.
These include:
- Primary shaft 4 with drive gears and synchronizers installed on it;
- Secondary shaft 10 with gears;
- Intermediate shaft 1, assembled.
Since the diagram of this mechanism is quite complex, we will dwell on it in more detail.