Replacing tie rod ends
If knocking occurs in the front suspension of a Priora, you should pay attention to the following parts and components:
- racks
- strut supports and bearings
- ball joints
- steering rack
- steering tips
And in this article we will look at repairs related to tie rod ends. If the knocking noise appears specifically from the tips, and the play when turning already exceeds the permissible limit, it is necessary to replace the tips. for new ones. To perform this repair, you will need the following tools and accessories:
- Ball Joint or Steering End Puller
- Crowbar and hammer (if puller is not available)
- Pliers
- 19 mm wrench
- 13 mm wrench
- Torque wrench
- Penetrating lubricant
How to determine that the steering tips have exhausted their service life and need to be replaced?
It is worth noting that this element is a weak point in the steering system of any car. The part is part of the steering rod structure. But the rod itself rarely fails, but its tip should be changed after 35-45 thousand kilometers. This figure is approximate and depends on the nature of the vehicle’s operation, the condition of the road surface and the quality of manufacture of the part itself.
Diagnosing a car's steering system is not difficult, since most faults appear at the initial stage, informing the driver about the presence of a control problem. Common symptoms indicating steering problems include:
- Uneven tire tread wear, with tires wearing out much faster.
- The appearance of third-party noise in the front of the vehicle. It is worth noting that this symptom is common to most car chassis breakdowns. However, it is a direct prerequisite for diagnosing the suspension and steering system of a car.
- Vibration and beating of the steering wheel, which are especially noticeable when performing various maneuvers.
- Problems with driving the car (pulling to the side, violating the trajectory of movement, difficulty turning the steering wheel and its delayed response to the force applied by the driver).
Replacing tie rod ends on a Priora with your own hands
1. First of all, remove the wheel bolts and lift the front of the car with a jack.
2. Apply penetrating lubricant to all threaded connections:
3. Now, using pliers, we align and pull out the cotter pin from the tip pin, as is clearly shown in the photo below.
4. Now loosen the coupling bolt that presses the tip to the rod:
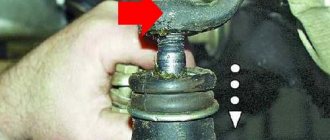
5. Then, using a puller or a pry bar with a hammer, you need to press the tip out of the hole in the rack.
The result of this action is shown clearly below.
6. Next, you need to unscrew the steering tip, twisting it from the rod. To do this, you may need an additional lever, for example, a small piece of pipe or a deep socket. It is worth noting that the left tip unscrews clockwise, and the right one counterclockwise. The photo below shows everything using the left side as an example:
The result can be seen below.
7. If you want to maintain the alignment of the front wheels, at least at approximately the desired angle, you need to count the number of revolutions made when unscrewing the tip. The new one should be wound at the same number of revolutions.
8. After replacing the tip, screw on all the nuts and bolts, and also install the cotter pin in place.
9. We do the same with the second side. Of course, the ideal option is to definitely go to a service station after replacement and have the front wheels wheel aligned. There is no need to save money on this procedure; it may cost more if the wheel angles are disturbed after the repair.
If there are any unclear points, the video below will tell you everything more clearly! The price of new tips for Priora is from 700 rubles per pair, of course, from 350 rubles. a piece.
Video review of replacing steering tips on a Priora
Replacing steering tips on VAZ 2110, 2111, 2112, Kalina, Granta, Priora, 2113, 2114, 2108, 2109
Since the procedure for replacing steering tips is practically no different from the tenth family, it is with the example of 2110 that everything will be shown.
Steering rods on domestic cars, including Priora, are changed in exceptional cases, and most often this occurs due to their damage during an accident. Although, even in the event of a serious accident, they can remain unharmed. But if you are unlucky and the rods are deformed during the impact, then you need to replace them with new ones. To perform this simple repair you will need the following tool:
- Socket head 22
- Steering wheel end remover
- Spanners for 17 and 19
- Driver and ratchet handle
- Key for 10
- Flat blade screwdriver
As for replacing these parts, we will try to provide a detailed description of this procedure below. So, the first thing you need to do is remove the cotter pin of the steering joint ball pin, and then unscrew the fastening nut. Then, using a special puller, you need to remove the pin from the steering knuckle of the strut. This is shown more clearly in the guide to replacing tie rod ends.
Now you need to move to the other side of the rod, where it is attached to the steering rack. First of all, using a 10 mm wrench, unscrew the fastening of the protective metal casing from above and slightly move it back. Then you can bend the locking washers with a screwdriver:
And then unscrew the fastening bolt:
And having slightly loosened the second bolt of the other rod so that the plate lowers, we remove the rod from the rack, as shown in the photo below:
And now we can easily remove the rod from the outside:
It is also worth unscrewing the steering tip and the adjusting coupling, and then screwing it all onto the new rod before installing it in its place. Replacement is carried out in reverse order.
Symptoms: increased free play of the steering wheel, knocking noise when turning the steering wheel.
Possible cause: damaged tie rod ends.
Tools: socket set, wrench set, pliers, ball joint puller.
1. Remove the front wheel.
2. Clean the tie rod mounting nut to the swing arm, and then lubricate this threaded connection with grease.
3. Slightly unscrew the mounting bolts of the outer and inner tie rod ends.
4. Press the ends of the cotter pins together tightly.
5. Remove the cotter pin using hand force (you can also use pliers).
6. Loosen the ball joint pin mounting nut.
7. Remove the ball joint pin by pressing out (use a puller).
8. Unscrew the tie rod mounting nut, and then remove the tie rod from the hole.
9. Unscrew the outer end from the rod while holding the adjusting rod with a wrench. Count the number of turns when unscrewing: during installation, this will help approximately maintain wheel alignment.
10. Use a screwdriver to pry off the locking plate.
11. Disconnect the locking plate from the steering linkage bolt heads.
12. Lightly unscrew both bolts of the steering linkage rods.
13. Unscrew the fastening bolt of the dismantled rod.
14. Move the inner tie rod end by turning the connecting plate.
15. Remove the steering rod through the hole in the wheel arch mudguard.
16. Install new tie rod ends in reverse order.
Sources
- https://priora-remont.ru/zamena-rulevyx-nakonechnikov/
- https://zarulemvaz.ru/zamena-rulevyx-tyag-na-priore-svoimi-rukami/
- https://www.avtika.ru/qa/817-snjatie-zamena-ustanovka-nakonechnikov-rulevykh-tjag-lada-priora
Diagnostics
If you suspect faulty tie rod ends in your car, they need to be checked. To do this, you can sign up for a service station and pay from 200 rubles and have the tips diagnosed, or do it yourself.
Self-diagnosis process
- To independently determine the condition of the helmsmen, you must have an assistant (we call a friend or neighbor).
- We place the car on a flat surface and be sure to set the handbrake.
- We put the assistant behind the wheel and ask him to swing with sharp movements left and right.
- Meanwhile, we go to the front wheel and put our hand between the wheel and the fender, wrap our hand around the bipod of the strut and the steering tip. If there is play in the steering tip, you will certainly feel it.
- We carry out the procedure on both sides of the car.
If the diagnostics showed that the steering gears are in a faulty condition, then we proceed to replacement.
Ford Mondeo 2003, 125 l. With. — scheduled maintenance
Cars for sale
Ford Mondeo, 2002
Ford Mondeo, 2003
Ford Mondeo, 2004
Ford Mondeo, 2004
Comments 25
I have been changing this method for a long time, only before removing the tip I find the center in the tip and make a mark on the tie rod and measure the distance of the rod with a compass (after installing the new tip I also find the center and adjust to this distance, if you change the rods it is even easier, unscrew the rod together with a tip, measure the distance from the edge of the rod to the center of the tip and transfer this distance to the new rod (if the rod has a lot of play, you can measure from the edge of the steering shaft), the first tip was changed to 80000, the second to 120000, the third to 160000, to 180000 I replaced the steering rods with a wheel alignment, I didn’t drive, the main thing is to change each side separately, after replacing one side, we make sure to drive through and make sure that the car does not pull to the side (usually the steering wheel immediately shows (looks to the side)), if it does, then we adjust the draft until the steering wheel is straight (the steering wheel is very sensitive to increasing or decreasing the distance between the steering shaft and the tip), after which we proceed to replacing the second side. Volkswagen Polo sedan 2011
Replacement
When carrying out work, it is necessary to purchase a set of steering ends and their remover in advance. The cost of a set of steering ends is from 700 rubles and more, depending on the region.
The cost of the puller is no more than 600 rubles, but this tool greatly facilitates and speeds up the replacement process.
When everything you need has been purchased, you can begin preparing the tool.
Required tool:
- Puller;
- Hammer and pry bar (necessary if you don’t have a puller);
- Open-end wrench “19mm” and “13mm”;
- WD-40 lubricant;
- Pliers;
- Shtangel-compass (Columbian);
Then we get to work
Replacement instructions
- We install the car on a flat horizontal surface without slopes or holes. We fix it with the parking brake, lift it with a jack and dismantle the wheel.
- The next step is to measure the distance between the tip and the steering rack rod. This is necessary for more accurate installation of the new tips so that the wheels of your car do not “look in different directions” while you are adjusting the alignment. We take the measurement as shown in the picture and write down the scale readings or remember them.
- Spray WD-40 onto the threads of the tip, then remove the cotter pin using pliers.
- Using a 13mm wrench, unscrew the locking bolt of the steering tip;
- Unscrew the tip nut with a 19mm wrench
- Using a puller or pry bar with a hammer, remove the tip pin from the bipod of the stand, as shown in the picture below;
- The next step is to unscrew the tip itself from the tie rod. To do this, it is better to use a small lever in the form of a tube or a socket wrench. Please note that you need to unscrew the tip in the opposite direction, i.e.: unscrew the right one to the left, and unscrew the left one to the right. The picture below shows an example from the left or right side.
Communities › Lada Priora Club › Blog › Replacing tie rod ends.
Well, I found some time between a project at work and the preparation of a technical report on pre-graduation practice. We continue to replace faulty components. It came to the tie rod ends. After scouring the forums for a long time in search of quality spare parts, I compared the reviews with what you can choose from in stores. The choice is of course huge, with a range of prices for any buyer. The choice was made - either lemforder or Lucas. After a visual inspection in the store, I chose Lucas TRW. They are more massive.
Comments 10
The suspension warranty is 1 year or 35,000 km. I didn’t do it myself. I have very little free time, and I’ve been sick for a week now. And on September 7th I have to go to Khokhland by car. I had to go to the service center. In the service, replacing tips costs 210 rubles per piece. So, having thought about it, I headed to the service center. In addition, after replacement, the wheel alignment still needs to be set again. It's not very difficult to do it yourself. The tools you need are a steering rod puller and a couple of keys. Jack it up. You take off the wheel. You pull out the cotter pin and unscrew the nut, but not all the way. Use a puller to press the rod pin out of its seat. You unscrew the locking nut and then unscrew the rod, counting the number of turns. You install a new one by tightening it the same number of turns. You're all going to a wheel alignment. I preferred to pay 400 rubles for replacing the rods.
everything is clear, thank you very much!
Did I do it myself or under warranty? My mileage is 26,000 and I think the tips are also there, although maybe the rack, I still need to check. But that’s not the point, if you change them yourself, what do you need, not counting the keys, is there a puller there, or something else?
Same question...I have 40 miles, the tips are dead. We need to change it too, but the price for these TRWs is space ((
The difference in tips ranges from 250 rubles to 700 rubles per piece. They change in pairs. This means the price is from 500r to 1400r. I don't argue that they are expensive. When I bought them they were the most expensive, and LEMFÖRDER cost about a kilo ruble per pair. Spare parts at our car markets are a lottery. You can get an excellent part for pennies, or you can fly away with branded ones.
Signs of a bad tip
The steering tips on the Priora fail quite rarely, but you need to keep an eye on them. The main thing in operation is to keep the anthers in good condition. The service life of the entire tip directly depends on them. If dust and water do not get inside, the ball joint will last its entire service life - and this is at least 100 thousand kilometers. But this is provided that the driving style is not aggressive, most of the operation takes place on relatively smooth roads, without a large number of holes.
If there is a malfunction in the steering tips, the following symptoms appear:
- Crunching sound when turning the steering wheel.
- Steering wheel sticking.
- When driving on uneven roads, knocking noises appear.
Similar symptoms appear when a ball joint or strut bearing breaks, so you need to carefully diagnose the entire suspension and steering.
Signs of a bad tie rod - Easy
How to identify symptoms of faulty tie rod ends
Steering is one of the important components of a vehicle. Not only comfortable movement, but also safety during driving, both for the driver and for other road users, depends on its condition. This control unit consists of several components that must be checked from time to time for wear and serviceability. One of these elements is the rod and the steering tip (there are two of them in the steering). These parts allow the car's wheels to turn at the required angle, promoting increased maneuverability. And in order to increase the service life of these levers, it is necessary to promptly recognize signs of malfunction of the steering tips.
Initial examination
It is very important to occasionally inspect not only the external condition of the car, but also look underneath it. Thus, it is possible to promptly prevent the breakdown of any part or assembly as a whole.
Such a check will not take much time and effort, and you do not have to be an expert in cars to do this. To determine the malfunction, it is better to ask a friend to help you, since it takes two people to determine the presence of play. In addition, you can check the part for mechanical damage.
The rod fails much less often than the tips.
To perform an initial inspection of the steering ends, you need to do the following:
The steering rod and ends are initially inaccessible, as they are located on the bottom of the car. For a more thorough inspection, you need to drive the car into the inspection hole. This will create more open access to all elements of the suspension, bottom and, among other things, will allow you to better check the steering tip. If it is not possible to use the hole, then you can use a jack, but only to lift the car. To increase safety, use stands (stumps). You need to use a rag to wipe the parts from any deposits, this will allow you to examine the surface for defects.
You also need to pay attention to the fastening points, since it is in the connections that a malfunction can most often lurk. Basically, the first part that becomes unusable is the boot
Therefore, you should check it for cracks. To check the play, you need an assistant to turn the steering wheel in both directions, while you watch the work of the tips. If the tip moves along the axis of the pin by more than one and a half millimeters, then this indicates that the steering tip is faulty. The malfunction can be anywhere; when checking, you need to be as careful as possible. After examining one side, you need to check the other. If you wish, since you are under the car, perform diagnostics of other important components and parts. If necessary, some of them can be lubricated or urgently replaced.
Signs of damage
The latter can be called consumables. Their service life, on average, is no more than forty thousand kilometers. To increase this indicator, you need to drive only on a flat surface and drive the car very carefully.
So, let's look at the main signs of a breakdown that can cause a car to malfunction.
- Backlash is a clear sign. If, when driving at low speeds, you begin to notice that the wheels of your car are not turning in accordance with the steering wheel, then you need to check the steering mechanism. This should be done urgently; the presence of backlash can lead to the worst consequences.
- Kickback to the steering wheel. If while driving you begin to notice a strong beating of the steering wheel, this is also a sign to check the steering rod and ends.
- The appearance of abnormal sounds. If the boot is damaged, dust appears and settles at the joint. Thus, when this element operates, sounds appear. In the future, such conditions can lead to premature wear of these parts.
It is very important to respond in a timely manner to the occurrence of abnormal deviations in the operation of your car. Try to spend as much time as possible on the diagnosis
This attitude will allow you to keep your car and its components for a long time.
"Checking the steering rods of the car"
The recording shows how tie rods are diagnosed on a VAZ car, and also provides tips for identifying faulty tie rod ends.
https://mineavto.ru
Tools for repairs
In order to independently repair Priora steering ends, you will need the following set of tools:
- A set of keys, specifically for “19”, “13” and a cylinder head. Others may be required.
- Pliers, duckbills.
- Jack and support for the car. As the latter, you can use several wooden blocks.
- Wheel chocks or suitable elements for securing the vehicle.
- A set of new tips or boots (depending on what exactly needs to be changed).
- Puller for ball ends.
Preparatory work
Before you begin work on replacing the steering tips on the Priora, you need to perform several manipulations to prepare the car. Namely:
- Place blocks under both rear wheels. The machine must be on a level surface so that it does not roll away during repairs.
- Place a jack under the side of the car that is being repaired.
- Loosen the bolts that secure the wheels to the hub.
- Raise the car on a jack and remove the entire wheel.
- Place a support under the car - wooden blocks.
- Lower the car onto the support.
At this point the preparatory work is completed, it’s time to dismantle the old tips. If you only plan to replace the anthers, then the whole job is simplified.
Ford Mondeo We Can Do Anything › Logbook › Replacing tips WITHOUT ALIGNMENT COSTS
The Delphi steering lugs I ordered on existential arrived on Sunday. And just last night I got around to it, or rather my wife let me into the garage to change them :))) I decided to replace them, the old way, through which many cars have already gone through: the Fourteenth, the Ten, the Elantra, the Chrysler 300m, the Dodge Sratus, etc. This is done using a regular caliper - a compass. And so, in order: We hang the wheel, remove it. Next, unscrew the nut from the steering tip pin:
Now let's measure the old and new tips and compare. It turned out that the old one is 1.5 mm longer than the new one. Accordingly, you need to tighten the new one so that the distance is not 139, but 137.5 mm; for me it turned out somewhere closer to 137 mm. We put everything back together, tighten it well, put the wheel on, and go check on the road to see if the steering wheel is moving or if it’s level. Everything is ok, let's go to the garage and change the other side. Here’s a way to save about 3,000 rubles :)) ps, well, I’m in the process of working:
Removing old tips
To remove the Priora tie rod end, you can use one of the following methods:
- Remove using a puller.
- Remove the hinge using a pry bar.
- Beat it out with a hammer.
The last two methods are very dangerous - you can damage not only the tip, but also the stand itself. And if you plan to replace only the anthers, then the risk of knocking off the thread on the finger is very high.
Therefore, it is best to use a puller for work. Follow these steps to remove the tip:
- Loosen the bolt that secures the clamp.
- Loosen the nut on the adjusting bolt.
- Remove the cotter pin from the hole in the hinge pin.
- Using a 19mm wrench, unscrew the nut from the pin.
- Install the puller and, by rotating its bolt, completely remove the tip pin from the hole in the rack.
- Unscrew the tip from the rod, while being sure to count the number of turns.
After repairs, be sure to do a wheel alignment. Even if you measure the total length of the rod before dismantling, you are unlikely to achieve the same value afterwards.
If you cannot unscrew the nuts on the rod, it is best to remove it completely. To do this, unscrew the bolts securing it to the rail. If necessary, you can warm up the threaded connection with a gas spray. But this is an extreme measure; usually pre-treatment with a penetrating lubricant such as WD-40 is sufficient.
Installing new items
Installation is performed in reverse order:
- Screw the tip onto the rod, counting the turns. The main thing is to achieve an approximate match in the length of the rod with the new and old tips.
- Place the pin in the hole in the stand and secure it with a new nut.
- Tighten the nut on the rod.
- Tighten the bolt on the tip clamp.
- Install a cotter pin to secure the nut to the pin.
At this point the repair can be considered complete. If you only need to replace the “Priora” steering tip boot, then you do not need to remove the entire element, just remove the pin from the hole in the steering knuckle of the strut. Be sure to wash the hinge and apply new grease.
Source: fb.ru