Description of the operation of the fuel pressure regulator
Before moving on to the question of how to check the fuel pressure sensor, you need to understand the principle of its operation.
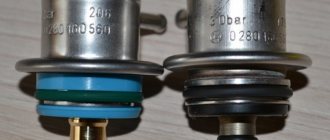
This will give a complete understanding of this process. As stated above, DDT consists of two parts - mechanical and electrical. The mechanical part is a metal membrane that bends under the influence of force caused by pressure in the fuel system. It should be noted that on sensors designed for different pressures, the thickness of the membrane will also be different. In particular, the thicker the membrane, the greater the pressure the sensor is designed for. It is also worth noting that some machines use two sensors - in the high pressure circuit and in the low pressure circuit. They are named accordingly. The electrical part of the fuel pressure sensor consists of four strain gauges, which change the value of their electrical resistance depending on the mechanical pressure exerted on them. The strain gauges are connected using a Winston bridge electrical circuit and voltage is applied to them through an amplifier. Accordingly, its output value will change depending on how much the membrane bends. Basically, testing the fuel pressure sensor involves measuring the output voltage from the fuel pressure sensor.
Based on information from the sensor, the ECU gives a command to open the fuel valve, as a result of which its pressure is released due to the fact that it is bypassed from the rack. This is true for both gasoline engines with injection and modern Common Rail diesel systems, which are controlled using electronic systems.
Fuel is supplied under pressure into a ramp, the element of which is a sensor with a membrane. In this case, the membrane bends, as a result of which the resistance of the resistors changes. The specified input voltage can range from 0 to 80 mV (accordingly, 0 indicates that there is no pressure at all, and 80 mV indicates that the pressure value is the maximum permissible). With the help of an electronic amplifier, the output voltage range increases to 0...5 Volts, which are transmitted to the electronic engine control unit (ECU).
The output voltage is the same, but the pressure of gasoline and diesel engines is known to be different. For reference:
- For a diesel engine, the output voltage is 1.3 Volts at 250 Bar and it increases to 4.5 Volts at 2500 Bar (1 Bar = 100 kPa).
- For gasoline engines, the voltage will be 1.3 Volts at a pressure of 50 Bar, and the value will be 4.5 Volts at a pressure of 200 Bar.
The data given is approximate, and is taken as an example for a sensor from the BOSCH company, installed on some models of automakers BMW, Alfa Romeo and many others. Similar characteristics may differ for specific car brands, including those using different fuel pressure regulators.
Older diesel engines use a mechanical fuel pressure regulator. However, due to the fact that it is practically not used on modern cars, we will not consider its design.
Signs of sensor failure
Signs of a malfunction include:
- Activation of the Check Engine warning light on the dashboard. When scanning for errors with the scan tool, one or more errors with numbers P0190, P0191, P0192, P0193, P0194 will be displayed. All of them indicate problems in the fuel pressure sensor control circuit.
- Decrease in engine power. At the same time, the car loses its dynamic characteristics (accelerates poorly) and does not pull, especially if it is loaded. The reason for this is the fact that the electronic control unit, when receiving incorrect information from the sensor (or lack of a signal from it), simply substitutes standard quantitative values of fuel and air. Because of this, a fuel-air mixture with suboptimal parameters is obtained.
- Excessive fuel consumption. This value also changes depending on the engine power.
- The car is bad even when cold.
- When the engine operates at high speeds, so-called “dips” may occur, when the speed changes sharply and the car does not obey the accelerator pedal.
In general, it is not advisable to drive a car with a faulty fuel pressure regulator. And this is expressed not only in the fact that the car has lost its dynamic characteristics, but also in the fact that the fuel pump will work, which is called “wear and tear”, since it cannot maintain significant pressure for a long time. And this naturally leads to a decrease in its service life and possible premature failure.
It also makes sense to check the fuel pressure sensor in diesel engines if error P1181 was detected using a diagnostic tool, indicating that the system cannot ensure tightness in the fuel rail. One of the reasons for this could be a faulty fuel pressure regulator.
Injectors
| Item name | Catalog number of the spare part | Description |
| 1 | Wiring harness connection | |
| 2 | High pressure port | |
| 3 | Control piston | |
| 4 | Nozzle needle | |
| 5 | Spray high pressure chamber | |
| 6 | Spray injection holes | |
| 7 | Valve cone | |
| 8 | Fuel return | |
| 9 | Valve piston | |
| 10 | Piezoelectric actuator |
Fuel dosing and the timing of fuel delivery are controlled directly by the ECM.
Working elements of piezoelectric fuel injectors:
- Piezoelectric actuator
- Nozzle body containing hydraulic servo system
- Fuel Injector Sprayer
NOTE:
New injectors do NOT require configuration and can be installed in any cylinder.
Similar articles
Kia Sorento
NOTE:
Each injector is controlled by a charge and discharge cycle, with energy dissipated in the injector and then returned from it. Never disconnect the electrical connector while the engine is running. The injector may remain open, causing engine damage.
NOTE:
For safety reasons, the engine should be turned off for 30 seconds before working on the high pressure fuel system.
Fuel injector is off (no fuel is injected)
| Item name | Catalog number of the spare part | Description |
| 1 | Piezoelectric actuator | |
| 2 | High pressure port | |
| 3 | Pressure acting on the control piston | |
| 4 | Pressure acting on the spray needle | |
| 5 | Control piston | |
| 6 | Fuel return | |
| 7 | Fuel return | |
| 8 | Control piston | |
| 9 | Nozzle needle | |
| 10 | Spray high pressure chamber | |
| 11 | Control chamber | |
| 12 | Valve cone |
High pressure fuel from the fuel manifold passes through the high pressure port (2) into the control chamber (11) and into the fuel injector high pressure chamber (10).
Electrical energy is not supplied to the piezoelectric element (1) and the valve fungus (12) under the action of a spring closes the hole in the return drain channel (7).
Fuel resulting from internal leaks in the injector is discharged through return channel 6.
The hydraulic pressure (3) now applied to the control piston from the side of the high-pressure fuel in the control chamber (11) is greater than the force of the hydraulic pressure (4) applied to the tip of the injector needle (since the area of the control piston in the control chamber is greater than the area nozzle needle tip).
Fuel injector on (fuel injection)
| Item name | Catalog number of the spare part | Description |
| 1 | High pressure feed | |
| 2 | Valve piston | |
| 3 | Pressure acting on the control piston | |
| 4 | Pressure acting on the spray needle | |
| 5 | Control piston | |
| 6 | Fuel return | |
| 7 | Piezoelectric actuator | |
| 8 | Fuel return | |
| 9 | Valve piston | |
| 10 | Valve cone | |
| 11 | Control chamber | |
| 12 | Control piston | |
| 13 | Nozzle needle |
The piezoelectric element (7) expands under the influence of electrical power from the ECM (charge cycle) and presses on the valve piston (9). The mushroom valve 10 opens a hole that connects the control chamber 11 with the return drain channels 8 and 6.
Similar articles
Kia ceed
As a result, the pressure in the control chamber drops, the force 4 acting on the spray needle becomes greater than the force 3 acting on the piston in the control chamber.
The nozzle needle (13) moves up and fuel is injected through the 7 nozzle holes into the combustion chamber.
Engine starting
— When starting, the pressure in the fuel manifold must be at least 150 bar. If the pressure is below this value, the injectors will not work and the car will not start.
Engine stopped
— To stop the engine, the ECM cuts off power to the piezoelectric actuators. No fuel is injected and the engine speed drops to zero.
Download document - TDV8 engine fuel supply and controls .pdf.
Design and principle of operation
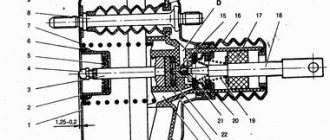
Fuel pressure regulator in closed (a) and open (b) positions.
The fuel regulator consists of the following elements:
- Frame. It is made of metal and has a high tightness necessary to prevent fuel leakage and loss of pressure.
- Membrane (diaphragm). Reacts to excess pressure and opens the drain line.
- Check valve. Located at the entrance.
- Spring. Places additional pressure on the valve diaphragm.
- Fittings for fastening fuel inlet and drain lines.
- Seals. Ensure the tightness of the system at the inlet and outlet.
The operating principle of a mechanical fuel volume regulator is simple. The membrane divides the internal space of the housing into two chambers (fuel and air). The first is supplied with fuel using a pump, which exerts some pressure on the membrane. The check valve prevents fuel from returning to the intake manifold, which allows the pressure necessary for engine operation to be created.
The classic valve design is a mechanical unit whose operation is based on pressure differences. In common rail systems, instead of a fuel regulator, a solenoid valve controlled by the engine ECU can be used.
On the reverse side of the membrane (in the second chamber) there is a spring that locks the regulator. This chamber is connected with a hose to the intake manifold, in which, under various modes, a certain level of air rarefaction is formed, which also affects the diaphragm. At the moment when the fuel pressure exceeds the total effect of the spring and vacuum in the intake manifold, the valve opens, dumping part of the fuel.
Thus, the lower the vacuum in the intake manifold, the greater the pressure of the fuel supplied to the fuel injectors. The control mode of the fuel regulator is engine idling, when the vacuum is minimal and the pressure is maximum.
Data from this mode are usually recorded on the outside of the housing, which simplifies the process of diagnosing and repairing the engine power system. When the engine stops, the valve closes completely, which maintains constant high pressure in the fuel rail (rail) and simplifies restarting.
How to check the fuel pressure sensor
Depending on what fuel supply system is used for the car, there are three ways to check the sensor for functionality without dismantling the fuel rail:
- mechanical method for old-style cars with rubber fuel discharge hoses for gasoline internal combustion engines;
- multimeter;
- pressure gauge.
Dismantling the rack and subsequent diagnostics of the regulator is a more reliable way to check the quality of the mixture, since all adjacent components and wiring are checked together with the DDT. In most cases, diagnostics are carried out at a service station, since you will need to use a special stand. Self-diagnosis in the garage without dismantling the rack requires a tester and is carried out in 15 minutes.
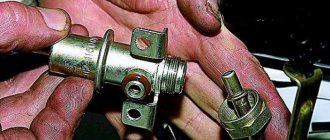
Mechanical diagnostics of an old-style regulator
For gasoline internal combustion engines in which a rubber pipe is used in the fuel removal system, the sensor is located at the inlet of the pump. The check is carried out only on a cold engine.
Similar articles
VAZ car sensors
- Start the engine.
- Remember the nature of its operation (a faulty sensor causes the motor to trip).
- Pinch the fuel outlet pipe with pliers for 1–3 seconds.
If the fault is in the regulator, the engine will restore its operation, the speed will become smooth, and jerking will disappear. If, after the outlet pipe is closed, the motor continues to operate incorrectly, the fault may be in clogged filters or worn contacts, although the sensor is working properly.
Diagnostics with a multimeter
Using a tester, they check the performance of the RTD and the quality of power from the block. Checking the electrical signal to the block is carried out in steps.
- Remove the block from the sensor.
- Set the multimeter to voltage measurement mode.
- Set the black lead of the tester to “minus”, attach the red probe to the connector of the block.
If nothing interferes with the passage of electricity to the sensor, there is no voltage loss, the tester screen will display a value of 5 V. The permissible deviation is ±1%.
The second stage is to check the quality of the output signal from the electrical part of the regulator. Checking the signal from the sensor step by step.
The black probe from the tester is connected to the negative terminal of the battery, the red probe is connected to the signal wire of the regulator (more often the wire is located in the block in the middle in a red braid).
Start the engine and let it run for 1 minute at minimum idle speed. In this speed mode, the output voltage on the DDT should remain at a minimum of 1.3 V.
As the speed increases, the voltage parameter from the sensor should increase to 5 V. If the unit is faulty, at the highest speeds the readings may differ significantly, both up (in 10% of cases) and down. This leads to the pump starting to pump fuel and switching to emergency operation.
Checking with a pressure gauge
To check the sensor for functionality, use a pressure gauge, a device for measuring pressure in the rail and pipes of the fuel system, air pressure in tires, etc. Before checking with a pressure gauge, it is necessary to disconnect the vacuum hose from the system and connect the device between the fitting and the fuel pipe.
Before diagnosing, it is necessary to clarify the pressure value for a particular car according to the manual. The operating pressure for gasoline engines ranges from 2.5–3 Atm. During the regas process, the pressure drops by 1–2% of the norm, a working valve maintains the value within the acceptable range.
Other spare parts for Kia CARNIVAL
› Seat headrest › Brake drum assembly › Nut m › Washer mm › Lock nut › Inner sill panel › Catalytic converter assembly › Heated right electric mirror › Oil filter › Automatic transmission retaining ring › O-ring › Bolt m › Shoulder bolt › Door stop › Bolt m › Bolt m › Alternator › Fuel filler door panel latch › Tie rod castle nut › Tailgate inner panel › Bolt m › Roof panel trim fastener › Screw m3 › Technical information sticker › Screw self res m › Fitting cap › Gearbox lever support › Clutch fork retaining ring › Interior flooring x cm › Sensor-camshaft position, rh
| Hyundai Accent Hyundai Aero City Hyundai Aero Queen / Express Hyundai Aero Space Hyundai Aero Town Hyundai Atos Hyundai Atos Prime Hyundai Azera Hyundai Centennial Hyundai Chorus Hyundai County Hyundai Coupe Hyundai Elantra Hyundai Elantra New Hyundai Elantra XD Hyundai Entourage Hyundai Equus Hyundai Excel Hyundai Galloper Hyundai Genesis Hyundai Genesis Coupe Hyundai Getz Hyundai Global 900 Hyundai Grandeur Hyundai H-1 Starex Hyundai H100 Porter Hyundai HD 120 Hyundai HD 160 / 170 Hyundai HD 250 / 260 Hyundai HD 65 / 72 Hyundai HD 78 Hyundai HD35 / 75 Hyundai HLD150 Hyundai HMD230 / 260 Hyundai i10 Hyundai i20 Hyundai i30 Hyundai ix35 Hyundai ix55 Hyundai Lantra Hyundai LaVita Hyundai Libero Hyundai Marcia Hyundai Matrix Hyundai Mighty Hyundai New Power Truck Hyundai Pony Hyundai Santa FE Hyundai Santa FE Classic Hyundai Santamo Hyundai Santro Hyundai SCoupe Hyundai Sonata Hyundai Sonata NF Hyundai Sonata YF Hyundai Stellar Hyundai Terracan Hyundai Tiburon Hyundai Trajet Hyundai Tucson Hyundai Universe Space Hyundai Universe Xpress Hyundai Veracruz Hyundai Verna Hyundai XG Hyundai 11 ton truck Hyundai 23 ton truck Hyundai 5 ton truck Hyundai 8 ton truck Hyundai 8 ton upper truck | Kia AVELLA Kia BESTA Kia BORREGO Kia CAPITAL Kia CARENS Kia CARNIVAL Kia CEED Kia CERATO Kia CLARUS Kia CONCORD Kia ELAN SPORT Kia ENTERPRISE Kia JOICE Kia K2700 Kia MAGENTIS Kia OPIRUS Kia OPTIMA Kia PICANTO Kia POTENTIA Kia PRIDE Kia RETONA Kia R IO Kia ROADSTER Kia SEDONA Kia SEPHIA Kia SHUMA Kia SORENTO Kia SOUL Kia SPECTRA Kia SPORTAGE Kia VENGA Kia VISTO Kia Pregio Kia Mohave Kia Amanti Kia Mentor Kia Bongo Kia Power Combi Kia AM928 Kia Ceres Kia Cosmos Kia Towner Kia Granbird Kia Credos Kia Rondo Kia Rhino Kia Mighty B-Body Kia K2500 Kia K3000 Kia K3600 | Chevrolet AVEO Chevrolet CAPTIVA Chevrolet EPICA Chevrolet EVANDA Chevrolet HHR Chevrolet LACETTI Chevrolet LANOS Chevrolet LEGANZA Chevrolet REZZO Chevrolet SPARK Chevrolet CRUZE | Daewoo DAMAS Daewoo ESPERO Daewoo EVANDA Daewoo KALOS Daewoo LANOS Daewoo LEGANZA Daewoo MATIZ Daewoo NEXIA Daewoo NUBIRA Daewoo TACUMA Daewoo TICO | SsangYong ACTYON SsangYong ISTANA SsangYong KORANDO SsangYong KYRON SsangYong MUSSO SsangYong REXTON SsangYong RODIUS SsangYong ACTYON SPORTS SsangYong CHAIRMAN SsangYong MUSSO SPORTS |
How does a mechanic diagnose a P0193 code?
First, the mechanic will check the electrical wires and fuel rail pressure sensor connector for short circuits, corrosion, and damage. It then reads all the stored data and error codes using an OBD-II scanner. The mechanic will then clear the error codes from the PCM memory and test drive the vehicle to see if the P0193 code appears again. If the P0193 code does not appear immediately, the problem may be an intermittent fault code, which is much more difficult to diagnose and repair. If the vehicle's engine does not start and the vehicle cannot be test driven, the mechanic will check the fuel pressure using a fuel pressure gauge.
Low fuel pressure may indicate that the fuel level in the fuel tank is too low or lacking. If there is fuel in the fuel tank, the mechanic will check the operation of the fuel pump, noting whether there are any unusual sounds when the pump is running. If the fuel pump works but the car does not start, this may indicate a clogged fuel filter or damaged fuel injectors. If there are no sounds when the fuel pump is running, the mechanic will try to lightly press the fuel tank and start the car at the same time
To do this, the mechanic will need an assistant. If the car starts, the problem is a faulty fuel pump. If the car does not start, the mechanic will check the voltage at the fuel pump connector. If there is no voltage at the fuel pump connector, the mechanic will check the fuel pump fuse and relay, as well as the wires going to the PCM. The mechanic will also check the operation of the fuel rail pressure sensor. He will measure the sensor reference voltage using a digital volt-ohmmeter after starting the car engine. The reference voltage should be 5 volts. If the reference voltage is ok, the mechanic will check the sensor ground wire. If there is a ground signal, the mechanic will measure the resistance and replace the fuel rail pressure sensor if necessary. In rare cases, the problem may be a faulty transmission control module (PCM). In this case, you will need to reprogram or replace the module.
How to check
After turning the ignition key to the “ON” position, the main relay is turned on and power is supplied to everything except the starter system of the vehicle. At this moment, a buzzing sound will be heard in the area of the gas tank - the operation of the fuel pump. Further turning of the key will close the contacts of the starter relay and start it. When you repeatedly try to turn the starter, such a sound will most likely not be heard, and this is not a malfunction. The fuel line is filled with gasoline, and the pressure sensor will not allow the pump to start when the engine is not running.
To check the serviceability, we use a 12-volt lamp with a current consumption of no more than 0.25 A. We connect pieces of insulated copper wire to the contacts. Using a more powerful lamp may damage the ECU chips.
We check the presence of power at the control contacts of the relay coil - terminals 85 and 86, alternately touching the negative contact of the battery. If there is power at one of the contacts, the lamp will flash, which means the control circuit is working properly. If you connect the lamp directly to the control terminals of pair 85-86, the next time you turn on the ignition, the lamp will light up for 15-20 seconds. Otherwise, you need to check the serviceability of the wiring leading to the terminals and the corresponding fuses, or proceed to check the operation of the computer.
If at the first stage of the test the serviceability of the control circuits of terminals 85 and 86 is established, at the second stage of the test we check for the presence of +12 V on leg 87 of the fuel pump control relay relative to ground. The lamp does not light up - check the circuit fuse and wiring. If there is voltage at the terminal, we close terminals 87 and 30 with a jumper, thereby simulating the situation when the relay is activated, as a result, the fuel pump should start and start working. If the result is negative, we will try to start the pump directly and touch one of the wires of the control lamp to the fuel pump terminals in turn, and attach the second wire to the body ground. If the lamp lights up, most likely there is a problem with the performance of the pump itself, otherwise you need to check the power wiring of the fuel pump.
One of the possible malfunctions of the fuel pump relay is sticking of contacts 86 and 30, due to which the fuel supply will continue even after the engine is turned off. The cause is usually the melting of the plastic of the holders and subsequent melt soldering of a pair of contacts. In this case, the relay must be replaced at the first opportunity.
The video describes in detail how to check the fuel pump:
- What malfunctions are prohibited from operating a car?
- How dual-zone climate control works
- How to make a winch from a starter with your own hands: video instructions and drawing
- Why do you need an air filter in a car?
Replacing the fuel pressure regulator in az 21 10 (and other cars)
To ensure that your car is always on the road and there are no problems with the fuel pressure regulator, you need to take the time for a thorough inspection.
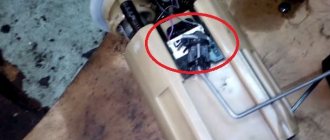
1) Under the hood of the car, open the fitting plug, which is responsible for controlling the fuel pressure at the end.
2) Take a special protective metal cap and carefully unscrew the spool from the inner cavity of the fitting.
3) Then attach a hose with a pressure gauge to it. Secure it to the fitting using a clamp. After this, you should start the engine and check the pressure shown by the pressure gauge. It should not be higher than 325 kPa (3.25 Bar).
4) Carefully disconnect the vacuum hose from the pressure regulator. You will immediately see how the pressure will increase on the pressure gauge. If this does not happen, you should replace the device with a new one. A device that has not been repaired cannot be repaired. But how to change the fuel pressure regulator?!
5) Now you can slightly reduce the pressure in the power system and remove the vacuum hose from the RTD. To do this, you will need to unscrew the reinforcing nut on the fuel drain pipes to the pressure regulator.
6) You need to unscrew the two bolts securing the device to the fuel rail.
7) Now you can remove the regulator from the fuel drain pipe itself. If the ring does not immediately detach and remains in the ramp, remove it. It is put on the regulator before installation. The regulator must be installed in the reverse order, observing the exact sequence.
So now you know the causes of fuel pressure regulator failure and how to replace the fuel pressure regulator. The most important thing is not to rush, and follow the sequence of actions.
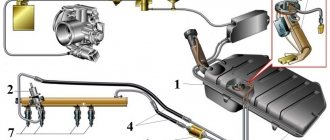
| Pos. | Name |
| A | Low pressure fuel return to filter |
| B | High Pressure Fuel Supply - From high pressure fuel pump to fuel manifold |
| C | High pressure pipe - from fuel manifold to injectors (4 pcs.) |
| 1 | Fuel manifold |
| 2 | PCV |
| 3 | Fuel manifold pressure sensor |
The fuel manifold is made from forged steel and is mounted directly to the cylinder head with two fasteners. The fuel manifold stores fuel under pressure from the high pressure pump. The fuel manifold also equalizes pressure changes in the high pressure system. The ports at each end of the fuel manifold contain a pressure sensor and a PWM type PCV. The pressure sensor is installed in the fuel manifold on the accessory drive side. The PCV is installed in the manifold on the transmission side.
The manifold is connected to the high pressure pump and fuel injectors via high pressure fuel lines. The bypass (return) pipeline connects the fuel manifold to the return circuit of the fuel filter.
The fuel manifold, fuel pressure sensor and PCV are combined into a single unit. If it is necessary to replace elements, it is advisable to replace the entire fuel manifold assembly.
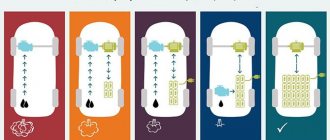
Location in the vehicle structure
In modern cars, two layouts of the fuel pressure regulator are used. In systems with a return line, it is installed on the fuel rail, and in designs without a “return” - directly inside the fuel tank (in the pump). The diagram located on the fuel rail involves connecting the regulator to two lines of the system:
Layout of the fuel pressure regulator in the system
- inlet - the supply channel from the fuel tank to the power system;
- return exhaust – channel for draining excess fuel (pressure relief).
In such a system, when the regulator opens, excess fuel enters the return line and then into the fuel tank. This scheme has some disadvantages:
- complexity of the design and the need to install an additional pipeline;
- heating of excess fuel when it enters the ramp, which increases the vapors generated in the tank.
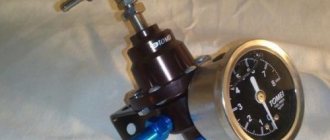
Each fuel regulator has its own factory settings and is suitable for a given car model. There are also universal designs for injection systems, which are equipped with pressure gauges and the ability to manually adjust. They are installed instead of the standard regulator exclusively in the fuel rail.
When the fuel pressure regulator is placed directly in the tank, the required amount of working fluid with a given compression level immediately enters the engine without the use of an additional line. In this case, the excess is also discharged directly into the tank, but it does not enter the engine compartment, which eliminates its heating.
In this case, a constant pressure difference is established relative to atmospheric pressure, and the amount of vacuum in the intake manifold is taken into account by changing the injection duration.
How to check the fuel rail? Checking the RTD yourself
Checking the fuel pressure regulator is carried out to identify malfunctions or for prevention. Such checks are carried out based on the recommendations of the car manufacturer. But still, how to check the pressure in the fuel rail? Basically, the check consists of inspecting and checking the pressure of the fuel system at various engine speeds. Then comparisons are made with indicators that correspond to the norm.
It is necessary to carefully inspect the tightness of the connections, the condition of the vacuum hose, as well as the regulator itself. If no damage or defects are found, then the regulator is dismantled by completely disassembling it. If a blockage is detected in this unit, it is washed.
Important: the pressure in the fuel rail should be diagnosed using a pressure gauge. It is connected to a special diagnostic fitting
How to check the fuel pressure regulator. Diagnostic tools regulate fuel pressure
You can also check the regulator yourself. To do this, you do not need to use any special tools or have any special auto mechanic skills. You will need to pinch or disconnect the valve and observe the force of the jet. Or for a better check, use a pressure gauge.
To measure the RTD pressure in the engine when turning on idle speed, it is worth connecting a pressure gauge, installing it between the fuel hose and the fitting. Don't forget to disconnect the vacuum hose. Below we will look at what pressure should be in the fuel rail of a VAZ 2110.
How do malfunctions of the fuel pressure regulator affect engine performance?
A faulty regulator valve affects not only operation, but also the very start of the engine. If the device is working properly, the pressure in the fuel rail does not drop after the engine stops. If the valve has a malfunction, then the pressure in the fuel rail drops when the engine stops. The engine will not start until the sediment has completely filled the system. And only after reaching the desired level, the first engine start signals may appear. Here everything will depend on the power of the battery. Otherwise, the engine will not be able to start. Therefore, if the pressure in the fuel rail does not hold, this indicates a malfunction!
In addition to the above, gas failures may occur during acceleration of the car, unstable idling, and a general weakening of engine power will begin to appear.
Diagnostics and malfunctions of the fuel regulator
Fuel pressure regulator
The design of the fuel pressure regulator does not allow for repairs. In some cases, it is cleaned, but this procedure does not briefly extend the life of the device. If a breakdown is detected, most often the regulator is completely replaced with a new one. The main types of faults of this unit are:
- sagging or breakage of the working regulator spring;
- depressurization of the housing;
- mechanical wear of contact surfaces;
- corrosion of various surfaces;
- channel contamination.
Direct malfunctions can manifest themselves in three formats:
- jamming - the regulator does not operate every time it is needed, but periodically;
- incomplete closure - fuel is constantly drained into the tank (return line), regardless of pressure;
- jamming in the closed position - fuel does not drain under any parameters.
Signs of a malfunctioning fuel regulator have much in common with fuel pump failures and dirty filters. Thus, preliminary diagnosis can be made based on the following observations:
- Unstable operation and engine stopping in idle mode.
- Increased fuel consumption.
- Reduced motor power.
- Slow response to pressing the throttle pedal.
- Lack of smooth movement when accelerating the car, jerking is observed.
- The content of harmful components CO and CH in the exhaust increases significantly.
- The car does not accelerate.
The quality of the fuel has a significant impact on the service life of the fuel pressure regulator. You should also not neglect the timely replacement of fuel filters. Particular attention should be paid to the fuel regulator if the car has not been in use for a long time.
Causes of malfunctions
There are not many reasons why the fuel regulator fails. The element cannot be called ultra-reliable; it works, as they say, under wear and tear, and is very dependent on the quality of the fuel.
Causes of breakdowns:
- Marriage. This is not a common reason, but sometimes you come across defective products from domestic automakers. It is recommended to check the spare part before purchasing.
- Wear. Usually observed after 100-200 thousand kilometers. In the regulator, the membrane becomes less elastic, the pressure control valve gets stuck, and the spring becomes weaker.
- Bad fuel. Gasoline and diesel car engine fuel often contains too much moisture, debris, and foreign toxins. Water in fuel causes rusting of the metal parts of the regulator. Increasing over time, they interfere with its normal functioning and lead to weakening of the spring.
- The fuel filter is clogged. Garbage fractions in the fuel clog the system, including the RTD, and become clogged. This leads to spring wear and valve jamming.
On a note!
RTDs are usually not repaired, but replaced with a new one. But, if the cause of the breakdown is clogging, it can be cleaned.
WE REPAIR
Restoring the pump's functionality can only be done by a specialized workshop with qualified personnel and diagnostic equipment. The cost of repairs is from 7 thousand rubles, then it depends on the complexity. In case of some damage, it is wiser to buy a new injection pump. The usual price, about 30 thousand rubles, will shock the tight-fisted diesel operator, which is why repaired or restored products are in use.
A CR diesel with high mileage is often impossible to start due to a malfunction of at least one of the injectors. Fuel leakage through its valve does not allow the pressure in the rail to rise to starting values. There is a special diagnostic kit to check the pressure at start-up. It includes a control pressure gauge, a pressure sensor, connection tubes, plugs instead of actuators and backflow measuring containers.
WE DIAGNOSE
There is a minimum of equipment without which it is unreasonable to start working. Diagnostics of electronic systems begins with reading fault codes, checking sensors and actuators. There are no special diesel scanners, there are universal ones, that is, for a wide range of cars, or dealer ones - for a specific brand. To study the signal from the device under test, you need an oscilloscope. But it is expensive; it is more profitable to buy a scanner with an additional oscilloscope function.
Fuel pressure is checked with pressure gauges. Low - mechanical, with a scale of up to 10 bar, and high - with a special device with adapters and a range of at least 2000 bar. And to measure the amount of fuel drained from the injectors, you need your own set.
The troubleshooting algorithm depends on the nature of the failure. If the engine does not start (electronic locks and forgotten secrets do not count), we check the integrity of the timing drive. If the starter rotates the crankshaft with force, this is not bad for the owner, but if without resistance, the repairmen will be happy: the work ahead will be expensive. After all, diesel engines are “plug-in” - when the timing drive is destroyed, the pistons bend the valves, and then whatever happens.
How does the fuel pressure regulator work? RTD operating mode
It must be remembered that the level of fuel pressure in the ramp itself depends on the vacuum in the suction manifold: the less discharge, the greater the pressure. The main mode of operation of the regulator is idle. Just at the moment of operation at this speed, the vacuum begins to reach a low point, and the pressure level in the fuel rail leads to the highest indicator. This value is applied to the regulator body in order to correctly monitor pressure during diagnostics of the supply system.
Important: if the pressure regulator cannot be repaired, it should be replaced with a new one. To avoid this, you need to check it as often as possible and monitor the pressure.
This will allow you to avoid breakdowns in time and save your money on purchasing another pressure regulator. There is no guarantee that the new regulator will not avoid such problems.
Important: despite the operating mode of the engine, the RTD must always respond to changes in it
Common faults
The fuel pump is humming
The fuel pump may hum or squeak for a variety of reasons. The fuel pump may hum due to the nature of the system design. If there is a suspicion of a malfunction of the electric fuel pump, you need to check the fuel system completely.
If the fuel pump makes noise at high ambient temperatures, you need to check whether the gas tank is breathing. Check the gasoline vapor pipe and absorber valve. If you cannot find the cause, drill a hole in the filler cap.
Fuel pump overheating
The pump overheats if:
- There is little or no gasoline in the tank;
- Foreign materials have entered the fuel pump module or the motor itself;
- Water in the tank;
- Fuel lines and fine or coarse filters are clogged. The fuel pulses back to the fuel pump, so it heats up;
- Short circuit of the stator windings of the BN motor, as a result of which it heats up.
The fuel pump does not pump when the ignition is turned on
Modern engine management systems block the fuel pump before the starter cranks. That is, in order for the electric fuel pump to work, you need to start the engine. If it still doesn’t work, check the 12 V power supply by using a scanner to turn on the fuel pump relay.
Signs of low fuel rail pressure
The main symptom of low pressure is poor engine starting and loss of power. The reasons may be the BN itself, conductive lines, or filters.
Why does fuel pressure drop in the rail?
If, when checking, the fuel pressure drops quickly after the pump is turned off, the fuel pressure regulator must be replaced. Before replacing, you can try to revive it. To do this, we clamp the return line and turn on the pump, the pressure will rise to maximum and suddenly release the return line. Thus, the membrane in the valve sits in place and maintains pressure. The same symptoms may occur after stopping the engine. The pressure drops sharply, gasoline is drained into the tank and the next time starting the engine will be difficult.
The alarm blocks the fuel pump
Blocking of the fuel pump can occur due to the closure of the non-standard alarm unit. In this case, you need to dismantle the alarm and replace it with a new one.
The fuel pump is constantly running
When the engine is stopped and the ignition is turned off, the pump does not turn off. The reason may be that the fuel pump relay is shorted and does not turn off. The 12V power supply is constantly supplied and the electric fuel pump pumps.
The fuel pump hums, but does not pump, what is the reason?
Car owners often encounter the problem that the car does not start, but the fuel pump is humming. The fact is that the motor itself works, and the impeller turns on the stator axis. Accordingly, pressure is not created and the engine does not start. In such cases, checking the fuel pressure with a pressure gauge will help.
Signs of a malfunctioning fuel pressure regulator
There are five main symptoms of a malfunctioning fuel pressure regulator (both types), which can be used to judge the complete or partial failure of this important unit. Moreover, the symptoms indicated below are typical for cars with both gasoline and diesel engines
However, it is worth mentioning that the listed situations may be signs of failure of other engine components (fuel pump, clogged fuel filter), so it is advisable to carry out comprehensive diagnostics in order to accurately determine its performance. So, the signs of a malfunctioning fuel pressure regulator are as follows:
- Difficulty starting the engine. This is usually expressed in a long rotation of the starter with the accelerator pedal depressed. Moreover, this sign is characteristic under any external weather conditions.
- The engine stalls at idle speed. To maintain its operation, the driver must constantly apply gas. Another option is that when the engine is idling, the speed is usually “floating”, unstable, until the engine stops completely.
- Loss of power and dynamics. Simply put, the car “does not pull,” especially when driving uphill and/or when loaded. The dynamic characteristics of the car are also lost, it accelerates poorly, that is, when trying to accelerate, a deep drop in revolutions occurs at their high values.
- Fuel is leaking from the fuel hoses (rail). In this case, replacing hoses (clamps) and other nearby elements does not help.
- Excessive fuel consumption. Its value will depend on both the breakdown factors and the engine power.
Accordingly, if at least one of the above symptoms appears, it is necessary to perform additional diagnostics, including using an electronic error scanner available in the ECU memory.
Fuel pressure regulator error
Diagnostic errors of the fuel pressure regulator
In modern cars, a fuel pressure sensor is installed as a regulator. If it fails partially or completely, one or more errors associated with this unit are formed in the memory of the electronic engine control unit. At the same time, the engine malfunction light is activated on the dashboard.
When there is a DRT malfunction, the driver most often encounters errors numbered p2293 and p0089. The first is called “fuel pressure regulator - mechanical failure”. The second is “the fuel pressure regulator is faulty.” For some car owners, when the corresponding regulator fails, errors are formed in the ECU memory: p0087 “the pressure measured in the fuel rail is too low relative to the required one” or p0191 “fuel pressure regulator or pressure sensor.” The external signs of these errors are the same as the general signs of failure of the fuel pressure regulator.
, Scan Tool Pro Black Edition, will help you find out if there is such an error code in the ECU memory.
. This device is compatible with most all modern cars with an OBD-2 connector. It is enough to have a smartphone with an installed diagnostic application.
You can connect to the car control unit via Bluetooth or Wi-Fi. Scan Tool Pro, having a 32-bit chip and easy to connect to, reads and stores all sensor data not only in the engine, but also in the gearbox, transmission, or auxiliary systems ABS, ESP, etc. It can also be used to monitor fuel pressure readings in real time, which it transmits to the vehicle’s ECM while performing a series of checks.
Symptoms of a problem
Since the RTD is part of the fuel system, its failure can be confused with other parts. One of the main reasons for RTD failure is the valve jamming in the open position. In this case, when the fuel pump pressurizes, the return line remains open, and the resulting pressure is not enough for the internal combustion engine to operate properly. As a result, engine interruptions occur, which significantly affect the technical characteristics of the car.
If the RTD in your car is faulty, the following signs of malfunction appear:
- Loss of engine power;
- Loss of acceleration dynamics;
- The internal combustion engine does not start well;
- When you press the gas, the engine stalls;
- Jerks when the car moves;
If these signs of malfunction are present on your car, it is necessary to check the RTD for operability.