VAZ 11113
Adjusting the carburetor drive
Performed when replacing the carburetor
, as well as when drive parts are worn or replaced.
- When the gas pedal is fully pressed, the throttle valves should be fully open, and when released, they should be closed.
- If this is not the case, by unscrewing or tightening the adjusting nuts on the front end of the drive cable (carburetor side), we achieve the correct position of the throttle valves.
- The tension of the cable with the pedal fully released is checked as follows: we pull the cable in the middle of the branch near the carburetor by about 10 mm, while the throttle valves should not open. If you pull the branch back a large amount (about 15 mm), they should begin to open slightly.
Adjusting the fuel level in the float chamber
Performed when replacing a needle valve or float (see also “Diagnostics of engine malfunctions”).
- We remove the carburetor cover (see “Disassembling the carburetor”) and measure the protrusion of the needle valve above the cover, which should be 10 mm. If this is not the case, replace the gasket or valve with gasket.
- Having placed the float with its lower part on a flat surface, measure the distance from it to the center of the float axis. It should be 23.1 mm. We adjust the size by bending the lever.
- We measure the distance from the tongue to the top plane of the float, which should be 2.0 mm.
- A drill can be used as a gauge.
- We adjust the distance by bending the tongue. In this case, its supporting surface must be perpendicular to the axis of the needle valve.
Adjusting the starter
Performed on a removed carburetor.
- When turning the choke control lever counterclockwise all the way, the choke should close completely. If it does not close, eliminate the cause of the jam (or straighten the deformed valve).
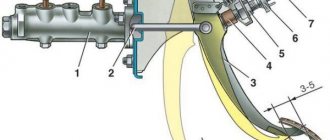
- With the air damper completely closed, the throttle valve of the first chamber must be slightly open to the starting gap C (see figure).
- This gap is adjusted by turning the screw on the throttle drive lever with a thin slotted screwdriver.
- With the air damper completely closed, press manually (you can use a screwdriver, stick, etc.) on the trigger rod until it stops. In this case, the air damper should open slightly to the starting gap (see table above). We use a drill as a gauge.
- To adjust the gap, use an “8” wrench to loosen the lock nut of the screw located on the starter cover. Inserting a thin slotted screwdriver into the slot, unscrew (to increase the gap) or tighten (to decrease the gap) the screw, and then tighten the locknut.
Starting device: 1 - starting device lever; 2 — throttle valve; 3 - thrust screw for opening the throttle valve; 4 — lever on the axis of the throttle valve of the first chamber; 5 — starter control cable: 6 — lower edge of the cam groove; 7 — upper edge of the cam groove: 8 — air damper spring; 9 - air damper: 10-lever on the air damper axis; 11 — trigger diaphragm rod: 12 — trigger diaphragm: 13 — diaphragm thrust (adjusting) screw; 14 — screw for fastening the trigger lever; B - starting gap of the air damper; C - starting gap of the throttle valve.
Adjusting the idle system
Performed during maintenance or engine malfunctions (see “Diagnostics of faults”).
- The adjustment is performed on a warm engine. At the factory, the engine is adjusted to a minimum crankshaft speed of 820-900 rpm and a carbon monoxide (CO) content of 0.5-1.2%, after which a restrictive plastic sleeve is pressed onto the screw head. If by turning the bushings it is not possible to restore the factory adjustment parameters, we unscrew the screw, breaking the bushing, then by rotating the quantity screw we set the crankshaft speed, and by turning the quality screw we set the content of carbon monoxide in the exhaust gases.
- When you press the gas pedal, the engine should increase the crankshaft speed without interruption, and when you release the pedal, it should not stall.
- When turning the quantity screw clockwise, the crankshaft speed increases.
- When turning the quality screw clockwise, the CO content in the exhaust gases increases.
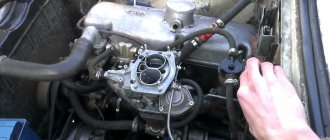
Device repair
Self-repair of a carburetor device requires a clear identification of the malfunction, the ability to properly dismantle the mechanism and wash it. In addition, in case of severe wear, it may be necessary to replace one or another structural element.
If the car owner does not have practical experience in servicing cars, it is not recommended to take any actions independently.
Video: performing repair work on the DAAZ-1111 with your own hands
Malfunctions and their diagnosis
The specificity of the structure of the cavities of the DAAZ-1111 carburetor is that exhaust gases are not removed immediately, but gradually. That is, the engine unit is forced to experience some difficulties when operating at high speeds. In addition, the entire design of the DAAZ-1111 does not prevent lubricating fluids from entering the carburetor, which can quickly lead to its contamination.
If the ignition system operates without interruption, the following malfunctions may occur on the Oka carburetor:
- instability of the engine unit (this may be due to carbon deposits on the fuel nozzles or malfunctions of the economizer);
- incorrect operation of the gas pedal while driving (the nozzle holes are clogged);
- deterioration in the dynamic qualities of the car occurs due to a critical decrease in the fuel level in the float chamber - the engine simply does not have enough fuel to fully operate at high speeds;
- jerks during movement indicate that carbon deposits have formed in the float chamber, therefore the normal movement of fuel in the system is disrupted;
- instability of revolutions indicates that the carburetor trigger needs to be adjusted.
However, the main sign that indicates a malfunction of the carburetor can be considered a sharp increase in fuel consumption.
How to set a carburetor without a strobe for efficiency
The carburetor is responsible for creating and supplying the internal combustion engine with an air-gasoline mixture corresponding to the speed limit, as well as for its reliable starting at any temperature. Despite the widespread introduction of fuel injection systems, carburetors will be in demand for a long time on the VAZ 2107, -2106, -2109 and their more modern counterparts. Their popularity is due to their relatively low price and the ability to customize the engine operating mode to best suit the owner’s driving style.
The carburetor is responsible for reliable engine starting at any air temperature
Design, principle of operation and self-adjustment of the carburetor on the Oka
Objectively, the carburetor installed on Oka cars has a simple design. And if you use it correctly, then no problems should arise.
The main thing here is to respond to changes in a timely manner, and also not to waste time and effort.
The carburetor is the main working element of the engine on the VAZ 11113. Depending on the period, different modifications were installed on the Oka. But in general their device was the same. The difference was observed only in certain settings.
How to set up a carburetor
The carburetor is one of the most complex components of a modern car, allowing the use of a particular engine with maximum efficiency. It is the correctness of its adjustment that determines fuel consumption and the content of toxic substances in exhaust gases. Regardless of the specific model of carburetor and car, it is possible to correctly adjust the parameters of the air-gasoline mixture only using a gas analyzer and professional measuring equipment. It is advisable to adjust the carburetor for efficiency after any work on the engine.
However, you can adjust it to your driving style yourself.
Video tutorial on how to clean and adjust a VAZ carburetor
In this case, you should follow the basic rules:
- The carburetor can be adjusted only after the engine reaches operating temperature;
- You should check and clean all high-voltage wires, as well as battery terminals;
- It is necessary to make sure that the fuel supply system is working properly and that the ignition is set correctly. You can start adjusting only after making sure that all other systems are working properly. Often the cause of dips and poor response to the pedal is simple contamination of the mesh filter;
- During adjustment, it is advisable to turn on all powerful consumers of electricity: high beams, stove, heated windows, etc.;
- Before disassembling and cleaning the carburetor, it is advisable to purchase a repair kit for a specific model. It contains jets, sealing gaskets, diaphragms of the accelerator pump, starting device and other auxiliary elements;
- It is unacceptable to use rags, brushes or metal wire to clean internal surfaces. The best option is to use compressed air.
SOLEX is a popular manufacturer of carburetors for domestic cars
The main manufacturers of carburetors for domestic cars are Ozon, Weber, PeKAR (K151) and Solex (SOLEX). There are no fundamental differences in their adjustment. However, it must be taken into account that all modifications of the Solex 2108 carburetor have different calibration data, which is caused by their widespread use on VAZ, ZAZ and AZLK vehicles.
Models of carburetors for OKA cars
There are several modifications of OKA cars. The very first car of this brand was model 1111. It was produced at the VAZ and KamAZ factories. This model had an engine capacity of 0.65 liters and was equipped with a DMZ brand carburetor, which was produced at the auto parts plant in Dimitrovgrad.
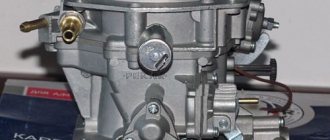
Main elements of the DAAZ 1111 carburetor for the OKA car
Then a new OKA car model appeared - 11113. The engine capacity of this car was slightly larger and amounted to 0.75 liters. Accordingly, the carburetor has also changed slightly. Model 11113 is equipped with DAAZ 1111 carburetors. This device is produced at the same plant in Dimitrovgrad. This carburetor differs from its predecessor only in the increased size of the mixing chamber. In all other respects, the device has not undergone any changes.
Do-it-yourself adjustments without disassembling the carburetor
Most carburetors are available for adjustment without disassembly:
- A screw that allows you to adjust the idle speed;
- A screw that allows you to adjust the enrichment of the gasoline-air mixture at idle;
- Throttle valve locking screw of the first chamber;
- Idle jet holder.
In most cases, experimentally, using only these elements, it is possible to significantly improve engine performance. It is advisable to set the idle speed to 800÷900 in the summer, and 900÷1000 in winter.
The carburetor can be adjusted optimally for efficiency at the service station.
Very often, the quality of the mixture entering the engine can be judged by the deposit on the spark plugs:
- Slight gray-brown soot indicates good quality of the mixture;
- Black color indicates a significant excess of fuel;
- White - about excess air.
The use of the IKS-2 indicator, installed instead of a standard spark plug and allowing you to see the color of the flame, is often recommended for adjusting the quality of carburetor operation. However, practice has shown that using it to achieve a minimum level of exhaust toxicity is very difficult.
Using your car's tachometer, you can adjust the idle speed without a strobe light. However, it is advisable to optimally configure the carburetor for efficiency and absence of harmful emissions at a service station. Despite well-described methods for tuning all models of carburetors, it is always difficult to get to the stand of a qualified carburetor technician.
Adjusting the carburetor float mechanism
Adjusting the float mechanism is a very important and at the same time simple operation when servicing a carburetor. Due to the design of the float mechanism, errors made here are most often the cause of its unsatisfactory operation.
The adjustment is performed with the cover removed and includes two operations:
— checking the degree of protrusion of the needle ball;
— adjusting the position of the float bracket tongue.
The first operation is performed to determine the condition of the needle damping ball and the resulting ability to make subsequent adjustments. At the same time, on the cover removed from the carburetor, measure the distance from the plane of the gasket to the ball protruding from the needle. A distance of 10 mm is considered normal. With a smaller size, you can install an additional gasket under the needle seat.
Before checking the fuel level, first unscrew the carburetor cover mounting screws, leaving the two middle screws tightened. Also, loosen the screw securing the clamp on the fuel hose. Then manually pump up the fuel with a fuel pump until the float chamber is completely filled; As quickly as possible, to prevent “excess” fuel from penetrating into the float chamber, remove the hose from the fuel supply fitting.
If the measured value does not correspond to the tabulated data, bend the float tongue; To lower the level, bend the tongue up, to raise it, bend it down. Before checking the level again with a rubber bulb or syringe, remove at least a third of the fuel from the float chamber.
Once correctly adjusted, the float mechanism remains for a very long time, being disrupted most often due to careless handling of the removed cover, as well as due to the natural wear of the rubbing parts of the mechanism: the needle locking cone, its seat, the tongue and the axis of the bracket.
In operation, there is usually no need to specially disassemble a properly functioning carburetor to check the adjustment; it is enough to combine its control with regular cleaning of the float chamber and air jets.