Removing and installing the oil pump
Removal and installation of the oil pump VAZ 2170
The oil pump is removed for repair when its supply decreases, causing a constant drop in oil pressure in the engine lubrication system, and when oil leaks through the sealing gasket.
You will need: all the tools necessary to remove the timing belt and engine oil sump, as well as a 10mm wrench.
1. Disconnect the wire from the negative terminal of the battery.
2. Drain the oil from the engine oil sump (see “Changing the engine oil and oil filter”).
3. Remove the timing belt (see “Replacing the timing belt and tension pulley”).
Warning
After removing the timing belt, do not rotate the camshaft and crankshaft, as the pistons may damage the valves.
4. Disconnect the wiring harness connector from the crankshaft position sensor.
5. Using two screwdrivers, remove the pulley from the crankshaft.
6. Remove the key from the crankshaft groove.
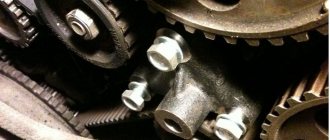
7. Remove the engine oil sump (see “Replacing the oil sump gasket”).
8. Using a “8” wrench, unscrew the three bolts securing the oil receiver...
9. ...and remove the oil pan.
10. Remove dirt and rinse the oil receiver mesh with white spirit. If the screen cannot be cleaned or is damaged, replace the oil receiver.
11. Replace the torn or lost elasticity sealing ring of the oil receiver.
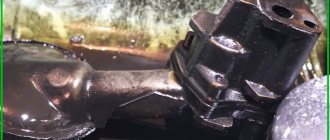
12. Remove the six bolts securing the oil pump to the cylinder block, move the oil pump with a screwdriver, inserting it between the pump and the main bearing cap...
13. ...and remove the pump with the gasket.
Helpful advice
Whenever you remove the oil pump, replace the gasket with a new one. Install only a factory-made original gasket; a gasket of a different thickness will interfere with the normal operation of the pump.
14. Clean the mating surfaces of the cylinder block and pump housing from the remnants of the old gasket.
15. Before installation, fill the oil pump cavity with grease to ensure oil suction from the oil sump when the engine is first started.
16. Rotate the oil pump drive gear to ensure proper installation on the crankshaft; the lugs on the drive gear should line up.
17. . with flats on the crankshaft.
18. Lubricate the seal lip with engine oil. When installing the pump, carefully tuck the working edge of the oil seal onto the crankshaft journal using a wooden stick. After this, tighten the pump mounting bolts.
19. Install all removed parts in reverse order.
20. Adjust the tension of the timing belt (see “Replacing the timing belt and tension roller”).
21. Adjust the tension of the generator drive belt (see “Replacing the generator drive belt”).
22. Fill the engine with oil (see “Changing the engine oil and oil filter”).
Helpful advice
When installing a new or refurbished oil pump, we recommend replacing the oil filter.
Video about “Removing and installing the oil pump” for VAZ 2170
Oil pump VAZ, INSTALLATION, Oil pump VAZ, INSTALLATION. VAZ 16V installation of the timing belt, replacement of the oil pump, about the crankshaft sensor VAZ 2110 REPLACEMENT OF THE OIL PUMP Repair Do it yourself!
Dismantling
Removing the pump yourself is not difficult. Yes, and you are quite capable of performing independent repairs.
To repair, assess the condition of the pump, check the performance and degree of wear of its individual elements, you first need to remove the device and disassemble it.
- De-energize the car by removing the negative terminal from the battery.
- Loosen the generator mounting bolts and remove the belt.
- Prepare a clean container by draining the oil from the crankcase into it. Next, you will need to remove the engine protection and oil pan.
- Remove the camshaft drive timing belt.
- Now that the belt is removed, do not turn the crankshaft or camshaft under any circumstances. Otherwise you will damage the valves by hitting them with the pistons.
- Remove the crankshaft pulley by using two flat head screwdrivers and pulling it off the shaft. If the key does not hold well in its seat, it is better to remove it too.
- Next in line for dismantling is the oil receiver. To remove it, you need to unscrew the two fastening bolts located on the main bearing cover, as well as one fastening bolt connecting the oil receiver to the pump (oil).
- Remove the pump, held in place by six bolts.
- After unscrewing all the bolts, carefully slide the oil pump away from the main bearing cap, then remove the oil pump with peace of mind.
Dismantling the device
Replacing the VAZ 2110 oil pump yourself
Replacing the VAZ 2110 oil pump is necessary in case of its complete or partial failure. A faulty oil pump can most often be identified by certain signs, such as increased or, conversely, too low oil pressure at idle.
Where is the VAZ 2110 oil pump located?
The location of the pump is a mystery to many; it is located in the engine oil sump, and in order to get to it you must drain the engine oil. The oil is drained into a clean canister and after the oil pump is replaced, it is refilled into the engine. Repair work to replace the oil pump is carried out on an inspection pit or lift, using a standard set of tools. In this article I will tell you how to replace the oil pump on a VAZ 2110 at home if the need arises.
Oil pump malfunctions
Oil pump malfunctions can significantly harm a car's engine because they disrupt the normal circulation of engine oil through the system. The causes of the breakdown may be poor-quality oil used, its low level in the crankcase, failure of the pressure relief valve, contamination of the oil filter, clogged oil receiver mesh and several others. You can check the condition of the oil pump either with or without dismantling it.
Signs of a faulty oil pump
There are several typical symptoms of a faulty oil pump. These include:
- Reduced engine oil pressure. This will be indicated by the oil can light on the dashboard.
- Increased oil consumption. Occurs due to leakage or waste.
Increasing engine oil pressure. Engine oil is squeezed out of various seals and joints in the system. For example, oil seals, gaskets, oil filter connection points. In more rare cases, due to excess pressure in the oil system, the car refuses to start at all. This happens because the hydraulic compensators stop performing their functions, and accordingly, the valves function poorly.
It is necessary to understand that some of them may indicate failure of other elements of the oil system. Therefore, it is advisable to carry out the check in a comprehensive manner.
Causes of oil pump failure
The reason why the oil pump has failed can be determined by diagnostics. There are at least 8 main oil pump faults. These include:
- Clogged oil pickup strainer. It is located at the inlet of the pump, and its function is to coarsely filter the engine oil. Like the system’s oil filter, it gradually becomes clogged with small debris and slag (often such slag is formed as a result of flushing the engine with various means).
- Malfunction of the oil pump pressure reducing valve. Usually the piston and spring included in its design fail.
- Wear of the inner surface of the pump housing, the so-called “mirror”. Occurs for natural reasons during engine operation.
- Wear of the working surfaces (blades, splines, axles) of the oil pump gears. It happens both over time of long operation and due to rare changes of (very thick) oil.
- Using dirty or unsuitable engine oil. The presence of debris in the oil can be for various reasons - careless installation of a pump or filter, use of low-quality lubricating fluid.
- Careless pump assembly. In particular, various debris was allowed to get into the oil or the pump was not assembled correctly.
- Drop in oil level in the engine crankcase. Under such conditions, the pump operates at excessive capacity, which causes it to overheat and may fail prematurely.
- Dirty oil filter. When the filter is very clogged, the pump has to make significant efforts to pump the oil. This leads to its wear and partial or complete failure.
Regardless of the reason that caused the partial failure of the oil pump, it is necessary to carry out a detailed check of it and, if necessary, make repairs or complete replacement.
How to determine if an oil pump is faulty
There are two types of pump testing - without dismantling it and with dismantling it. Without removing the pump, you can verify its malfunction only when it is already in a “dying” state, so it is better to remove it to perform detailed diagnostics.
How to check the oil pump without removing it
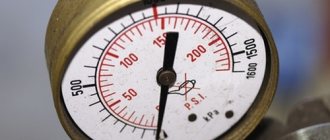
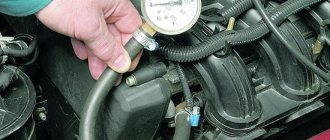
Before directly testing the pump, it makes sense to check the oil pressure in the system using a pressure gauge. This way you can make sure that the oil pressure light is working correctly and did not light up in vain. To do this, a pressure gauge is screwed in instead of the emergency lamp pressure sensor.
Please note that the pressure value often drops precisely “when it’s hot,” that is, when the engine is warm. Therefore, the test must be carried out on a warm engine and at idle speed. The minimum and maximum pressure values will differ for different machines. For example, for a VAZ “classic” (VAZ 2101-2107) the minimum emergency pressure value is 0.35...0.45 kgf/cm². It is under such conditions that the emergency lamp on the instrument panel is activated. The normal pressure value is 3.5…4.5 kgf/cm² at a rotation speed of 5600 rpm.
On the same “classic” you can check the oil pump without removing it from its seat. To do this, you need to dismantle the distributor and remove the pump drive gear. Next, evaluate her condition. If there are numerous scuffs on its surface on the blades or on the gear axis, then the pump must be dismantled. It is also worth paying attention to the gear splines. If they are knocked down, it means the pump is jammed. This is usually due to debris and/or sludge in the oil.
Another check without dismantling the pump is to check the play of its rod. This is done in the same way, with the distributor removed and the gear removed. You need to take a long screwdriver and simply move the rod with it. If there is play, it means the pump has failed. On a normal working pump, the gap between the surfaces of the rod and the housing should be 0.1 mm, respectively, and there is practically no play.
Oil receiver mesh
For further inspection it is necessary to dismantle and disassemble the pump. This is also done in order to subsequently flush out any accumulated debris. First you need to unscrew the oil receiver. In this case, it is necessary to check the condition of the sealing ring present at the joint. If it has hardened significantly, it is advisable to change it. Pay special attention to the oil receiver mesh, since most often it is the reason that the pump does not pump oil well. Accordingly, if it is clogged, it needs to be cleaned, or even the entire oil receiver complete with mesh must be changed.
Checking the pressure relief valve
The next item to check is the pressure relief valve. The task of this element is to relieve excess pressure in the system. The main components are a piston and a spring. When the extreme pressure value is reached, the spring is activated and the oil is poured back into the system through the piston, thereby equalizing the pressure. Most often, the malfunction of the oil pump pressure reducing valve is due to the failure of the spring. It either loses its rigidity or bursts.
Depending on the design of the pump, the valve can be dismantled (flared). Next you need to evaluate piston wear. It is advisable to clean it with very fine sandpaper and spray it with an aerosol cleaner for further normal operation.
It is imperative to inspect the place where the valve fits onto the body. There should be no risks or scratches. These defects can lead to a decrease in system pressure (reduced pump efficiency). As for the valve spring for the same VAZ “classic”, its size at rest should be 38 mm.
Pump housing and gears
It is necessary to inspect the condition of the internal surfaces of the cover, the pump housing, as well as the condition of the blades. If they are significantly damaged, the efficiency of the pump will decrease. There are several standard tests.
Checking the gap between the gear and the oil pump housing
The first is to check the gap between the contacting blades of the two gears. The measurement is made using a set of special probes (tools for measuring gaps of different thicknesses). Another option is a caliper. Depending on the model of a particular pump, the permissible maximum clearance will differ, so the relevant information must be clarified further.
For example, the new original oil pump of a Volkswagen B3 has a gap of 0.05 mm, and the maximum allowable is 0.2 mm. If this gap is exceeded, the pump must be replaced. The VAZ “classic” has a similar maximum value - 0.25 mm.
Which oil pump to install on Lanos and Chance 1.5 and the article numbers of the necessary parts
If the factory oil pump has failed and cannot be repaired, then it should be replaced. To do this, you need to find an alternative option that will last no less than the factory one. It is best to choose original spare parts, even despite their high cost. They are 100% guaranteed to last for the stated period and will not fail at the wrong time. To summarize, let's make a short conclusion about what parts and components will be needed when replacing the oil pump on Lanos and Chance 1.5:
- Oil pump - you need to buy it only after diagnosing the standard mechanism. The original oil pump for Chevrolet and Daewoo Lanos has article number 96350159. Analogues for Lanos are produced by the manufacturers Auto TOP, PHC (Valeo), DW.
- Lanos front crankshaft oil seal - article number 96350161.
- Oil pump gasket - article number 96414580.
- Pan gasket - serial number 96179241.
- Oil pickup ring - article number 94580643.
At the end of the work, the oil and filter are replaced, after which the engine is started and its operation is checked. A video of the process of repairing and replacing the oil pump on Lanos is presented below.
In conclusion, it should be noted that if a Lanos car shows signs of knocking hydraulic compensators, then you should not rush to change them. First of all, make sure that the oil pump provides the required pressure. Usually, when there is insufficient pressure in the system, a short-term knocking of the expansion joints occurs. If, after replacing the oil pump on Lanos, the hydraulic compensators continue to knock, then it is necessary to resort to diagnostics and replacement of these parts.
In order for the oil pump on Lanos to serve for a long time, you need to carry out timely maintenance of the car. In addition, it is very important not only to change the oil, but also to choose high-quality lubricants. From the material you understand what signs indicate a malfunction of the oil pump, and in which cases you should resort to checking the mechanism. Do not rush to replace the part, as in most cases it can be repaired. Once you are convinced that the mechanism is unsuitable, you can replace it yourself, saving on a visit to a car service center, where such a procedure will cost 2 thousand rubles or up to 600 hryvnia excluding spare parts.
Oil pump
Oil pump
Removing and installing the oil pump
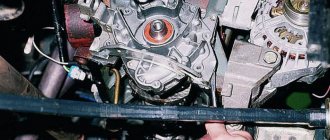
1. If only the oil pump needs to be repaired, place the vehicle on a lift or in an inspection pit, disconnect the wires from the battery and drain the oil from the engine crankcase.
2. Remove the engine splash guard, unscrew the nuts securing the engine front mount cushions to the cross member and slightly lift the engine with a hoist.
3. After unscrewing the mounting bolts, remove the engine crankcase and the oil pump with the inlet pipe.
4. Perform operations to install the oil pump on the engine in the reverse order of removal.
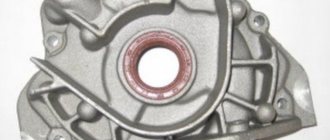
Disassembly and assembly of the oil pump
Disassembling the oil pump
1 – pressure reducing valve; 2 – spring; 3 – cover; 4 – body; 5 – roller.
1. Secure the oil pump carefully in a vice to avoid damaging the housing.
2. Unscrew the bolts and remove the intake pipe along with the oil pressure reducing valve.
3. Remove cover 3 of the pump housing and remove the pump shaft with the drive gear and the driven gear from the housing.
4. To assemble, carefully secure the pump in a vice and perform the operations in the following order: – install the drive gear with the shaft into the pump housing, and put the driven gear on the axle in the housing; – install the pump cover, pressure reducing valve with spring and attach the inlet pipe to the pump body.
Warning! After assembling the pump, when turning the drive shaft by hand, the gears should rotate smoothly and without jamming.
Checking the oil pump
Basic data for checking the pressure reducing valve spring.
1. After disassembling, wash all pump parts with kerosene or gasoline, blow with a stream of compressed air, and then inspect the pump body and cover; If there are cracks, replace the parts.
2. Using a set of feeler gauges, check the gaps between the gear teeth, as well as between the outer diameters of the gears and the walls of the pump housing, which should be respectively 0.15 mm (maximum permissible 0.25 mm) and 0.11 - 0.18 mm (maximum permissible 0 .25 mm).
3. If the clearances exceed the limit values, replace the gears and, if necessary, the pump housing.
4. Using a feeler gauge and ruler, check the gap between the ends of the gears and the plane of the housing, which should be equal to 0.066–0.161 mm (maximum permissible 0.2 mm). If the gap is greater than 0.2 mm, replace the gears or pump housing, whichever is worn.
5. Having measured the parts, determine the gap between the driven gear and its axis, which should be 0.017–0.057 mm (maximum permissible 0.1 mm), as well as between the pump shaft and the hole in the housing, this gap should be 0.016–0.055 mm (maximum permissible 0.1 mm). If the clearances exceed the limits, replace worn parts.
Checking the pressure relief valve
6. When repairing the oil pump, check the pressure relief valve. Pay attention to the valve and pump surfaces, as possible contamination or deposits on the mating surfaces may cause seizing. There should be no nicks or burrs on the mating surface of the valve, which could lead to a decrease in pressure in the system.
7. Check the elasticity of the pressure reducing valve spring, comparing the data obtained with those shown in Fig. Basic data for checking the pressure relief valve spring are listed in the section on crankcase ventilation.
Checking the oil pump drive shaft and gear
8. There should be no dents or marks on the surfaces of the roller support journals and on the working surface of the eccentric.
9. The teeth of the oil pump drive gears and the ignition distributor must not be chipped; if such a defect occurs, replace the shaft and gear.
Checking the oil pump drive shaft bushings
10. Check the inner diameter of the bushings, their pressing into the sockets, and also the alignment of the lubrication hole in the front bushing with the channel in the cylinder block (rotating the bushing). The inner surface should be smooth and free of burrs.
11. Having measured the diameters of the roller and bushings, determine the gaps between the bushings and the bearing surfaces of the roller. If the gap exceeds 0.15 mm (maximum wear), or if the surfaces of the bushings are damaged or their press fit is loosened, replace the bushings.
12. When replacing, use both for removal and installation, mandrel A.60333/1/2 (1 – mandrel A.60333/1/2).
13. The bushings must be pressed into their sockets, and the oil hole in the front bushing must be opposite the channel in the cylinder block.
14. After pressing, the bushings must be finally processed and adjusted to the internal diameter (dimensions are given in Fig. Main dimensions of the oil pump and its drive).
15. To ensure complete alignment of the shaft bushings, a reamer A.90353 is used to finish them, which simultaneously processes both bushings.
Checking the oil pump drive gear bushing
16. The inner surface must be smooth and free of burrs, otherwise replace the bushing.
17. To press out and press in the bushing, use mandrel A.60326/R (1 – mandrel A.60326/R).
18. After pressing, expand the bushing to a diameter of 16.016–16.037 mm.
Diagnostics and testing of the Lanos oil pump - troubleshooting
When the oil pump on Lanos is removed, you should inspect it. The absence of visual signs of wear does not mean that the mechanism is suitable for further use. It is checked as follows:
- First you need to inspect the gear mechanism. To do this, use an impact screwdriver to unscrew the 5 screws securing the oil pump cover.
- After removing the cover, we inspect the gears. Signs of wear can be identified visually.
- Using a caliper and feeler gauge to adjust the valves, check the clearance between the housing and the output rotor. To do this, we apply the edge of the caliper to the body and measure the distance to the rotor mechanism. The permissible distance value is 0.4-0.484 mm. If the gap is greater than the specified limit, then the pump must be replaced. With an increased distance, the mechanism will not be able to create the necessary pressure, so its further operation is irrational.
- The next step of testing involves measuring the distance between the peaks of the inner and outer gear teeth when they are aligned. This distance should be between 0.035 and 0.085 mm. If the gap is greater than the specified values, then the mechanism must be replaced.
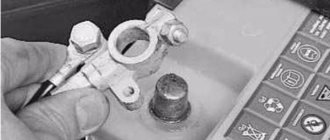
- Another important part of the mechanism that needs to be checked is the pressure reducing valve. At the same time, we will also find out where the pressure reducing valve is located on Lanos. Using a 24 mm wrench, unscrew the pressure reducing valve bolt.
- The valve components are a bolt or plug 1, an o-ring 2 (it must be replaced if the oil pump is used further), a spring 3 and a valve with holes 4 (the valve can be represented in the form of a ball).
- Checking the valve involves measuring the length of the spring. When free, it should be 81 mm. If the values deviate from the norm, the part must be replaced.
- Another sign of valve malfunction is the valve jamming in the channel. If the valve does not come out of the channel, the oil pump should be replaced immediately.
- If there are deposits in the oil pump holes, they should be removed. If there is damage to the channels, then the part must be completely replaced.
- After diagnosing and repairing the Lanos and Chance 1.5 oil pump, it should be properly assembled. To do this, tighten the pressure reducing valve bolt with a torque of 30 Nm. Before installing the cover in place, it must be treated with Loctite 242 sealant (recommended by the manufacturer) or equivalent. The five bolts are tightened with a torque of 8 Nm.
This completes the process of diagnosing and repairing the oil pump for Chevrolet and Daewoo Lanos cars. If the mechanism is suitable for use, then it is assembled in the reverse order of removal. Before installing the pump, it is necessary to additionally lubricate the sealing gasket with RTV sealant. The fastening bolts are tightened with a torque of 30 Nm. Don’t forget to also fill the pump with oil and rotate the gears, pre-lubricating them.
This is interesting!
When replacing the oil pump, a new crankshaft oil seal is installed. Moreover, it is pressed in after the oil pump is installed.
Replacing the oil pump on a VAZ 2110
Obviously, the oil pump (OP) in the VAZ 2110 car system serves to transport the lubricant.
It’s not uncommon that when you get behind the wheel and start the engine, a warning light with an image of an oil can lights up on the dashboard and does not go out. In this case, the likely cause of the signal may be a failed pump.
troubleshooting
Don't rush to conclusions and blame the pump for everything. It is necessary to organize a full check to make sure what caused the signal to appear on the dashboard.
Check area
Your actions
You need to check the functionality of the electrical circuit that goes from the sensor to the instrument panel. The wire that goes from the regulator to the engine must be connected to ground. If the circuit is working properly, the lamp will go out.
Checking the oil filter
Just unscrew the oil pressure sensor. If it is soaked in lubricant, everything is fine. If it is dry, then the filter is clogged or the filter valve is stuck.
Checking internal elements
You will need to replace the filter if there is a problem with it. Next, the pan is opened and the condition of the oil receiver and rubber seals are inspected.
If the measures taken did not produce results, the lamp still does not go out, then the pump is the culprit in the current situation.
Useful information
Let's talk a little about the principles of the design and operation of the oil pump. This can help you during the repair process.
- Domestic “tens” use a combined lubrication system.
- The design of the car provides for the presence of a gear oil pump. It is installed on the front end of the cylinder block.
- Special gears with trochoidal internal gearing help reduce mechanical losses during rotation.
- The pump is equipped with a full-flow filter with a non-separable design. It contains an anti-drip and bypass valve.
- This design guarantees efficient circulation of lubricant throughout all engine components.
- The pump operates by rotating the crankshaft. The connection is direct.
- The operating life of the pump is about 120 thousand kilometers.
Location
Not everyone knows where to look for this oil filter. It is not located in a visible place, so you will have to try hard to gain access to the device.
The MN is located directly inside the engine oil sump. To get to it, the oil must be drained from the engine.
Element location
Please note that if your engine uses high-quality oil that was only recently filled, use a clean container when draining it so that you can then refill the same substance. If the oil is old, replacing the pump is an excellent reason to change the lubricant.
Dismantling
Depending on the situation, the oil pump can be completely replaced, or repair work can be performed - change gears, return the pump pressure reducing valve to functionality.
Pressure reducing valve
But let's talk about everything in order. In any case, work begins with dismantling the oil pump.
- Before you remove the pan to gain access to the pump, you will definitely need to drain the oil.
- To do this, warm up the engine to operating temperature, open the drain hole and wait until all the liquid drains out.
- Draining can also be done when it is cold, but due to its high viscosity, the oil can flow for a very long time and most of it will still remain inside the crankcase.
- After draining the oil, remove the three mounting bolts from the crankcase protection using an 8 mm wrench. The protection blocks access to the flywheel near the crankcase.
- Remove the flywheel guard and then remove the bolts from the crankcase. That's it, now the crankcase can be removed.
- In front of you is the crankshaft and the oil sump where the desired pump is located.
- By unscrewing the three mounting bolts, you can remove the intake from the pump.
- Let's move on to the engine compartment. Lift the hood and remove the plastic cover. This is a guard that covers the timing belt.
- Next, you need to remove the front right wheel to remove the pulley fixing washer, and then remove the pulley itself.
- Remove the timing belt and remove the six mounting bolts that hold the oil pump in place. Here you will need an 8 mm wrench.
- Remove the oil pump from the crankshaft.
Removing the cover
Disassembly
If you do not want or cannot yet purchase a new pump, you can try to repair it. Perhaps the problem is a malfunctioning valve or worn gears.
- Remove the gasket from the pump;
- Remove the bolt holding the crankshaft position sensor;
- By unscrewing the six mounting bolts, you can remove the cover from the pump;
- Using a pair of screwdrivers, lift the housing so that the pins on it come out of their holes freely;
- Remove the body, disconnect it from the cover;
- Now you need to remove two gears from the cover. The drive gear is removed first, and then the driven gear is removed;
- Next in line is the pressure reducing valve. You need to unscrew the plug under which the o-ring is located;
- Check the condition of this seal. If the ring shows signs of damage or is too squeezed out, be sure to replace it with a new one;
- Remove the valve spring;
- Now you can remove the valve itself. To do this, gently tap the case on a stand made of pure wood;
- The valve may be stuck. Do not worry. Take any thin, sharp object, pry it up and remove the element. It is better not to use metal objects so as not to damage the surface;
- Check the current condition of the aluminum cover. If there are deep scratches or signs of wear, replace it;
- If the pump body shows signs of wear, do not even try to repair anything. The only correct solution would be to completely replace it;
- You also need to make sure that the gears and the diameter of their sockets comply with the standards;
- The maximum diameter of the driven gear socket is 75.1 millimeters. If it is larger, the case must be replaced;
- Measure the width of the body in the middle. If the indicator is less than 3.4 mm, it is worn out and needs to be replaced;
- As for the thickness of the gears, according to the requirements, the thickness of the drive is at least 7.42 mm, and the driven one - 7.35 mm. In case of deviations from the norm, the gears are changed.
Removing the gear
Assembly and installation
If you managed to repair the oil pump, then all that remains is to assemble it and install the unit in place. If you decide to completely replace the device, skip the first part of the further instructions.
- Install the driven gear onto the housing with the chamfers on the teeth.
- Also, the new pump drive gear is returned into place using chamfers on the teeth.
- Be sure to remember to lubricate the gears with oil so that they work more reliably and longer.
- Replace the pump cover and screw back all the fasteners.
- Lubricate a new or repaired old relief valve before installing it in its proper place.
- The valve fits into its seat. Make sure installation is done bottom down.
- Now it’s the turn of the spring and the plug, which is wrapped with an o-ring. Again, these elements are pre-lubricated with engine oil.
- Using the oil pickup tube, oil is poured back into the unit.
- Once assembly is complete, rotate the pump gears several full turns. This will ensure effective lubrication of all surfaces inside the pump.
The unit is assembled and can be returned to its place. For this:
- Return the timing belt to its place by pulling it onto the rollers. Don't forget to set according to the labels;
- Return the plastic belt protection to its rightful place, install the wheel;
- Now you need to crawl under the car to install the oil pick-up on the pump;
- Be sure to treat the crankcase with compounds, removing all fat. Treat with sealant;
- We recommend installing a new gasket on the crankcase, after which another layer of sealant is applied;
- The block is degreased, the crankcase is returned to its rightful place;
- To make it easier to attach it, tighten several bolts at different points, and then screw in all the rest;
- Protection is installed on the flywheel, the crankcase protection is returned to its place;
- Pour oil back into the system, start the engine, and allow the oil to distribute throughout the components.
Reassembly
If you carry out all the manipulations correctly and first determine that it is the pump that has failed, the warning light on the dashboard will go out.
The oil pump plays a huge role in the functioning of the engine’s lubrication system, so at the first sign of its breakdown, immediately go to the garage, or entrust the replacement to specialists from trusted service stations.