How to remove a VAZ 2101 gearbox with your own hands
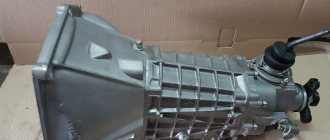
VAZ-2101 cars are equipped with a 4-speed manual transmission, the main part of the gearbox is located under the bottom of the car.
Basic faults
The gearbox used on the Kopeyka is structurally a fairly reliable unit, capable of handling a significant resource without any special intervention. But still there are problems with the gearbox.
The main problems with this unit are:
Of course, there are other types of malfunctions, for example, jamming of the gearbox while driving, inability to engage or disable any gear, destruction of gears or shafts, breakdown of the gearbox housing.
But such problems arise much less frequently and are mainly due to improper operation of the gearbox, as well as design defects in the component elements of the box. Elimination of any of the malfunctions is carried out on the removed box. Therefore, in order to restore the functionality of the gearbox, you must first know how to remove the gearbox on a VAZ-2101.
Moreover, it doesn’t matter whether the VAZ-2101 gearbox is being repaired or replaced, it will still have to be removed.
What you need
This operation is not particularly complicated, but it requires certain skills and knowledge of the sequence of work. The complexity of the operation lies in the fact that many elements have to be unscrewed and disconnected, and access to them is not always convenient.
To remove the box you will need the following tools and accessories:
All work is carried out in three places - the interior, the engine compartment, and under the car. Therefore >a viewing hole will definitely be required.
Sequence of work
Having prepared everything you need, you can begin work.
The removal sequence is as follows:
If the gearbox is to be repaired, then the VAZ-2101 gearbox is then disassembled, followed by replacement of worn elements, and then the unit is assembled and installed in place.
Reinstalling the box is carried out in the reverse order. In this case, you should check the installation of all removed elements in place, as well as the reliability of tightening the fasteners.
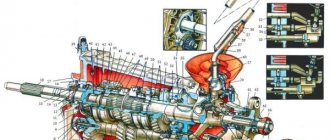
Article on the topic - VAZ-2101 gearbox design
Video - how to remove a gearbox without a hole
← We tried, your assessment is interesting. Loading…
Sequence of work
Having prepared everything you need, you can begin work.
The removal sequence is as follows:
- We place the car in the pit and immobilize it with wheel chocks installed under the wheels. We put the gearbox in the neutral position, do not tighten the handbrake;
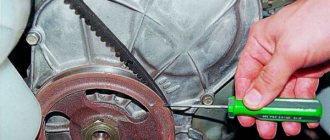
- First we will do all the work in the salon. At this point it is necessary to remove the lever from the box rod. To do this, pull the lever boot up, which will provide access to the fixing sleeve. You need to carefully pry it up with a thin screwdriver so that it pops out, after which you can pull the lever off the rod;
- Remove the upper plastic bushing from the rod by loosening the petals with a screwdriver, then the rubber boot and the lower bushing. As a result, there should be nothing left on the rod;
- Remove the plastic trim located under the floor covering. To do this, you need to remove the seats, their guides, etc. from the car. It is much easier to make a cut towards the rear seats, this will allow you to not disassemble the interior. Having provided access to the cover, unscrew the 4 screws securing it and remove it. We turn on 1st gear at the gearbox;
- Let's go under the car. For ease of work, the exhaust system should be completely dismantled. To do this, unscrew the muffler from the exhaust pipe. To make it easier to unscrew bolts and nuts, you should treat them with WD-40 in advance;
- Having removed the muffler, we go into the engine compartment and unscrew the nuts securing the exhaust pipe to the exhaust manifold. Then we remove this pipe from the car;
- All subsequent work is carried out under the car. Unscrew the driveshaft from the gearbox flange. Next, unscrew the two safety crossbars to lower the cardan down;
- We substitute the prepared container and unscrew the drain plug to remove oil from the gearbox;
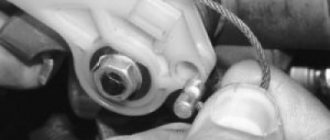
- Unscrew the fastening of the clutch slave cylinder. In this case, there is no need to disconnect the pipe from it; after unscrewing the fastening, it should simply be moved to the side;
- Unscrew the 4 bolts securing the clutch housing cover;
- We support the back of the box with a beam and unscrew the nuts securing the cross member. Carefully pull out the timber. In this case, the rear of the gearbox will go down a little, this will provide more convenient access to the remaining elements that need to be removed;
- We disconnect the chip with the wiring suitable for the gearbox. Unscrew and remove the clutch cable;
- We get to the bottom and unscrew the starter mounting bolts. Start with the top bolt. After unscrewing the fastening, move the starter away;
- We place a support under the rear part of the engine, after lifting the box by hand;
- We unscrew the bolts securing the gearbox to the power plant;
- Supporting it with your hands, rock it up and down to remove it from the guides, and then remove the input shaft from the clutch and lower the box down;
- We install the prepared section of the input shaft into the clutch to prevent displacement of the driven shaft.
If the gearbox is to be repaired, then the VAZ-2101 gearbox is then disassembled, followed by replacement of worn elements, and then the unit is assembled and installed in place.
Reinstalling the box is carried out in the reverse order. In this case, you should check the installation of all removed elements in place, as well as the reliability of tightening the fasteners.
Article on the topic - VAZ-2101 gearbox design
Replacing the VAZ 2107 gearbox
The gearbox is the key unit of the car, transmitting torque from the engine to the wheels. Over time, transmission parts wear out and it may require repair or replacement.
Replacing a VAZ 2107 gearbox does not require the use of non-standard tools, but the large mass of the unit makes the operation quite dangerous. Removal and installation should be done carefully to avoid injury or damage to the vehicle.
Signs of the need to replace (repair) the VAZ 2107 gearbox
To eliminate most problems, a complete replacement of the gearbox is not required, but repairs require its removal and installation.
List of required tools
Removing the VAZ 2107 gearbox
First you need to roll the car onto a pit or onto a lift and remove the negative battery cable. This must be done so that when the starter is disconnected, a short circuit does not occur.
When placing in a pit, apply the handbrake and support the rear wheels with shoes or bricks. Otherwise, the machine may roll during operation. This is not required when using a lift.
You can start work by removing the decorative cover of the gear shift lever. Then you need to remove the lever spacer sleeve, for which it is better to use a thin screwdriver or an awl, and remove the lever together with the sleeve.
To avoid losing parts, it is better to insert the spacer back into the gearshift lever.
Under the decorative mat there are four self-tapping screws that secure the cover. They are unscrewed with a Phillips screwdriver, after which the cover should be removed along with the foam seal to avoid damage when removing the gearbox.
Next, you should go into the pit (lift the car on a lift).
First, remove the exhaust pipe from the muffler and the starter.
To remove the cardan, it is necessary to unscrew the bolts securing the cardan suspension to the body and connecting the cardan to the rear axle gearbox. After this, the cardan is easily removed from the coupling splines.
Now you need to find the block of wires connected to the reversing light sensor and disconnect it. It is attached to the right side of the box. Then you need to unscrew the speedometer cable nut using pliers and remove it, then unscrew the bolts securing the clutch housing cover and remove them.
To avoid injury or damage to the vehicle, you should be safe by supporting the gearbox.
When working from a pit, this can be done with a short, strong block and a jack, or with a long block if using a lift or pit.
It is better to play it safe with a support or to involve partners in the work who will support the gearbox during the dismantling process. All that remains is to remove the clutch slave cylinder and remove the gearbox.
Installation is in the reverse order.
How to replace the gearbox on a VAZ 2101-VAZ 2107?
Note! Before you begin the operation, be sure to make sure that the box malfunction is not caused by any other reasons, for example:
1. There is not enough oil in the box or there is no oil at all, which is why the gear shift knob will move heavily and the gears will engage with a strong crunch.
2. Also check the tightness of all the bolts that secure the box, because due to their looseness, the box may oscillate and also dangle while driving and this will mainly be noticeable on bumps.
3. Another malfunction may be in the clutch drive itself, namely, due to a broken clutch drive, the clutch pedal in a fully depressed state will not work at all, or if the clutch drive is worn out, when squeezing the speed pedal, it can be just as difficult to shift and shift from characteristic crunch. (For more detailed information, see the article entitled: “Replacing the clutch”, in this article you will find a section entitled: “When you need to change the clutch”, so study this section in detail and you will know what signs will indicate clutch wear )
Removal:
1) First, drive the car into the pit.
2) Next, if possible, place stones under the rear wheels, and also be sure to lower the handbrake to the very bottom.
3) Next, remove the gear shift lever from the car. (For information on how to remove the lever, see the article entitled: “Replacing the Shift Lever”)
4) Now that the lever has been removed, there will be three bushings left on the main lever or the so-called rocker, which will also need to be removed, for this:
1. Using two screwdrivers, lightly spread the petals of the uppermost bushing (As shown in the photo at the very bottom), and then remove the upper bushing.
2. Then, holding the bushings “A” and “B” with your hands, with a little effort, remove them from the lever.
5) Next, remove both screws that secure the cover to the floor, and then remove it.
6) Next, again using a screwdriver, unscrew the two screws that secure the handbrake cover, and then remove this cover.
7) Then remove all the screws that are located under both front seats and that secure the front carpet of the car in different places to the floor.
 Next, move both front seats back as far as they will go, and then bend the edges of the floor mat.
9) Now on both front seats, unscrew the nuts that secure the seat slides to the brackets.
10) Then unscrew the four screws securing the trim to the threshold, and then remove the metal trim.
Note! Do the same operation with the other metal trim, which is located on the opposite side of the car!
11) Then lift the floor mat and thereby roll it into the front of the car so that it does not interfere; when folding, be sure to pass the mat ring indicated by the letter “A” through the lever or the so-called box link “B”.
12) Next, unscrew both screws that secure the plastic cover of this very rocker, and then remove this cover from its installation location.
13) Next, remove the hose that is responsible for supplying warm air to the air filter housing. (For information on how to remove this hose, see the article entitled: “Replacing the air filter housing on a VAZ”, paragraph “1-3”)
14) When the warm air supply hose is removed, use a wrench to unscrew all the bolts that secure the starter and then move the starter slightly forward. (For information on how to unscrew the bolts and then move the starter, see the article: “Replacing the starter on a VAZ”, in paragraphs “10-12”)
15) Now unscrew the gearbox housing drain plug and then drain all remaining oil from this hole into some container. (For more information on how to drain the oil from the box, see the article: “Changing oil on a VAZ”, paragraph “2-4”)
16) Then completely remove the entire muffler from the vehicle. (For information on how to remove the muffler, see the article: “Replacing the muffler”)
17) Next, after removing the muffler from the car, disconnect the cardan coupling from the box flange. (For information on how to do this, read the article: “Replacing a universal joint on a VAZ”, point “3-6”)
18) Next, find the wiring block that is connected to the reversing light sensor, which in turn is located on the right side of the box itself. Once this wire block has been found, disconnect it from this sensor by hand.
19) Now, by hand or using pliers, loosen the speedometer cable nut indicated by the arrow, and after loosening this nut, disconnect the end of the cable from the gearbox.
20) Then remove the clutch slave cylinder. (For information on how to remove the slave cylinder, read the article entitled: “Replacing the clutch slave cylinder”, paragraph “2-6”)
Note! The working cylinder only needs to be removed from the bracket, and the cylinder hose nut does not need to be unscrewed!
21) Next, remove the four bolts that secure the clutch housing cover.
22) Next, support the crossbar or the so-called bracket with a thick and long block, which at one end will rest against the crossbar and the other will stand on the ground.
23) Then remove both nuts that secure the cross member to the car body.
Note! The second nut is located on the other side of the cross member and therefore, due to the chosen angle, it is unfortunately not visible!
24) Next, carefully remove the block and then bring together the back of the box.
25) Now prop the same stick, but only the front part of the engine, strictly in the place shown in the photo:
26) Next, remove the two upper bolts that secure the clutch housing to the engine.
27) Then have a helper support the rear of the box while you remove the last two bottom bolts that secure the clutch housing to the engine.
Note! The second bottom bolt is located on the other side of the box!
28) After all the operations performed, first move the box back until the input shaft of the box comes out of the clutch.
Note! When removing the box, try not to lean it on the clutch flange and other parts!
Installation:
Note! Before proceeding with the installation of a new box, it is recommended to lubricate the splined part of the box’s input shaft using LSC-15 or Litol-24 grease, and after lubrication, select either “1st” or “3rd” gear and then proceed with the installation!
1) Install the new box in the reverse order of removal.
Note! When you install the exhaust pipe of the muffler, do not tighten the nuts securing it directly to the bracket on the box, but rather first tighten the nuts where the exhaust pipe is connected to the exhaust manifold, and only then tighten the nuts securing the exhaust pipe to the bracket located on the box!
2) After installation, fill the required oil level into the gearbox and then get into the car and test the gearbox for performance, and after the test, if no violations are found, then start the car and drive it.
Important! It is recommended to do the removal and installation of the box only with an assistant, because the box is very heavy and therefore you may not be able to hold it and drop it either on the ground or on yourself!
Additional video clip: For more detailed visual instructions on how to remove the box, see the interesting video clip located just below:
VAZ-2101 cars are equipped with a 4-speed manual transmission, the main part of the gearbox is located under the bottom of the car.
VAZ 2107 - we do the gearbox repair ourselves
Gearbox VAZ 2107
Along with the engine and transmission, the gearbox is the main chassis of any car. It’s not worth going on the road without a reliable and properly adjusted gearbox.
Every driver knows this, and experienced drivers can even repair it themselves if problems suddenly arise.
In this article we will look at, through step-by-step instructions, how to repair the gearbox of a VAZ 2107 car.
Removing the gearbox from the car
For a VAZ 2107, we repair the gearbox after the causes of the malfunction are identified and the gearbox is removed from the car. This is not an easy task, but if there is an assistant nearby, everything will go without a hitch. So let's begin:
Removing the rod from the gear shift lever
Unclamping the petals of the spacer bushing
Unscrewing the clutch mounting bolts on a VAZ 2107
The VAZ 2107 repair process requires special knowledge and skill. Before you start disassembling the gearbox, you need to equip yourself with the following tools:
So, let's move on to the actual repair:
Disconnecting the speedometer flexible shaft
Removing the clutch from the ball joint of the lever
Removing the gasket
In this video you can see with your own eyes how to do everything correctly and not make mistakes.
We continue the process of disassembling the gearbox:
The photo below shows everything perfectly:
Removing the gearbox rear cover nuts
Treating threaded holes with fixing glue
Unscrewing the remaining fastening nut
To make it easier to remove the rear gearbox cover, use a screwdriver to push in the shift rod for first and second gears. The gearbox must be in second gear.
Before removing the cover, remove it from the studs and turn it clockwise. The operation must be carried out very carefully and carefully so as not to damage the gasket installed under the cover. It is very sensitive and can tear.
If this does happen, then you need to install a new gasket yourself.
Pressing out the plastic plug
You need to work very carefully and in order not to damage the surface of the back cover, it is recommended to place it on two wooden blocks. After this, press out the bearing of the gear block of the fifth and rear gears. As for the inner ring of the bearing, it remains on the block shaft.
Removing the rear secondary shaft bearing
At this point you can finish disassembling the gearbox and replace worn parts. But if the reason lies deeper, then experts advise continuing repairs. The step-by-step instructions presented above will help you not only learn how to repair a car when it breaks down, but also save a lot of money. After all, as you know, the price for this type of service or a new gearbox is very high.
Such are the things! Good luck!
Gearbox VAZ 2107: operating instructions
The VAZ 2107 gearbox is one of the main parts of the vehicle. If the gearbox is faulty, then you should not go on the highway, as this can lead to an emergency. Due to the fact that the design of the VAZ 2107 gearbox is quite simple, repairing it yourself will not be difficult for people who understand at least a little about cars.
Generally speaking, gearbox repair conditionally consists of two stages:
- The gearbox is removed from the car;
- Immediate start of repairs;
Each phase has its own sequence of actions. We will consider them for each stage separately.
On a note. The process of repairing a conventional gearbox and repairing a 5 VAZ 2107 gearbox is the same.
Main problems with the VAZ 2107 gearbox
There can be many gearbox malfunctions, but the most common of them are:
- Noise at the checkpoint. The reason may be bearing wear, lack of oil in the gearbox;
- Changing gears is difficult. A common cause may be a breakdown of the lever that is responsible for changing speeds;
- Oil leakage. Causes: worn oil seals, loose crankcase caps.
Of course, these are not all the problems that can arise with the gearbox.
First stage. Removing the gearbox from the car
Repair of the VAZ 2107 gearbox must be carried out when the first signs of a malfunction appear. For repairs, it is necessary to remove the gearbox from the vehicle.
On a note. It is quite difficult to do this alone. Therefore, it is advisable to have an assistant so that everything goes smoothly.
- the first thing to do is to lift the vehicle above the pit or onto an overpass;
- disconnect the wire with a minus sign that goes to the battery;
Do not forget that on VAZ cars, for repairs, the radio panel must be removed.
- press the box lever;
- a screwdriver is inserted into the marked hole. It has a bushing that is of the locking type;
- the screwdriver needs to be moved down;
- remove the sleeve from the rod;
- we separate this rod located on the RPP.
- the rubber bushing of the damper is removed from the rod using pliers;
- then you need to unclench the petals that grip the damper bushing, then you need to remove them from the lever (see the figure).
- then the damper spacer bushing is removed;
- the floor upholstery moves;
- the bolts that secure the cover covering the hole are unscrewed;
- the lever is removed simultaneously with the foam rubber seal;
- the receiving pipe is removed from the device releasing gas;
- we climb under the car;
Read the latest news from the world of sedans here, you will learn everything about tuning here.
- the starter is removed;
- the “cross” is removed;
- the support cross member of the power device is disconnected;
- it is necessary to remove the flexible shaft, which is connected to the speedometer drive;
- The hydraulic drive cylinder must be separated from the crankcase. Important! The hose attached to it does not need to be touched;
- remove the bolts securing the clutch housing cover using a ten key;
- it is necessary to install a support under the gearbox;
- you need to take an extension cord and put it on a 19 socket type key;
- using a key and a “cross” hinge, you need to unscrew the bolts securing the cylinder block with the clutch;
- using a screwdriver that was inserted into the gap, it is necessary to press the clutch away from the cylinder;
- remove the starter from the directional bushings;
- the input shaft of the VAZ 2107 gearbox must be removed from the driven disk hub;
- we displace the primary shaft from inside the bearing ring located in the crankshaft;
- and finally, remove the gearbox from the car.
Second phase. Disassembly and direct repair
Before starting repairs, it is necessary to clean the outer part of the gearbox using a brush and rinse it with kerosene. Now we can begin. The fork that disengages the clutch and the release bearing in the clutch is removed from the gearbox. We separate the secondary shaft from the propeller shaft and disconnect the edge of the EF from the secondary shaft. Then we separate the entire power unit block. We remove the speedometer drive.
- It is necessary to remove the cuff from the ball joint;
- Unscrew the three fastening nuts that secure the shift lever to the rear of the crankcase;
- The sealing gasket is removed from the stud;
- Using a socket-type wrench, loosen the nuts that secure the supports (bracket) of the exhaust pipe;
- This support is removed and the bolt that is located between them is removed;
- The nuts that secure the cover from the back must be unscrewed using a thirteen wrench;
- Using a 10mm socket wrench, unscrew the 10 nuts securing the bottom cover of the box;
- After which the cover is removed and the gasket is removed from under it;
If the nuts are turned out at the same time as the studs, it would be wise to use fixing glue. Before applying it to threaded holes and studs, they must first be washed with solvent. After completing this procedure, you need to take a 30mm wrench and unscrew the nut that secures the back cover. You can see it inside the crankcase itself.
Then you need to remove the back cover. Important! It is necessary to put in second gear. We take out the plug made of plastic, which is located on the back of the lid; using tweezers or tweezers, you need to remove the thrust ring. And finally, we take out the secondary shaft ring, which is located inside.
Sometimes it becomes necessary to replace bearings. So, replacing the VAZ 2107 gearbox bearings will be carried out according to the following algorithm:
- The retaining ring is removed from the holder located outside;
- Using a puller, the ring is removed;
- Then we take out the old bearing and insert a new one, after which we put the retaining ring in place.
This completes the disassembly of the VAZ2107 gearbox. Now you can replace all unusable parts.
We repair the gearbox on a VAZ 2107 with our own hands
Of course, everyone knows that repairing a car’s engine or gearbox is best left to professionals. But for every owner of a VAZ 2107 it will be absolutely useful to know how to remove the box and repair it yourself.
The VAZ 2107 five-speed gearbox needs repair when the following symptoms appear:
These symptoms are caused by wear of various parts of the gearbox 5, for example, bearings, synchronizers, spherical joints or oil seals. But in any case, if malfunctions are detected, removal and disassembly of the mechanism will be required. And in order to do all these steps correctly, you need to be familiar with the structure of the VAZ 2107 gearbox and be able to disassemble it.
Gearbox device for VAZ 2107
In general, the five-speed transmission has the same functions as its predecessors: it varies the direction and magnitude of torque from the engine. The differences are that the five-speed has 6 speeds, including 1 reverse speed.
Inside the gearbox housing there are:
If any malfunctions are detected, it is recommended to remove the box based on the manufacturer's instructions.
Work on dismantling the five-speed gearbox VAZ 2107
Installing the car on a lift (you can use an overpass or a pit) is preceded by disconnecting the battery and removing the radio panel:
At this stage, it is also advisable to drain the transmission oil.
After all these steps have been completed, we repair the VAZ 2107 gearbox.
Repair process
Next, you should carefully unscrew all the fastening bolts, sequentially releasing the parts.
Each gear is disassembled separately, and it is important to carefully check not only the gaskets, but also the seals. Correcting and diagnosing breakdowns includes replacing gaskets, this is a prerequisite; oil seals are usually changed if they are very worn.
To replace parts, you can buy a ready-made gearbox repair kit, designed taking into account the most frequently occurring faults in five-speed gearboxes.
Also, before disassembling the transmission, prepare the necessary tools: an impact driver, a three-jaw puller, wrenches of different diameters and a torque wrench.
Also for maintenance you will need fixing glue, a set of gaskets and seals, preferably a repair kit.
After all the parts have been checked and replaced, you can begin assembling the gearbox, carrying out all the steps in the reverse order. If the parts have undergone too much wear and replacement of individual components no longer helps, a complete replacement of the gearbox on a VAZ 2107 may be necessary.
Thus, it is quite possible to carry out maintenance and repair of the VAZ 2107 gearbox yourself, the main thing is to follow all the requirements of the dismantling instructions and follow the drawings during assembly.
We remove the gearbox on a VAZ 2107 car
The gearbox is one of the main components of the chassis of a car. It must always be correctly adjusted and work properly. To carry out self-repair of the gearbox, you need to know how to remove the box on a VAZ 2107. The article provides detailed instructions and a video that describes and shows the process of removing the box, and lists the tools necessary for the work.
Transmission replacement may be required in the following cases:
Box removal process
To carry out the removal procedure, the car must be placed on an overpass, lift or inspection pit, since the process is labor-intensive and difficult. Removing the box is impossible without help, so you should call a couple of people, preferably with experience in car repair.
Tools
To carry out the gearbox removal procedure, you will need the following tools:
Stages
The thrust flange of the clutch basket must not be used to support the end of the transmission input shaft.
Video “Classic of removing the gearbox on a VAZ car”
This video is about how to remove the gearbox with your own hands on a VAZ car.
Was this article helpful?This article was helpfulPlease share the information with your friends
Source
Replacing the clutch disc on a VAZ-2104-2107
The clutch is the most important component of a car, without which it is impossible to imagine the operation of the gearbox mechanism, as well as the car’s performance of such operations as starting and braking to a final stop. In other words, the clutch is a necessary mechanism of any car, which is a kind of transfer point between the engine and the drive axles.
This unit includes:
So what is this component of the clutch mechanism? This is a disc with spring plates and friction linings that are not connected to each other and are made of a material comparable to the material of the brake pads, i.e. abrasion resistant. In the center of the disk there is a hub with a splined connection.
Malfunctions
As a result of vehicle operation, the clutch disc, like any consumable material, can become unusable - the springs weaken, the friction linings wear out and become thinner.
Manufacturers do not indicate a specific service life of the disk, because it depends only on the driver: one “clutch” can last only 5,000 km, while another can last 100,000.
Increased clutch wear can result from:
Usually there are two faults for which it is worth considering repairs:
When slipping, the driven disk is not pressed completely against the flywheel.
What does this mean? If you sharply press the gas pedal while the car is moving, you may notice an increase in engine speed, but there will be no increase in speed.
In the end, the car will someday just stand up and only towing or muscle power can set it in motion. Therefore, the issue of replacing the driven disk should not be shelved.
When the clutch “drives”, uncharacteristic sounds and noises are observed when changing gears, gears are difficult to engage. In this case, the driven disk, on the contrary, does not completely “separate” from the flywheel.
In this case, pumping the hydraulics and adjusting the free play of the clutch helps, which can be easily done by anyone in a garage.
If you ignore this malfunction, you can run into expensive gearbox repairs.
Clutch kit price
Now, in the era of the development of the Internet, there is no need to run to stores and look for the necessary spare part. It is enough to have access to the World Wide Web and you will have any detail in a couple of clicks. Prices for clutch discs for the VAZ-2107 vary from 470 to 2000 rubles. The cost of replacement work in Moscow and the Moscow region is 2–2.5 thousand rubles.
What advice can you give when choosing a disk? First, rummage through the forums and read reviews. Secondly, when purchasing a disc, do not be lazy to inspect it. Examine the splines especially carefully - there should be no nicks or burrs there, otherwise there is a risk that the disk simply will not fit on the shaft or will not be removed during the next replacement.
Take a look at the friction linings: they should all be uniform in composition and free of cracks. Another point is the quality of the riveting. The key to quality here is the identical dimensions of the flange. Try to swing the damper springs; if there is play, then you should refuse the purchase. And the last thing worth paying attention to is the presence of markings on the damper plate.
Replacement
So, having purchased a new clutch disc, we proceed to install it. In order to slightly reduce the labor intensity, we will perform the replacement without removing the box. We carry out the work on an overpass or inspection pit.
Getting started with labor feats, we will carry out the preparatory stage:
Now we move directly to the main stage of our work - replacing the clutch disc:
We carry out further assembly in the reverse order, not forgetting to adjust the free play of the clutch pedal afterwards.
With simple manipulations, you can make the replacement yourself and save some money from visiting a service station. The main thing is not to miss the moment when the disk fails. No nail, no rod!
Removal and installation of VAZ classic gearbox
Removal and installation of the VAZ classic gearbox must be done on a lift or inspection ditch.
Before starting to remove the gearbox, if the work is being done on an inspection ditch, it is necessary to secure the front wheels with stops, then just put the gear shift lever in the neutral position, release the handbrake and hang one or both rear wheels. Disconnect the battery.
To minimize disassembly, first look at possible transmission problems and how to fix them.
disassembly by disconnecting the gear shift lever rod 32 (see Fig. 1). To do this, remove the front floor mat, then the cover 37 and, finally, the plastic cover along with the seal. We firmly press down on rod 32 and, using a screwdriver or other suitable tool, pull out the locking sleeve 36 from the groove on the lever rod and remove the rod.
Remove the muffler and disconnect the clamp securing the pipe to the gearbox.
Unscrew the lower bolts that secure the clutch housing cover. Disconnect the ground and reverse light wires.
We remove the spring 1 from the fork 5 and the cotter pin 4 from the pusher 6 (see Fig. 2) and disconnect the slave cylinder 8 from the clutch housing, but do not disconnect it from the pipeline that leads to the master cylinder. Otherwise, the brake fluid will leak out and you will need to top it up and bleed the clutch.
We remove the universal joint safety bracket and also disconnect the speedometer shaft (cable).
How to change the clutch disc on a VAZ 2107?
Home page » VAZ » VAZ 2107 » Changing the clutch pedal disc on a VAZ 2107: step-by-step instructions and photos
The clutch in a vehicle plays the role of ensuring smooth gear shifting by briefly disconnecting the VAZ engine from the transmission system. It is precisely because the car has a clutch that it can move off smoothly without overloading the engine and helping to increase the service life of most of its elements. This includes the gearbox itself.
VAZ 2107 car
Clutch disc cost
How much does it cost to replace a clutch disc (hereinafter referred to as DS)? This question was probably asked by every car owner who encountered a breakdown of this element. We will try to give you the most current figures, those that are found on the market.
Today, on the Ukrainian car market it is quite possible to purchase a domestically produced DS for 2107 for an average of 210 hryvnia. If you're lucky, you'll find it cheaper. But, depending on the stores, this price can vary and reach 250 hryvnia.
In Russian car stores this element costs about 500 rubles. This cost is average, so you can find DS both cheaper than this price and more expensive (mostly up to 700 rubles).
We make a replacement
If you decide to change the element yourself, but do not have enough knowledge and experience to do this, then it does not matter. Many motorists use the instructions on our website when carrying out certain repair work for the first time - and most of them are satisfied with the results.
Even if you have never changed this element, just follow the instructions and you will succeed. But if you are not confident in your abilities and open the hood of the car only to add washer fluid to the expansion tank, then it is better to entrust this matter to specialists.
New DS for VAZ 2107
When do you need to change the DS? This may be needed in several cases:
The process of replacing the DS involves dismantling the gearbox. However, we have a simpler option. We will look at the process of changing the clutch component without removing the transmission.
Sorry, there are no surveys available at this time.
What will you need?
Prepare everything you may need during the repair process, namely:
We will need rags and gasoline to lubricate the DS, and a mandrel to center it. It is not expensive and is sold in any car store. When replacing the DS, this point is very important, since the new element necessarily requires alignment. Having collected everything you need, you can start working.
A set of wrenches for carrying out repair work on changing the DS of a VAZ 2107 A mount that will be needed during the repair process A jack for carrying out the work A little rag for lubricating the DS A little gasoline for lubricating the DS: this amount is quite enough A special mandrel for centering the DS: sold in any car store
Replacement instructions
If you decide to replace the DS yourself, then you will need the help of another person. You need to drive onto a hole or overpass, otherwise the repair will not be possible.
1. Using a socket wrench, unscrew the casing nuts2. Take a pry bar and carefully move the gearbox away from the engine3. Take a wrench set to “13” and unscrew the nuts securing the mechanism basket4. Dismantle the old DS, do not forget to pay attention to which side it is installed6. Center the new DS: the mandrel should move freely into and out of the hole5. Place a new DS and insert a special centering mandrel into the hole
Important: do not forget to center the disk when it is already installed. To do this, use a special mandrel.
If the DS is installed correctly on the mechanism, the mandrel will move freely into and out of the bearing when the basket mounting bolts are tightened.
Don’t forget to also coat the gearbox input shaft splines with a thin layer of lubricant. Don't forget to also adjust the pedal free play.
Video “Replacing the clutch on a classic”
This video describes the process of replacing the clutch on a VAZ 2102 car. The process of replacing the element, and, accordingly, the clutch disc, is identical for all classic car models, including the VAZ 2107.
Do you have any questions? Specialists and readers of the LABAVTO website will help you ask a question
Replacing engine mounts on a VAZ 2107 (2106, 2105, 2104): tricks
Engine mounts are a critical design element of any vehicle. They perform the following tasks:
The same supports are used for the entire Classic range. These are models VAZ 2101, 2102, 2103,2104, 2105, 2106 and 2107.
The following models are used in Zhiguli:
Two side supports with which the engine is mounted on the left and right.
Front airbag (support) Disassembled part
These are collapsible models, inside of which there is a special spring and a rubber bumper (barrel).
The rear support on which the gearbox is mounted.
Rear support (pillow) for a five-speed gearbox Rear cushion (support) for a four-speed gearbox
In case of malfunctions, the engine mounts on the VAZ 2107 are replaced.
Engine mount malfunctions
Typically, the front cushions of a VAZ engine are provided with a manufacturer’s warranty equal to 100 thousand kilometers. In practice, the actual service life can range from 150 to 200 thousand kilometers. The rear supports do not last that long and fail after 80 - 100 thousand kilometers.
Experts advise changing the entire set of pillows at the same time. This increases their overall resource and eliminates the need to climb under the hood three times to replace each cushion individually.
Most often, failure manifests itself in the fact that the support ceases to be elastic. The rubber of the cushion loses its properties over the years. This is due to regular load, as well as changes in environmental temperature and humidity. The rubber begins to harden, cracks appear on it, and delamination occurs. The pillow ceases to perform its shock-absorbing function.
Do you hear strange sounds from the engine compartment? Does the sound appear while driving on a bad road, but disappears on flat areas and during acceleration? Is the rattling of the gear knob starting to irritate you? Are there body vibrations that are strongly transmitted to the steering wheel? It's time to check the condition of the engine mounts!
If the breakdown is not repaired in a timely manner, this will lead to misalignment of the motor, which will lead to wear on the drive axle, failure of the gearbox bearings, damage to the clutch system and other unpleasant consequences.
What will be needed for repairs
Replacing supports: operating procedure
Here are instructions on how to change the mounts on a VAZ engine yourself.
Front
We place a board under the crankcase so as to block the inspection hole. The edges of the board should protrude from the edge of the pit by at least 20 centimeters on both sides. The board must be thick and strong enough to support the weight of the motor.
To attach the lower nut to the stud, it must be inserted into the wrench.
Replacement for each of the front supports is carried out according to a similar scheme.
Rear
The rear support is mounted inside the yoke under the gearbox. To replace it, you will have to unscrew the traverse itself.
Small tricks
In various instructions on the Internet, the process of replacing pillows is described very simply and unpretentiously. There is a feeling that this work will take no more than an hour, and even a person without experience can cope with it.
But in practice you usually have to tinker. Difficulties arise due to poor access to nuts and tight space for maneuvering with spare parts. As a result, work can drag on for the whole day and be quite nerve-wracking.