Tools:
- Torque wrench
- Phillips screwdriver
- Flat screwdriver
- Pliers
- Key for 8
- Key for 10
- Socket wrench 13
- Open-end wrench 17 2pcs
- Socket wrench 17
- Socket wrench 22
- Socket wrench
- Socket wrench extension
- Head for socket wrench 8
- Head for socket wrench 10
- Head for socket wrench 13
- Head for socket wrench 17
- Socket for 13 E-Torx socket wrench
- Ratchet wrench scraper
Parts and consumables:
- Engine head gasket
- Engine valve cover gasket
- Chain tensioner gasket
- Sealant
- Coolant for topping up
- Camshaft lock washer Sandpaper 180-240
Note: The cylinder head gasket is replaced if it is damaged.
The main signs of damage to the head gasket:
– insufficient compression (below 1 MPa (10 kgf/cm2)) in one or more cylinders;
– breakthrough of gases into the cooling system (seething, foaming of liquid in the radiator, rapid drop in the liquid level in the expansion tank in the absence of external leaks);
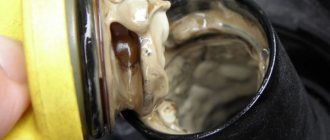
– coolant entering the lubrication system (emulsion on the oil level indicator, stratification of oil drained from the crankcase - especially noticeable in a transparent container);
– oil getting into the cooling system (oil film on the surface of the liquid in the expansion tank).
1. Remove the cylinder head cover as described here.
2. Drain the engine cooling system as described here.
3. Reduce the pressure in the supply system as described here.
4. Disconnect the throttle drive cable from the throttle assembly and receiver.
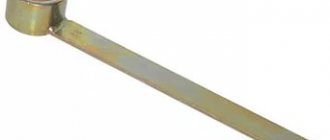
5. Remove the bearing housing together with the camshaft from the cylinder head studs, first making marks with a ratchet wrench and removing the camshaft sprocket as described here.
Ratchet key.
6. Remove the valve drive levers, unscrew all the hydraulic mounts of the levers from the holes in the cylinder head.
7. Remove the oil supply ramp to the hydraulic mounts.
8. Disconnect the wiring harness connector from the throttle position sensor.
9. Disconnect the wiring harness connector from the sensor, idle air control.
10. Disconnect the wiring harness connector from the engine coolant temperature sensor.
11. Disconnect the injector wiring harness connector.
12. Disconnect the wiring harness from the knock sensor.
13. Move the engine harness to the side.
14. Disconnect the wires from the spark plugs.
15. Slide the protective cap and disconnect the wire from the coolant temperature gauge sensor.
16. Disconnect the exhaust pipe from the exhaust manifold.
17. Unscrew the upper bolt securing the intake pipe strut and, loosening the lower bolt securing the strut, move it to the side.
18. Loosen the fastening clamp and disconnect the adsorber purge hose from the throttle assembly.
19. Loosen the fastening clamps and disconnect the radiator hoses of the cooling system from the cylinder head pipe.
20. Loosen the fastening clamp and disconnect the hose of the lower thermostat pipe.
21. Loosen the fastening clamp and disconnect the hose of the thermostat side pipe.
22.Loosen the fastening clamp and disconnect the fluid supply hose to the heater radiator from the cylinder head pipe.
23. Unscrew the nuts of the fuel pipes and disconnect the fuel supply and drain lines.
24. Remove the upper bolt securing the rear intake pipe strut, loosen the lower bolt of the strut and move it to the side.
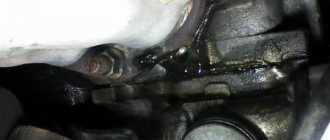
25. Remove the two nuts securing the starter heat shield.
This is where the nuts for securing the heat shield are located.
26. Move the shield to the side.
27. Remove the chain tensioner.
28. Disconnect the power steering pump bracket from the engine and move it to the side along with the pump.
29. Remove the chain from the camshaft sprocket.
30. Carefully place it on the tensioner shoe.
Make sure that the chain does not disengage with the oil pump drive shaft sprocket. It is best to tie the chain with wire.
31. Remove the ten cylinder head bolts. The bolt heads are made with an “E-Torx” wrench, but if necessary, you can use a “13” head.
Removing the cylinder head on a Niva VAZ 2121 (VAZ 2106 engine)
I’ll say right away that I carried out this work on a removed engine, so that it would be more convenient to prepare this manual. First of all, unscrew all the valve cover bolts:
Then carefully lift it and remove the rubber gasket, approximately as shown in the photo below:
Then you need to unscrew the camshaft gear with a 17 key:
And lightly hitting it from the back with a hammer, it should come off easily, after which we remove the chain from it:
Next, you can begin to unscrew the Niva camshaft mounting bolts, for which you can completely get by with a spanner wrench:
Then carefully remove the camshaft assembly from the studs, lifting it up from the head:
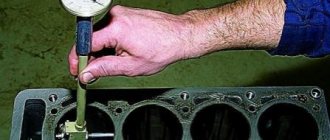
Now you can begin to unscrew the 10 bolts securing the Niva cylinder head. To do this you will need a long wrench and an extension to create decent leverage.
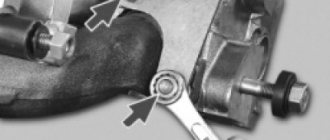
And you will need to unscrew one more bolt, which can be unscrewed with a ratchet with a 13-mm head. This is what it looks like, as shown in the photo below:
Now you can carefully remove the head by grasping its body from below:
Most likely, the gasket will stick thoroughly to the head, so you will have to pry it off with a screwdriver and remove it.
And after all this, it is necessary to thoroughly clean both the head and the block itself from traces of the old gasket and other contaminants, and it is advisable to degrease the whole thing so that the surface is perfectly dry and clean.
We install a new cylinder head gasket and put the head back. And then you just need a torque wrench to tighten the bolts with a certain torque. They must be pulled in a strictly defined order, as shown in the visual diagram below:
Chevy Niva cylinder head tightening torque
How to adjust the carburetor on a field 21213 video
Has Yandex been canceled already?
To ensure a reliable seal and eliminate the need to tighten the bolts during vehicle maintenance, tighten the bolts in four steps:
1st step – tighten bolts 1–10 to a torque of 20 N.m (2.0 kgf.m); 2nd step - tighten bolts 1–10 with a torque of 69.4–85.7 N.m (7.1–8.7 kgf.m), and bolt 11 with a torque of 31.4–39.1 N.m ( 3.2–4.60 kgf.m). Then we turn bolts 1–10 by 90° (3rd step) and another 90° (4th step).
What do you mean without additional twists? This is not a cheap 1200 cm3 engine with hardened bolts, and not a Muscovite with a Volga.
Here you can pull according to any manual
Why check there? In essence, you are already depressing the head with two passes.
and then you just drag it out until you go crazy.
By the way, don’t forget to soak the bolts in oil. Hell knows, it seems to be made of iron and should not get wet through, but without it (or slightly lubricated) the bolts break like crazy. and then - seeeeeeexssss
The masters who taught me pointed to the manuals where it was written to soak well and then let it drain :)))
I disobeyed once. oh and then I remove the bolt from the block
* In practical applications, it is allowed to round off the tightening torque values to tenths of Nm (kgfm) within the tolerance limits ** If the nut cutout does not coincide with the hole for the cotter pin, retighten the nut (at an angle less than 60°) to ensure cotter pinning
Any engine sooner or later requires repair, especially when the car has to be operated in difficult conditions, which is important for jeeps, which is what the Chevrolet Niva is.
The procedure for removing the valve cover and replacing its gasket
It is worth noting that this procedure will be the same for all types of Niva engines, starting from the oldest VAZ 2121 and ending with 21213 and even 21214. The only thing is that in an injection engine you will have to release the throttle cable, if my memory serves me correctly, although I can’t say for sure, because I already forgot.
So, if the engine is carburetor, then the first step is to remove the air filter housing so that it does not interfere. After this, unscrew all the nuts in a circle on the cover, as shown in the photo below:
After this, you should also remove the gas pedal drive rod:
Now, without any problems, carefully lift the valve cover and remove it completely from the cylinder head:
Then we remove the old gasket, doing this with a simple movement of the hand, since it usually holds quite weakly:
After this, carefully wipe the surface of the cover and head with a dry cloth and install a new gasket. You should not use sealant, since with normal installation there should not be any leaks. After this, we install the cover in the reverse order.
It is worth noting the fact that the gasket must be replaced every time the valve cover is removed on the Niva, since it is disposable, so to speak! That is, if you have, for example, adjusted the valves, then be sure to change it to a new one, otherwise you will then have to constantly wipe off the “snot” at the junction.
We remove the cylinder head on a VAZ 2121 and Niva 2131 with an injection engine to disassemble and repair it, replace the gasket or when removing the cylinder block. To carry out repair work, prepare a standard set of tools and do the following sequence of actions yourself:
- First of all, you need to de-energize the car; to do this, disconnect the minus terminal from the battery.
- We prepare an empty container and drain the cooling system.
- Using a thirteen wrench, unscrew the two nuts securing the throttle assembly and remove it without disconnecting the hoses and drive rod with the damper.
- We loosen the clamps and disconnect the hoses from the outlet pipe of the cooling jacket and the inlet pipe of the interior heating radiator.
- We disconnect all the electrical connectors that will interfere, namely the power supply to the injectors, sensors, and remove the caps of the high-voltage wires from the spark plugs.
- Disconnect the fuel pipes from the fuel rail.
- From the exhaust manifold we disconnect the exhaust pipe, the heat shield of the starter, and the bracket for the radiator outlet pipe.
- Remove the cylinder head cover, after which we dismantle the bearing housing in the assembly with the camshaft, having first removed its drive sprocket, and secured the chain with a piece of wire on the sprocket teeth to prevent jumping and, as a result, failure of the valve timing.
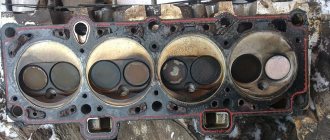
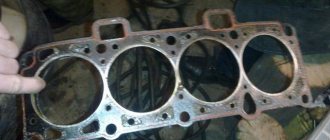
Block plane and gasket penetration
Distributors of a contactless ignition system of a new type.
To say that on Niva and Shnivy this is a birth defect is to say nothing. At some point they just drove off en masse. At a mileage of 15-25 thousand, the cylinder head gasket was punctured, and so on down the list.....What do they do in the Papuan service center, they buy a "Fritex" metal package, tighten it, and after 10 thousand the client comes back with a new one, with the same question. Or rather, with two. How long? And the classic “what should I do?” It is not the gaskets or bolts that are to blame, it is the factory quality of processing of the block plane and the cylinder head plane that is to blame. Below I publish a photo of one of the blocks. I personally changed the gasket on it twice until I found the optimal set, which I now recommend.
block plane
The metal bag does not help, but rather hinders. It cannot be crimped and does not fill uneven spots. You need a shrink gasket that will completely accept the topography of the block surface and the bolts that will constantly press it. This is the reason why hardened bolts are not rolled here. Of course, there is an option with subsequent broaching, as was the case in all Soviet times, but this is too labor-intensive. For a long time, the plant installed the Yaroslavl metal package “Fritex”, and now they have switched again to shrink gaskets. In normal production, it would probably be easier to update the milling equipment, but with us it’s easier to go back ten steps on the technical line.
What is a cylinder head and its functions in a car engine
To ensure that the connection between the head and the cylinder block itself is sufficiently tight and airtight, a gasket is used. It performs three functions:
- seals the cooling system channel;
- prevents oil leakage;
- distribution - the cylinder functions normally, as a result of which the mixture of gasoline and air does not leak out.
The seal is used only once and is changed during any engine repair. You can use the following types - asbestos, non-asbestos, steel. Each gasket is good in its own way: metal gaskets distribute mechanical stress well, asbestos gaskets are more elastic and can withstand high temperatures.
You will need the following equipment: a 10 mm wrench, pliers and a flathead screwdriver. Different cars have their own design features, engine models and bolt patterns. It is impossible to create the same algorithm for all machines. Let's look at exactly how to do this with your own hands.
ICE device
Structurally, engines are divided taking into account the design and layout of the equipment on which they are installed. But the principles remain unchanged, the same for the design of any internal combustion engine.
The engine is equipped with the following structural components:
- cylinder block - the main part of the body with openings for the working chambers, a cooling jacket (for liquid-cooled engines), mounting holes for installing heads and crankcase, seats for the crankshaft and other structural elements;
- crank group - with a crankshaft to which connecting rods are attached, driving the pistons moving inside the cylinders; rotational inertia is maintained by the flywheel;
- gas distribution mechanism - a system that supplies a fuel-air mixture to the combustion chambers, with exhaust outlet; includes a camshaft, valves actuated by rocker arms, a belt or chain connected to the crankshaft;
- fuel system - supplies fuel to the combustion chambers after enrichment with air; includes a tank, a system of tubes for supplying supply fluid, a carburetor or injector (taking into account the features of the design device), nozzles, a pump, a filter element;
- lubrication system - with the supply of lubricant to the rubbing parts; includes an oil pump driven by the crankshaft, a system of pipes and cavities, a filter and a pan; a “dry” or “wet” sump device is provided;
- ignition system - to ignite the fuel-air mixture; used only on gasoline engines, since on diesel engines fuel and air ignite independently at a certain pressure;
- cooling system - can be air or liquid, to reduce the temperature of the motor housing to prevent wear and failure of elements;
- electrical system - the source of electricity necessary for the operation of the motor; includes battery, generator block, starter and wiring with sensors;
- exhaust system - to remove combustion products into the atmosphere, with additional purification of this mixture, reducing noise from engine operation, and a filter element.
The design of components is being improved as new materials and design solutions become available.
Taking into account the design features of various engine elements, it is important to consider the following points:
- cylinders can be made separately, pressed into the block body, or together with the body; monoblock systems do not provide for restoration, due to the fact that the sleeve cannot be replaced;
- engine housings are made of cast iron or aluminum alloys that are resistant to temperature changes and high pressure;
- the cylinder head is made together with it or as a separate part; with a separate version, it is possible to use different materials for the cylinder head and block;
- the operation of the crank mechanism can be balanced by balancer shafts located on the sides of the crankshaft and leveling the influence of inertial forces; as a result, vibration and noise are reduced and engine overloads are eliminated;
- the negative influence of springs during fast operation of an engine with a mechanical gas distribution mechanism is reduced due to the desmodromic engine control system - with a complex cam configuration;
- sticking of valves is eliminated by lightweight materials for the manufacture of these parts and spring elements, and a pneumatic drive;
- an alternative to the traditional timing belt design is the sleeve method developed by Knight; provides for the use of sliding sleeves instead of valves, operating silently and durable; this method was no longer used due to high consumption of lubricating fluid, with the development of an overhead valve design;
- early engine models were equipped not with starters, but with alternating current generators (magneto) driven by the crankshaft; this required cranking the engine shaft to start;
- the harmful effects on the environment of exhaust gases are partially reduced by a catalytic converter that oxidizes and chemically transforms the exhaust;
- electronic systems further improve engine performance; changing the valve timing changes the load on the engine, taking into account the gear engaged, reducing fuel consumption; cylinder deactivation regulates the volume of compression chambers, turning off unnecessary cylinders; adjusting the compression ratio changes the volume of the combustion chambers, taking into account the operating modes of the engine.
These and other features have structurally improved the performance of internal combustion engines.
Replacing the cylinder head gasket on cars
General rules suitable for any car, including the Chevrolet Niva:
- When disassembling, mark all attached parts with a marker - this way you will not get confused during the reverse process;
- when purchasing a gasket, buy exactly the type recommended by the engine manufacturer;
- be sure to remove any oil deposits on the fastening bolts;
- perform half or one turn when loosening the bolts to reduce the pressure;
- The cylinder head is assembled using special bushings;
- The bolts are finally tightened with a special wrench very carefully so as not to twist.
After replacing the gasket, carefully observe to see if there are any signs of leakage to ensure that it is properly replaced on the Chevrolet Niva.
A little theory
The engine has three circuits: the working fluid (fuel, air, exhaust), oil and coolant. And the main task of the cylinder head gasket is to ensure that these circuits do not mix with each other. Today we can talk about three types of gaskets.
- Shrinkable or elastomeric. Initially they had a steel base on which an asbestos-graphite mixture was applied. It has modern versions, in a “non-asbestos” design and sealant applied around the channels. The oldest type of gaskets, from which factories are gradually moving away, and we are gradually returning.
- Multilayer steel, popularly called “metal package”. As a rule, in the middle of the gasket there is a layer of composite, and on top and bottom there are two thin crimping sheets of steel. The most striking example is Fritex pads, a Yaroslavl manufacturer. The factory also makes these gaskets for our engines, but I’ll tell you why it’s sometimes bad to install them a little later.
- Copper. The best type of gaskets today. Used on sports and special equipment. Of course, this is not copper in its pure form, but some alloys, but among the people they received this name. I saw similar gaskets for 21213 and 21214, but these were handmade products, that is, completely handmade.
Replacing the cylinder head gasket on a Niva Chevrolet car
- We remove the battery wiring and drain the antifreeze.
- We free the carburetor from cables and hoses.
- We dismantle the controller with voltage wires.
- Carefully remove the starter screen and heater tube from the manifold.
- Remove the antifreeze temperature sensor.
- Remove the brake booster hose.
- Remove the hoses from the cooling system and heater.
- Disconnect the camshaft and valve levers.
- We dismantle the chain and secure it.
- We unscrew the fasteners and remove the cylinder head with the pipe, carburetor and manifold.
According to reviews from Chevrolet Niva owners, you need to pay attention to the following subtleties:
- you should buy a metal seal as it is more durable and of higher quality;
- If the head fastener does not unscrew, you need to tap it with a hammer - this way you will minimally damage the surfaces and the key will not turn.
As you can see, replacing a gasket is not an easy task; you can do it yourself only if you have good general technical knowledge, skills and abilities. Remember, this is still the engine, the main part of the car. Before you do this, study the engine diagram well, the features of your car, do everything slowly, preferably in the morning with a fresh mind, because replacing a gasket is a feasible thing, but it requires attentiveness, scrupulousness and accuracy.
Set of "cylinder head installation"
As I promised earlier, at the request of services and mechanics, a kit called “cylinder head installation” was born. This kit includes the gaskets and components that need to be replaced if you are removing the cylinder head/exhaust manifold assembly. This is the most convenient and correct option. The kit includes:
- Niva cylinder head gasket, shrinkage (Egoryevsk)
- Deformable cylinder head bolts
- Manifold gasket (smile)
- Receiver gasket
- Inlet pipe laying
- Intake pipe nuts, m8, copper-plated, with a narrowed upper part. Do not unscrew due to vibrations (made in Germany)
- Cork valve cover gasket (from Fiat, made in Germany)
The whole thing is shipped on a rigid plywood backing as there have been complaints about the pads being damaged in transit. I hope this issue will be closed. In the price list, this kit is located in the engine-cylinder head section, and is called “cylinder head installation”.